2023 TOYOTA 86 key
[x] Cancel search: keyPage 82 of 449
821-4. Theft deterrent system
mately 10 seconds after the
driver’s door has opened.
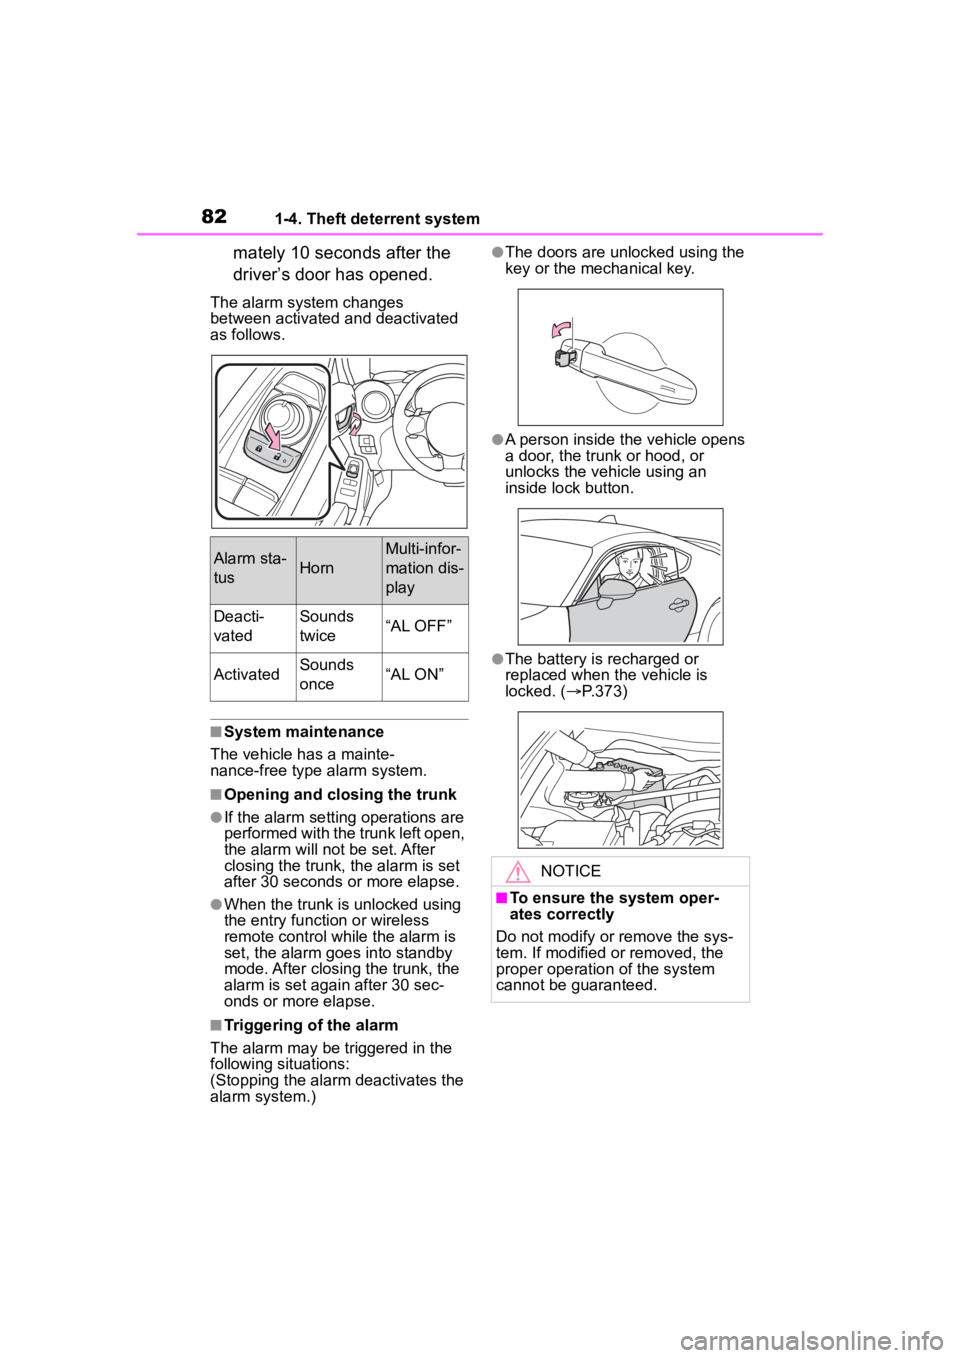
The alarm system changes
between activated and deactivated
as follows.
■System maintenance
The vehicle has a mainte-
nance-free type alarm system.
■Opening and closing the trunk
●If the alarm setting operations are
performed with the trunk left open,
the alarm will not be set. After
closing the trunk, the alarm is set
after 30 seconds or more elapse.
●When the trunk is unlocked using
the entry function or wireless
remote control while the alarm is
set, the alarm goes into standby
mode. After closing the trunk, the
alarm is set again after 30 sec-
onds or more elapse.
■Triggering of the alarm
The alarm may be triggered in the
following situations:
(Stopping the alarm deactivates the
alarm system.)
●The doors are unlocked using the
key or the mechanical key.
●A person inside the vehicle opens
a door, the trunk or hood, or
unlocks the vehicle using an
inside lock button.
●The battery is recharged or
replaced when the vehicle is
locked. ( P.373)
Alarm sta-
tusHorn
Multi-infor-
mation dis-
play
Deacti-
vatedSounds
twice“AL OFF”
ActivatedSounds
once“AL ON”
NOTICE
■To ensure the system oper-
ates correctly
Do not modify or remove the sys-
tem. If modified or removed, the
proper operation of the system
cannot be guaranteed.
Page 86 of 449
862-1. Instrument cluster
Drive mode indicators
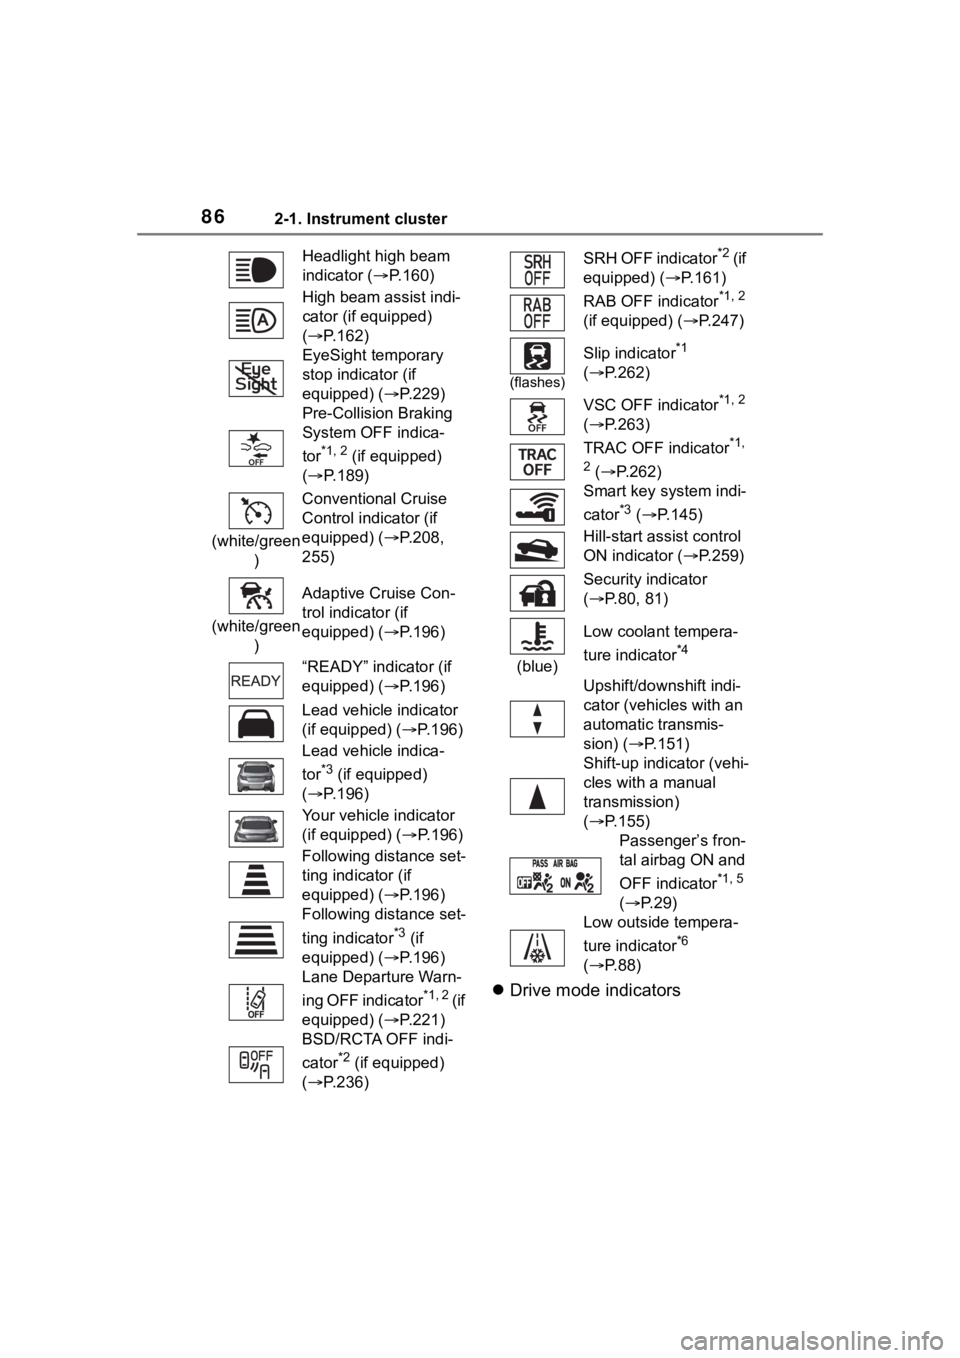
Headlight high beam
indicator ( P.160)
High beam assist indi-
cator (if equipped)
( P.162)
EyeSight temporary
stop indicator (if
equipped) (P.229)
Pre-Collision Braking
System OFF indica-
tor
*1, 2 (if equipped)
( P.189)
(white/green ) Conventional Cruise
Control indicator (if
equipped) (P.208,
255)
(white/green ) Adaptive Cruise Con-
trol indicator (if
equipped) (P.196)
“READY” indicator (if
equipped) (P.196)
Lead vehicle indicator
(if equipped) (
P.196)
Lead vehicle indica-
tor
*3 (if equipped)
( P.196)
Your vehicle indicator
(if equipped) ( P.196)
Following distance set-
ting indicator (if
equipped) (P.196)
Following distance set-
ting indicator
*3 (if
equipped) (P.196)
Lane Departure Warn-
ing OFF indicator
*1, 2 ( i f
equipped) (P.221)
BSD/RCTA OFF indi-
cator
*2 (if equipped)
( P.236)
SRH OFF indicator*2 ( i f
equipped) ( P.161)
RAB OFF indicator
*1, 2
(if equipped) ( P.247)
(flashes)
Slip indicator*1
( P.262)
VSC OFF indicator
*1, 2
( P.263)
TRAC OFF indicator
*1,
2
( P.262)
Smart key system indi-
cator
*3 ( P.145)
Hill-start assist control
ON indicator ( P.259)
Security indicator
( P.80, 81)
(blue) Low coolant tempera-
ture indicator
*4
Upshift/downshift indi-
cator (vehicles with an
automatic transmis-
sion) (
P.151)
Shift-up indicator (vehi-
cles with a manual
transmission)
( P.155)
Passenger’s fron-
tal airbag ON and
OFF indicator
*1, 5
( P. 2 9 )
Low outside tempera-
ture indicator
*6
( P. 8 8 )
Page 101 of 449
101
3
3
Before driving
Before driving
.3-1. Key informationKeys ............................ 102
3-2. Opening, closing and locking the doors and
trunk
Doors .......................... 105
Trunk ........................... 107
Smart key system ....... 111
3-3. Adjusting the seats Front seats .................. 119
Rear seats................... 121
Head restraints............ 123
3-4. Adjusting the steering wheel and mirrors
Steering wheel ............ 125
Inside rear view mirror .................................. 126
Outside rear view mirrors .................................. 127
3-5. Opening, closing the win- dows
Power windows ........... 129
Page 102 of 449
1023-1. Key information
3-1.Key information
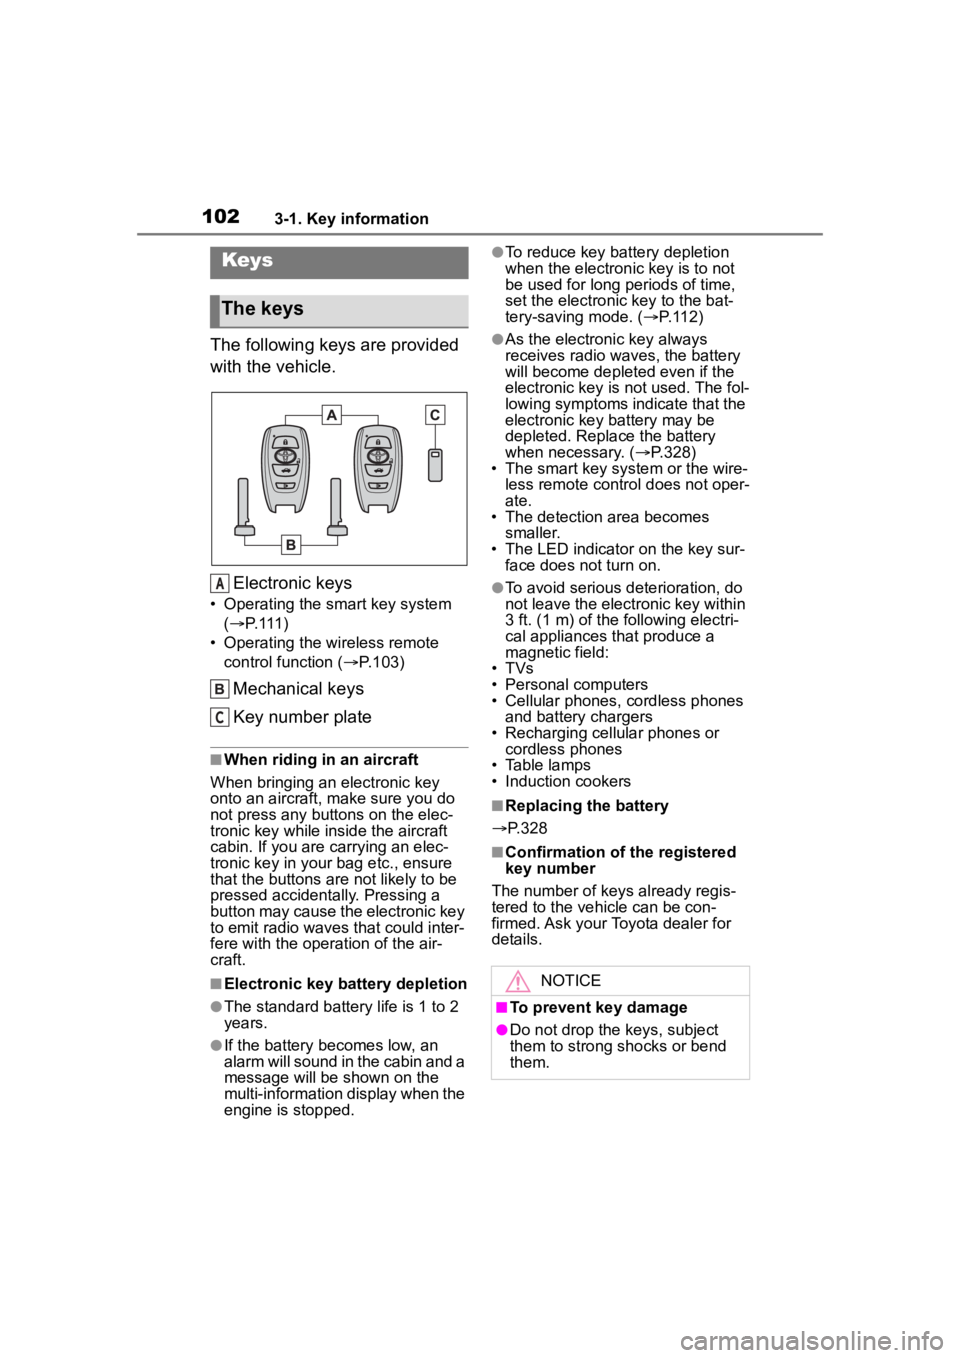
The following keys are provided
with the vehicle.Electronic keys
• Operating the smart key system ( P. 1 1 1 )
• Operating the wireless remote control function ( P.103)
Mechanical keys
Key number plate
■When riding in an aircraft
When bringing an electronic key
onto an aircraft, make sure you do
not press any buttons on the elec-
tronic key while inside the aircraft
cabin. If you are carrying an elec-
tronic key in your bag etc., ensure
that the buttons are not likely to be
pressed accidentally. Pressing a
button may cause the electronic key
to emit radio waves that could inter-
fere with the oper ation of the air-
craft.
■Electronic key battery depletion
●The standard battery life is 1 to 2
years.
●If the battery becomes low, an
alarm will sound in the cabin and a
message will be shown on the
multi-information display when the
engine is stopped.
●To reduce key battery depletion
when the electronic key is to not
be used for long periods of time,
set the electronic key to the bat-
tery-saving mode. ( P. 1 1 2 )
●As the electronic key always
receives radio waves, the battery
will become depleted even if the
electronic key is not used. The fol-
lowing symptoms indicate that the
electronic key battery may be
depleted. Replace the battery
when necessary. ( P.328)
• The smart key system or the wire-
less remote contro l does not oper-
ate.
• The detection area becomes
smaller.
• The LED indicator on the key sur- face does not turn on.
●To avoid serious deterioration, do
not leave the electronic key within
3 ft. (1 m) of the following electri-
cal appliances that produce a
magnetic field:
• TVs
• Personal computers
• Cellular phones, cordless phones and battery chargers
• Recharging cellular phones or cordless phones
• Table lamps
• Induction cookers
■Replacing the battery
P.328
■Confirmation of the registered
key number
The number of keys already regis-
tered to the vehi cle can be con-
firmed. Ask your Toyota dealer for
details.
Keys
The keys
A
C
NOTICE
■To prevent key damage
●Do not drop the keys, subject
them to strong shocks or bend
them.
Page 103 of 449
1033-1. Key information
3
Before driving
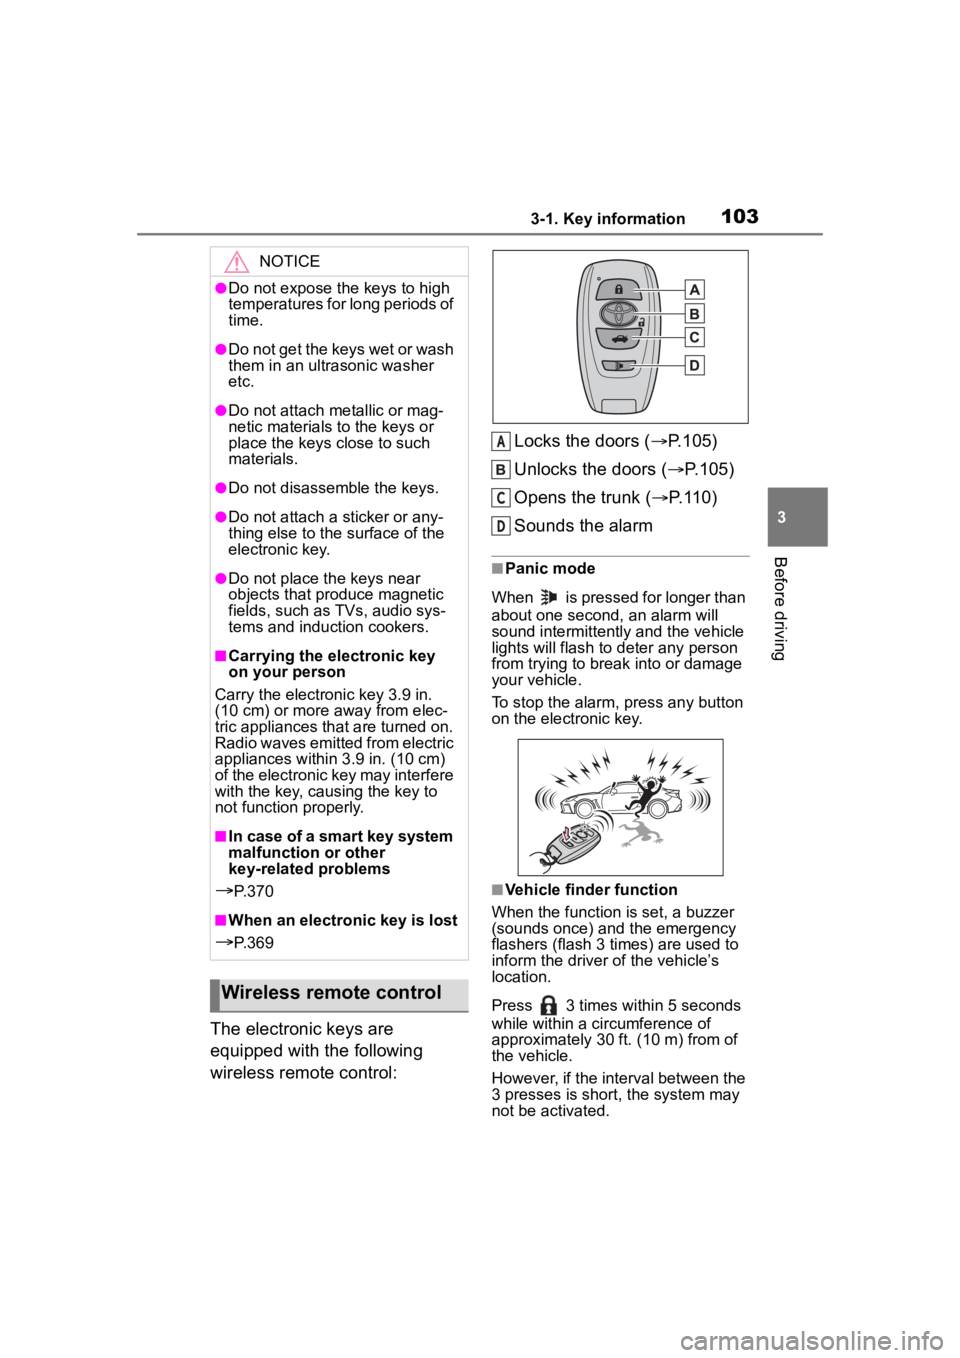
The electronic keys are
equipped with the following
wireless remote control:Locks the doors (
P.105)
Unlocks the doors ( P.105)
Opens the trunk ( P.110)
Sounds the alarm
■Panic mode
When is pressed for longer than
about one second, an alarm will
sound intermittently and the vehicle
lights will flash to deter any person
from trying to break into or damage
your vehicle.
To stop the alarm, press any button
on the electronic key.
■Vehicle finder function
When the function is set, a buzzer
(sounds once) and the emergency
flashers (flash 3 times) are used to
inform the driver of the vehicle’s
location.
Press 3 times within 5 seconds
while within a ci rcumference of
approximately 30 ft. (10 m) from of
the vehicle.
However, if the interval between the
3 presses is short, the system may
not be activated.
NOTICE
●Do not expose the keys to high
temperatures for long periods of
time.
●Do not get the keys wet or wash
them in an ultrasonic washer
etc.
●Do not attach metallic or mag-
netic materials to the keys or
place the keys close to such
materials.
●Do not disassemble the keys.
●Do not attach a sticker or any-
thing else to the surface of the
electronic key.
●Do not place th e keys near
objects that produce magnetic
fields, such as TVs, audio sys-
tems and induction cookers.
■Carrying the electronic key
on your person
Carry the electronic key 3.9 in.
(10 cm) or more away from elec-
tric appliances that are turned on.
Radio waves emitted from electric
appliances within 3.9 in. (10 cm)
of the electronic key may interfere
with the key, causing the key to
not function properly.
■In case of a smart key system
malfunction or other
key-related problems
P. 3 7 0
■When an electronic key is lost
P. 3 6 9
Wireless remote control
A
C
D
Page 104 of 449
1043-1. Key information
■Customization
Some functions can be customized.
( P.400)
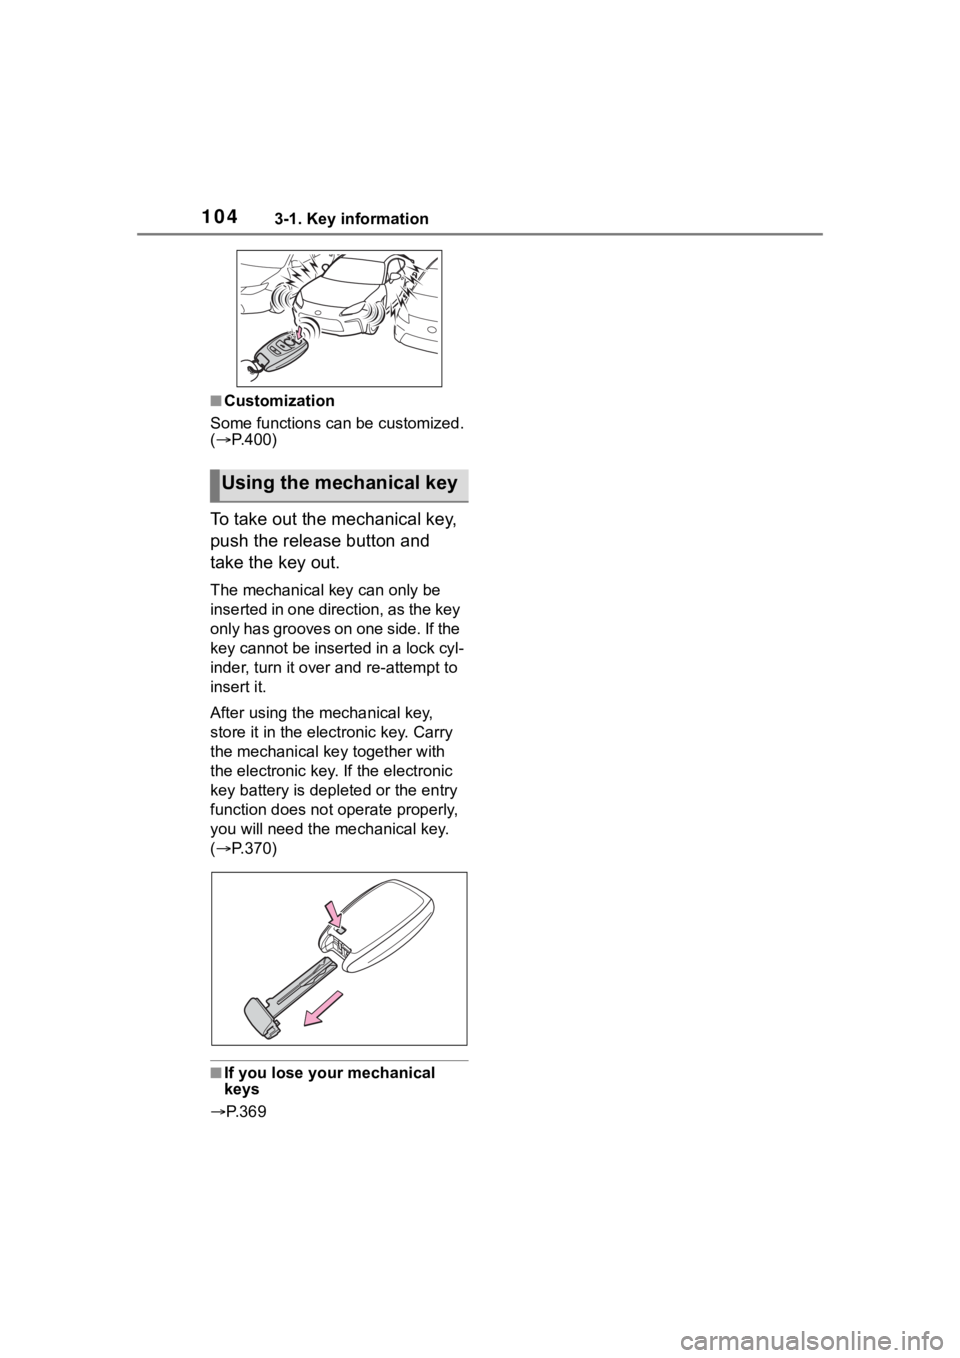
To take out the mechanical key,
push the release button and
take the key out.
The mechanical key can only be
inserted in one direction, as the key
only has grooves on one side. If the
key cannot be inserted in a lock cyl-
inder, turn it over and re-attempt to
insert it.
After using the mechanical key,
store it in the electronic key. Carry
the mechanical k ey together with
the electronic key. If the electronic
key battery is dep leted or the entry
function does not operate properly,
you will need the m echanical key.
( P.370)
■If you lose your mechanical
keys
P. 3 6 9
Using the mechanical key
Page 105 of 449

1053-2. Opening, closing and locking the doors and trunk
3
Before driving
3-2.Opening, closing and locking the doors and trunk
■Smart key system
Carry the electronic key to
enable this function.
1 Grip the driver’s door handle
to unlock the door. Grip the
passenger’s door handle to
unlock all the doors.
*
Make sure to touch the sensor on
the back of the handle.
The doors cannot be unlocked for 3
seconds after the doors are locked.
*: The door unlock settings can be
changed.
2 Touch the lock sensor (inden-
tation on the side of the door
handle) to lock the doors.
Check that the door is securely
locked.
■Wireless remote control
1 Locks both side doors
Check that the d oor is securely
locked.
2 Unlocks both side doors
Pressing the button unlocks the
driver’s door. Pressing the button
again within 3 seconds unlocks the
other door.
■Side window open/close func-
tion linked to door operation
In order to make opening and clos-
ing the doors easier, completely
closed windows are linked to door
operations. Therefore, when a door
is opened, its window opens slightly.
When a door is closed, its window
closes completely.
However, if the battery has dis-
charged or is di sconnected, this
function will not operate. ( P.374)
■Operation signals
A buzzer sounds and the emer-
gency flashers flash to indicate that
the doors have been
locked/unlocked. (Locked: once;
Unlocked: twice)
■When the door cannot be
locked by the lock sensor on
the surface of the door handle
If the doors cannot be locked by
touching the lock se nsor with a fin-
ger, touch the lock sensor with the
palm of your hand.
If you are wearing gloves, remove
Doors
Unlocking and locking the
doors from the outside
Page 106 of 449
1063-2. Opening, closing and locking the doors and trunk
them.
■Door lock buzzer
If an attempt to lock the doors using
the entry function or wireless remote
control is made w hen a door is not
fully closed, a buzzer will sound
continuously for 5 seconds. Fully
close the door to stop the buzzer,
and lock the doors again.
■Alarm
Locking the doors will set the alarm
system. ( P.81)
■Conditions affecting the opera-
tion of the smart key system or
wireless remo te control
P. 1 1 2
■If the smart key system or the
wireless remote control does
not operate properly
Use the mechanical key and/or
inside lock buttons to lock and
unlock the doors. ( P.370)
Replace the key battery with a new
one if it is depleted. ( P.328)
■If the battery is discharged
The doors cannot be locked and
unlocked using the smart key sys-
tem or wireless remote control. Lock
or unlock the doors using the
mechanical key. ( P.370)
■Customization
Some functions can be customized.
( P.400)
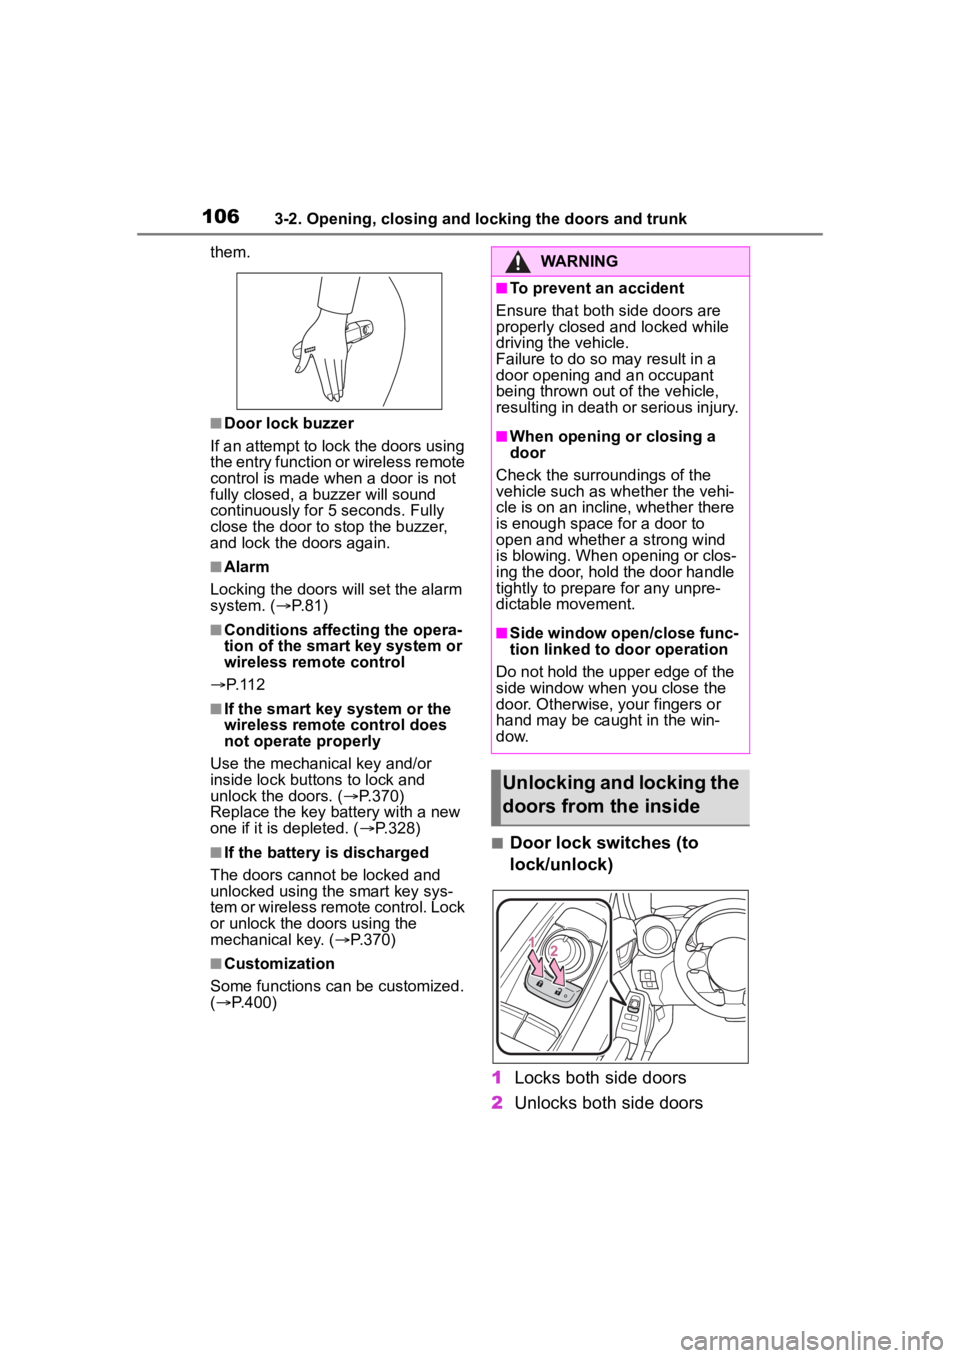
■Door lock switches (to
lock/unlock)
1 Locks both side doors
2 Unlocks both side doors
WARNING
■To prevent an accident
Ensure that both side doors are
properly closed and locked while
driving the vehicle.
Failure to do so may result in a
door opening and an occupant
being thrown out o f the vehicle,
resulting in death o r serious injury.
■When opening or closing a
door
Check the surroundings of the
vehicle such as wh ether the vehi-
cle is on an incline, whether there
is enough space for a door to
open and whether a strong wind
is blowing. When opening or clos-
ing the door, hold the door handle
tightly to prepare for any unpre-
dictable movement.
■Side window open/close func-
tion linked to door operation
Do not hold the upper edge of the
side window when you close the
door. Otherwise, your fingers or
hand may be caught in the win-
dow.
Unlocking and locking the
doors from the inside