2023 HYUNDAI IONIQ 6 ECO mode
[x] Cancel search: ECO modePage 7 of 582
1
1. Introduction/Getting Started with Your Electric Vehicle
Introduction ...................................................................................................................... 1-3
HYUNDAI Motor America................................................................................................. 1-3
Guide to HYUNDAI Genuine Parts ...................................................................................1-4
How to Use This Manual .................................................................................................. 1-5
Safety Messages ...............................................................................................................1-6
Vehicle Modifications ....................................................................................................... 1-7
Vehicle Data Collection and Event Data Recorders ....................................................... 1-7
About "Getting Started with Your Electric Vehicle" ...................................................... 1-8
Understanding Your Electric Vehicle ..............................................................................1-9
Characteristics of Your Electric Vehicle ......................................................................1-9Precautions When Using the High Voltage Battery.................................................. 1-10
Other Precautions for Electric Vehicle Management................................................ 1-11
Charging Your Electric Vehicle ...................................................................................... 1-12 Safety Precautions for Charging Your Electric Vehicle ............................................ 1-12
Checking Basic Information on Charging Your Electric Vehicle ............................. 1-15
Using an AC Charger................................................................................................... 1-21
Using a DC Charger.....................................................................................................1-24
Using a Portable Charger (ICCB) ...............................................................................1-26
Using EV Mode Functions ..............................................................................................1-33 Checking the EV Mode Screen Configuration ..........................................................1-33
Checking Energy Information ....................................................................................1-34
Setting the Next Departure Time............................................................................... 1-37
Setting Scheduled Charging and Climate ................................................................ 1-38
Setting a Battery Discharging Limit When Using Vehicle to Load (V2L)................ 1-40
Setting Electric Vehicle Specialized Functions ......................................................... 1-41
Using V2L Function........................................................................................................ 1-46 Safety Precautions When Using the V2L Function .................................................. 1-46
Using Electricity Outside the Vehicle ....................................................................... 1-48
Using Electricity Inside the Vehicle .......................................................................... 1-49
Solving V2L Problems ................................................................................................. 1-51
Aux. Battery Saver+ ........................................................................................................ 1-52
Driving Your Electric Vehicle .........................................................................................1-53 Starting and Stopping the Vehicle .............................................................................1-53
Checking Electric Vehicle Driving Information.........................................................1-54
Hyundai_CE_en_US.book Page 1
Page 21 of 582
1
1-15
Precautions when handling and storing the charging cable
CAUTION • Always keep the charging connector and plug dry and clean.
• Ensure that the connectors, plugs, and control box (portable charger) of the charging cable are not submerged or in contact with water.
• Keep the charging cable free from water or moisture, and keep it in the cargo storage compartment.
• Do not keep the charging cable near heat source or heating appliances.
• Keep the charging cable away from children.
• If there is dust or contaminants inside the charging connector or plug, remove it using the air gun.
• If the charging cable is contaminated, completely disconnect the cable from the charger or power, and remove the contaminants.
- Wipe the charging cable lightly with the soft cloth soaked with a 3 % neutral detergent aqueous solution, then use a clean cloth to completely remove moisture
and dry the cable in a well-ventilated shade.
- When removing contaminants, ensure the charging connector and charging plug are not in contact with water.
- Do not use organic solvents, such as benzene, paint thinner, or detergent. Doing so may cause deformation, discoloration, or malfunction of charging cable.
- When using a vehicle decontamination agent, ensure that the product does not contain organic solvents, such as benzene, paint thinner, or detergent.
Checking Basic Information on Charging Your Electric Vehicle
Before charging your vehicle, check and understand the information such as the
expected charging time according to the charge type, checking the State of Charge
(SOC), and setting the charger lock mode.
Checking charging type and charging time
The charge types for electric vehicle are as follows:
• AC charge : The electric vehicle is charged via a Level 2 AC public charger or
professionally installed home charger.
• DC charge : You can charge at high speeds at public charging stations. Refer to the
respective company’s charger app or online information that is provided for each DC
charger type.
• Portable charge : If the vehicle cannot be moved to a public charging station due to a
lack of battery power, the vehicle can be charged with household electricity, using the
120 V ICCB portable charger included with the vehicle.
Hyundai_CE_en_US.book Page 15
Page 35 of 582
1
1-29
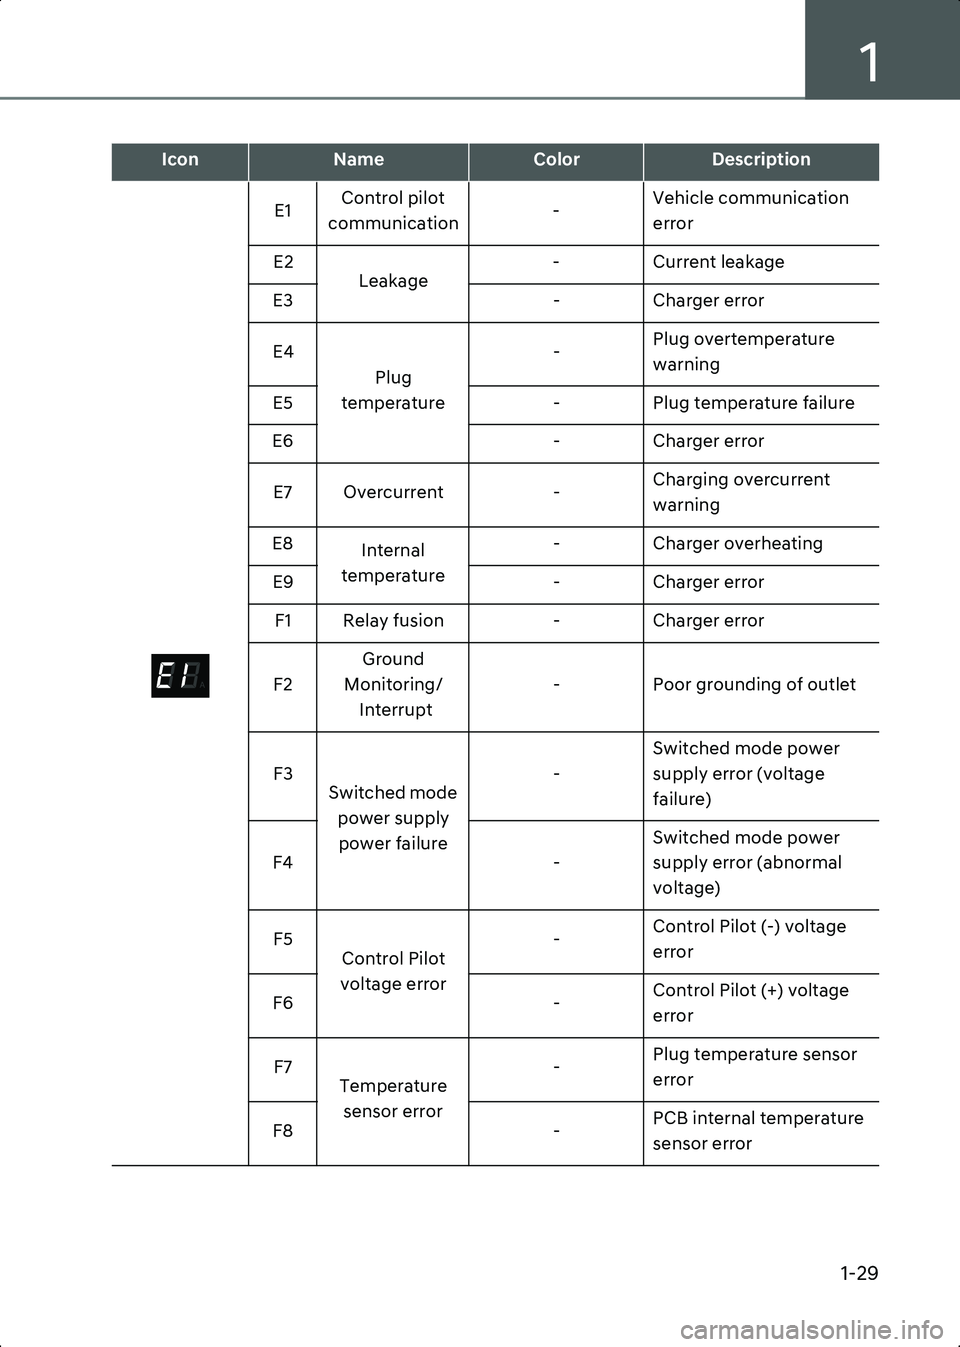
E1Control pilot
communication -Vehicle communication
error
E2 Leakage - Current leakage
E3 - Charger error
E4 Plug
temperature -
Plug overtemperature
warning
E5 - Plug temperature failure
E6 - Charger error
E7 Overcurrent -Charging overcurrent
warning
E8 Internal
temperature - Charger overheating
E9 - Charger error
F1 Relay fusion - Charger error
F2 Ground
Monitoring/ Interrupt - Poor grounding of outlet
F3 Switched mode
power supply power failure -
Switched mode power
supply error (voltage
failure)
F4 -Switched mode power
supply error (abnormal
voltage)
F5 Control Pilot
voltage error -
Control Pilot (-) voltage
error
F6 -Control Pilot (+) voltage
error
F7 Temperature
sensor error -
Plug temperature sensor
error
F8 -PCB internal temperature
sensor error
IconNameColorDescription
A
Hyundai_CE_en_US.book Page 29
Page 36 of 582

Introduction/Getting Started with Your Electric Vehicle
1-30
• If an error occurs, you can reset the portable charger by disconnecting and reconnecting the power plug, and then pressing the button on the control box for more
than two seconds.
• If the same symptom repeats after resetting the portable charger, have the vehicle inspected by an authorized HYUNDAI dealer.
• If there is no status change for more than one minute, the portable charger will be switched to power saving mode, and the display light will be turned off.
Charging with a portable charger
Follow the instructions below to charge the vehicle with a portable charger.
1. Connect the power plug of the portable charger to the electrical outlet at tour home.
• The power indicator light on the control box will turn green.
2. Set the charging current by pressing the button on the back of the control box for more than two seconds until the number on the charging current indicator blinks.
NOTICE An example of a portable charger charging current setting suitable for the rated current
of the power supplied is as follows. However, the appropriate charging current may
vary depending on the environment, such as the power usage inside the building.
• The charging current is changed each time the button is pressed, in the order of "6 A - 8 A - 10 A - 12 A."
• If 10 seconds have passed without pressing any button, the blinking will stop and the charging current will be finished.
3. With the vehicle started, apply the Electronic Parking Brake (EPB) while pressing the brake pedal.
4. Turn all switches off, shift to P (Park), and stop the vehicle.
5. With the vehicle door unlocked, press the open indicator on the charging door to open the charging door.
6. Open the charging inlet cover and check the charging connector and charging inlet for dust or other contaminants.
• If there is any dirt or contaminants, remove it using the air gun.
Outlet CurrentICCB Charge level
14-16 A 12 A
12-13 A 10 A
10-11 A 8 A
8-9 A 6 A
Hyundai_CE_en_US.book Page 30
Page 54 of 582
Introduction/Getting Started with Your Electric Vehicle
1-48
• The V2L discharging mode is blocked automatically in the event of overheating. When the discharging mode is blocked, check whether the V2L connector or power plug is
contaminated, worn, corroded or broken.
- If the temperature falls to a proper level after it is left unattended, you can use it again.
- If overheating repeats when using a certain electric device, do not use the electric device.
• Do not connect more than two extension cords or multi-outlet. Also, when using the extension cable, ensure that the cable is not twisted. Heat from the overlapped cable
may cause fire.
• Do not hang home appliances on the wire.
• Do not use if the sheath of home appliance cables is damaged or broken.
• Fully insert the power plug when connecting it to the power.
• Only use qualified power plug with ground connection that meets the standard. Do not use worn, corroded, or broken power plug or improper power plug that does not meet
the standard.
Using Electricity Outside the Vehicle
Before using V2L function, carefully read all the safety information and precautions on
the “Safety Precautions When Using the V2L Function” section and follow the
instructions.
Follow the instructions below to connect the V2L connector to the charging inlet on the
vehicle and supply power to an electronic product.
1. Open the cover of the V2L connector.
2. Close the cover after connecting the plug of an electronic product to the power outlet of the connector.
WARNING Some types of plugs may not fit into the outlet cover of the V2L connector, causing
incomplete closing of the cover. Do not use the V2L connector on a rainy or snowy day
if the outlet cover is not completely closed. There is a risk of fire and/or injury.
3. Open the connection terminal protection cap of the connector with the open switch pressed.
4. Open the charging door and connect the V2L connector to the charging inlet on the vehicle.
• Connect the V2L connector to the charging inlet within 60 seconds after opening the charging door.
5. Press the power switch of the V2L connector. • The power is supplied and the indicator on the V2L connector is turned on.
Hyundai_CE_en_US.book Page 48
Page 60 of 582

Introduction/Getting Started with Your Electric Vehicle
1-54
Understanding virtual engine sound system
Electric vehicles do not use an internal combustion engine, so there is no engine noise
while driving. The Virtual Engine Sound System (VESS) generates engine sound to make
pedestrians aware of the approaching vehicle when driving.
• If the vehicle is in the ready ( ) mode and the gear is not in P (Park), the VESS is operated.
• When the gear is shifted to R (Reverse), an additional warning sound will be heard.
CAUTION • Be aware that the vehicle does not make engine noise while driving.
• Pay attention to the surrounding environment and drive carefully.
• After parking or waiting for a traffic light, please check around for children, or other obstacles before departure.
• When reversing, check directly behind you before driving. Pedestrians may not be able to recognize vehicle sounds.
Checking Electric Vehicle Driving Information
During vehicle operation, the instrument cluster displays the main information, such as
distance to empty, real-time energy status, battery charge level, and warning messages,
via the user interface and indicators.
Factors affecting the distance to empty
The distance to empty refers to the distance that can be driven by the current charged
battery level and is displayed on the bottom of the instrument cluster while driving the
electric vehicle.
B0002901
The distance to empty vary depending on many factors such as driving habits, power
usage, driving conditions, and high voltage battery. The distance to empty may be
increased or decreased from the certified figures as it reflects all the factors
comprehensively. Check the distance to empty considering the following:
Hyundai_CE_en_US.book Page 54
Page 62 of 582
Introduction/Getting Started with Your Electric Vehicle
1-56
Tips for enhancing the distance to empty
The distance to empty vary depending on the charge level of the high voltage battery,
weather, temperature, duration of the battery use, terrain, driving habits, etc.
You can increase the distance to empty by driving the vehicle following the instructions
below.
• The air resistance increases rapidly as the electric vehicle drives faster, so avoid speeding to increase the distance to empty and the electric energy economy.
• Rapid acceleration consumes a lot of driving energy and rapid deceleration limits the regenerative braking. Gradually depress and release the accelerator pedal when
accelerating or decelerating to maintain speed.
• If you operate the air conditioner or heater too much, the high voltage battery uses excessive electricity. This may reduce the distance to empty. Therefore, set the cabin
temperature to 72 °F (22 °C) AUTO level 2. Various assessment tests have been used to
verify that this setting maintains optimal energy consumption rates. Especially in
winter, reducing heating and using heated seats instead can significantly increase the
distance to empty. Turn off the air conditioner or heater if you do not need them.
• When using the air conditioner or heater, the energy consumption is reduced if recirculation mode is selected instead of fresh mode. Fresh mode requires a large
amount of energy consumption as the outside air has to be reheated or cooled.
• Close the windows while driving. Driving with the windows open increases air resistance and the usage of the air conditioner or heater.
• When using the air conditioner or heater while driving alone, use the DRIVER ONLY function.
• Always maintain specified tire pressures and use tires for electric vehicles.
• Do not use unnecessary electrical components while driving.
• Do not load unnecessary items in the vehicle.
• Do not mount parts that may increase air resistance.
When the distance to empty is insufficient
• When the High voltage battery level warning light is displayed, immediately charge the vehicle at a nearby charging station.
• Drive energy efficiently following the “Tips for enhancing the distance to empty.”
• When the battery level is 0 %, do not try to drive. Move to a safe place and call for help.
Hyundai_CE_en_US.book Page 56
Page 81 of 582
2
2-7
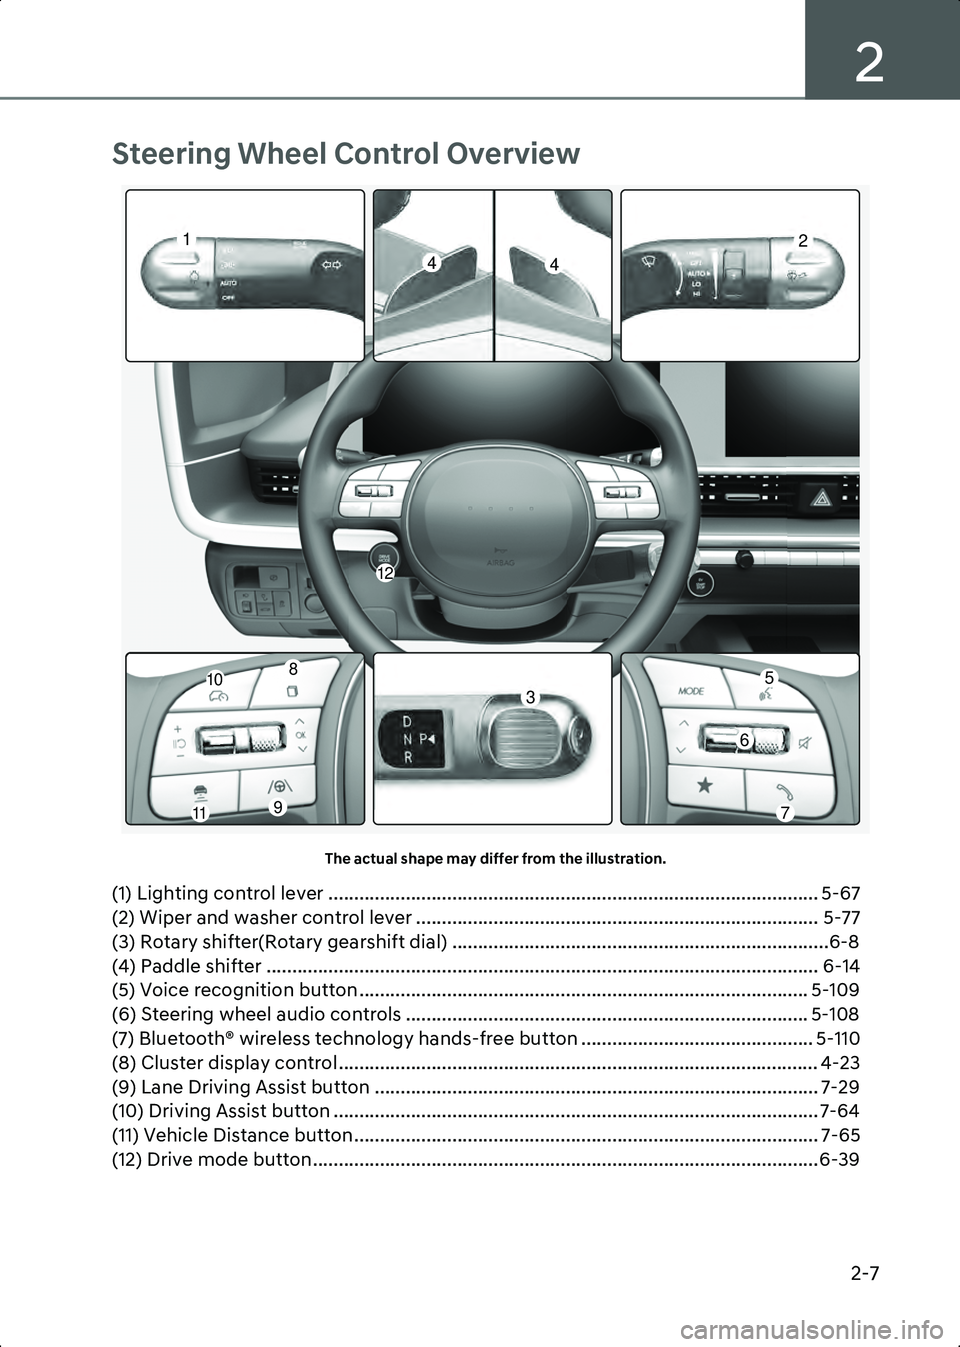
Steering Wheel Control Overview
A1000701The actual shape may differ from the illustration.
(1) Lighting control lever ............................................................................................... 5-67
(2) Wiper and washer control lever .............................................................................. 5-77
(3) Rotary shifter(Rotary gearshift dial) .........................................................................6-8
(4) Paddle shifter ........................................................................................................... 6-14
(5) Voice recognition button ....................................................................................... 5-109
(6) Steering wheel audio controls .............................................................................. 5-108
(7) Bluetooth® wireless technology hands-free button ............................................. 5-110
(8) Cluster display control............................................................................................. 4-23
(9) Lane Driving Assist button ...................................................................................... 7-29
(10) Driving Assist button .............................................................................................. 7-64
(11) Vehicle Distance button .......................................................................................... 7-65
(12) Drive mode button ..................................................................................................6-39
5
7
108
11
12
9
1244
3
6
Hyundai_CE_en_US.book Page 7