Page 230 of 814
229
uuOperating the Switches Around the Steering Wheel uWipers and Washers
Continued
Controls
Wipers and Washers
The windshield wipers and washers can be
used when the power mode is in ON.
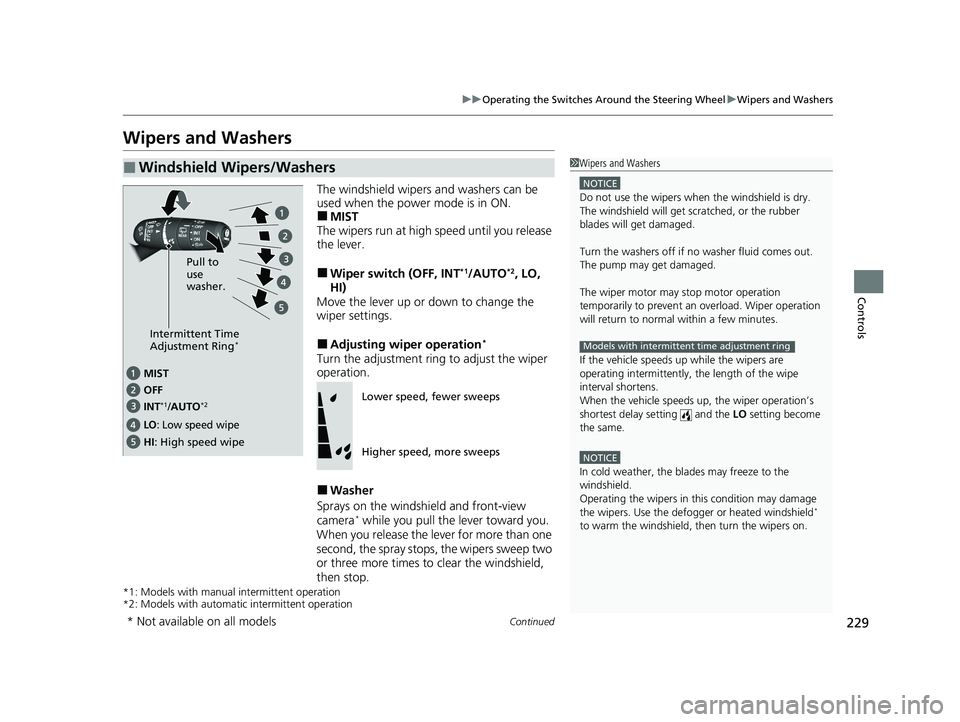
■MIST
The wipers run at high speed until you release
the lever.
■Wiper switch (OFF, INT*1/AUTO*2, LO,
HI)
Move the lever up or down to change the
wiper settings.
■Adjusting wiper operation*
Turn the adjustment ring to adjust the wiper
operation.
■Washer
Sprays on the windshield and front-view
camera
* while you pull the lever toward you.
When you release the le ver for more than one
second, the spray stops, the wipers sweep two
or three more times to clear the windshield,
then stop.
*1: Models with manual intermittent operation
*2: Models with automati c intermittent operation
■Windshield Wipers/Washers1Wipers and Washers
NOTICE
Do not use the wipers when the windshield is dry.
The windshield will get sc ratched, or the rubber
blades will get damaged.
Turn the washers off if no washer fluid comes out.
The pump may get damaged.
The wiper motor may stop motor operation
temporarily to prevent an overload. Wiper operation
will return to normal within a few minutes.
If the vehicle speeds up while the wipers are
operating intermittently, the length of the wipe
interval shortens.
When the vehicle speeds up, the wiper operation’s
shortest delay se tting and the LO setting become
the same.
NOTICE
In cold weather, the blades may freeze to the
windshield.
Operating the wipers in th is condition may damage
the wipers. Use the defogge r or heated windshield
*
to warm the windshield, then turn the wipers on.
Models with intermittent time adjustment ringIntermittent Time
Adjustment Ring*
MIST
INT
*1/AUTO*2OFF
LO: Low speed wipe
HI: High speed wipe Pull to
use
washer.
Lower speed, fewer sweeps
Higher speed, more sweeps
* Not available on all models
23 PILOT-31T906000_03.book 229 ページ 2022年10月31日 月曜日 午前10時26分
Page 235 of 814
uuOperating the Switches Around the Steering Wheel uDriving Position Memory System*
234
Controls
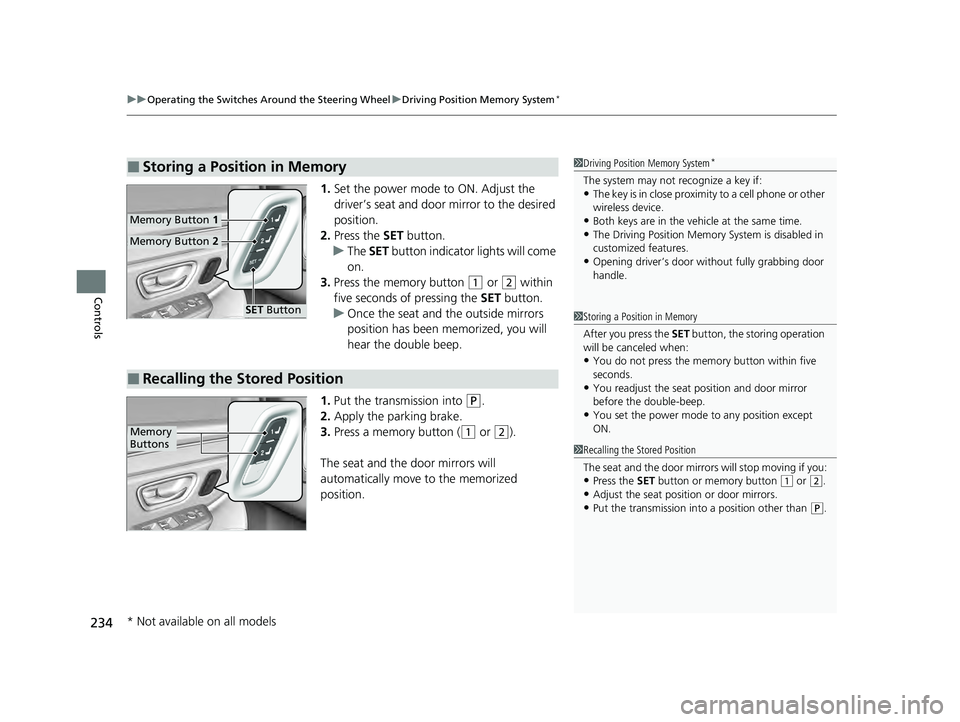
1. Set the power mode to ON. Adjust the
driver’s seat and door mirror to the desired
position.
2. Press the SET button.
u The SET button indicator lights will come
on.
3. Press the memory button
(1 or (2 within
five seconds of pressing the SET button.
u Once the seat and the outside mirrors
position has been memorized, you will
hear the double beep.
1. Put the transmission into
(P.
2. Apply the parking brake.
3. Press a memory button (
(1 or (2).
The seat and the door mirrors will
automatically move to the memorized
position.
■Storing a Position in Memory1 Driving Position Memory System*
The system may not recognize a key if:•The key is in close proximity to a cell phone or other
wireless device.
•Both keys are in the vehicle at the same time.•The Driving Position Memory System is disabled in
customized features.
•Opening driver’s door wi thout fully grabbing door
handle.
Memory Button 1
Memory Button 2
SET Button
■Recalling the Stored Position
1Storing a Position in Memory
After you press the SET button, the storing operation
will be canceled when:
•You do not press the memory button within five
seconds.
•You readjust the seat position and door mirror
before the double-beep.
•You set the power mode to any position except
ON.
1Recalling the Stored Position
The seat and the door mirrors will stop moving if you:
•Press the SET button or memory button (1 or (2.
•Adjust the seat position or door mirrors.•Put the transmission into a position other than (P.
Memory
Buttons
* Not available on all models
23 PILOT-31T906000_03.book 234 ページ 2022年10月31日 月曜日 午前10時26分
Page 240 of 814
239Continued
Controls
Seats
Front Seats
Adjust the driver’s seat as far back as possible
while allowing you to ma intain full control of
the vehicle. You should be able to sit upright,
well back in the seat and be able to
adequately press the pedals without leaning
forward, and grip the steering wheel
comfortably. The passenger’s seat should be
adjusted in a similar manner, so that it is as far
back from the front airbag in the dashboard
as possible.
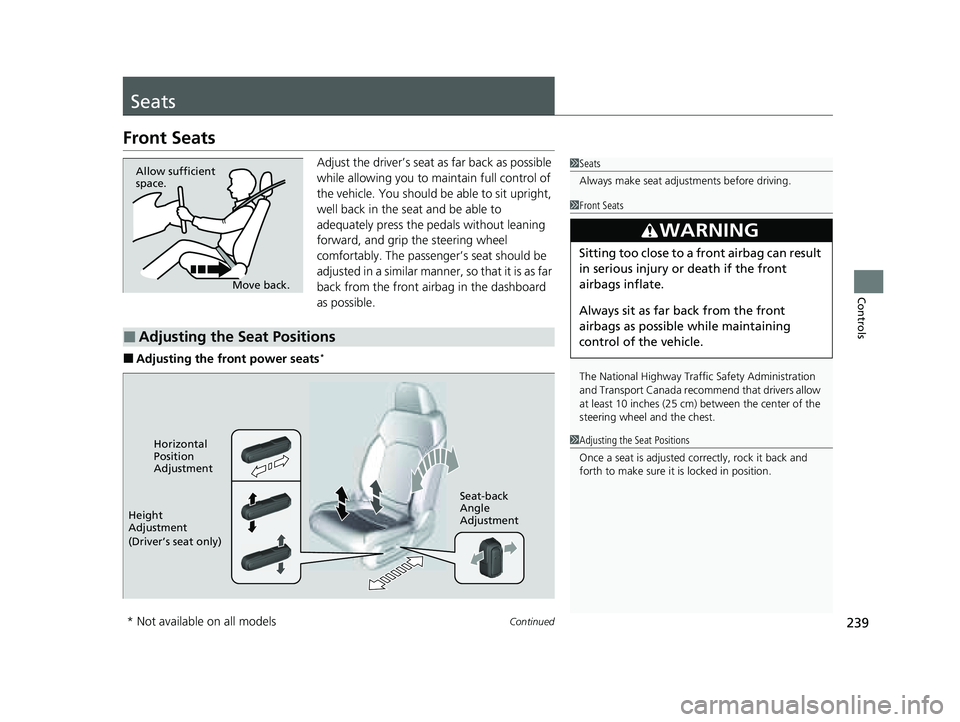
■Adjusting the front power seats*
1 Seats
Always make seat adjustments before driving.
Move back.
Allow sufficient
space.
■Adjusting the Seat Positions
1
Front Seats
The National Highway Traffic Safety Administration
and Transport Cana da recommend that drivers allow
at least 10 inches (25 cm) between the center of the
steering wheel and the chest.
3WARNING
Sitting too close to a front airbag can result
in serious injury or death if the front
airbags inflate.
Always sit as far back from the front
airbags as possible while maintaining
control of the vehicle.
1 Adjusting the Seat Positions
Once a seat is adjusted co rrectly, rock it back and
forth to make sure it is locked in position.Horizontal
Position
Adjustment
Height
Adjustment
(Driver’s seat only) Seat-back
Angle
Adjustment
* Not available on all models
23 PILOT-31T906000_03.book 239 ページ 2022年10月31日 月曜日 午前10時26分
Page 244 of 814
243
uuSeats uSecond Row Seats
Continued
Controls
Second Row Seats
■Adjusting the Seat Positions1Second Row Seats
Once a seat is adjusted co rrectly, rock it back and
forth to make sure it is locked in position.
3WARNING
An unsecured seat or seat-back can move
out of position or collapse without warning
if there is sudden acce leration or stop or in
a crash.
A seat or seat-back that suddenly moves or
collapses can result in severe injury or
death.
Always make sure all seats and seat-backs
are securely locked in to position before
driving.
Seat-back Angle
Adjustment*
Pull up the strap to
change the angle.
Horizontal Position AdjustmentPull up the bar to move the seat, then
release the bar.
Seat-back Angle
Adjustment
Pull up the lever to
change the angle.
* Not available on all models
23 PILOT-31T906000_03.book 243 ページ 2022年10月31日 月曜日 午前10時26分
Page 247 of 814
uuSeats uSecond Row Seats
246
Controls
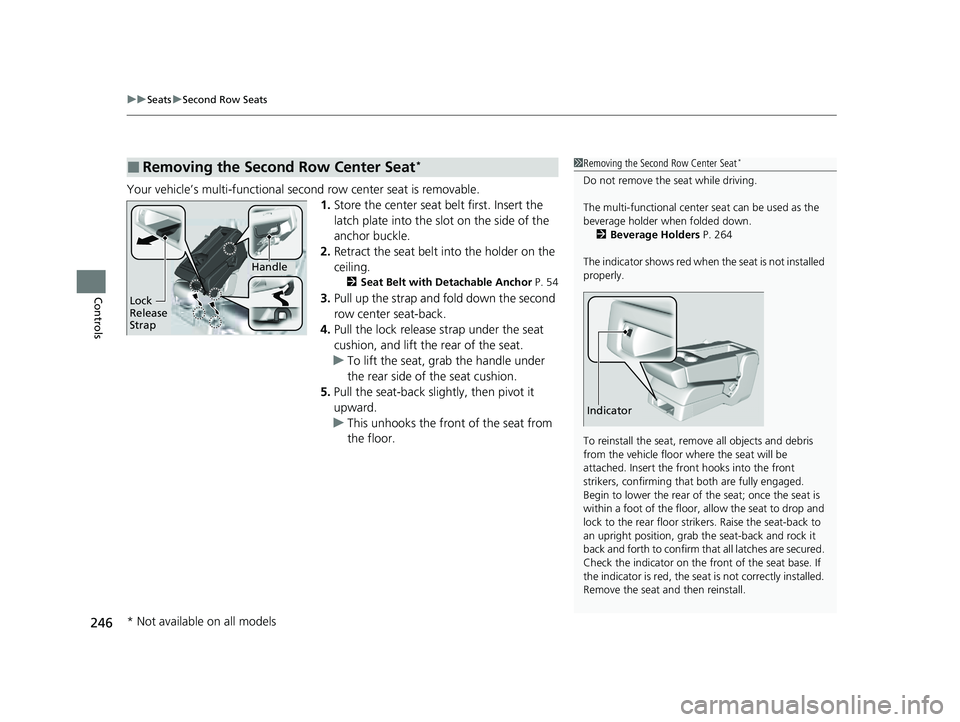
Your vehicle’s multi-functional second row center seat is removable.
1.Store the center seat belt first. Insert the
latch plate into the slot on the side of the
anchor buckle.
2. Retract the seat belt into the holder on the
ceiling.
2 Seat Belt with Detachable Anchor P. 54
3.Pull up the strap and fold down the second
row center seat-back.
4. Pull the lock release strap under the seat
cushion, and lift the rear of the seat.
u To lift the seat, grab the handle under
the rear side of the seat cushion.
5. Pull the seat-back slig htly, then pivot it
upward.
u This unhooks the front of the seat from
the floor.
■Removing the Second Row Center Seat*1Removing the Second Row Center Seat*
Do not remove the seat while driving.
The multi-functional center seat can be used as the
beverage holder when folded down. 2 Beverage Holders P. 264
The indicator shows red when the seat is not installed
properly.
To reinstall the seat, remove all objects and debris
from the vehicle floor where the seat will be
attached. Insert the front hooks into the front
strikers, confirming that both are fully engaged.
Begin to lower the rear of the seat; once the seat is
within a foot of the floor, allow the seat to drop and
lock to the rear floor strikers. Raise the seat-back to
an upright position, grab the seat-back and rock it
back and forth to confirm that all latches are secured.
Check the indicator on the fr ont of the seat base. If
the indicator is red, the seat is not correctly installed.
Remove the seat and then reinstall.
Indicator
Lock
Release
Strap
Handle
* Not available on all models
23 PILOT-31T906000_03.book 246 ページ 2022年10月31日 月曜日 午前10時26分
Page 248 of 814
Continued247
uuSeats uSecond Row Seats
Controls
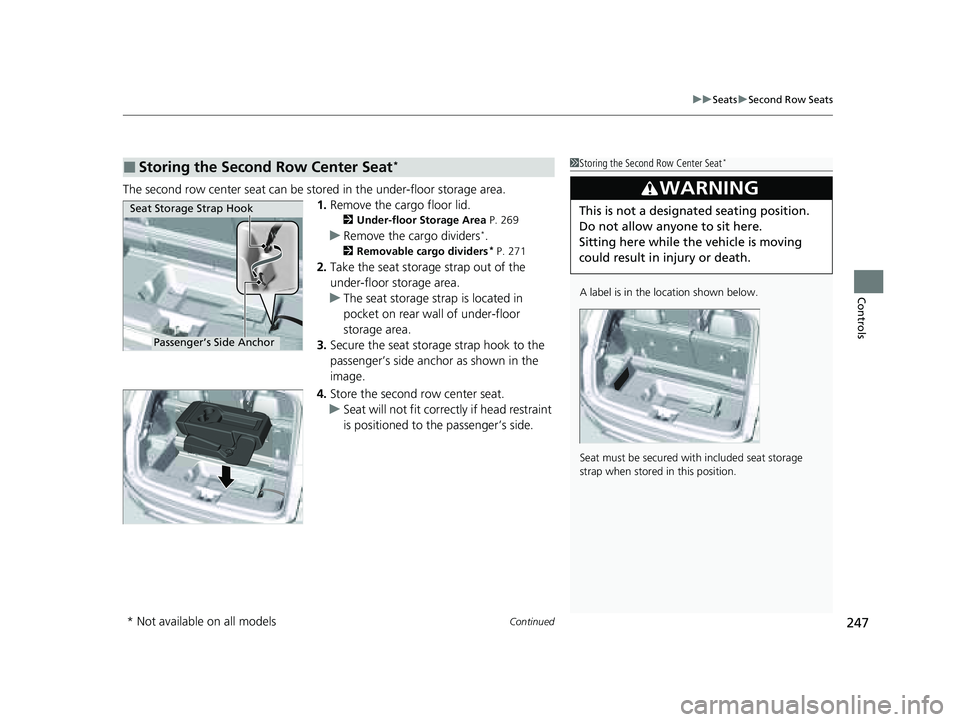
The second row center seat can be stored in the under-floor storage area.
1.Remove the cargo floor lid.
2 Under-floor Storage Area P. 269
uRemove the cargo dividers*.
2 Removable cargo dividers* P. 271
2.Take the seat storage strap out of the
under-floor storage area.
u The seat storage strap is located in
pocket on rear wall of under-floor
storage area.
3. Secure the seat storage strap hook to the
passenger’s side anchor as shown in the
image.
4. Store the second row center seat.
u Seat will not fit correctly if head restraint
is positioned to the passenger’s side.
■Storing the Second Row Center Seat*1Storing the Second Row Center Seat*
A label is in the location shown below.
Seat must be secured with included seat storage
strap when stored in this position.
3WARNING
This is not a designated seating position.
Do not allow anyone to sit here.
Sitting here while th e vehicle is moving
could result in injury or death.Seat Storage Strap Hook
Passenger’s Side Anchor
* Not available on all models
23 PILOT-31T906000_03.book 247 ページ 2022年10月31日 月曜日 午前10時26分
Page 249 of 814
248
uuSeats uSecond Row Seats
Controls
5. Secure the seat storage strap hook to the
driver’s side anchor.
u Make sure the seat storage strap is not
twisted.
u Store the cargo dividers
*.
6. Store the cargo floor lid in the cargo area.
Seat Storage Strap Hook
Driver’s Side Anchor
* Not available on all models
23 PILOT-31T906000_03.book 248 ページ 2022年10月31日 月曜日 午前10時26分
Page 252 of 814
251
uuSeats uRear Seat Reminder
Controls
Rear Seat Reminder
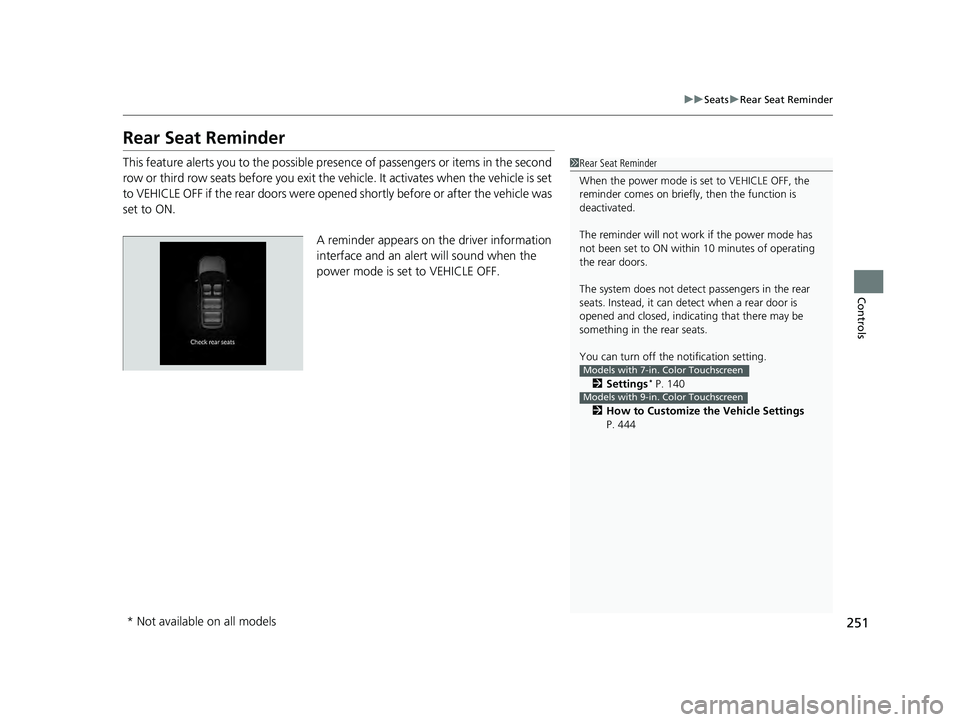
This feature alerts you to th e possible presence of passengers or items in the second
row or third row seats before you exit the ve hicle. It activates when the vehicle is set
to VEHICLE OFF if the rear doors were open ed shortly before or after the vehicle was
set to ON.
A reminder appears on the driver information
interface and an alert will sound when the
power mode is set to VEHICLE OFF.1Rear Seat Reminder
When the power mode is set to VEHICLE OFF, the
reminder comes on briefly, then the function is
deactivated.
The reminder will not work if the power mode has
not been set to ON within 10 minutes of operating
the rear doors.
The system does not detect passengers in the rear
seats. Instead, it can detect when a rear door is
opened and closed, indica ting that there may be
something in the rear seats.
You can turn off the notification setting.
2 Settings
* P. 140
2 How to Customize the Vehicle Settings
P. 444
Models with 7-in. Color Touchscreen
Models with 9-in. Color Touchscreen
* Not available on all models
23 PILOT-31T906000_03.book 251 ページ 2022年10月31日 月曜日 午前10時26分