2023 FORD MAVERICK tailgate
[x] Cancel search: tailgatePage 87 of 556
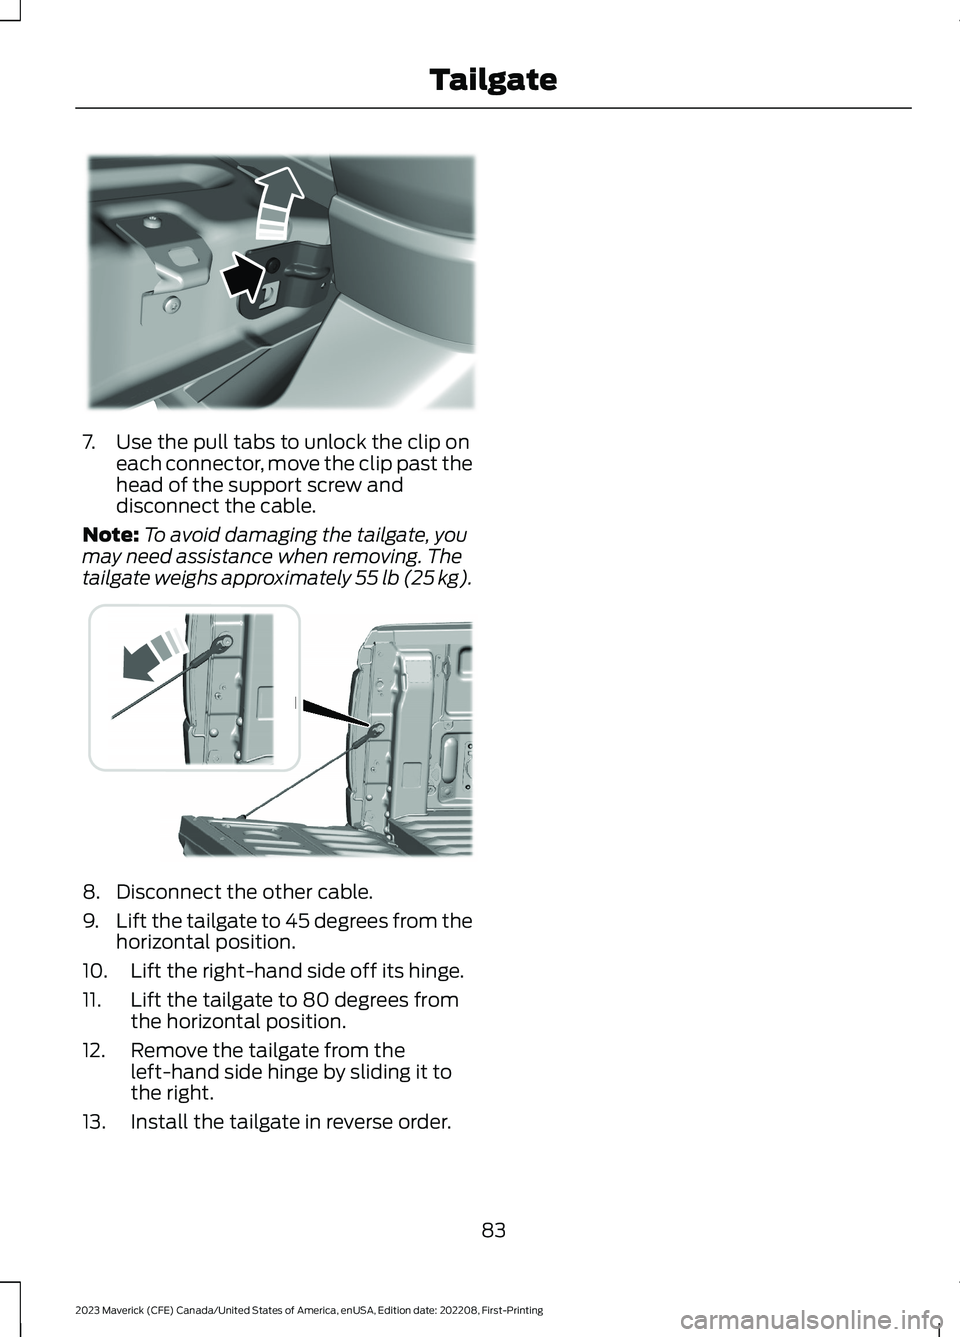
7.Use the pull tabs to unlock the clip oneach connector, move the clip past thehead of the support screw anddisconnect the cable.
Note:To avoid damaging the tailgate, youmay need assistance when removing. Thetailgate weighs approximately 55 lb (25 kg).
8.Disconnect the other cable.
9.Lift the tailgate to 45 degrees from thehorizontal position.
10.Lift the right-hand side off its hinge.
11.Lift the tailgate to 80 degrees fromthe horizontal position.
12.Remove the tailgate from theleft-hand side hinge by sliding it tothe right.
13.Install the tailgate in reverse order.
83
2023 Maverick (CFE) Canada/United States of America, enUSA, Edition date: 202208, First-PrintingTailgateE351547 E355264
Page 215 of 556

PARKING AID PRECAUTIONS
WARNING: To help avoid personalinjury, always use caution when inreverse (R) and when using the sensingsystem.
WARNING: The system may notdetect objects with surfaces that absorbreflection. Always drive with due careand attention. Failure to take care mayresult in a crash.
WARNING: Traffic control systems,fluorescent lamps, inclement weather,air brakes, external motors and fans mayaffect the correct operation of thesensing system. This may cause reducedperformance or false alerts.
WARNING: The system may notdetect small or moving objects,particularly those close to the ground.
WARNING: The parking aid systemcan only assist you to detect objectswhen your vehicle is moving at parkingspeeds. To help avoid personal injury youmust take care when using the parkingaid system.
WARNING: The system may notfunction if the sensor is blocked.
WARNING: In cold and severeweather conditions the system may notfunction. Rain, snow and spray can alllimit sensor performance.
WARNING: If damage occurs in theimmediate area surrounding the sensor,have your vehicle checked as soon aspossible.
Note:If your vehicle sustains damageleaving the sensors misaligned, this willcause inaccurate measurements or falsealerts.
When you connect a trailer to your vehicle,the rear parking aid detects the trailer andprovides an alert. Disable the parking aidwhen you connect a trailer to prevent thealert.
Note:Connected trailers might be detectedby the vehicle and parking aid turns offautomatically in those instances.
Note:Certain add-on devices installedaround the bumper or fascia may createfalse alerts, for example, large trailerhitches, bike or surfboard racks, license platebrackets, bumper covers or any other devicethat could block the normal detection zoneof the parking aid system. Aftermarket sparetires or spare tire covers mounted to the reartailgate could cause false alerts from thepark aid system. Remove the add-on deviceto prevent false alerts.
Note: Keep the sensors free from snow, iceand large accumulations of dirt. If thesensors are covered, the system's accuracycan be affected.
Do not clean the sensors with sharpobjects.
Note: When using a programmed MyKey,you cannot switch the parking aids off. SeeMyKey™ (page 67).
REAR PARKING AID
WHAT IS THE REAR PARKING AID
Rear parking sensors detect objects behindyour vehicle when in reverse (R).
REAR PARKING AID LIMITATIONS
There is a decreased coverage area at theouter corners.
211
2023 Maverick (CFE) Canada/United States of America, enUSA, Edition date: 202208, First-PrintingParking Aids (If Equipped)
Page 218 of 556
WHAT IS THE REAR VIEW
CAMERA
The rear view camera provides a videoimage of the area behind your vehicle whenthe transmission is in reverse (R).
REAR VIEW CAMERA
PRECAUTIONS
WARNING: The rear view camerasystem is a reverse aid supplementdevice that still requires the driver to useit in conjunction with the interior andexterior mirrors for maximum coverage.
WARNING: Objects that are closeto either corner of the bumper or underthe bumper, might not be seen on thescreen due to the limited coverage of thecamera system.
WARNING: Reverse your vehicleslowly. Failure to follow this instructioncould result in the loss of control of yourvehicle, personal injury or death.
WARNING: Use caution when thetailgate is ajar. If the tailgate is ajar, thecamera is out of position and the videoimage could be incorrect. All guide linesdisappear when the tailgate is ajar.Failure to follow this instruction couldresult in personal injury.
WARNING: Use caution whenturning camera features on or off whenthe transmission is not in park (P). Makesure your vehicle is not moving.
Note: When towing, the camera only seeswhat you are towing. This might not provideadequate coverage and you might not seesome objects. In some vehicles, the guidelines may disappear when you connect thetrailer tow connector.
LOCATING THE REAR VIEW
CAMERA
The rear view camera is on the tailgate. Itprovides a video image of the area behindyour vehicle.
REAR VIEW CAMERA GUIDE
LINES
Note:Active guide lines and fixed guidelines are only available when thetransmission is in reverse (R).
Note:The centerline is only available if theactive or fixed guide lines are on.
214
2023 Maverick (CFE) Canada/United States of America, enUSA, Edition date: 202208, First-PrintingRear View Camera
Page 267 of 556
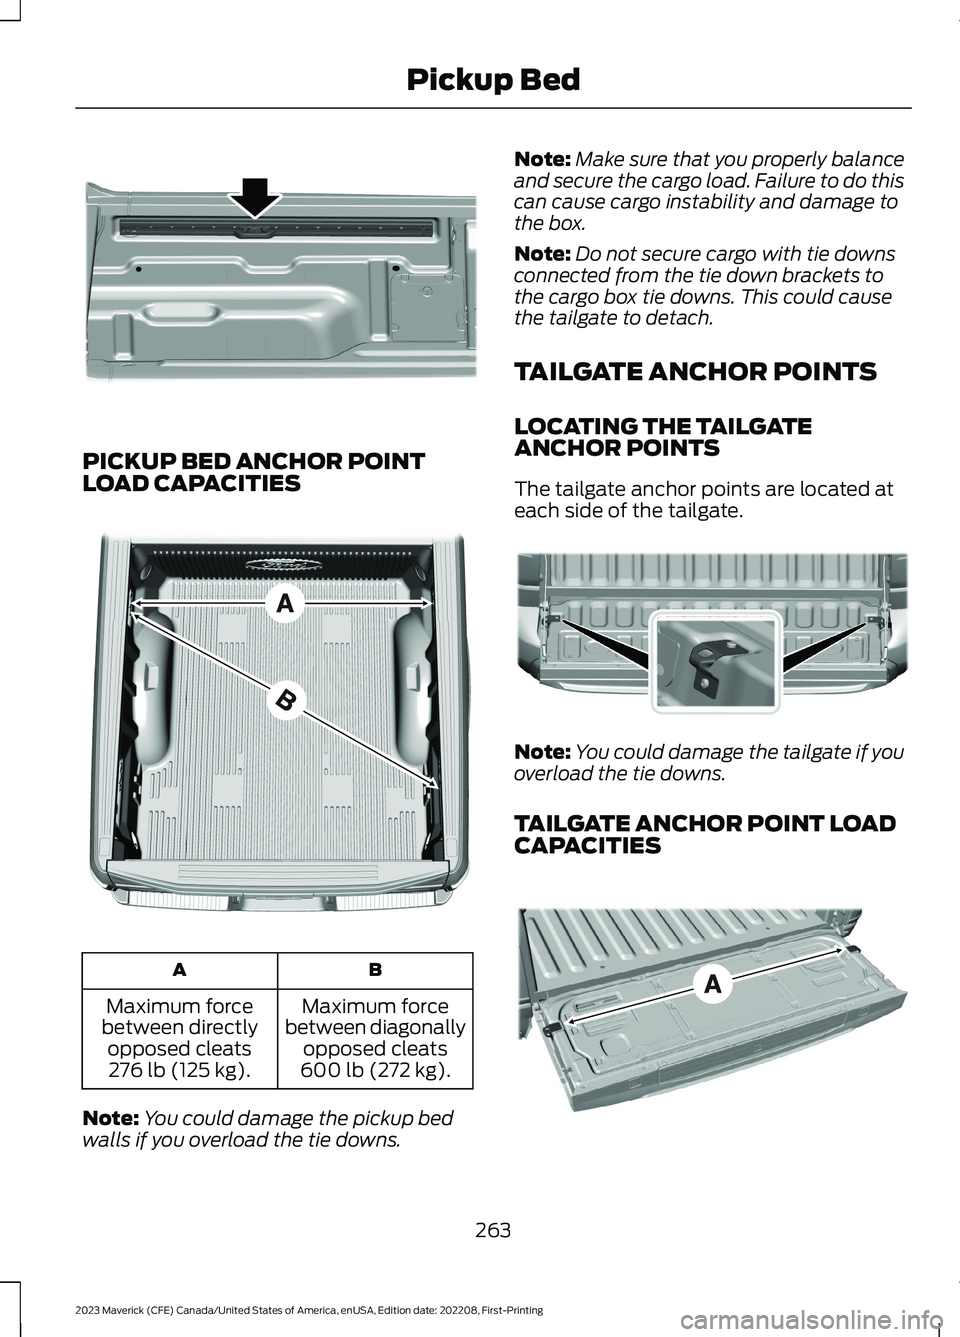
PICKUP BED ANCHOR POINTLOAD CAPACITIES
BA
Maximum forcebetween diagonallyopposed cleats600 lb (272 kg).
Maximum forcebetween directlyopposed cleats276 lb (125 kg).
Note:You could damage the pickup bedwalls if you overload the tie downs.
Note:Make sure that you properly balanceand secure the cargo load. Failure to do thiscan cause cargo instability and damage tothe box.
Note:Do not secure cargo with tie downsconnected from the tie down brackets tothe cargo box tie downs. This could causethe tailgate to detach.
TAILGATE ANCHOR POINTS
LOCATING THE TAILGATEANCHOR POINTS
The tailgate anchor points are located ateach side of the tailgate.
Note:You could damage the tailgate if youoverload the tie downs.
TAILGATE ANCHOR POINT LOADCAPACITIES
263
2023 Maverick (CFE) Canada/United States of America, enUSA, Edition date: 202208, First-PrintingPickup BedE355819 E327576 E355884 E327790
Page 268 of 556
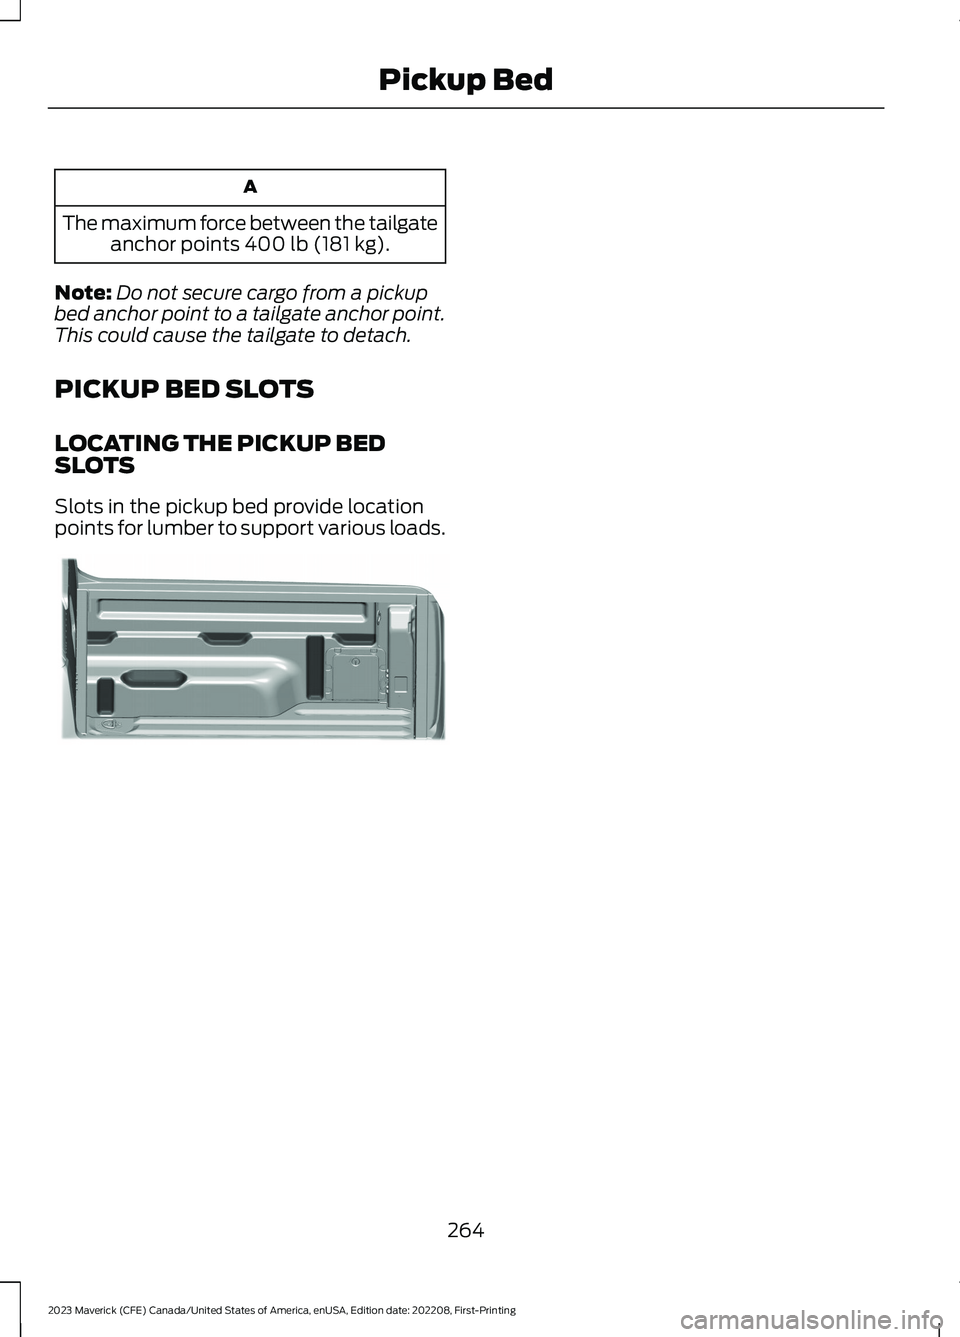
A
The maximum force between the tailgateanchor points 400 lb (181 kg).
Note:Do not secure cargo from a pickupbed anchor point to a tailgate anchor point.This could cause the tailgate to detach.
PICKUP BED SLOTS
LOCATING THE PICKUP BEDSLOTS
Slots in the pickup bed provide locationpoints for lumber to support various loads.
264
2023 Maverick (CFE) Canada/United States of America, enUSA, Edition date: 202208, First-PrintingPickup BedE354605
Page 326 of 556
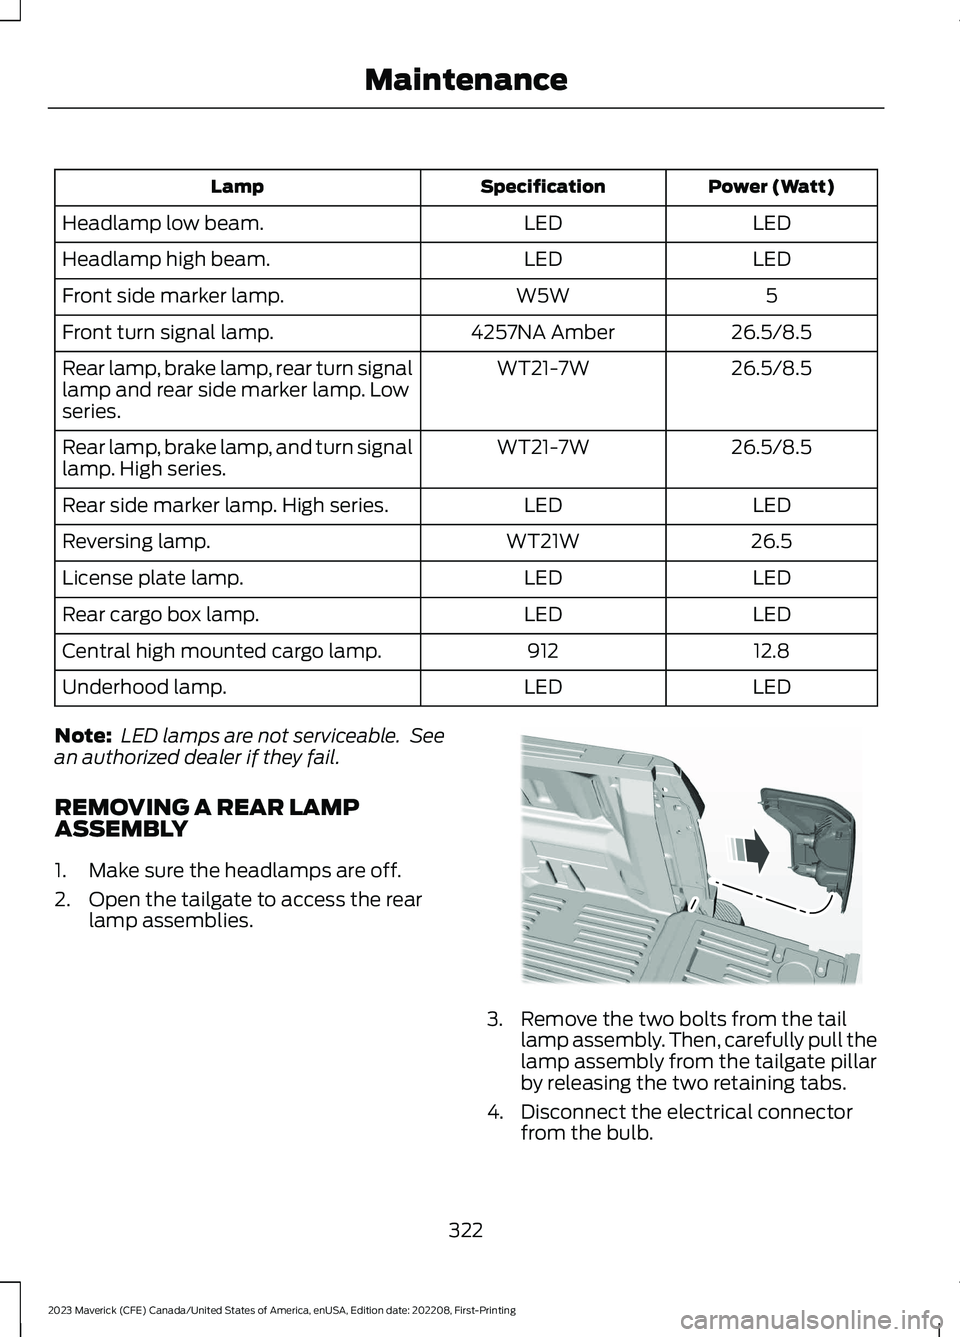
Power (Watt)SpecificationLamp
LEDLEDHeadlamp low beam.
LEDLEDHeadlamp high beam.
5W5WFront side marker lamp.
26.5/8.54257NA AmberFront turn signal lamp.
26.5/8.5WT21-7WRear lamp, brake lamp, rear turn signallamp and rear side marker lamp. Lowseries.
26.5/8.5WT21-7WRear lamp, brake lamp, and turn signallamp. High series.
LEDLEDRear side marker lamp. High series.
26.5WT21WReversing lamp.
LEDLEDLicense plate lamp.
LEDLEDRear cargo box lamp.
12.8912Central high mounted cargo lamp.
LEDLEDUnderhood lamp.
Note: LED lamps are not serviceable. Seean authorized dealer if they fail.
REMOVING A REAR LAMPASSEMBLY
1.Make sure the headlamps are off.
2.Open the tailgate to access the rearlamp assemblies.
3.Remove the two bolts from the taillamp assembly. Then, carefully pull thelamp assembly from the tailgate pillarby releasing the two retaining tabs.
4.Disconnect the electrical connectorfrom the bulb.
322
2023 Maverick (CFE) Canada/United States of America, enUSA, Edition date: 202208, First-PrintingMaintenanceE187288
Page 451 of 556
WHAT ARE THE 12V PRE-
WIRED CONNECTIONS
The connections are a set of pre-wired 12 Vcircuits that make aftermarketcustomization easier. The circuits areindividually fused for 12 V connection ofelectrical accessories.
12V PRE-WIRED
CONNECTIONS PRECAUTIONS
When you switch the vehicle on, you canuse the connections to power 12 Vappliances with a maximum combinedcurrent rating total of 15 A between theright and left adapters.
Do not use right and left connections overthe vehicle capacity of 12 V DC 180 watt ora fuse could blow.
Do not plug in any device that suppliespower to the vehicle through theconnection point. This could result indamage to vehicle system.
Always keep the connection pointsplugged into the cap when not in use.
To prevent the battery from running out ofcharge:
•Do not use the connections longer thannecessary when the vehicle is off.
•Do not leave devices plugged inovernight or when you park your vehiclefor extended periods.
LOCATING THE 12V PRE-
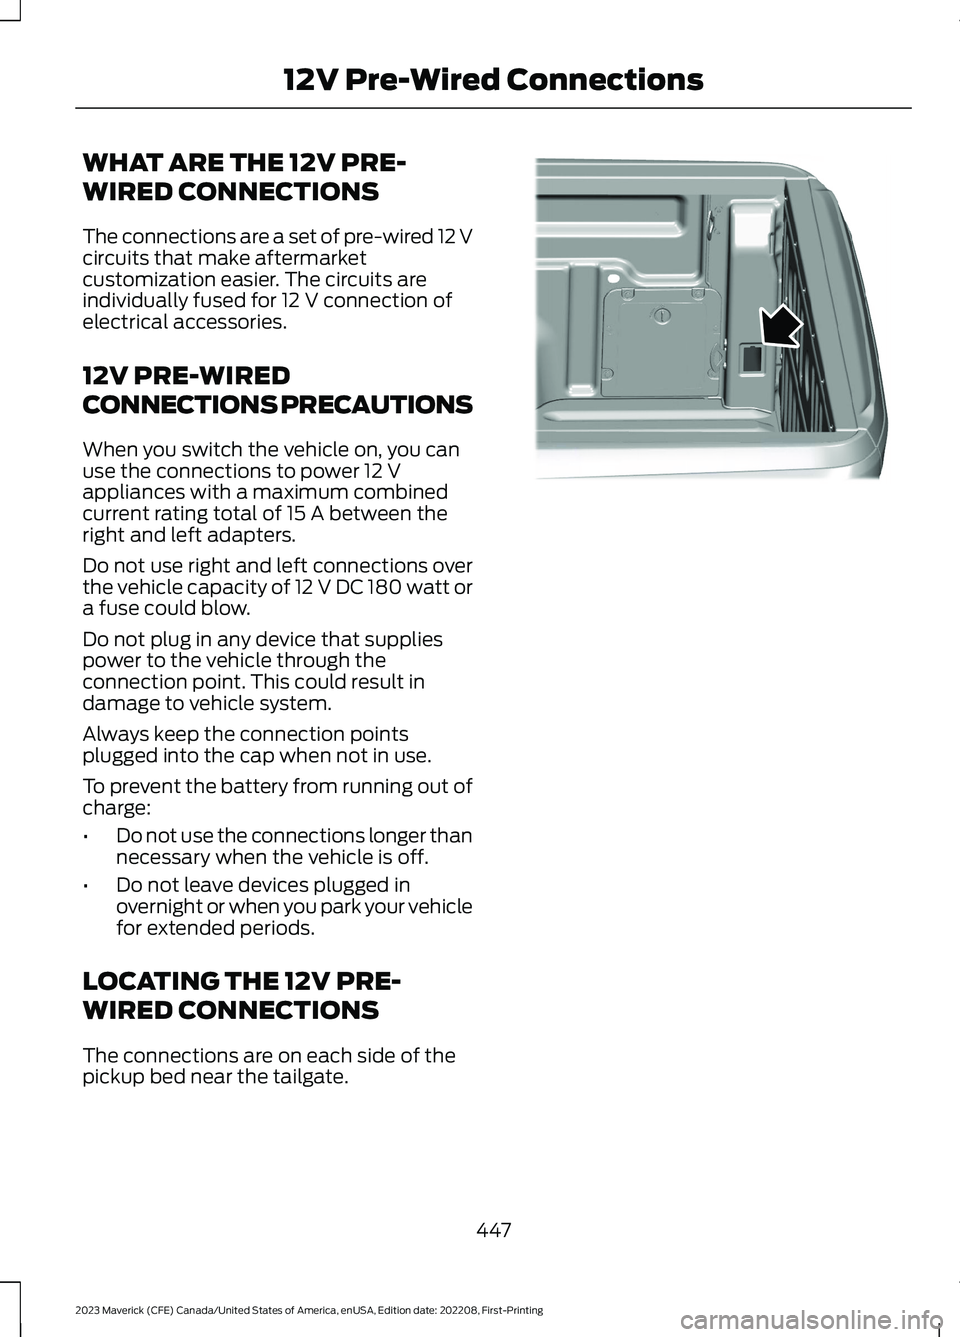
WIRED CONNECTIONS
The connections are on each side of thepickup bed near the tailgate.
447
2023 Maverick (CFE) Canada/United States of America, enUSA, Edition date: 202208, First-Printing12V Pre-Wired ConnectionsE357738
Page 548 of 556

Introduction.......................................................17
J
Jump Starting the Vehicle........................284Jump Starting Precautions............................284Jump Starting the Vehicle..............................285Preparing the Vehicle.......................................285
K
Keyless Entry....................................................76Keyless Entry – Troubleshooting.....................77Keyless Entry Keypad....................................78Keyless Entry Keypad –Troubleshooting..............................................80Keyless Entry Keypad Limitations............78Keyless Entry Keypad Master AccessCode.................................................................78Keyless Entry Keypad Personal AccessCodes...............................................................78Keyless Entry Keypad –Troubleshooting..........................................80Keyless Entry Keypad – Frequently AskedQuestions..........................................................80Keyless Entry Limitations............................76Keyless Entry Settings..................................76Keyless Entry – Troubleshooting..............77Keyless Entry – Frequently AskedQuestions............................................................77Keys and Remote Controls..........................61Keys and Remote Controls –Troubleshooting..............................................66Keys and Remote Controls –Troubleshooting..........................................66Keys and Remote Controls – InformationMessages...........................................................66
L
Lane Centering..............................................225How Does Lane Centering Work..................225Lane Centering Alerts.......................................226Lane Centering AutomaticCancellation....................................................227Lane Centering Indicators...............................227Lane Centering Limitations............................226Lane Centering Manual Cancellation.........227
Lane Centering Precautions..........................225Lane Centering Requirements......................225Switching Lane Centering On andOff.......................................................................226Lane Keeping System Indicators............237Lane Keeping System................................234Aid Mode...............................................................236Alert and Aid Mode...........................................236Alert Mode............................................................235Lane Keeping System –Troubleshooting............................................238Lane Keeping System Limitations........234Lane Keeping System Precautions.......234Lane Keeping System –Troubleshooting........................................238Lane Keeping System – Frequently AskedQuestions........................................................239Lane Keeping System – InformationMessages.........................................................238Launching or Retrieving a Boat orPersonal Watercraft................................269Load Carrying.................................................257Load Carrying Precautions.......................257Loading Your Trailer....................................268Locating the 12V Pre-WiredConnections................................................447Locating the Blind Spot InformationSystem Sensors.........................................242Locating the Brake Fluid Reservoir.........191Locating the Cross Traffic AlertSensors.........................................................245Locating the Fuel Filler Funnel.................172Locating the Keyless Entry Keypad.........78Locating the Power Outlets......................149Locating the Pre-Collision AssistSensors.........................................................249Locating the Rear View Camera.............214Locating the Safety ComplianceCertification Labels..................................258Locating the Tire label...............................335Locating the USB Ports..............................147Locating the Wireless AccessoryCharger..........................................................152Locating Your Vehicle...................................62Locking and Unlocking the Tailgate........82Locking the Rear Window Controls........101
544
2023 Maverick (CFE) Canada/United States of America, enUSA, Edition date: 202208, First-PrintingIndex