2023 FORD MAVERICK clock
[x] Cancel search: clockPage 236 of 556
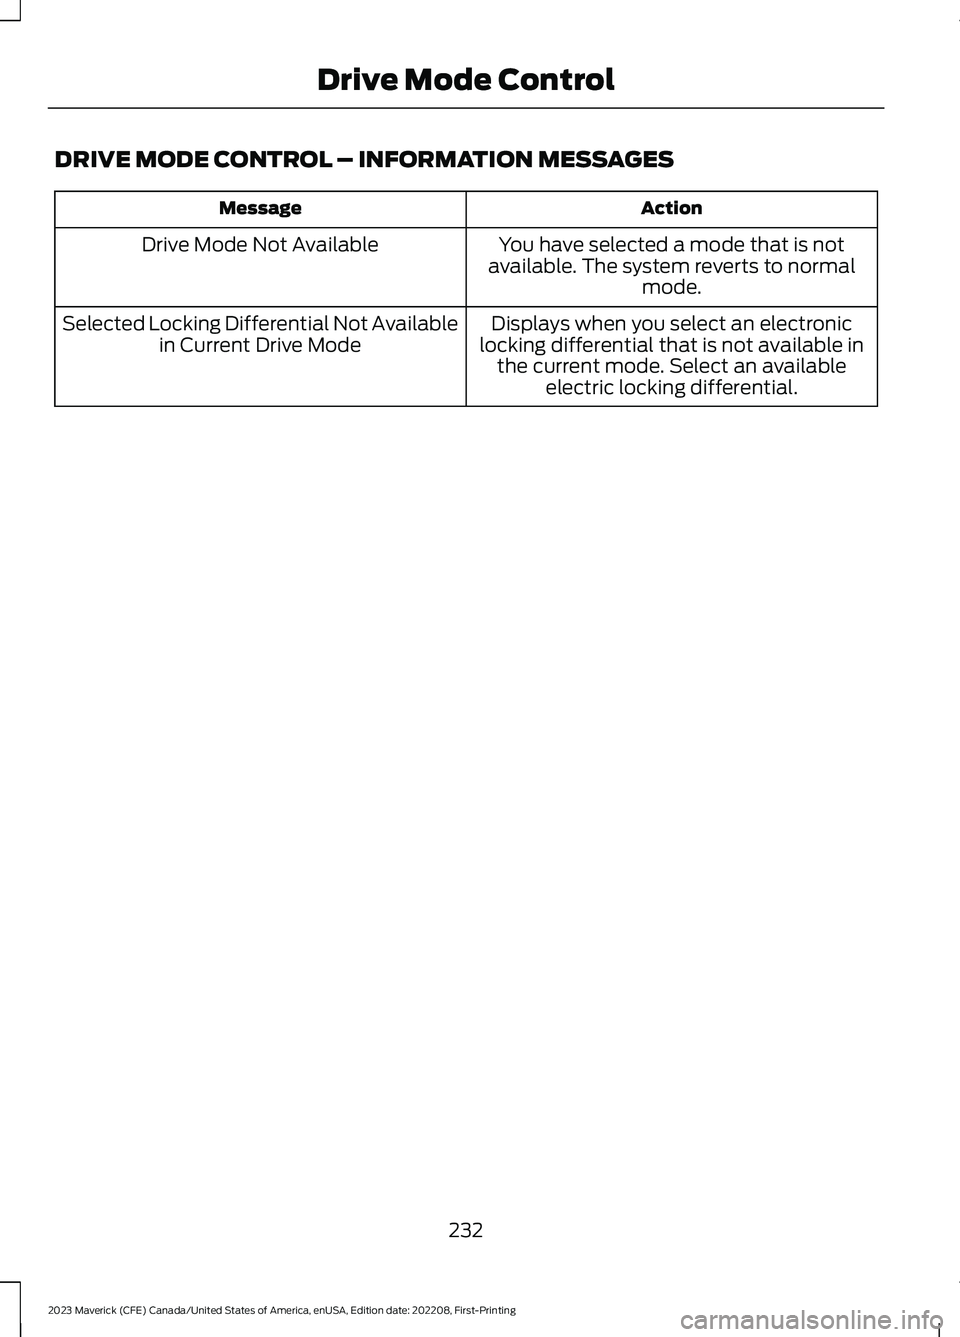
DRIVE MODE CONTROL – INFORMATION MESSAGES
ActionMessage
You have selected a mode that is notavailable. The system reverts to normalmode.
Drive Mode Not Available
Displays when you select an electroniclocking differential that is not available inthe current mode. Select an availableelectric locking differential.
Selected Locking Differential Not Availablein Current Drive Mode
232
2023 Maverick (CFE) Canada/United States of America, enUSA, Edition date: 202208, First-PrintingDrive Mode Control
Page 312 of 556
ENGINE OIL
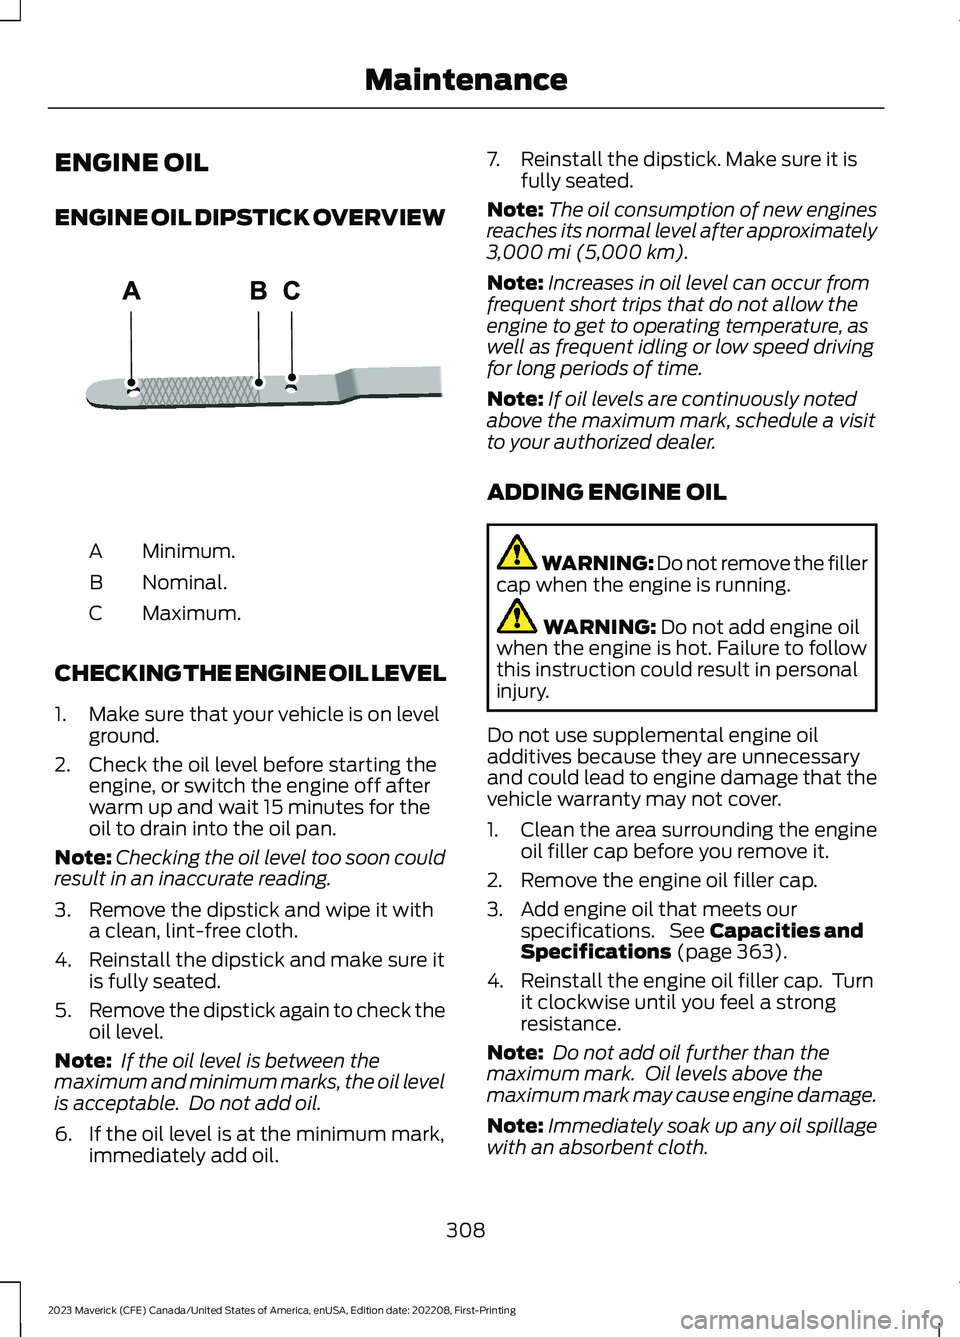
ENGINE OIL DIPSTICK OVERVIEW
Minimum.A
Nominal.B
Maximum.C
CHECKING THE ENGINE OIL LEVEL
1.Make sure that your vehicle is on levelground.
2.Check the oil level before starting theengine, or switch the engine off afterwarm up and wait 15 minutes for theoil to drain into the oil pan.
Note:Checking the oil level too soon couldresult in an inaccurate reading.
3.Remove the dipstick and wipe it witha clean, lint-free cloth.
4.Reinstall the dipstick and make sure itis fully seated.
5.Remove the dipstick again to check theoil level.
Note: If the oil level is between themaximum and minimum marks, the oil levelis acceptable. Do not add oil.
6.If the oil level is at the minimum mark,immediately add oil.
7.Reinstall the dipstick. Make sure it isfully seated.
Note:The oil consumption of new enginesreaches its normal level after approximately3,000 mi (5,000 km).
Note:Increases in oil level can occur fromfrequent short trips that do not allow theengine to get to operating temperature, aswell as frequent idling or low speed drivingfor long periods of time.
Note:If oil levels are continuously notedabove the maximum mark, schedule a visitto your authorized dealer.
ADDING ENGINE OIL
WARNING: Do not remove the fillercap when the engine is running.
WARNING: Do not add engine oilwhen the engine is hot. Failure to followthis instruction could result in personalinjury.
Do not use supplemental engine oiladditives because they are unnecessaryand could lead to engine damage that thevehicle warranty may not cover.
1.Clean the area surrounding the engineoil filler cap before you remove it.
2.Remove the engine oil filler cap.
3.Add engine oil that meets ourspecifications. See Capacities andSpecifications (page 363).
4.Reinstall the engine oil filler cap. Turnit clockwise until you feel a strongresistance.
Note: Do not add oil further than themaximum mark. Oil levels above themaximum mark may cause engine damage.
Note:Immediately soak up any oil spillagewith an absorbent cloth.
308
2023 Maverick (CFE) Canada/United States of America, enUSA, Edition date: 202208, First-PrintingMaintenanceE250320
Page 314 of 556
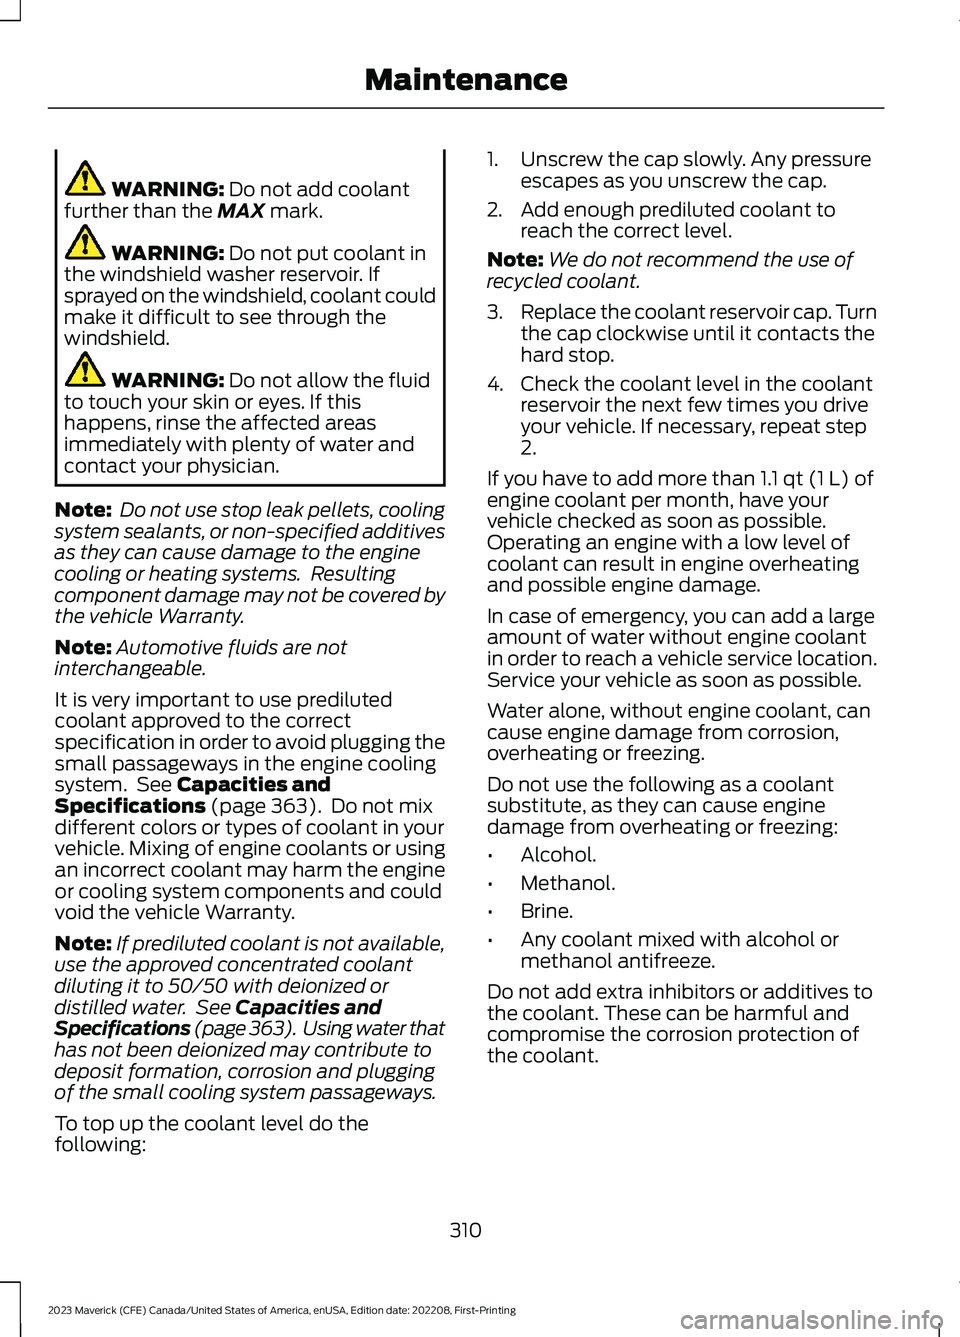
WARNING: Do not add coolantfurther than the MAX mark.
WARNING: Do not put coolant inthe windshield washer reservoir. Ifsprayed on the windshield, coolant couldmake it difficult to see through thewindshield.
WARNING: Do not allow the fluidto touch your skin or eyes. If thishappens, rinse the affected areasimmediately with plenty of water andcontact your physician.
Note: Do not use stop leak pellets, coolingsystem sealants, or non-specified additivesas they can cause damage to the enginecooling or heating systems. Resultingcomponent damage may not be covered bythe vehicle Warranty.
Note:Automotive fluids are notinterchangeable.
It is very important to use predilutedcoolant approved to the correctspecification in order to avoid plugging thesmall passageways in the engine coolingsystem. See Capacities andSpecifications (page 363). Do not mixdifferent colors or types of coolant in yourvehicle. Mixing of engine coolants or usingan incorrect coolant may harm the engineor cooling system components and couldvoid the vehicle Warranty.
Note:If prediluted coolant is not available,use the approved concentrated coolantdiluting it to 50/50 with deionized ordistilled water. See Capacities andSpecifications (page 363). Using water thathas not been deionized may contribute todeposit formation, corrosion and pluggingof the small cooling system passageways.
To top up the coolant level do thefollowing:
1.Unscrew the cap slowly. Any pressureescapes as you unscrew the cap.
2.Add enough prediluted coolant toreach the correct level.
Note:We do not recommend the use ofrecycled coolant.
3.Replace the coolant reservoir cap. Turnthe cap clockwise until it contacts thehard stop.
4.Check the coolant level in the coolantreservoir the next few times you driveyour vehicle. If necessary, repeat step2.
If you have to add more than 1.1 qt (1 L) ofengine coolant per month, have yourvehicle checked as soon as possible.Operating an engine with a low level ofcoolant can result in engine overheatingand possible engine damage.
In case of emergency, you can add a largeamount of water without engine coolantin order to reach a vehicle service location.Service your vehicle as soon as possible.
Water alone, without engine coolant, cancause engine damage from corrosion,overheating or freezing.
Do not use the following as a coolantsubstitute, as they can cause enginedamage from overheating or freezing:
•Alcohol.
•Methanol.
•Brine.
•Any coolant mixed with alcohol ormethanol antifreeze.
Do not add extra inhibitors or additives tothe coolant. These can be harmful andcompromise the corrosion protection ofthe coolant.
310
2023 Maverick (CFE) Canada/United States of America, enUSA, Edition date: 202208, First-PrintingMaintenance
Page 322 of 556

Note:Before reconnecting the battery,make sure the ignition remains switched off.
Note:Make sure to fully tighten the batterycables.
If you disconnect or replace the vehiclebattery, you must reset the followingfeatures:
•Window bounce-back. See What IsWindow Bounce-Back (page 100).
•Clock Settings.
•Pre-set radio stations.
Battery Disposal
Make sure that you dispose ofold batteries in anenvironmentally friendly way.Seek advice from your local authorityabout recycling old batteries.
CHANGING THE 12V BATTERY
- HYBRID ELECTRIC VEHICLE
(HEV)
WARNING: Batteries normallyproduce explosive gases which cancause personal injury. Therefore, do notallow flames, sparks or lightedsubstances to come near the battery.When working near the battery, alwaysshield your face and protect your eyes.Always provide correct ventilation.
WARNING: When lifting aplastic-cased battery, excessive pressureon the end walls could cause acid to flowthrough the vent caps, resulting inpersonal injury and damage to thevehicle or battery. Lift the battery with abattery carrier or with your hands onopposite corners.
WARNING: Keep batteries out ofreach of children. Batteries containsulfuric acid. Avoid contact with skin,eyes or clothing. Shield your eyes whenworking near the battery to protectagainst possible splashing of acidsolution. In case of acid contact with skinor eyes, flush immediately with water fora minimum of 15 minutes and get promptmedical attention. If acid is swallowed,call a physician immediately.
WARNING: Battery posts,terminals and related accessoriescontain lead and lead compounds,chemicals known to the State ofCalifornia to cause cancer andreproductive harm.Wash your handsafter handling.
WARNING: This vehicle may havemore than one battery. Removing thebattery cables from only one batterydoes not disconnect your vehicleelectrical system. Make sure youdisconnect the battery cables from allbatteries when disconnecting power.Failure to do so may cause seriouspersonal injury or property damage.
WARNING: For vehicles withAuto-Start-Stop the battery requirementis different. You must replace the batterywith one of exactly the samespecification.
The battery is in under the rear seat. SeeAdjusting the Seat Cushion (page 143).
Your vehicle has a maintenance-freebattery. It does not require additionalwater during service.
If the vehicle battery has a cover and venthose, make sure you correctly install it aftercleaning or replacing the battery.
318
2023 Maverick (CFE) Canada/United States of America, enUSA, Edition date: 202208, First-PrintingMaintenanceE107998
Page 324 of 556

Electrical Accessory Installation
To make sure the battery managementsystem works correctly, do not connect anelectrical device ground connectiondirectly to the battery negative post. Thiscan cause inaccurate measurements ofthe battery condition and potentialincorrect system operation.
Note:If you add electrical accessories orcomponents to the vehicle, it may adverselyaffect battery performance and durability.This may also affect the performance ofother electrical systems in the vehicle.
Remove and Reinstall the Battery
Install a battery approved for use by ourspecifications. See Capacities andSpecifications (page 363).
To disconnect or remove the battery, dothe following:
1.Apply the parking brake and switch theignition off.
2.Switch all electrical equipment off, forexample lights and radio.
3.Wait a minimum of two minutes beforedisconnecting the battery.
Note:The engine management system hasa power hold function and remains poweredfor a period of time after you switch theignition off. This is to allow the system tostore diagnostic and adaptive tables.Disconnecting the battery without waitingcan cause damage not covered by thevehicle warranty.
4.Disconnect the negative battery cableterminal.
5.Disconnect the positive battery cableterminal.
6.Remove the battery securing clamp.
7.Remove the battery.
8.To install, reverse the removalprocedure.
Note:Before reconnecting the battery,make sure the ignition remains switched off.
Note:Make sure to fully tighten the batterycables.
If you disconnect or replace the vehiclebattery, you must reset the followingfeatures:
•Window bounce-back. See What IsWindow Bounce-Back (page 100).
•Clock Settings.
•Pre-set radio stations.
Battery Disposal
Make sure that you dispose ofold batteries in anenvironmentally friendly way.Seek advice from your local authorityabout recycling old batteries.
ADJUSTING THE HEADLAMPS
Vertical Aim Adjustment
The headlamps on your vehicle areproperly aimed at the assembly plant. Ifyour vehicle has been in an accident, havethe alignment of your headlamps checkedas soon as possible.
8 ft (2.4 m)A
Center height of lamp to groundB
320
2023 Maverick (CFE) Canada/United States of America, enUSA, Edition date: 202208, First-PrintingMaintenanceE107998 E142592
Page 325 of 556
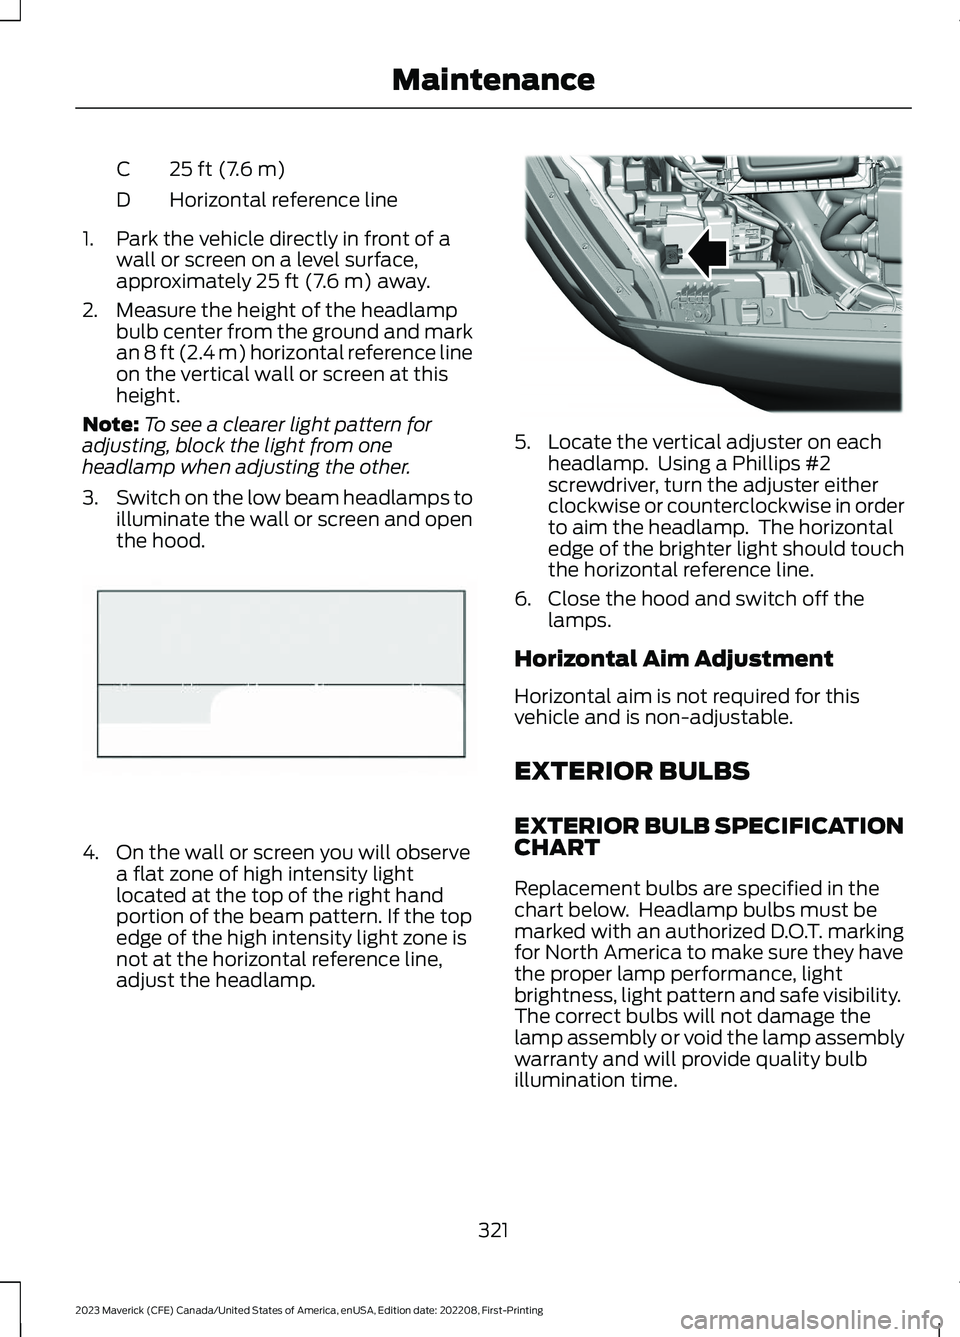
25 ft (7.6 m)C
Horizontal reference lineD
1.Park the vehicle directly in front of awall or screen on a level surface,approximately 25 ft (7.6 m) away.
2.Measure the height of the headlampbulb center from the ground and markan 8 ft (2.4 m) horizontal reference lineon the vertical wall or screen at thisheight.
Note:To see a clearer light pattern foradjusting, block the light from oneheadlamp when adjusting the other.
3.Switch on the low beam headlamps toilluminate the wall or screen and openthe hood.
4.On the wall or screen you will observea flat zone of high intensity lightlocated at the top of the right handportion of the beam pattern. If the topedge of the high intensity light zone isnot at the horizontal reference line,adjust the headlamp.
5.Locate the vertical adjuster on eachheadlamp. Using a Phillips #2screwdriver, turn the adjuster eitherclockwise or counterclockwise in orderto aim the headlamp. The horizontaledge of the brighter light should touchthe horizontal reference line.
6.Close the hood and switch off thelamps.
Horizontal Aim Adjustment
Horizontal aim is not required for thisvehicle and is non-adjustable.
EXTERIOR BULBS
EXTERIOR BULB SPECIFICATIONCHART
Replacement bulbs are specified in thechart below. Headlamp bulbs must bemarked with an authorized D.O.T. markingfor North America to make sure they havethe proper lamp performance, lightbrightness, light pattern and safe visibility.The correct bulbs will not damage thelamp assembly or void the lamp assemblywarranty and will provide quality bulbillumination time.
321
2023 Maverick (CFE) Canada/United States of America, enUSA, Edition date: 202208, First-PrintingMaintenanceE142465 E355886
Page 327 of 556
5.To install, reverse the removalprocedure.
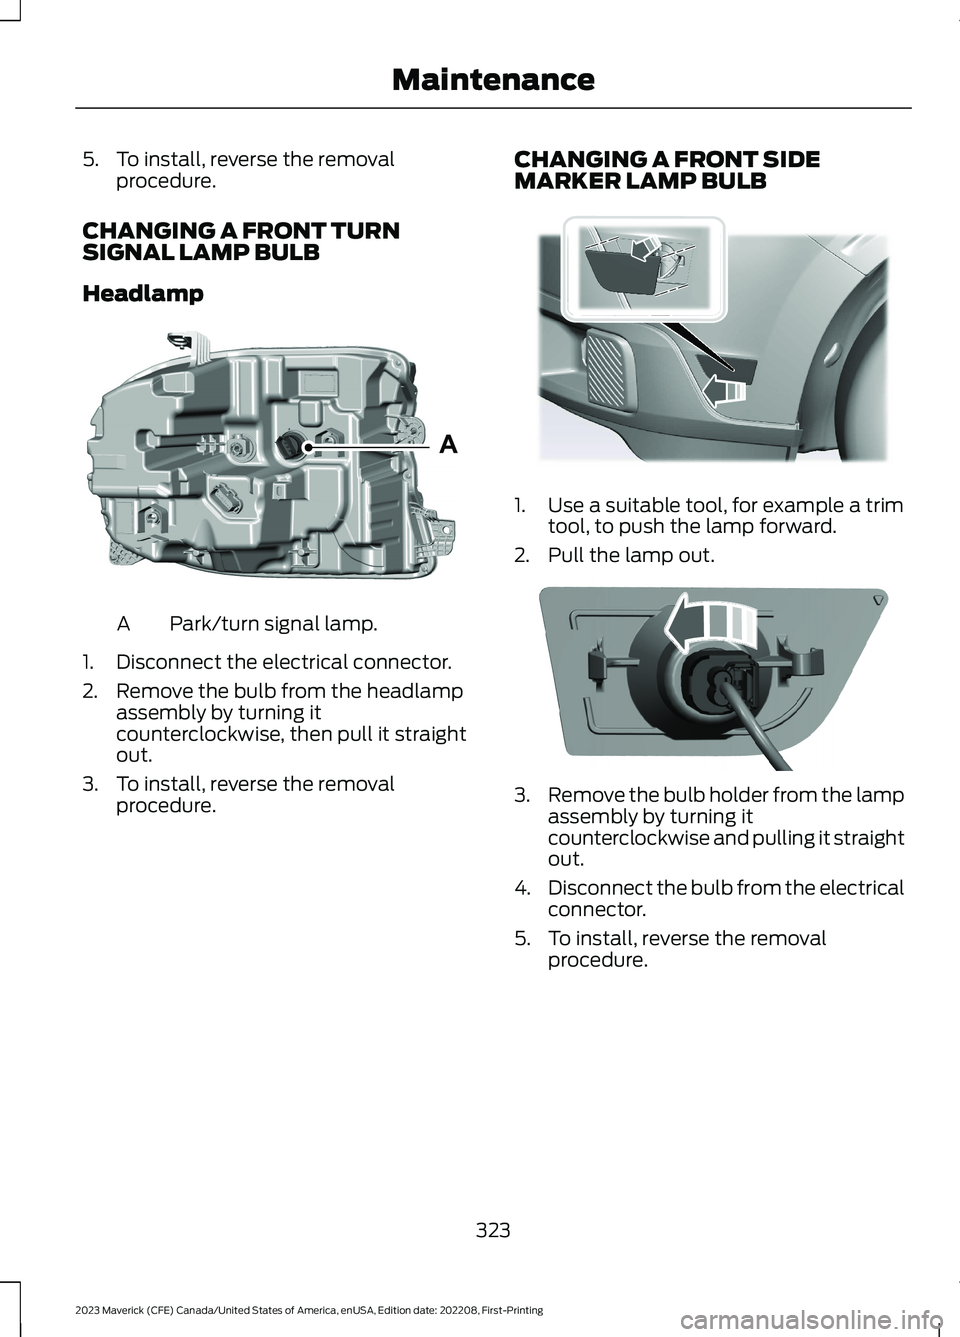
CHANGING A FRONT TURNSIGNAL LAMP BULB
Headlamp
Park/turn signal lamp.A
1.Disconnect the electrical connector.
2.Remove the bulb from the headlampassembly by turning itcounterclockwise, then pull it straightout.
3.To install, reverse the removalprocedure.
CHANGING A FRONT SIDEMARKER LAMP BULB
1.Use a suitable tool, for example a trimtool, to push the lamp forward.
2.Pull the lamp out.
3.Remove the bulb holder from the lampassembly by turning itcounterclockwise and pulling it straightout.
4.Disconnect the bulb from the electricalconnector.
5.To install, reverse the removalprocedure.
323
2023 Maverick (CFE) Canada/United States of America, enUSA, Edition date: 202208, First-PrintingMaintenanceAE348847 E349259 E349260
Page 328 of 556
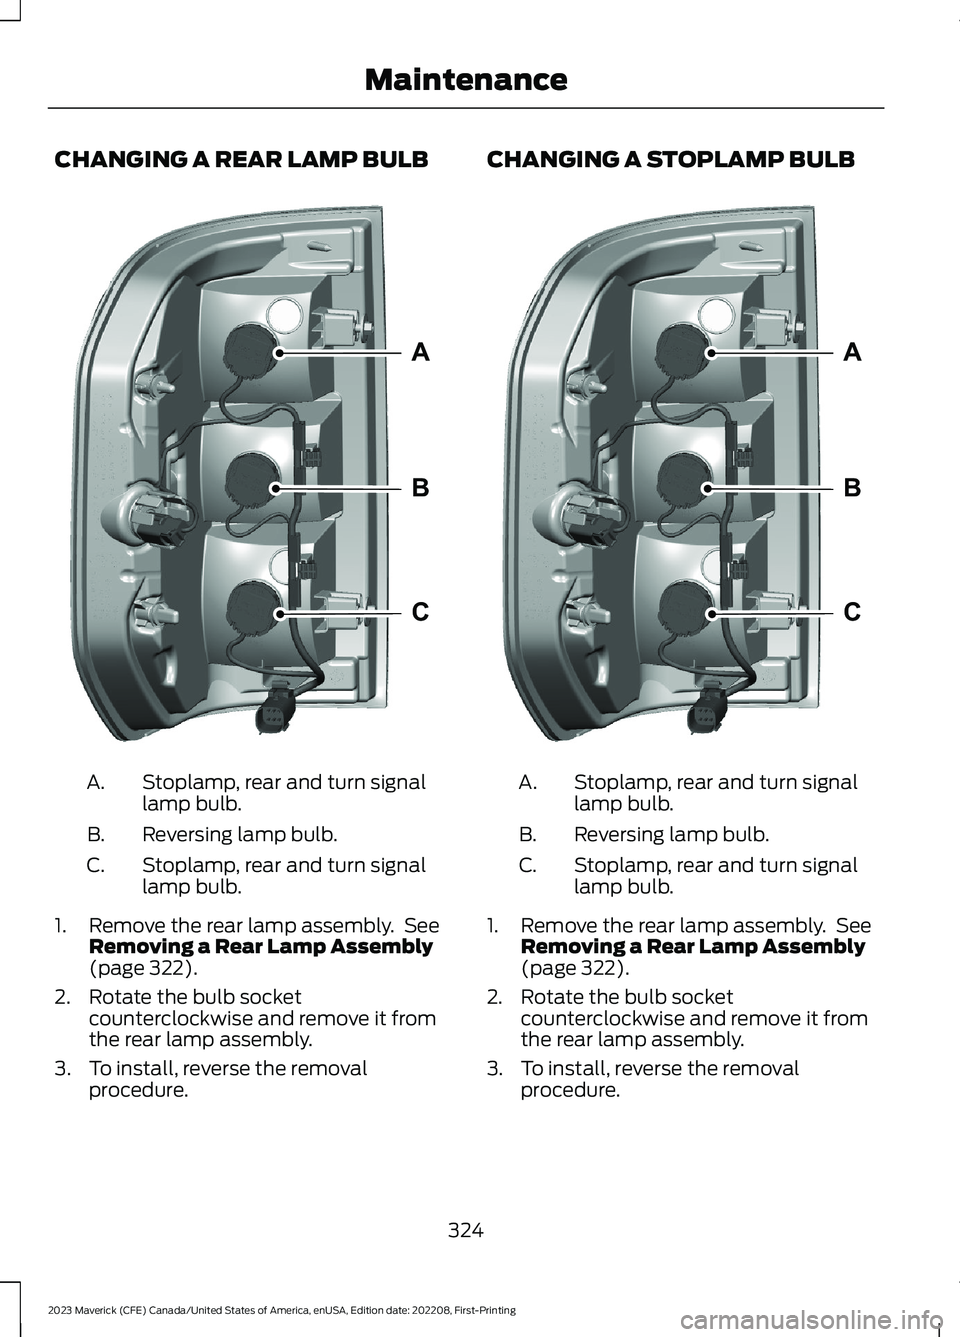
CHANGING A REAR LAMP BULB
Stoplamp, rear and turn signallamp bulb.A.
Reversing lamp bulb.B.
Stoplamp, rear and turn signallamp bulb.C.
1.Remove the rear lamp assembly. SeeRemoving a Rear Lamp Assembly(page 322).
2.Rotate the bulb socketcounterclockwise and remove it fromthe rear lamp assembly.
3.To install, reverse the removalprocedure.
CHANGING A STOPLAMP BULB
Stoplamp, rear and turn signallamp bulb.A.
Reversing lamp bulb.B.
Stoplamp, rear and turn signallamp bulb.C.
1.Remove the rear lamp assembly. SeeRemoving a Rear Lamp Assembly(page 322).
2.Rotate the bulb socketcounterclockwise and remove it fromthe rear lamp assembly.
3.To install, reverse the removalprocedure.
324
2023 Maverick (CFE) Canada/United States of America, enUSA, Edition date: 202208, First-PrintingMaintenanceABCE348848 ABCE348848