2023 FORD MAVERICK clock
[x] Cancel search: clockPage 329 of 556
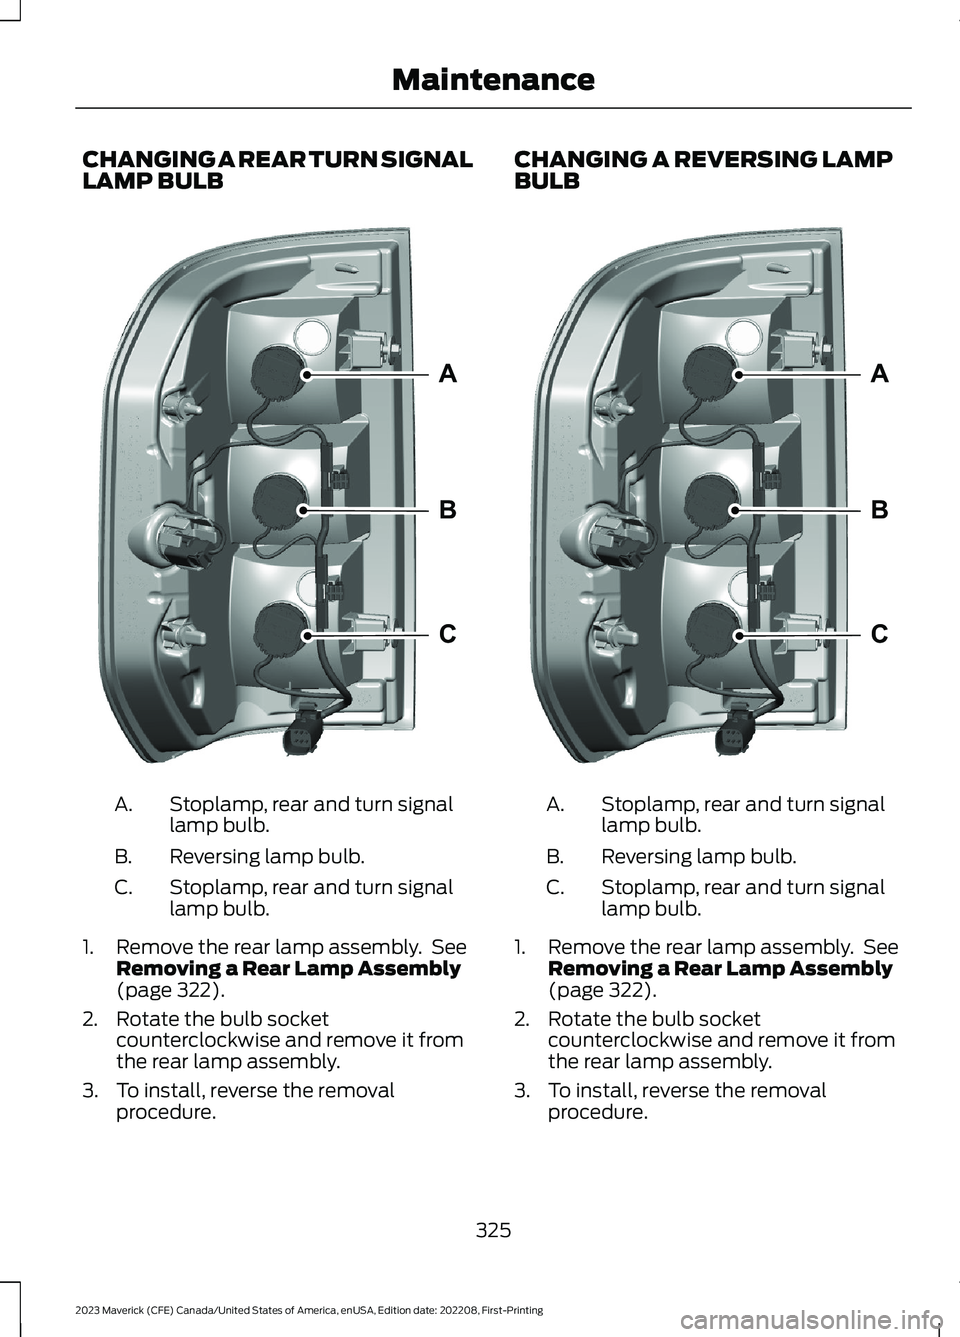
CHANGING A REAR TURN SIGNALLAMP BULB
Stoplamp, rear and turn signallamp bulb.A.
Reversing lamp bulb.B.
Stoplamp, rear and turn signallamp bulb.C.
1.Remove the rear lamp assembly. SeeRemoving a Rear Lamp Assembly(page 322).
2.Rotate the bulb socketcounterclockwise and remove it fromthe rear lamp assembly.
3.To install, reverse the removalprocedure.
CHANGING A REVERSING LAMPBULB
Stoplamp, rear and turn signallamp bulb.A.
Reversing lamp bulb.B.
Stoplamp, rear and turn signallamp bulb.C.
1.Remove the rear lamp assembly. SeeRemoving a Rear Lamp Assembly(page 322).
2.Rotate the bulb socketcounterclockwise and remove it fromthe rear lamp assembly.
3.To install, reverse the removalprocedure.
325
2023 Maverick (CFE) Canada/United States of America, enUSA, Edition date: 202208, First-PrintingMaintenanceABCE348848 ABCE348848
Page 330 of 556
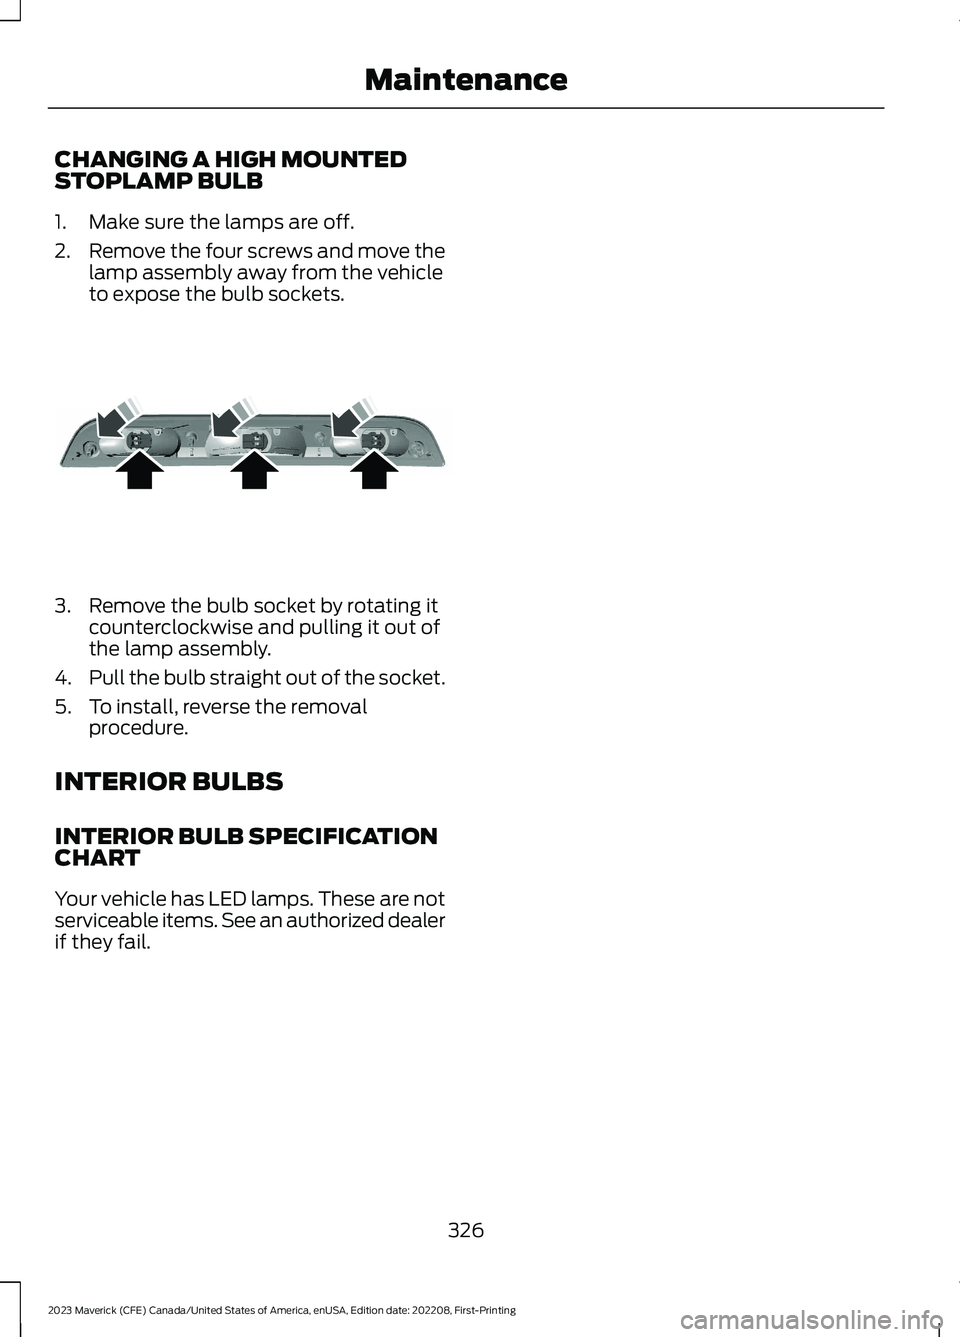
CHANGING A HIGH MOUNTEDSTOPLAMP BULB
1.Make sure the lamps are off.
2.Remove the four screws and move thelamp assembly away from the vehicleto expose the bulb sockets.
3.Remove the bulb socket by rotating itcounterclockwise and pulling it out ofthe lamp assembly.
4.Pull the bulb straight out of the socket.
5.To install, reverse the removalprocedure.
INTERIOR BULBS
INTERIOR BULB SPECIFICATIONCHART
Your vehicle has LED lamps. These are notserviceable items. See an authorized dealerif they fail.
326
2023 Maverick (CFE) Canada/United States of America, enUSA, Edition date: 202208, First-PrintingMaintenanceE187290
Page 360 of 556
•Exceed 50 mph (80 km/h).
•Load the vehicle beyond maximumvehicle load rating listed on the SafetyCompliance Label.
•Tow a trailer.
•Use snow chains on the end of thevehicle with the dissimilar spare tire.
•Use more than one dissimilar spare tireat a time.
•Use commercial car washingequipment.
•Try to repair the dissimilar spare tire.
Use of one of the dissimilar spare tireslisted above at any one wheel location canlead to impairment of the following:
•Handling, stability and brakingperformance.
•Comfort and noise.
•Ground clearance and parking at curbs.
•Winter weather driving capability.
•Wet weather driving capability.
•All-wheel driving capability.
3.Full-size dissimilar spare withoutlabel on wheel
When driving with the full-size dissimilarspare wheel and tire assembly, do not:
•Exceed 70 mph (113 km/h).
•Use more than one dissimilar sparewheel and tire assembly at a time.
•Use commercial car washingequipment.
•Use snow chains on the end of thevehicle with the dissimilar spare wheeland tire assembly.
The usage of a full-size dissimilar sparewheel and tire assembly can lead toimpairment of the following:
•Handling, stability and brakingperformance.
•Comfort and noise.
•Ground clearance and parking at curbs.
•Winter weather driving capability.
•Wet weather driving capability.
•All-wheel driving capability
When driving with the full-size dissimilarspare wheel and tire assembly additionalcaution should be given to:
•Towing a trailer.
•Driving vehicles equipped with acamper body.
•Driving vehicles with a load on thecargo rack.
Drive cautiously when using a full-sizedissimilar spare wheel and tire assemblyand seek service as soon as possible.
Removing the Vehicle Jack andTool Bag
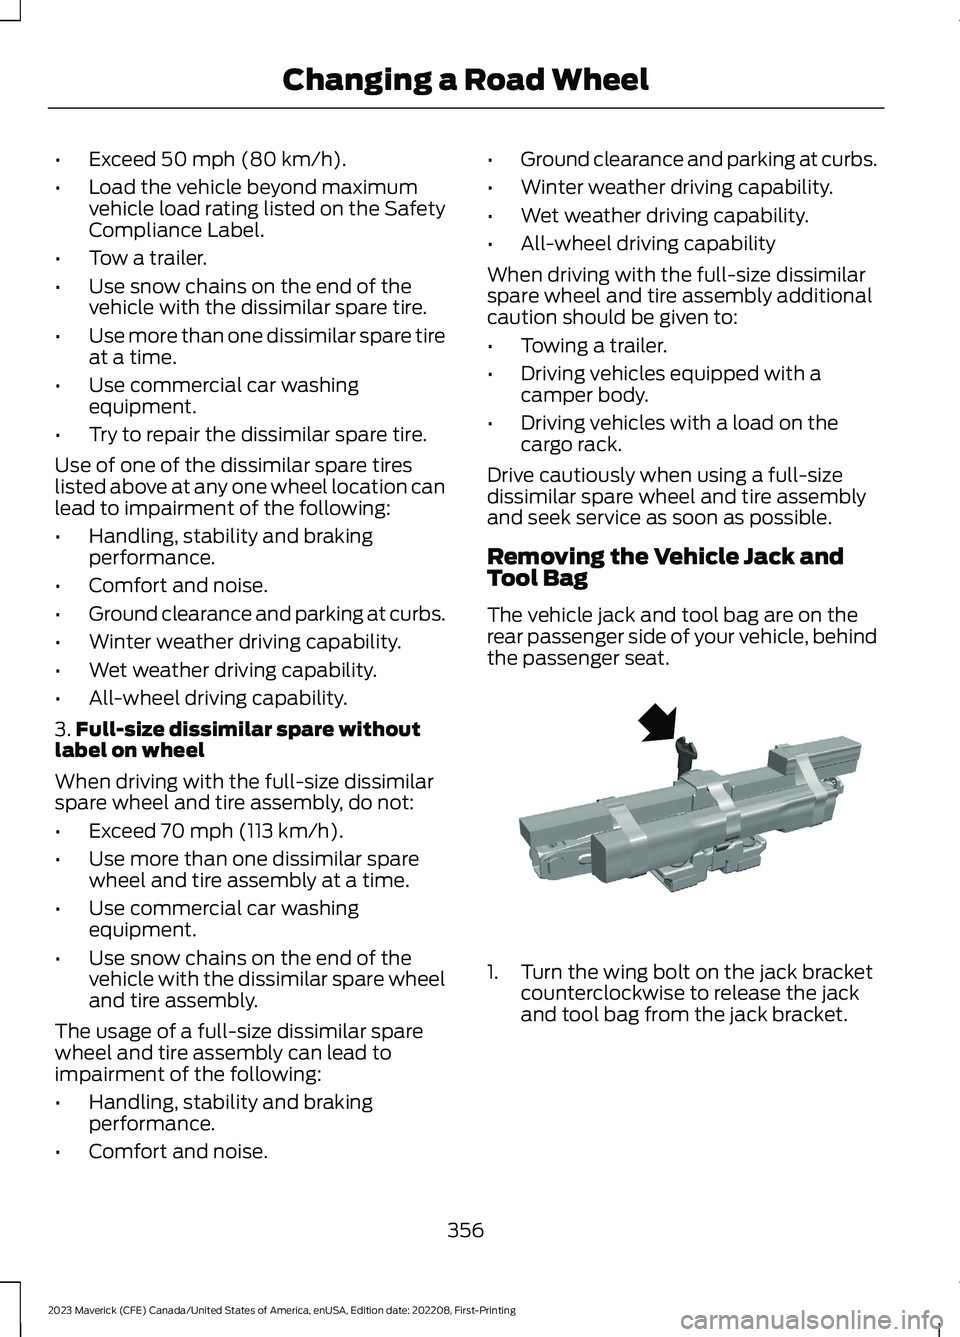
The vehicle jack and tool bag are on therear passenger side of your vehicle, behindthe passenger seat.
1.Turn the wing bolt on the jack bracketcounterclockwise to release the jackand tool bag from the jack bracket.
356
2023 Maverick (CFE) Canada/United States of America, enUSA, Edition date: 202208, First-PrintingChanging a Road WheelE352020
Page 362 of 556
2.Fully insert the jack handle through thebumper hole and into the guide tubethrough the access hole in the rearbumper. Turn the handlecounterclockwise until the tire islowered to the ground and the cable isslightly slack to allow the tire to be slidrearward from under the vehicle.
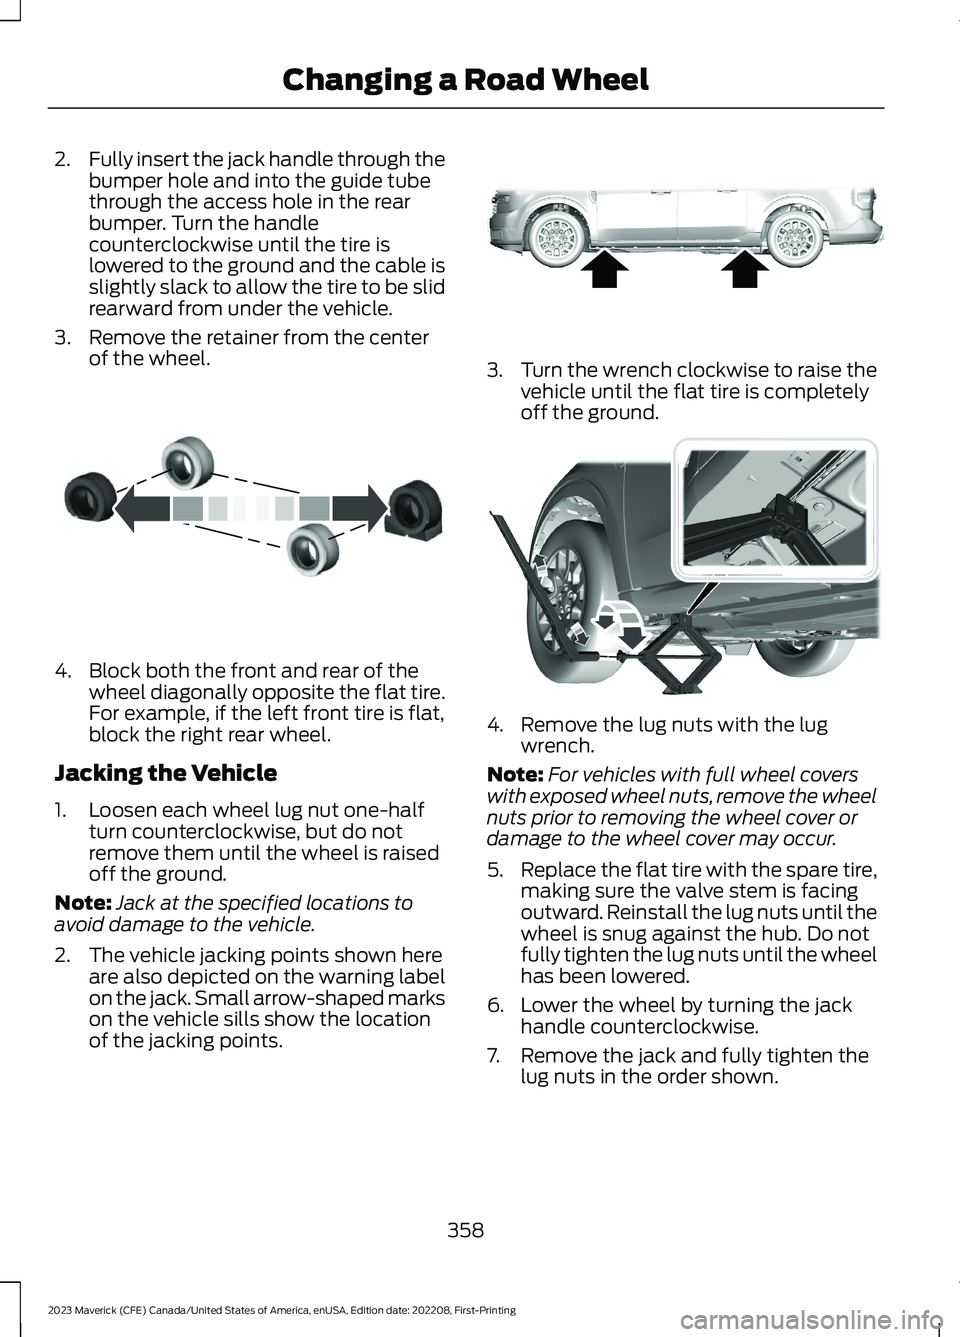
3.Remove the retainer from the centerof the wheel.
4.Block both the front and rear of thewheel diagonally opposite the flat tire.For example, if the left front tire is flat,block the right rear wheel.
Jacking the Vehicle
1.Loosen each wheel lug nut one-halfturn counterclockwise, but do notremove them until the wheel is raisedoff the ground.
Note:Jack at the specified locations toavoid damage to the vehicle.
2.The vehicle jacking points shown hereare also depicted on the warning labelon the jack. Small arrow-shaped markson the vehicle sills show the locationof the jacking points.
3.Turn the wrench clockwise to raise thevehicle until the flat tire is completelyoff the ground.
4.Remove the lug nuts with the lugwrench.
Note:For vehicles with full wheel coverswith exposed wheel nuts, remove the wheelnuts prior to removing the wheel cover ordamage to the wheel cover may occur.
5.Replace the flat tire with the spare tire,making sure the valve stem is facingoutward. Reinstall the lug nuts until thewheel is snug against the hub. Do notfully tighten the lug nuts until the wheelhas been lowered.
6.Lower the wheel by turning the jackhandle counterclockwise.
7.Remove the jack and fully tighten thelug nuts in the order shown.
358
2023 Maverick (CFE) Canada/United States of America, enUSA, Edition date: 202208, First-PrintingChanging a Road WheelE175447 E352156 E352182
Page 364 of 556
Stowing the Spare Tire
Note:Failure to follow the spare tirestowage instructions could result in failureof the cable or loss of the spare tire.
1.Lay the tire on the ground with thevalve stem facing down.
2.Slide the wheel partially under thevehicle and install the retainer throughthe wheel center. Pull on the cable toalign the components at the end of thecable.
3.Turn the jack handle clockwise untilthe tire is raised to its stowed positionunderneath the vehicle. The effort toturn the jack handle increasessignificantly and the spare tire carrierratchets or slips when the tire is raisedto the maximum tightness. Tighten tothe point where the ratchet or slipoccurs, a minimum of three times asindicated by an audible click each time.The spare tire carrier does not allowyou to overtighten. If the spare tirecarrier ratchets or slips with little effort,contact your authorized dealer.
4.Check that the tire lies flat against theframe and is properly tightened. Try topush or pull, then turn the tire to besure it does not move. Loosen andretighten, if necessary. Failure toproperly stow the spare tire couldresult in failure of the winch cable andloss of the tire.
5.Repeat this tightness check procedurewhen servicing the spare tire pressure,every six months, as per your scheduledmaintenance information, or at anytime that the spare tire is disturbedthrough service of other components.
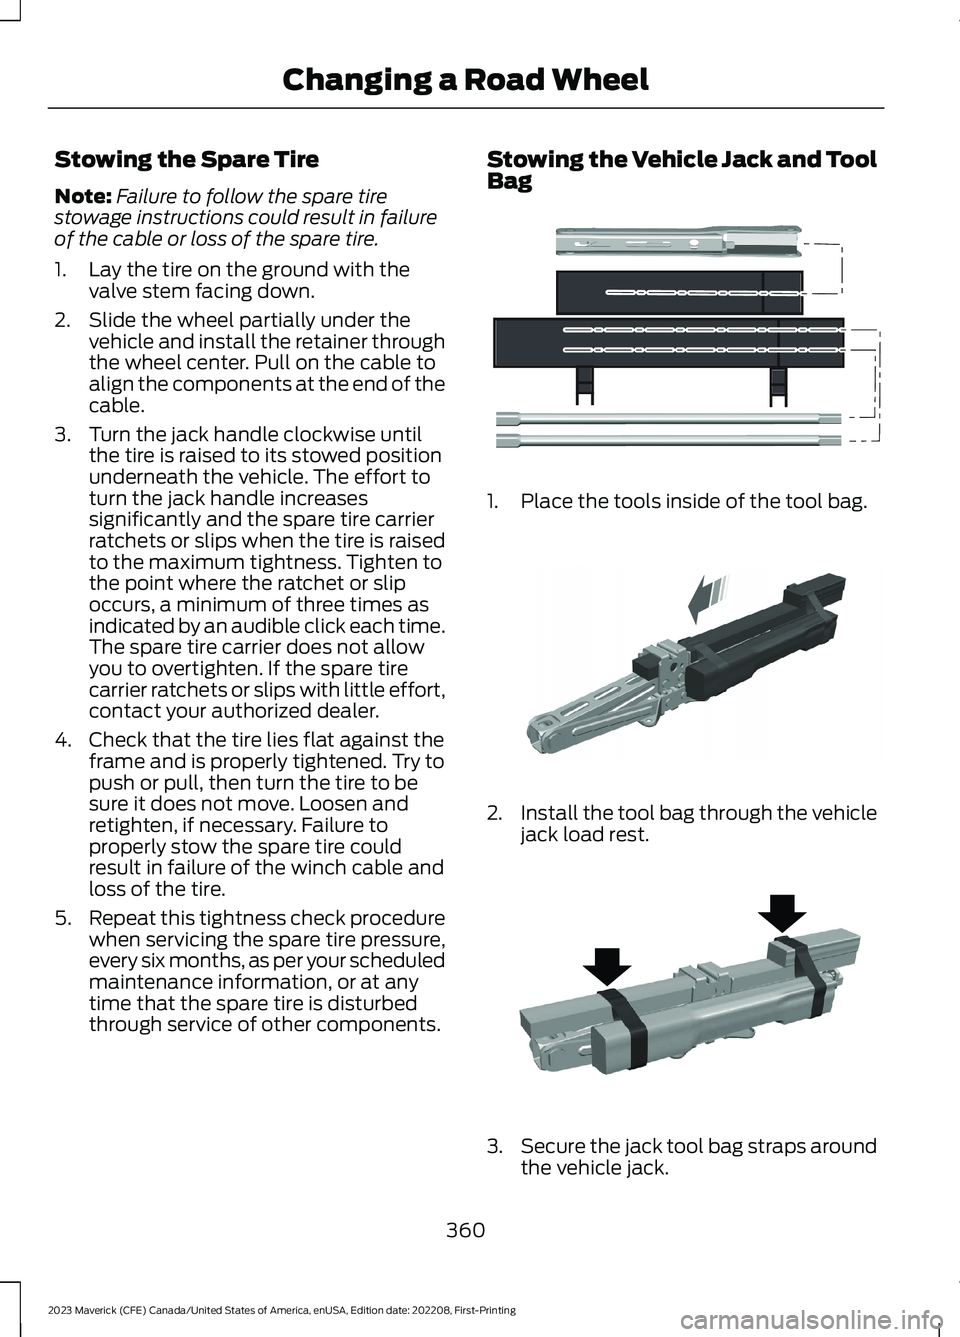
Stowing the Vehicle Jack and ToolBag
1.Place the tools inside of the tool bag.
2.Install the tool bag through the vehiclejack load rest.
3.Secure the jack tool bag straps aroundthe vehicle jack.
360
2023 Maverick (CFE) Canada/United States of America, enUSA, Edition date: 202208, First-PrintingChanging a Road WheelE352149 E352034 E352022
Page 365 of 556
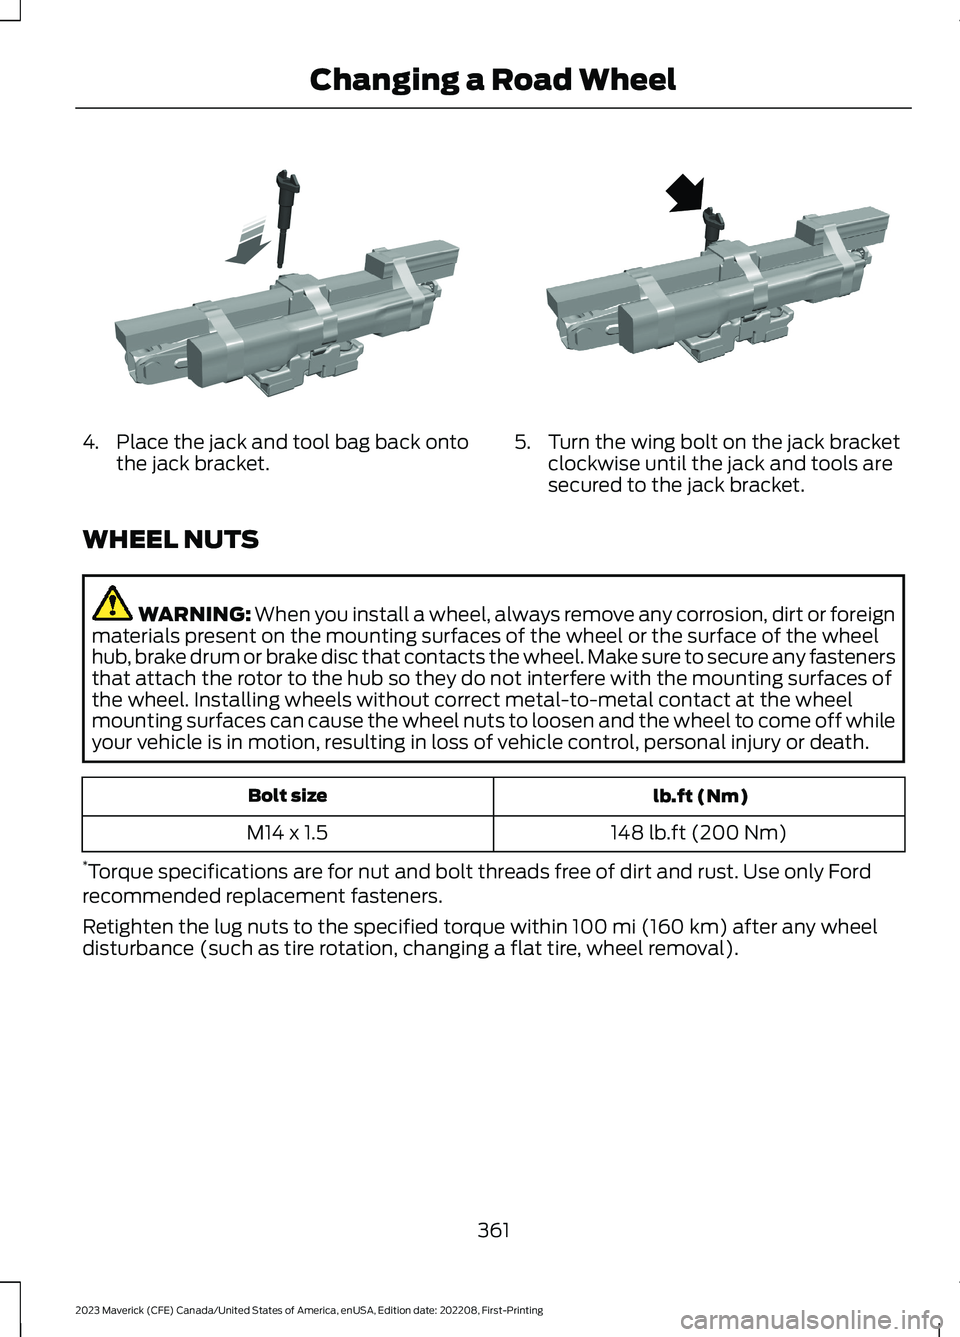
4.Place the jack and tool bag back ontothe jack bracket.5.Turn the wing bolt on the jack bracketclockwise until the jack and tools aresecured to the jack bracket.
WHEEL NUTS
WARNING: When you install a wheel, always remove any corrosion, dirt or foreignmaterials present on the mounting surfaces of the wheel or the surface of the wheelhub, brake drum or brake disc that contacts the wheel. Make sure to secure any fastenersthat attach the rotor to the hub so they do not interfere with the mounting surfaces ofthe wheel. Installing wheels without correct metal-to-metal contact at the wheelmounting surfaces can cause the wheel nuts to loosen and the wheel to come off whileyour vehicle is in motion, resulting in loss of vehicle control, personal injury or death.
lb.ft (Nm)Bolt size
148 lb.ft (200 Nm)M14 x 1.5
*Torque specifications are for nut and bolt threads free of dirt and rust. Use only Fordrecommended replacement fasteners.
Retighten the lug nuts to the specified torque within 100 mi (160 km) after any wheeldisturbance (such as tire rotation, changing a flat tire, wheel removal).
361
2023 Maverick (CFE) Canada/United States of America, enUSA, Edition date: 202208, First-PrintingChanging a Road WheelE352027 E352026
Page 397 of 556

SETTING A MEMORY PRESET
1.Select a station or channel.
2.Press and hold a memory preset buttonon the touchscreen.
Note:The audio mutes briefly while thesystem saves the preset and returns once itis stored.
Note:You can save presets from multiplesources to the memory preset bar.
MUTING THE AUDIO
Press the button on the steeringwheel to mute the audio.
Press to mute the signal. Pressagain to restore the signal.
ADJUSTING THE SOUND
SETTINGS
Balance and Fade (If Equipped)
1.Access the vehicle drawer on thetouchscreen.
2.Press SETTINGS.
3.Press Sound.
4.Press Balance / Fade.
5.Press the arrows to adjust the settings.
Tone Settings
1.Access the vehicle drawer on thetouchscreen.
2.Press SETTINGS.
3.Press Sound.
4.Press Tone Settings.
5.Use the slider bar to adjust the settings.
Speed Compensated Volume
1.Access the vehicle drawer on thetouchscreen.
2.Press SETTINGS.
3.Press Sound.
4.Press Speed Compensated Volume.
5.Press a setting.
Occupancy Mode (If Equipped)
1.Access the vehicle drawer on thetouchscreen.
2.Press SETTINGS.
3.Press Sound.
4.Press Occupancy Mode.
5.Press a setting.
Sound Mode (If Equipped)
1.Access the vehicle drawer on thetouchscreen.
2.Press SETTINGS.
3.Press Sound.
4.Press Sound Mode.
5.Press a setting.
SETTING THE CLOCK AND
DATE
1.Access the vehicle drawer on thetouchscreen.
2.Press SETTINGS.
3.Press Clock.
4.Set the time.
Note:The AM and PM options are notavailable if 24-hour mode is on.
5.Press the arrows to adjust the settings.
393
2023 Maverick (CFE) Canada/United States of America, enUSA, Edition date: 202208, First-PrintingAudio System - Vehicles With: SYNC 3
Page 398 of 556

Switching Automatic TimeUpdates On and Off
1.Access the vehicle drawer on thetouchscreen.
2.Press SETTINGS.
3.Press Clock.
4.Switch Automatic time zone updateon or off.
AM/FM RADIO
AM/FM RADIO LIMITATIONS
The further you travel from an AM or FMstation, the weaker the signal and theweaker the reception.
Hills, mountains, tall buildings, bridges,tunnels, freeway overpasses, parkinggarages, dense tree foliage andthunderstorms can interfere with thereception.
When you pass a ground-based broadcastrepeating tower, a stronger signal mayovertake a weaker one and result in theaudio system muting.
SELECTING A RADIO STATION
Manually Selecting a RadioStation
Turn to search through the radio frequencyband.
Using Direct Tune
1.Press Direct Tune to open the numberpad.
2.Enter the station you prefer.
Note:You can only enter a valid station forthe audio source you are currently listeningto.
Using Seek
Press either button. The systemstops at the first station it findsin that direction.
Using the Station List
1.Press Browse.
Note:Available on FM radio only.
2.Press a station.
394
2023 Maverick (CFE) Canada/United States of America, enUSA, Edition date: 202208, First-PrintingAudio System - Vehicles With: SYNC 3E270235