2022 TOYOTA YARIS CROSS plate
[x] Cancel search: platePage 15 of 618

13
CV Owner's Manual_Europe_M52N20_en
Pictorial index
Precautions for car wash (vehicles with rain-sensing windshield wipers)
............................................................... ..........................................P.343
Fuel filler door ............................................... .................................P.210
Refueling method ............................................... .............................. P.211
Fuel type/fuel tank capacity ................................... ..........................P.450
Tires .......................................................... ......................................P.363
Tire size/inflation pressure ................................... ............................P.454
Winter tires/tire chains ....................................... ..............................P.307
Checking/rotation/tire pressure warning system ................. .............P.363
Coping with flat tires......................................... ........................P.415, 426
Hood ........................................................... .....................................P.351
Opening ........................................................ ...................................P.351
Engine oil ..................................................... ....................................P.450
Coping with overheating ........................................ ..........................P.442
Headlights/front position lights ............................... .............P.186, 192
Turn signal lights/daytime running lights ...................... ......P.186, 192
Front fog lights*2............................................................... .............P.204
Tail lights/turn signal lights ................................. .................P.186, 192
Stop lights
Tail lights*2 /turn signal lights*2............................................P.186, 192
Rear fog light*2............................................................... ................P.204
Back-up light*2
Shifting the shift position to R ............................... ...................P.179, 183
Side turn signal lights ........................................ ...........................P.186
License plate lights........................................... .............................P.192
*1: Vehicles with a smart entry & start system
Light bulbs of the exterior lights for driving
(Replacing method:P.386, Watts: P.455)
Page 37 of 618
35
1
CV Owner's Manual_Europe_M52N20_en
1-1. For safe use
For safety and security
Seat belts
Make sure that all occupants
are wearing their seat belts
before driving the vehicle.
WARNING
Observe the following precautions to
reduce the risk of injury in the event of sudden braking, sudden swerving or an accident.
Failure to do so may cause death or serious injury.
■Wearing a seat belt
●Ensure that all passengers wear a seat belt.
●Always wear a seat belt properly.
●Each seat belt should be used by one person only. Do not use a seat belt for more than one person at
once, including children.
●Toyota recommends that children
be seated in the rear seat and always use a seat belt and/or an appropriate child restraint system.
●To achieve a proper seating posi-tion, do not recline the seat more
than necessary. The seat belt is most effective when the occupants are sitting up straight and well back
in the seats.
●Do not wear the shoulder belt under
your arm.
●Always wear your seat belt low and
snug across your hips.
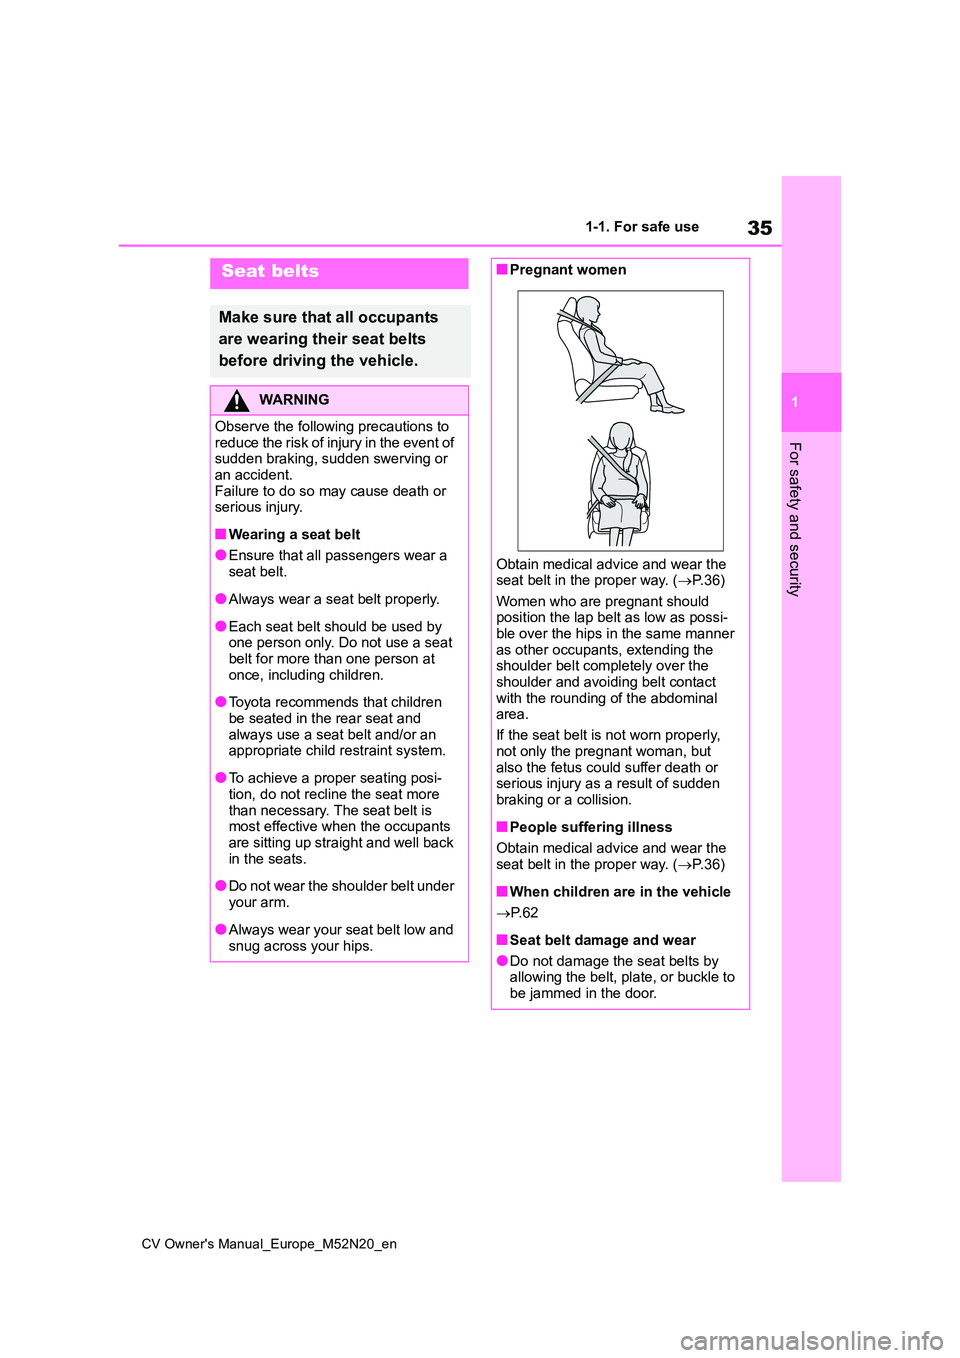
■Pregnant women
Obtain medical advice and wear the seat belt in the proper way. ( P. 3 6 )
Women who are pregnant should position the lap belt as low as possi-ble over the hips in the same manner
as other occupants, extending the shoulder belt completely over the shoulder and avoiding belt contact
with the rounding of the abdominal area.
If the seat belt is not worn properly,
not only the pregnant woman, but also the fetus could suffer death or serious injury as a result of sudden
braking or a collision.
■People suffering illness
Obtain medical advice and wear the seat belt in the proper way. ( P. 3 6 )
■When children are in the vehicle
P. 6 2
■Seat belt damage and wear
●Do not damage the seat belts by allowing the belt, plate, or buckle to
be jammed in the door.
Page 38 of 618
36
CV Owner's Manual_Europe_M52N20_en
1-1. For safe use
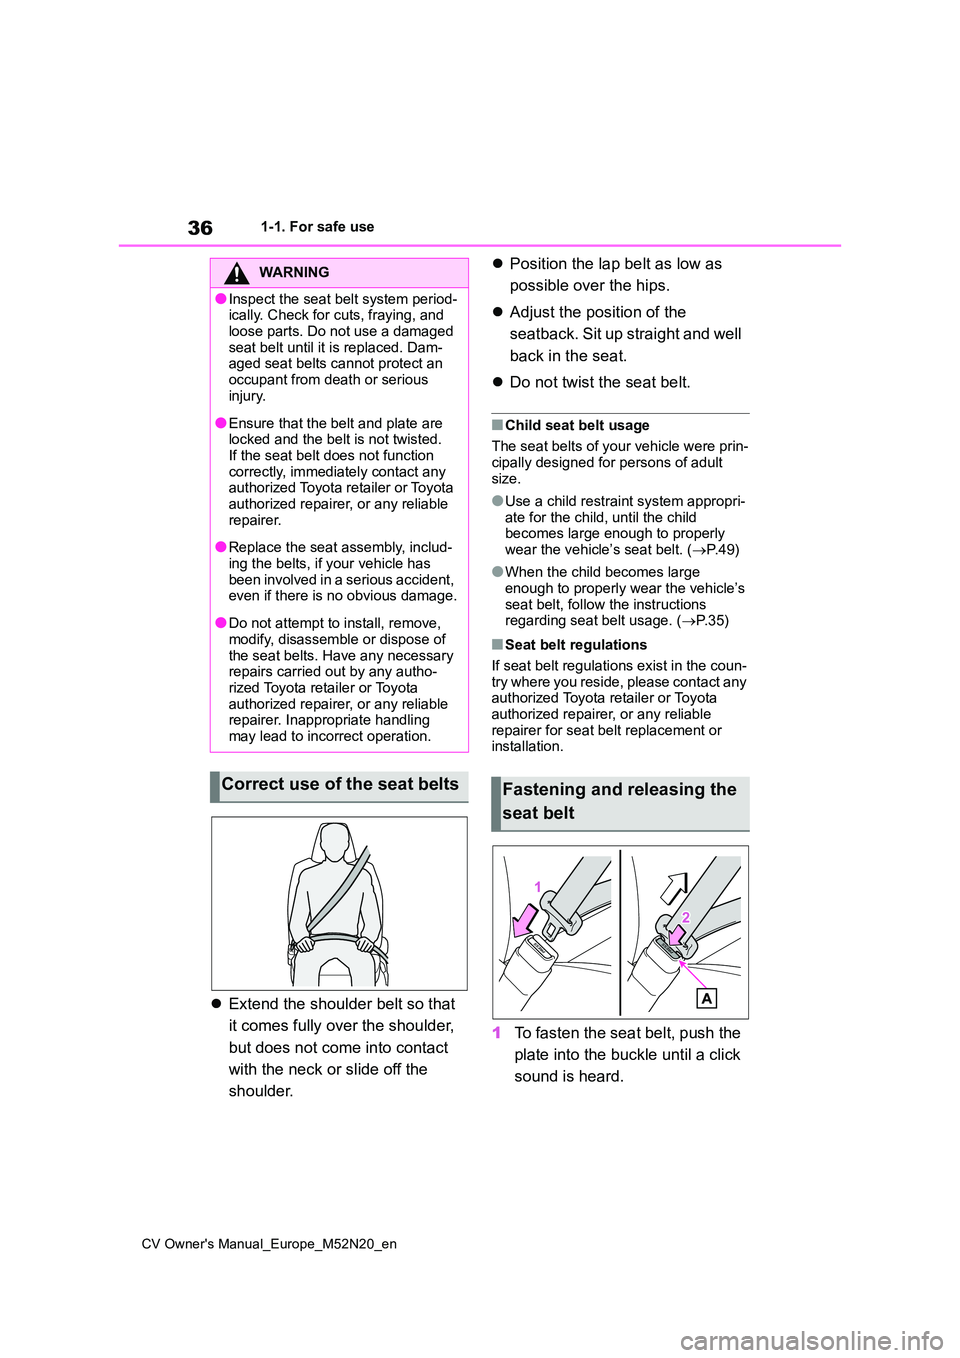
Extend the shoulder belt so that
it comes fully over the shoulder,
but does not come into contact
with the neck or slide off the
shoulder.
Position the lap belt as low as
possible over the hips.
Adjust the position of the
seatback. Sit up straight and well
back in the seat.
Do not twist the seat belt.
■Child seat belt usage
The seat belts of your vehicle were prin- cipally designed for persons of adult
size.
●Use a child restraint system appropri-
ate for the child, until the child becomes large enough to properly wear the vehicle’s seat belt. ( P.49)
●When the child becomes large enough to properly wear the vehicle’s
seat belt, follow the instructions regarding seat belt usage. ( P.35)
■Seat belt regulations
If seat belt regulations exist in the coun-
try where you reside, please contact any authorized Toyota retailer or Toyota authorized repairer, or any reliable
repairer for seat belt replacement or installation.
1 To fasten the seat belt, push the
plate into the buckle until a click
sound is heard.
WARNING
●Inspect the seat belt system period- ically. Check for cuts, fraying, and
loose parts. Do not use a damaged seat belt until it is replaced. Dam-aged seat belts cannot protect an
occupant from death or serious injury.
●Ensure that the belt and plate are locked and the belt is not twisted.If the seat belt does not function
correctly, immediately contact any authorized Toyota retailer or Toyota authorized repairer, or any reliable
repairer.
●Replace the seat assembly, includ-
ing the belts, if your vehicle has been involved in a serious accident, even if there is no obvious damage.
●Do not attempt to install, remove, modify, disassemble or dispose of
the seat belts. Have any necessary repairs carried out by any autho-rized Toyota retailer or Toyota
authorized repairer, or any reliable repairer. Inappropriate handling may lead to incorrect operation.
Correct use of the seat beltsFastening and releasing the
seat belt
Page 63 of 618

61
1
CV Owner's Manual_Europe_M52N20_en
1-2. Child safety
For safety and security
is not in the table), refer to the
“Vehicle List” provided by the child
restraint system maker for various
possible installation positions, or
check the compatibility after asking
the retailer of the child seat.
( P.53, 54)
1 If installing the child restraint
system to the front passenger
seat is unavoidable, refer to
P.50 for the front passenger seat
adjustment.
2 If the head restraint interferes
with your child restraint system,
and the head restraint can be
removed, remove the head
restraint. Otherwise, put the
head restraint in the upper most
position. ( P.144)
3 Run the seat belt through the
child restraint system and insert
the plate into the buckle. Make
sure that the belt is not twisted.
Securely fix the seat belt to the
child restraint system in accor-
dance to the directions enclosed
with the child restraint system.
4 If your child restraint system is
not equipped with a lock-off (a
seat belt locking feature),
s e c u r e t h e c h i l d r e s t r a i n t s y s t e m
using a locking clip.
5 After installing the child restraint
system, rock it back and forth to
ensure that it is installed
securely. ( P. 6 2 )
■Removing a child restraint
system installed with a seat
belt
Press the buckle release button
and fully retract the seat belt.
When releasing the buckle, the child
restraint system may spring up due to
the rebound of the seat cushion.
Release the buckle while holding down
the child restraint system.
Since the seat belt automatically reels
itself, slowly return it to the stowing
position.
■When installing a child restraint system
You may need a locking clip to install the child restraint system. Follow the
instructions provided by the manufac- turer of the system. If your child restraint system does not provide a locking clip,
you can purchase the following item from any authorized Toyota retailer or Toyota authorized repairer, or any reli-
able repairer: Locking clip for child restraint system
Page 64 of 618
62
CV Owner's Manual_Europe_M52N20_en
1-2. Child safety
(Part No. 73119-22010)
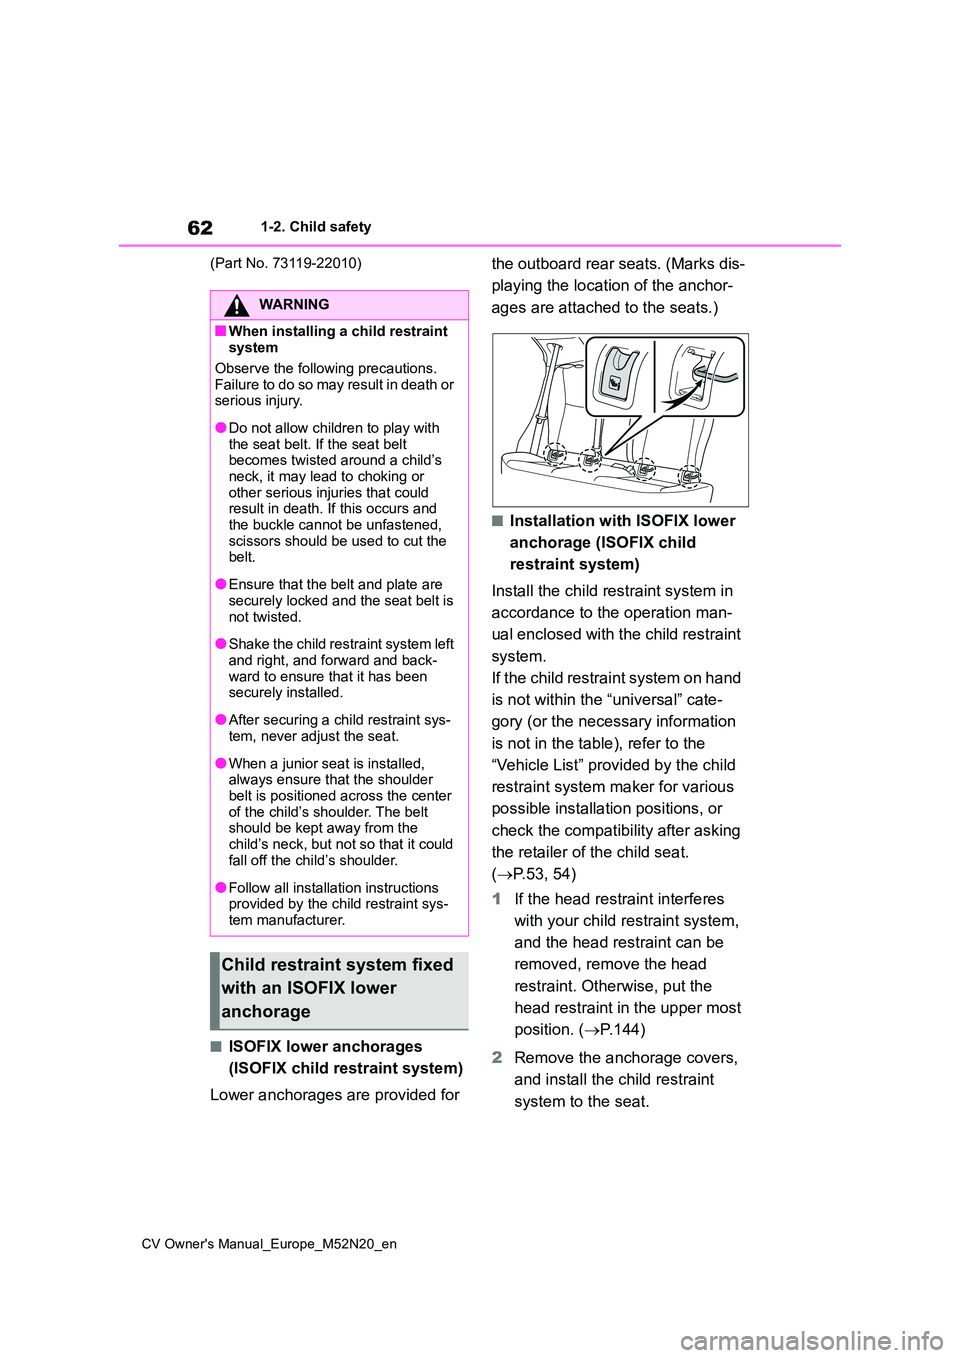
■ISOFIX lower anchorages
(ISOFIX child restraint system)
Lower anchorages are provided for
the outboard rear seats. (Marks dis-
playing the location of the anchor-
ages are attached to the seats.)
■Installation with ISOFIX lower
anchorage (ISOFIX child
restraint system)
Install the child restraint system in
accordance to the operation man-
ual enclosed with the child restraint
system.
If the child restraint system on hand
is not within the “universal” cate-
gory (or the necessary information
is not in the table), refer to the
“Vehicle List” provided by the child
restraint system maker for various
possible installation positions, or
check the compatibility after asking
the retailer of the child seat.
( P.53, 54)
1 If the head restraint interferes
with your child restraint system,
and the head restraint can be
removed, remove the head
restraint. Otherwise, put the
head restraint in the upper most
position. ( P.144)
2 Remove the anchorage covers,
and install the child restraint
system to the seat.
WARNING
■When installing a child restraint system
Observe the following precautions.
Failure to do so may result in death or serious injury.
●Do not allow children to play with the seat belt. If the seat belt becomes twisted around a child’s
neck, it may lead to choking or other serious injuries that could result in death. If this occurs and
the buckle cannot be unfastened, scissors should be used to cut the belt.
●Ensure that the belt and plate are securely locked and the seat belt is
not twisted.
●Shake the child restraint system left
and right, and forward and back- ward to ensure that it has been securely installed.
●After securing a child restraint sys-tem, never adjust the seat.
●When a junior seat is installed, always ensure that the shoulder
belt is positioned across the center of the child’s shoulder. The belt should be kept away from the
child’s neck, but not so that it could fall off the child’s shoulder.
●Follow all installation instructions provided by the child restraint sys-tem manufacturer.
Child restraint system fixed
with an ISOFIX lower
anchorage
Page 116 of 618

114
CV Owner's Manual_Europe_M52N20_en
3-1. Key information
3-1.Key info rmation
The following keys are provided
with the vehicle.
Vehicles without a smart entry &
start system (type A)
Key (with a wireless remote con-
trol function)
Operating the wireless remote control
function (→P.116)
Key (without a wireless remote
control function)
Key number plate
Vehicles without a smart entry &
start system (type B)
Key (with a wireless remote con-
trol function)
Operating the wireless remote control
function (→P.116)
Key number plate
Vehicles with a smart entry &
start system
Electronic keys
• Operating the smart entry & start sys-
tem ( P.136)
• Operating the wireless remote control
function ( P. 1 1 6 )
Mechanical keys
Key number plate
■When riding in an aircraft
When bringing a key with wireless remote control function onto an aircraft,
make sure you do not press any buttons on the key while inside the aircraft cabin. If you are carrying the key in your bag,
etc., ensure that the buttons are not likely to be pressed accidentally. Press-ing a button may cause the key to emit
radio waves that could interfere with the operation of the aircraft.
■Key battery depletion (vehicles without a smart entry & start sys-
tem)
●The standard battery life is 1 to 2
years.
●The battery will become depleted
even if the key is not used. The follow- ing symptoms indicate that the key
Keys
The keys
Page 169 of 618
167
4
CV Owner's Manual_Europe_M52N20_en
4-1. Before driving
Driving
Check the allowable towing capac-
ity, GVM (Gross Vehicle Mass),
MPAC (Maximum Permissible Axle
Capacity), and permissible draw-
bar load before towing. ( P. 4 4 8 )
Toyota recommends the use of the
Toyota hitch/bracket for your vehi-
cle. Other products of a suitable
nature and comparable quality may
also be used.
For vehicle where the towing
device blocks any of the lights or
license plate, the following shall be
observed:
Do not use towing devices that
cannot be easily removed or
repositioned.
Towing devices must be
removed or repositioned when
not in use.
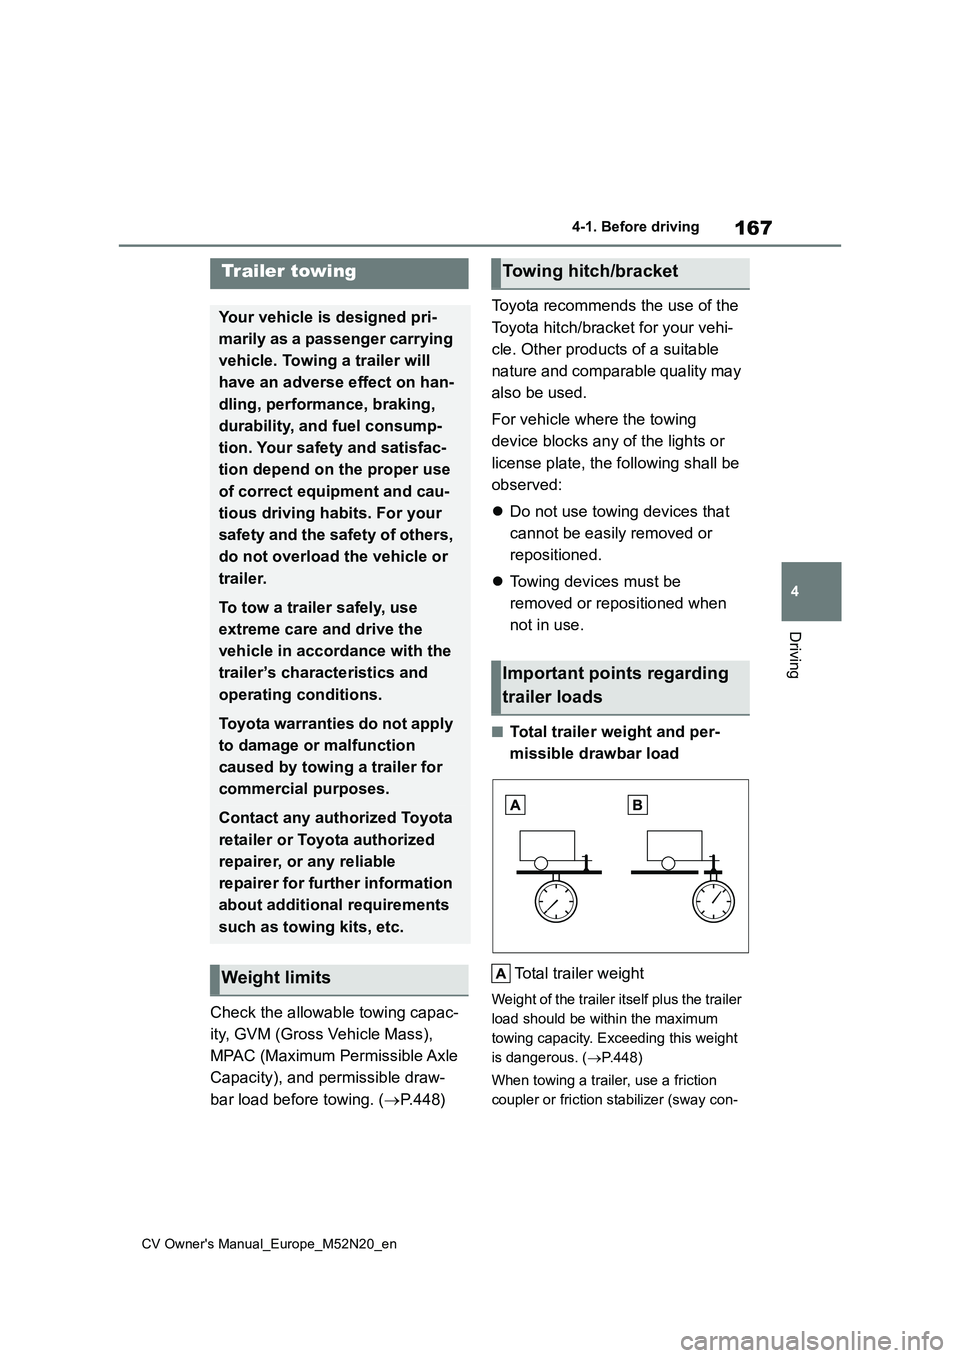
■Total trailer weight and per-
missible drawbar load
Total trailer weight
Weight of the trailer itself plus the trailer
load should be within the maximum
towing capacity. Exceeding this weight
is dangerous. ( P.448)
When towing a trailer, use a friction
coupler or friction stabilizer (sway con-
Trailer towing
Your vehicle is designed pri-
marily as a passenger carrying
vehicle. Towing a trailer will
have an adverse effect on han-
dling, performance, braking,
durability, and fuel consump-
tion. Your safety and satisfac-
tion depend on the proper use
of correct equipment and cau-
tious driving habits. For your
safety and the safety of others,
do not overload the vehicle or
trailer.
To tow a trailer safely, use
extreme care and drive the
vehicle in accordance with the
trailer’s characteristics and
operating conditions.
Toyota warranties do not apply
to damage or malfunction
caused by towing a trailer for
commercial purposes.
Contact any authorized Toyota
retailer or Toyota authorized
repairer, or any reliable
repairer for further information
about additional requirements
such as towing kits, etc.
Weight limits
Towing hitch/bracket
Important points regarding
trailer loads
Page 194 of 618
192
CV Owner's Manual_Europe_M52N20_en
4-3. Operating the lights and wipers
4-3.Operating the lights and wipers
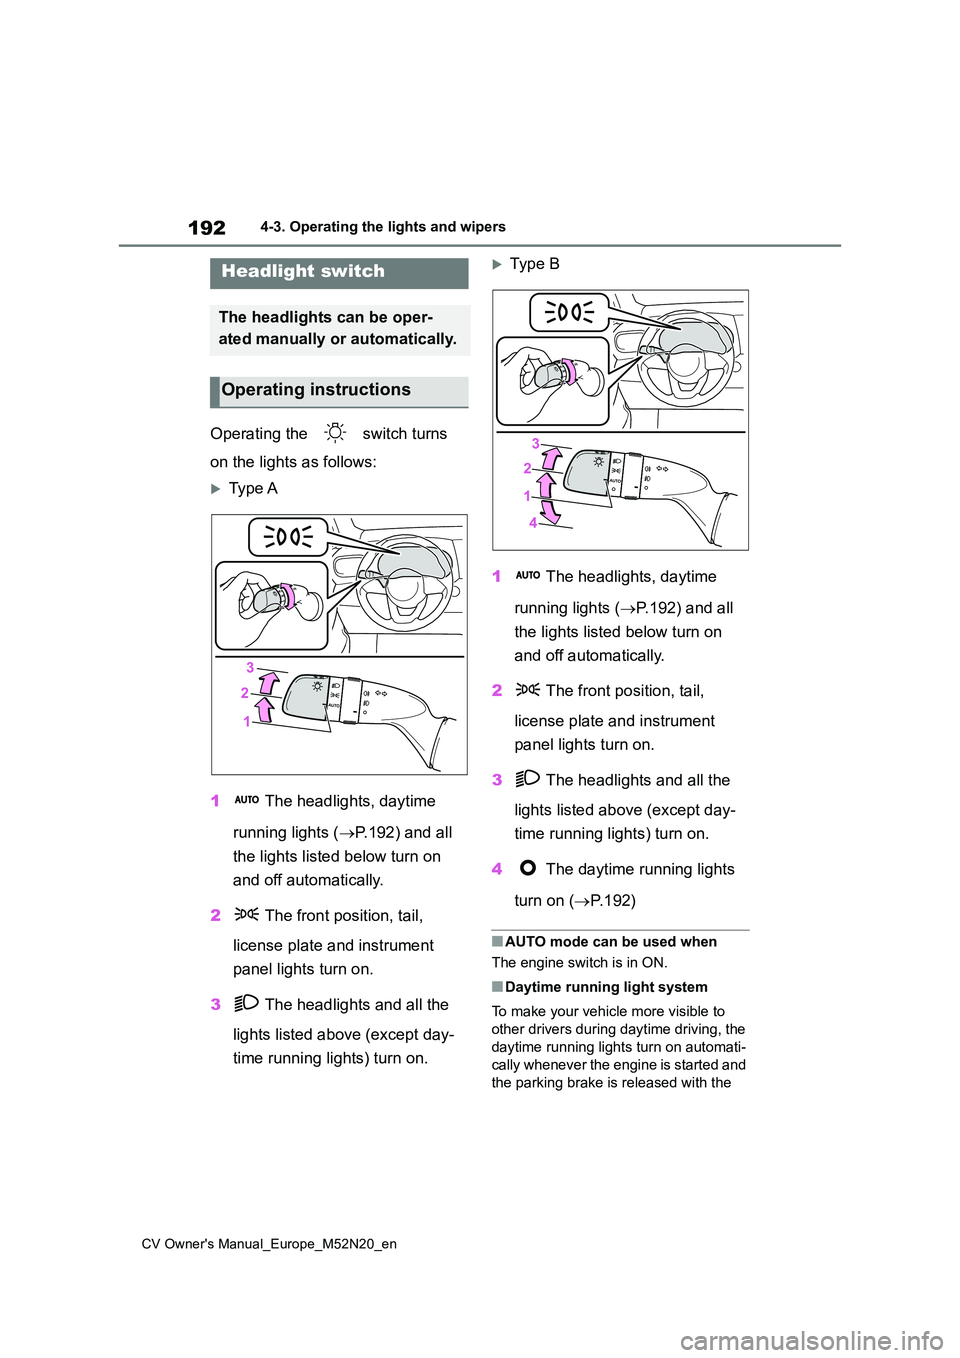
Operating the switch turns
on the lights as follows:
Type A
1 The headlights, daytime
running lights ( P.192) and all
the lights listed below turn on
and off automatically.
2 The front position, tail,
license plate and instrument
panel lights turn on.
3 The headlights and all the
lights listed above (except day-
time running lights) turn on.
Typ e B
1 The headlights, daytime
running lights ( P.192) and all
the lights listed below turn on
and off automatically.
2 The front position, tail,
license plate and instrument
panel lights turn on.
3 The headlights and all the
lights listed above (except day-
time running lights) turn on.
4 The daytime running lights
turn on ( P. 1 9 2 )
■AUTO mode can be used when
The engine switch is in ON.
■Daytime running light system
To make your vehicle more visible to
other drivers during daytime driving, the
daytime running lights turn on automati-
cally whenever the engine is started and
the parking brake is released with the
Headlight switch
The headlights can be oper-
ated manually or automatically.
Operating instructions