2022 TOYOTA YARIS CROSS auto hold
[x] Cancel search: auto holdPage 5 of 618

3
CV Owner's Manual_Europe_M52N20_en
TABLE OF CONTENTS
1
6
5
4
3
2
8
7
3-5. Opening and closing the win-
dows
Power windows ................... 153
4-1. Before driving
Driving the vehicle .............. 158
Cargo and luggage ............. 165
Trailer towing ...................... 167
4-2. Driving procedures
Engine (ignition) switch (vehicles
without a smart entry & start
system) ............................. 173
Engine (ignition) switch (vehicles
with a smart entry & start sys-
tem) .................................. 174
Multidrive ............................ 179
Manual transmission ........... 183
Turn signal lever ................. 186
Parking brake...................... 186
Brake Hold .......................... 190
4-3. Operating the lights and wip-
ers
Headlight switch.................. 192
AHS (Adaptive High-beam Sys-
tem) .................................. 197
AHB (Automatic High Beam)
.......................................... 201
Fog light switch ................... 204
Windshield wipers and washer
.......................................... 205
Rear window wiper and washer
.......................................... 208
4-4. Refueling
Opening the fuel tank cap ... 210
4-5. Using the driving support sys-
tems
Toyota Safety Sense ........... 212
PCS (Pre-Collision System) 217
LTA (Lane Tracing Assist) ... 228
Dynamic radar cruise control
with full-speed range ........ 238
Dynamic radar cruise control
.......................................... 250
Speed limiter ....................... 261
RSA (Road Sign Assist) ...... 263
Stop & Start system ............ 267
BSM (Blind Spot Monitor) ... 272
Toyota parking assist-sensor
.......................................... 277
RCTA (Rear Crossing Traffic
Alert) ................................. 284
PKSB (Parking Support Brake)
.......................................... 289
Parking Support Brake function
(static objects) .................. 294
Parking Support Brake function
(rear-crossing vehicles) .... 297
Driving mode select switch . 299
GPF (Gasoline Particulate Filter)
system .............................. 300
Driving assist systems ........ 301
4-6. Driving tips
Winter driving tips ............... 307
4Driving
Page 19 of 618

17
CV Owner's Manual_Europe_M52N20_en
Pictorial index
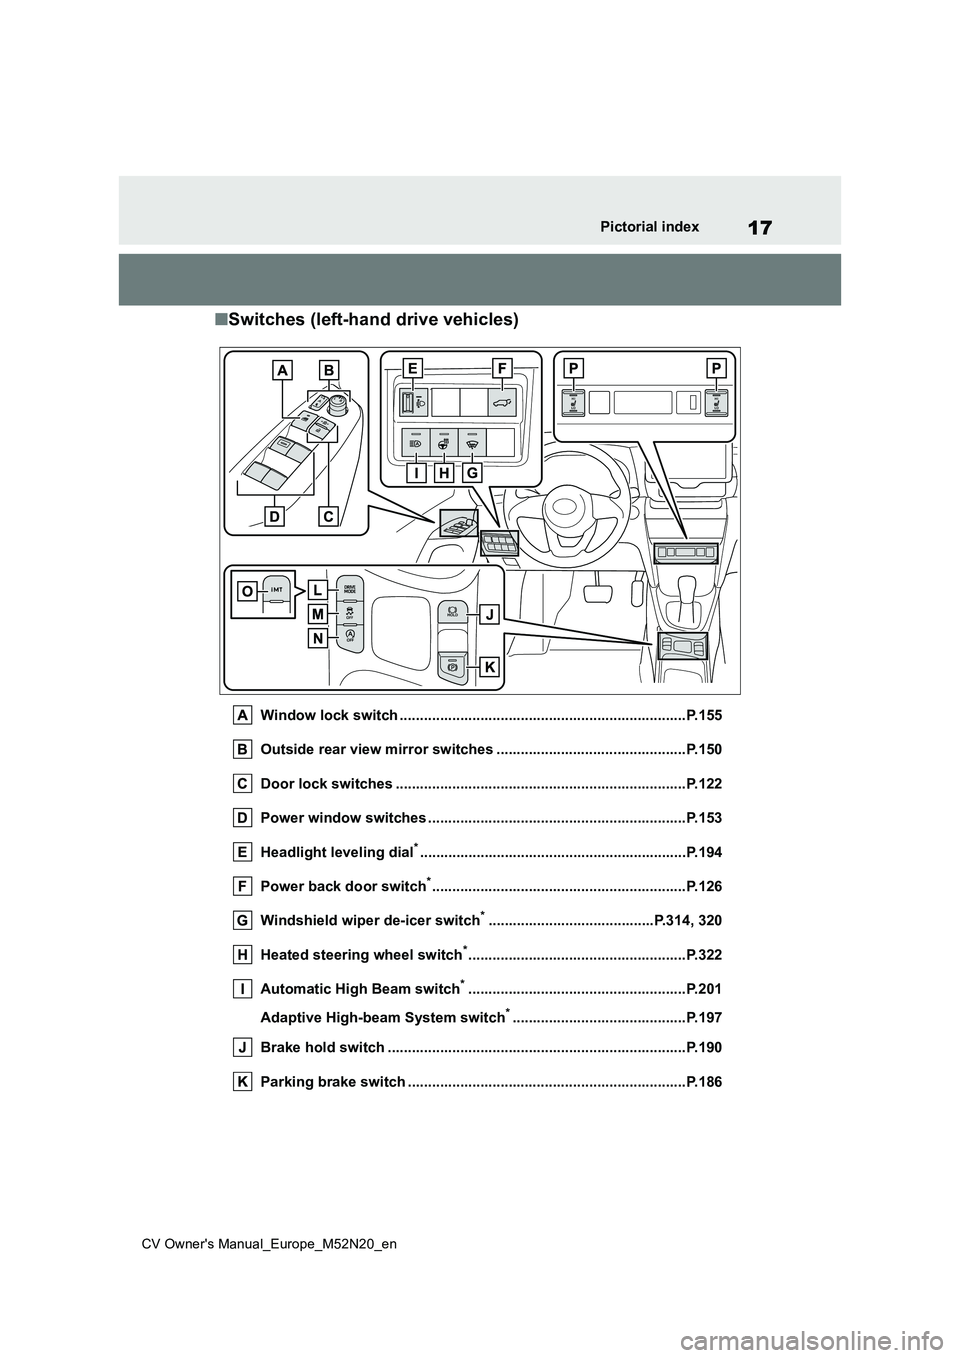
■Switches (left-hand drive vehicles)
Window lock switch .......................................................................P.155
Outside rear view mirror switches .............................. .................P.150
Door lock switches ............................................. ...........................P.122
Power window switches .......................................... ......................P.153
Headlight leveling dial*............................................................... ...P.194
Power back door switch*............................................................... P. 1 2 6
Windshield wiper de-icer switch*.........................................P.314, 320
Heated steering wheel switch*......................................................P.322
Automatic High Beam switch*......................................................P.201
Adaptive High-beam System switch*...........................................P.197
Brake hold switch .............................................. ............................P.190
Parking brake switch ........................................... ..........................P.186
Page 27 of 618

25
CV Owner's Manual_Europe_M52N20_en
Pictorial index
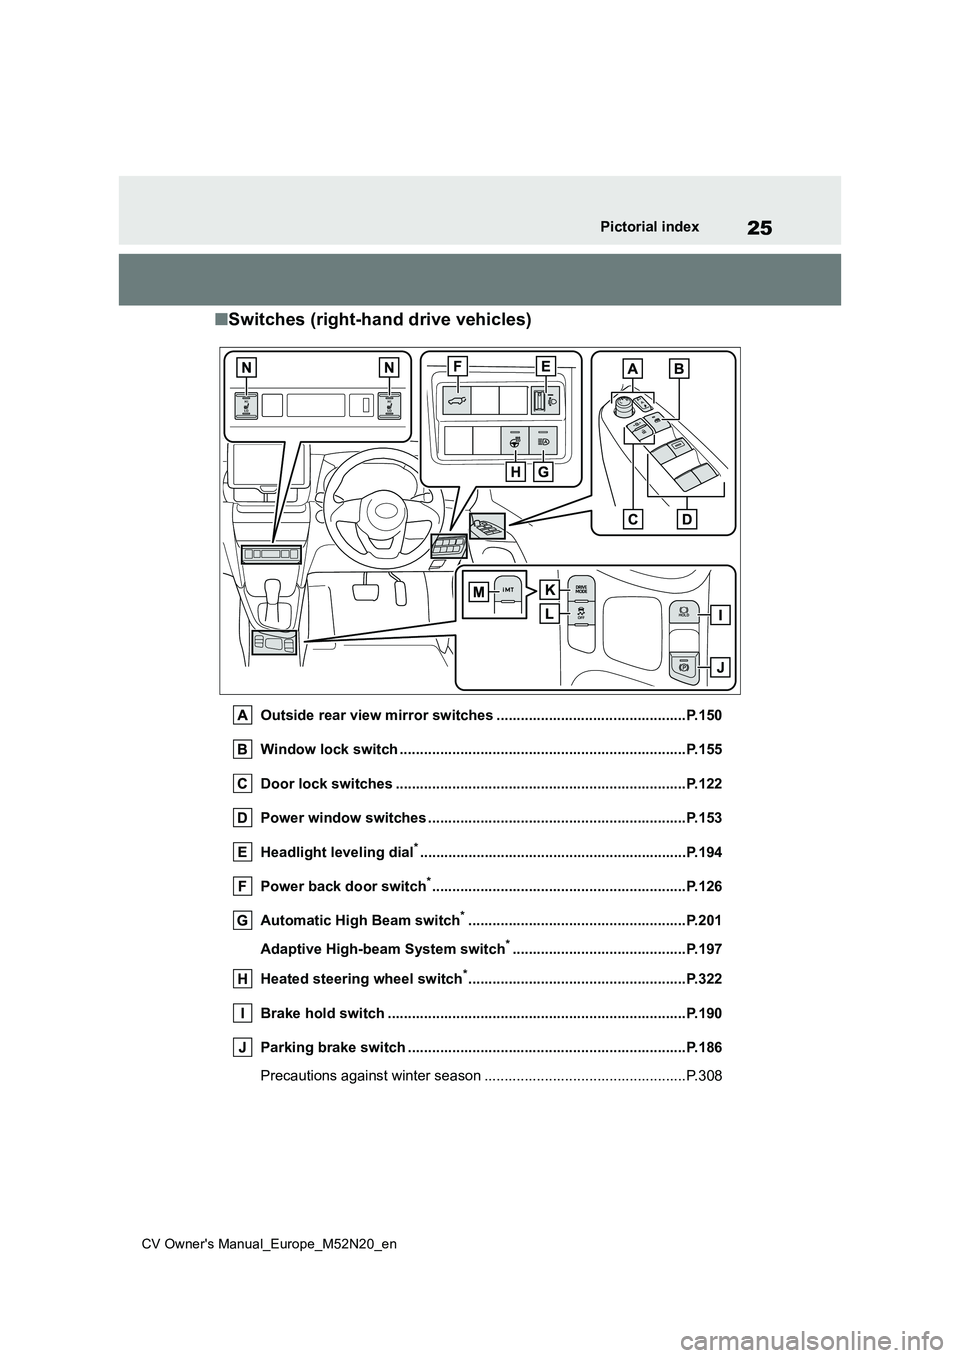
■Switches (right-hand drive vehicles)
Outside rear view mirror switches ...............................................P.150
Window lock switch ............................................. ..........................P.155
Door lock switches ............................................. ...........................P.122
Power window switches .......................................... ......................P.153
Headlight leveling dial*............................................................... ...P.194
Power back door switch*............................................................... P. 1 2 6
Automatic High Beam switch*......................................................P.201
Adaptive High-beam System switch*...........................................P.197
Heated steering wheel switch*......................................................P.322
Brake hold switch .............................................. ............................P.190
Parking brake switch ........................................... ..........................P.186
Precautions against winter season .............................. ....................P.308
Page 42 of 618

40
CV Owner's Manual_Europe_M52N20_en
1-1. For safe use
“PASSENGER AIR BAG” indicator
Airbag sensor assembly
The main SRS airbag system components are shown above. The SRS air-
bag system is controlled by the airbag sensor assembly. As the airbags
deploy, a chemical reaction in the inflators quickly fills the airbags with non-
toxic gas to help restrain the motion of the occupants.
■If the SRS airbags deploy (inflate)
●Slight abrasions, burns, bruising etc., may be sustained from SRS airbags,
due to the extremely high speed deployment (inflation) by hot gases.
●A loud noise and white powder will be emitted.
●Parts of the airbag module (steering wheel hub, airbag cover and inflator) as well as the front seats, parts of the
front and rear pillars, and roof side rails, may be hot for several minutes.
The airbag itself may also be hot.
●The windshield may crack.
●The brakes and stop lights will be con- trolled automatically. ( P.301)
●The interior lights will turn on automat- ically. ( P.325)
●The emergency flashers will turn on automatically. ( P.394)
●Fuel supply to the engine will be stopped. ( P.402)
●Vehicles with eCall: If any of the fol-
lowing situations occur, the system is
designed to send an emergency call* to the eCall control center, notifying them of the vehicle’s location (without
needing to push the “SOS” button) and an agent will attempt to speak with the occupants to ascertain the
level of emergency and assistance required. If the occupants are unable to communicate, the agent automati-
cally treats the call as an emergency and helps to dispatch the necessary emergency services. ( P.65)
• An SRS airbag is deployed. • A seat belt pretensioner is activated.
• The vehicle is involved in a severe rear-end collision.*: In some cases, the call cannot be
made. ( P. 6 6 )
■SRS airbag deployment conditions (SRS front airbags)
●The SRS front airbags will deploy in the event of an impact that exceeds
the set threshold level (the level of force corresponding to an approxi-mately 20 - 30 km/h [12 - 18 mph]
frontal collision with a fixed wall that does not move or deform).
However, this threshold velocity will be considerably higher in the following situ-ations:
• If the vehicle strikes an object, such as a parked vehicle or sign pole, which can move or deform on impact
• If the vehicle is involved in an under- ride collision, such as a collision in which the front of the vehicle “under-
rides”, or goes under, the bed of a truck
●Depending on the type of collision, it is possible that only the seat belt pretensioners will activate.
■SRS airbag deployment conditions
(SRS side and curtain shield air- bags and SRS front seat center air-bags)
●The SRS side and curtain shield air-bags and SRS front seat center air-
bags will deploy in the event of an impact that exceeds the set threshold level (the level of force corresponding
to the impact force produced by an approximately 1500 kg [3300 lb.] vehi-cle colliding with the vehicle cabin
Page 52 of 618

50
CV Owner's Manual_Europe_M52N20_en
1-2. Child safety
■When installing a child
restraint system to a front pas-
senger seat
For the safety of a child, install a
child restraint system to a rear seat.
When installing a child restraint
system to a front passenger seat is
unavoidable, adjust the seat as fol-
lows and install the child restraint
system:
Move the front seat fully rear-
ward.
Adjust the seat height to the
upper most position.
Adjust the seatback angle to the
most upright position.
When installing a forward-facing child
WARNING
●For effective protection in automo- bile accidents and sudden stops, a
child must be properly restrained, using a seat belt or child restraint system which is correctly installed.
For installation details, refer to the operation manual enclosed with the child restraint system. General
installation instruction is provided in this manual.
●Toyota strongly urges the use of a proper child restraint system that conforms to the weight and size of
the child, installed on the rear seat. According to accident statistics, the child is safer when properly
restrained in the rear seat than in the front seat.
●Holding a child in your or someone else’s arms is not a substitute for a child restraint system. In an acci-
dent, the child can be crushed against the windshield or between the holder and the interior of the
vehicle.
■Handling the child restraint sys-
tem
If the child restraint system is not properly fixed in place, the child or
other passengers may be seriously injured or even killed in the event of sudden braking, sudden swerving, or
an accident.
●If the vehicle were to receive a
strong impact from an accident, etc., it is possible that the child restraint system has damage that is
not readily visible. In such cases, do not reuse the restraint system.
●Depending on the child restraint system, installation may be difficult or impossible. In those cases,
check whether the child restraint system is suitable for installment in the vehicle. ( P.53) Be sure to
install and observe the usage rules after carefully reading the child restraint system fixing method in
this manual, as well as the opera- tion manual enclosed with the child restraint system.
●Keep the child restraint system properly secured on the seat even if
it is not in use. Do not store the child restraint system unsecured in the passenger compartment.
●If it is necessary to detach the child restraint system, remove it from the
vehicle or store it securely in the luggage compartment.
When using a child restraint
system
Page 63 of 618

61
1
CV Owner's Manual_Europe_M52N20_en
1-2. Child safety
For safety and security
is not in the table), refer to the
“Vehicle List” provided by the child
restraint system maker for various
possible installation positions, or
check the compatibility after asking
the retailer of the child seat.
( P.53, 54)
1 If installing the child restraint
system to the front passenger
seat is unavoidable, refer to
P.50 for the front passenger seat
adjustment.
2 If the head restraint interferes
with your child restraint system,
and the head restraint can be
removed, remove the head
restraint. Otherwise, put the
head restraint in the upper most
position. ( P.144)
3 Run the seat belt through the
child restraint system and insert
the plate into the buckle. Make
sure that the belt is not twisted.
Securely fix the seat belt to the
child restraint system in accor-
dance to the directions enclosed
with the child restraint system.
4 If your child restraint system is
not equipped with a lock-off (a
seat belt locking feature),
s e c u r e t h e c h i l d r e s t r a i n t s y s t e m
using a locking clip.
5 After installing the child restraint
system, rock it back and forth to
ensure that it is installed
securely. ( P. 6 2 )
■Removing a child restraint
system installed with a seat
belt
Press the buckle release button
and fully retract the seat belt.
When releasing the buckle, the child
restraint system may spring up due to
the rebound of the seat cushion.
Release the buckle while holding down
the child restraint system.
Since the seat belt automatically reels
itself, slowly return it to the stowing
position.
■When installing a child restraint system
You may need a locking clip to install the child restraint system. Follow the
instructions provided by the manufac- turer of the system. If your child restraint system does not provide a locking clip,
you can purchase the following item from any authorized Toyota retailer or Toyota authorized repairer, or any reli-
able repairer: Locking clip for child restraint system
Page 85 of 618

83
2
CV Owner's Manual_Europe_M52N20_en
2-1. Instrument cluster
Vehicle status information and indicators
*1: This light illuminates on the multi-
information display (with 7-inch dis-
play only).
*2: These lights come on when the
engine switch is turned to ON to indi-
cate that a system check is being
performed. They will turn off after the
engine is started, or after a few sec-
onds. There may be a malfunction in
a system if the lights do not come
on, or turn off. Have the vehicle
inspected by any authorized Toyota
retailer or Toyota authorized repairer,
or any reliable repairer.
*3: This light comes on when the system
is turned off.
*4: This light illuminates on the multi-
information display.
*5: Depending on the operating condi-
tion, the color and illuminating/flash-
ing state of the light change.
Cruise control “SET” indica-
tor*4 (if equipped) ( P.238,
250)
*5
LTA indicator*4 (if equipped)
( P.218, 234)
BSM outside rear view mirror
indicators*2, 6 (if equipped)
( P.273, 284)
BSM OFF indicator*1, 3 (if
equipped) ( P.273)
Toyota parking assist-sensor
OFF indicator*1, 2, 3 (if
equipped) ( P.278)
RCTA OFF indicator*1, 2, 3 (if
equipped) ( P.284)
PKSB OFF indicator*1, 2, 3 (if
equipped) ( P.291)
Stop & Start indicator*1, 2 (if
equipped) ( P.267)
Stop & Start cancel indica-
tor*1, 2, 3 (if equipped)
( P.268)
Speed limiter indicator (if
equipped) ( P.261)
(Flashes)
Slip indicator*2 (P.302)
VSC OFF indicator*2, 3
( P.302)
Smart entry & start system
indicator*4 (if equipped)
( P.174)
iMT indicator (if equipped)
( P.184)
Gear Shift Indicator (if
equipped) ( P.185)
Parking brake indicator
( P.186)
Auto EPB OFF indicator*1, 2,
3 (if equipped) ( P.186)
Brake hold standby indica-
tor*1, 2 ( P.190)
Brake hold operated indica-
tor*2 ( P.190)
Eco Driving Indicator Light*1,
2 (if equipped) ( P.96, 102)
Low outside temperature
indicator*4, 7 ( P.86, 91)
Security indicator ( P. 7 5 ,
77)
“PASSENGER AIR
BAG” indicator*2, 8
( P.47)
Eco drive mode indicator*4 ( i f
equipped) ( P.299)
Power mode indicator*4 (if
equipped) ( P.299)
Page 122 of 618

120
CV Owner's Manual_Europe_M52N20_en
3-2. Opening, closing and locking the doors
■Key
Turning the key operates the doors
as follows:
Vehicles without a smart entry &
start system
1 Locks all the doors
Turn and hold to close the windows.*
2Unlocks all the doors
Turn and hold to open the windows.*
*: This setting must be customized at
any authorized Toyota retailer or
Toyota authorized repairer, or any
reliable repairer.
Vehicles with a smart entry &
start system
The doors can also be locked and
unlocked with the mechanical key.
( P.437)
■Operation signals
Vehicles without a smart entry & start system
The emergency flashers flash to indicate
that the doors have been
locked/unlocked using the wireless
remote control. (Locked: Once;
Unlocked: Twice)
Vehicles with a smart entry & start system
The emergency flashers flash to indicate
that the doors have been
locked/unlocked using the entry function
or wireless remote control. (Locked:
Once; Unlocked: Twice)
A buzzer sounds to indicate that the win-
dows are operating.
■Security feature
Vehicles without a smart entry & start
system
If a door is not opened within approxi- mately 30 seconds after the vehicle is
unlocked using the wireless remote con- trol, the security feature automatically locks the vehicle again.
Vehicles with a smart entry & start system
If a door is not opened within approxi-
mately 30 seconds after the vehicle is unlocked using the entry function or wireless remote control, the security fea-
ture automatically locks the vehicle again. (However, depending on the loca-tion of the electronic key, the key may
be detected as being in the vehicle. In this case, vehicle may remain unlocked.)
■When the door cannot be locked by
the lock sensor on the surface of the front door handle (vehicles with a smart entry & start system)
If the doors cannot be locked by touch- ing the lock sensor with a finger, touch the lock sensor with the palm of your
hand.
If you are wearing gloves, remove them.
■Door lock buzzer (vehicles with a smart entry & start system)
If an attempt to lock the doors using the