2022 TOYOTA YARIS CROSS ECU
[x] Cancel search: ECUPage 219 of 618

217
4
CV Owner's Manual_Europe_M52N20_en
4-5. Using the driving support systems
Driving
*: If equipped
The system can detect the following (The detectable objects differs
depending on the function.):
The countries and areas for each region listed in the table are current as of
September 2021. However, depending on when the vehicle was sold , the
countries and areas of each region may be different. Contact an y autho-
rized Toyota retailer or Toyota authorized repairer, or any rel iable repairer
for details.
PCS (Pre-Collision System)*
The pre-collision system uses a rad ar sensor and front camera to
detect objects ( P.217) in front of the vehicle. When the system
determines that the possibility of a frontal collision with an object is
high, a warning operates to urge the driver to take evasive act ion
and the potential brake pressure is increased to help the drive r
avoid the collision. If the syste m determines that the possibility of a
frontal collision with an object is extremely high, the brakes are
automatically applied to help avoid the collision or help reduc e the
impact of the collision.
The pre-collision system can be disabled/enabled and the warnin g timing
can be changed. ( P.221)
Detectable objects and function availability
RegionsDetectable objectsFunction availabilityCountries/areas
AVehicles
Bicyclists
Pedestrians
The pre-collision warn-
ing, pre-collision brake
assist, pre-collision brak-
ing, emergency steering
assist and intersection
right/left turn assistance
are available
Except for Azerbai-
jan, Colombia, Ecua-
dor and Georgia
BThe pre-collision warn-
ing, pre-collision brake
assist and pre-collision
braking are available
Colombia and Ecua-
dor
CVehiclesAzerbaijan and Geor-
gia
Page 279 of 618

277
4
CV Owner's Manual_Europe_M52N20_en
4-5. Using the driving support systems
Driving
• When a vehicle enters a detection
area traveling at about the same speed as your vehicle• As your vehicle starts from a stop, a
vehicle remains in the detection area • When driving up and down consecu-tive steep inclines, such as hills, dips
in the road, etc. • When driving on roads with sharp bends, consecutive curves, or uneven
surfaces • When vehicle lanes are wide, or when driving on the edge of a lane, and the
vehicle in an adjacent lane is far away from your vehicle• When towing a trailer
• When an accessory (such as a bicycle carrier) is installed to the rear of the vehicle
• When there is a significant difference in height between your vehicle and the vehicle that enters the detection
area • Immediately after the Blind Spot Moni-tor is turned on
●Instances of the Blind Spot Monitor unnecessarily detecting a vehicle
and/or object may increase in the fol- lowing situations:• When the sensor is misaligned due to
a strong impact to the sensor or its surrounding area• When the distance between your vehi-
cle and a guardrail, wall, etc., that enters the detection area is short• When driving up and down consecu-
tive steep inclines, such as hills, dips in the road, etc.• When vehicle lanes are narrow, or
when driving on the edge of a lane, and a vehicle traveling in a lane other than the adjacent lanes enters the
detection area • When driving on roads with sharp bends, consecutive curves, or uneven
surfaces • When the tires are slipping or spinning• When the distance between your vehi-
cle and a following vehicle is short • When an accessory (such as a bicycle carrier) is installed to the rear of the
vehicle
*: If equipped
■Location and types of sensors
Front corner sensors
Front center sensors
Rear corner sensors
Rear center sensors
■Display
When the sensors detect an object,
such as a wall, a graphic is shown
on the multi-information display or
Toyota parking assist-
sensor*
The distance from your vehicle
to objects, such as a wall,
when parallel parking or
maneuvering into a garage is
measured by the sensors and
communicated via the multi-
information display or naviga-
tion/multimedia system dis-
play (if equipped) and a buzzer.
Always check the surrounding
area when using this system.
System components
Page 354 of 618

352
CV Owner's Manual_Europe_M52N20_en
6-3. Do-it-yourself maintenance
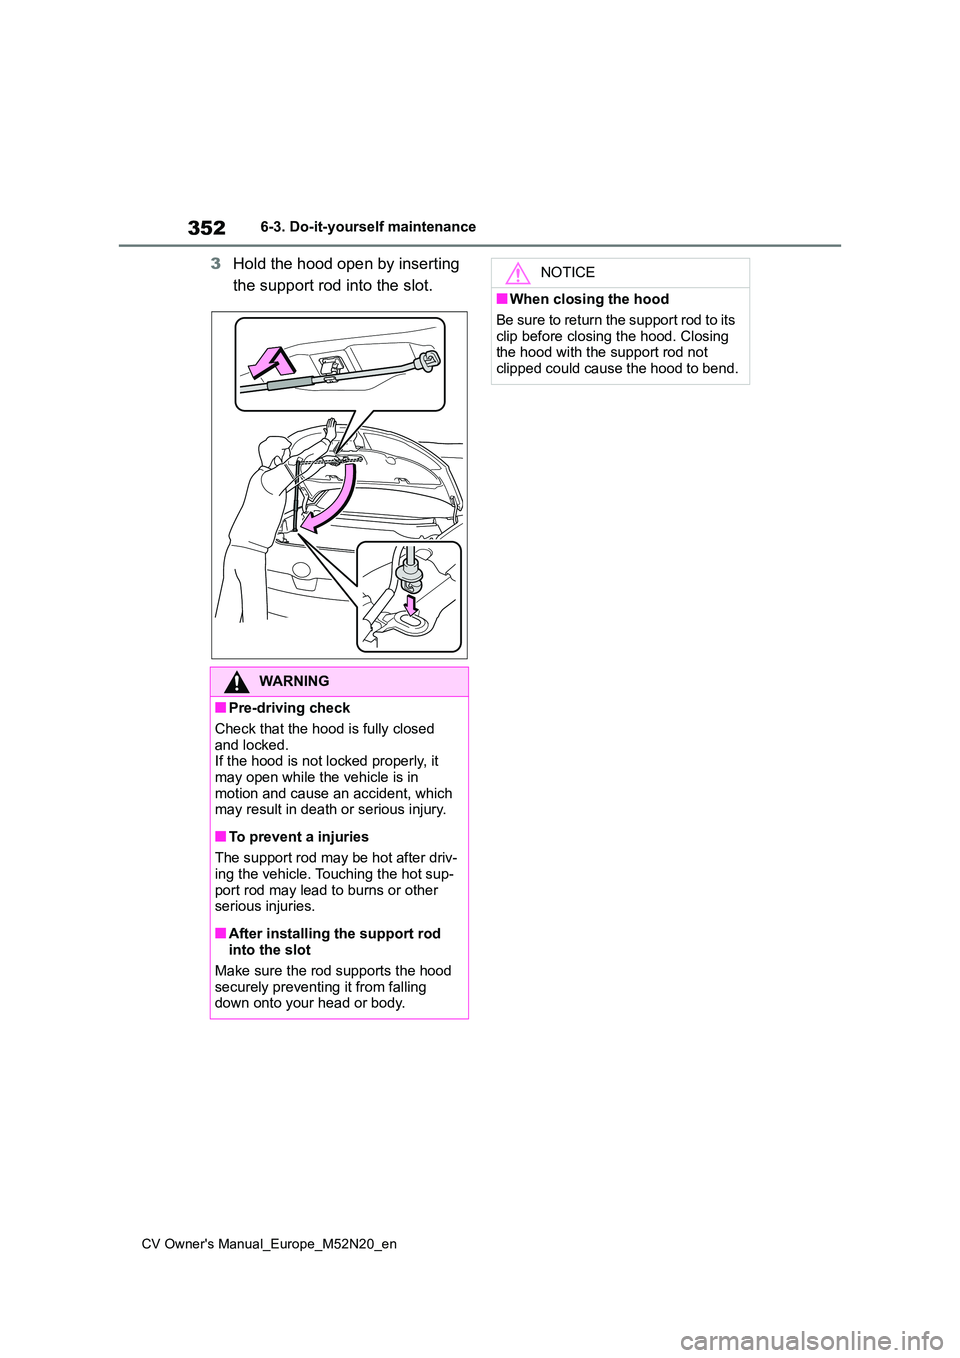
3Hold the hood open by inserting
the support rod into the slot.
WARNING
■Pre-driving check
Check that the hood is fully closed
and locked. If the hood is not locked properly, it may open while the vehicle is in
motion and cause an accident, which may result in death or serious injury.
■To prevent a injuries
The support rod may be hot after driv- ing the vehicle. Touching the hot sup-
port rod may lead to burns or other serious injuries.
■After installing the support rod into the slot
Make sure the rod supports the hood
securely preventing it from falling down onto your head or body.
NOTICE
■When closing the hood
Be sure to return the support rod to its
clip before closing the hood. Closing the hood with the support rod not clipped could cause the hood to bend.
Page 361 of 618

359
6
CV Owner's Manual_Europe_M52N20_en
6-3. Do-it-yourself maintenance
Maintenance and care
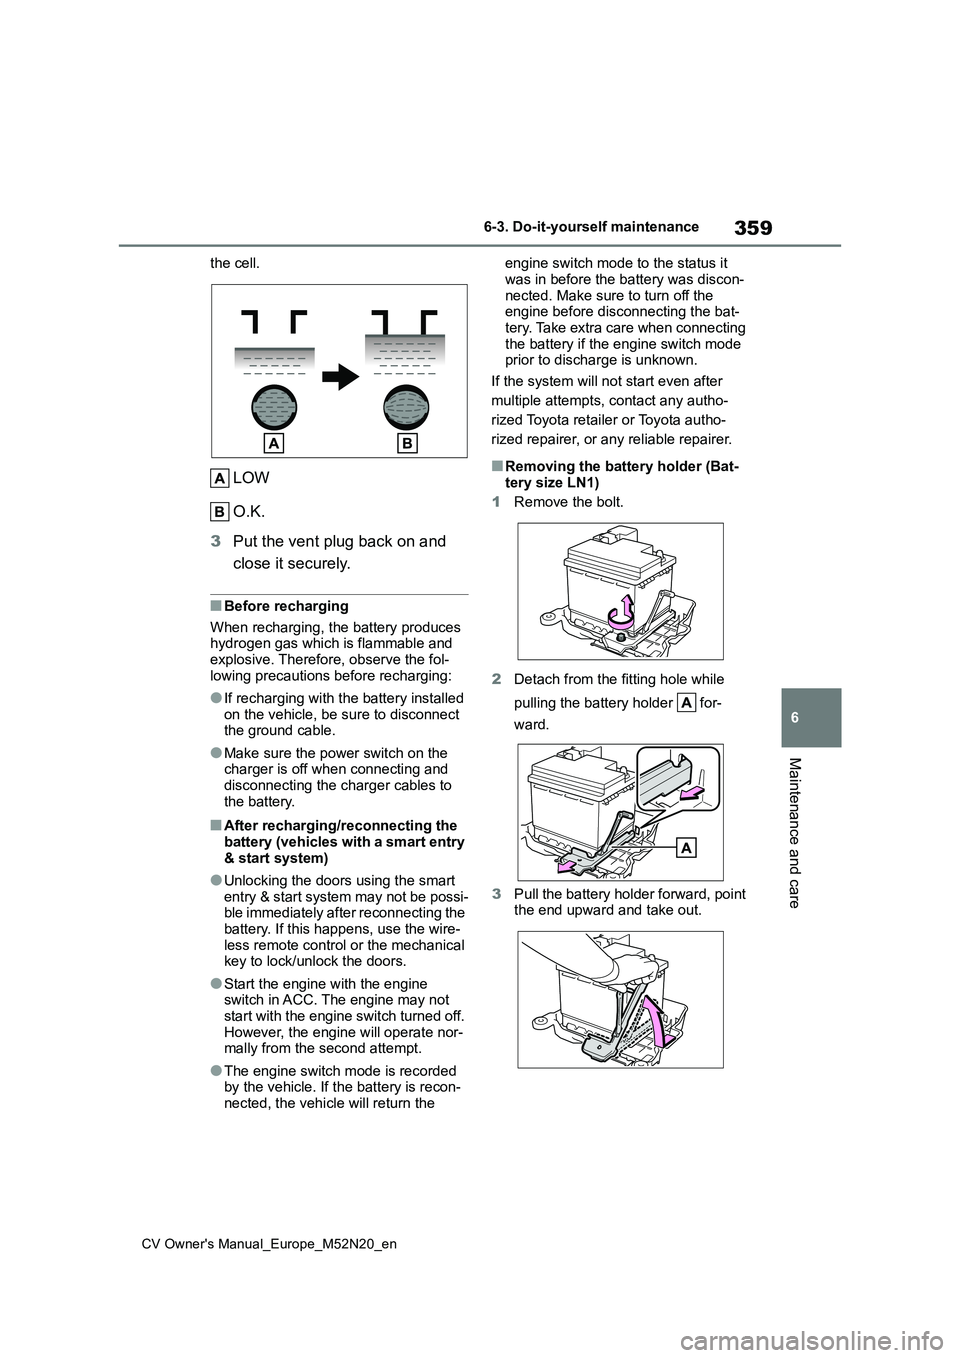
the cell.
LOW
O.K.
3 Put the vent plug back on and
close it securely.
■Before recharging
When recharging, the battery produces hydrogen gas which is flammable and explosive. Therefore, observe the fol-
lowing precautions before recharging:
●If recharging with the battery installed
on the vehicle, be sure to disconnect the ground cable.
●Make sure the power switch on the charger is off when connecting and
disconnecting the charger cables to the battery.
■After recharging/reconnecting the battery (vehicles with a smart entry
& start system)
●Unlocking the doors using the smart
entry & start system may not be possi- ble immediately after reconnecting the battery. If this happens, use the wire-
less remote control or the mechanical key to lock/unlock the doors.
●Start the engine with the engine switch in ACC. The engine may not start with the engine switch turned off.
However, the engine will operate nor- mally from the second attempt.
●The engine switch mode is recorded by the vehicle. If the battery is recon-nected, the vehicle will return the
engine switch mode to the status it
was in before the battery was discon- nected. Make sure to turn off the engine before disconnecting the bat-
tery. Take extra care when connecting the battery if the engine switch mode prior to discharge is unknown.
If the system will not start even after
multiple attempts, contact any autho-
rized Toyota retailer or Toyota autho-
rized repairer, or any reliable repairer.
■Removing the battery holder (Bat-
tery size LN1)
1 Remove the bolt.
2 Detach from the fitting hole while
pulling the battery holder for-
ward.
3 Pull the battery holder forward, point the end upward and take out.
Page 381 of 618

379
6
CV Owner's Manual_Europe_M52N20_en
6-3. Do-it-yourself maintenance
Maintenance and care
shops or camera stores.
●Replace only with the same or equiva- lent type recommended by the manu-
facturer.
●Dispose of used batteries according to
local laws.
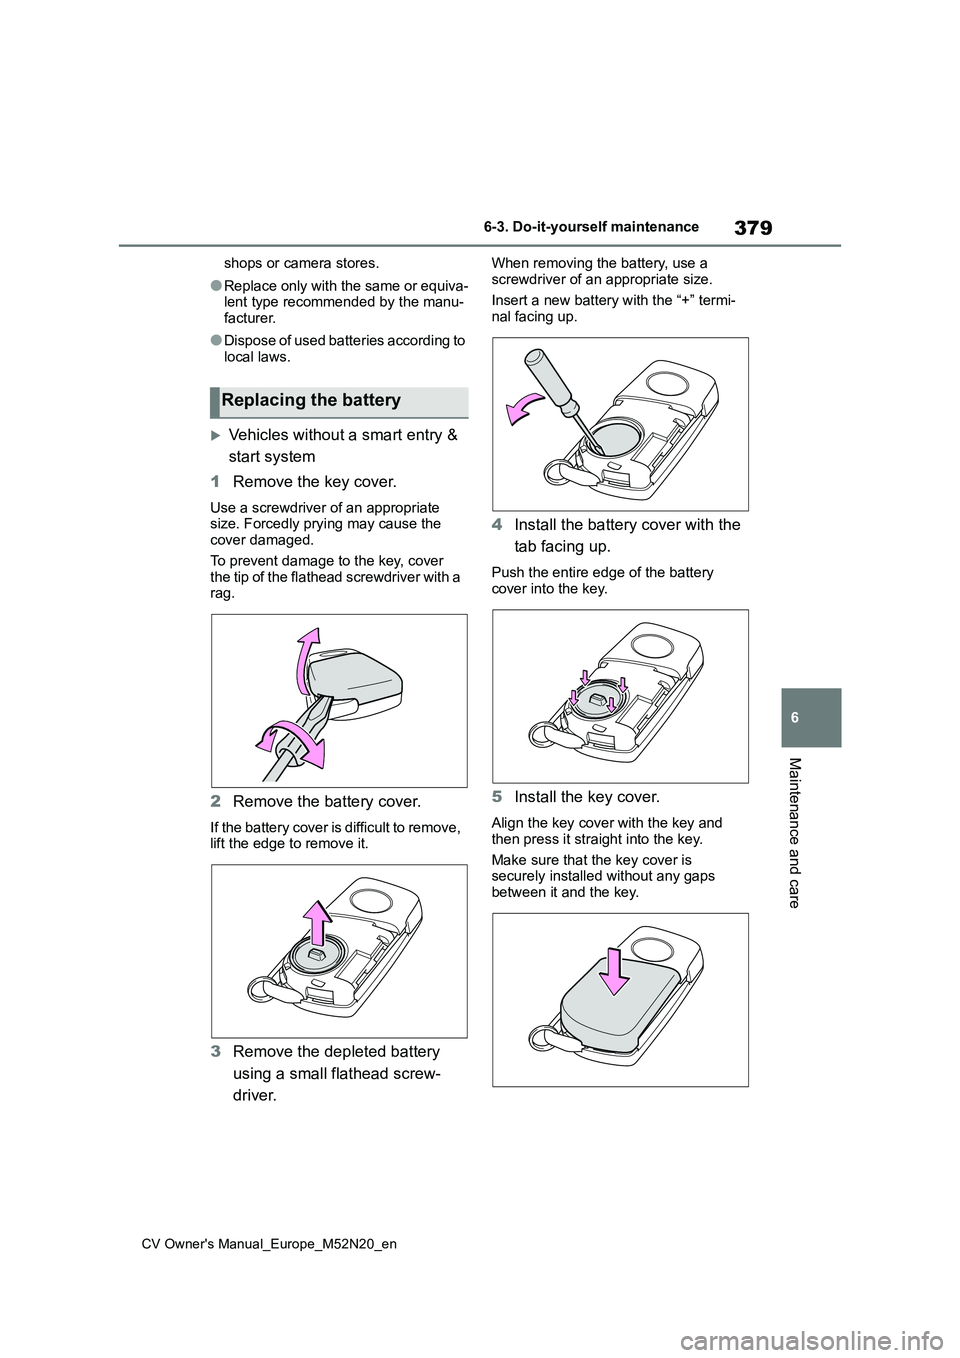
Vehicles without a smart entry &
start system
1 Remove the key cover.
Use a screwdriver of an appropriate size. Forcedly prying may cause the cover damaged.
To prevent damage to the key, cover the tip of the flathead screwdriver with a rag.
2 Remove the battery cover.
If the battery cover is difficult to remove, lift the edge to remove it.
3 Remove the depleted battery
using a small flathead screw-
driver.
When removing the battery, use a
screwdriver of an appropriate size.
Insert a new battery with the “+” termi- nal facing up.
4 Install the battery cover with the
tab facing up.
Push the entire edge of the battery cover into the key.
5 Install the key cover.
Align the key cover with the key and
then press it straight into the key.
Make sure that the key cover is securely installed without any gaps
between it and the key.
Replacing the battery
Page 386 of 618

384
CV Owner's Manual_Europe_M52N20_en
6-3. Do-it-yourself maintenance
Normal fuse
Blown fuse
Type B
Normal fuse
Blown fuse
Type C
Normal fuse
Blown fuse
Type D
Normal fuse
Blown fuse
Typ e E
Normal fuse
Blown fuse
■After a fuse is replaced
●When installing the lid, make sure that the tab is installed securely.
●If the lights do not turn on even after the fuse has been replaced, a bulb may need replacement. ( P.386)
●If the replaced fuse blows again, have the vehicle inspected by any autho-
rized Toyota retailer or Toyota autho- rized repairer, or any reliable repairer.
■If there is an overload in a circuit
The fuses are designed to blow, protect-
ing the wiring harness from damage.
■When replacing light bulbs
Toyota recommends that you use genu- ine Toyota products designed for this
vehicle. Because certain bulbs are connected to circuits designed to prevent overload,
non-genuine parts of parts not designed for this vehicle may be unusable.
Page 393 of 618

391
6
CV Owner's Manual_Europe_M52N20_en
6-3. Do-it-yourself maintenance
Maintenance and care
3Remove the light bulb.
4 Install a new light bulb.
5 Install the bulb base.
6 Install the back door cover.
WARNING
■Replacing light bulbs
●Turn off the lights. Do not attempt to
replace the bulb immediately after turning off the lights. The bulbs become very hot and may cause
burns.
●Do not touch the glass portion of
the light bulb with bare hands. When it is unavoidable to hold the glass portion, use and hold with a
clean dry cloth to avoid getting moisture and oils on the bulb. Also, if the bulb is scratched or dropped,
it may blow out or crack.
●Fully install light bulbs and any
parts used to secure them. Failure to do so may result in heat damage, fire, or water entering the light unit.
This may damage the lights or cause condensation to build up on the lens.
■To prevent damage or fire
Make sure bulbs are fully seated and
locked.
Page 397 of 618

395
7
CV Owner's Manual_Europe_M52N20_en
7-1. Essential information
When trouble arises
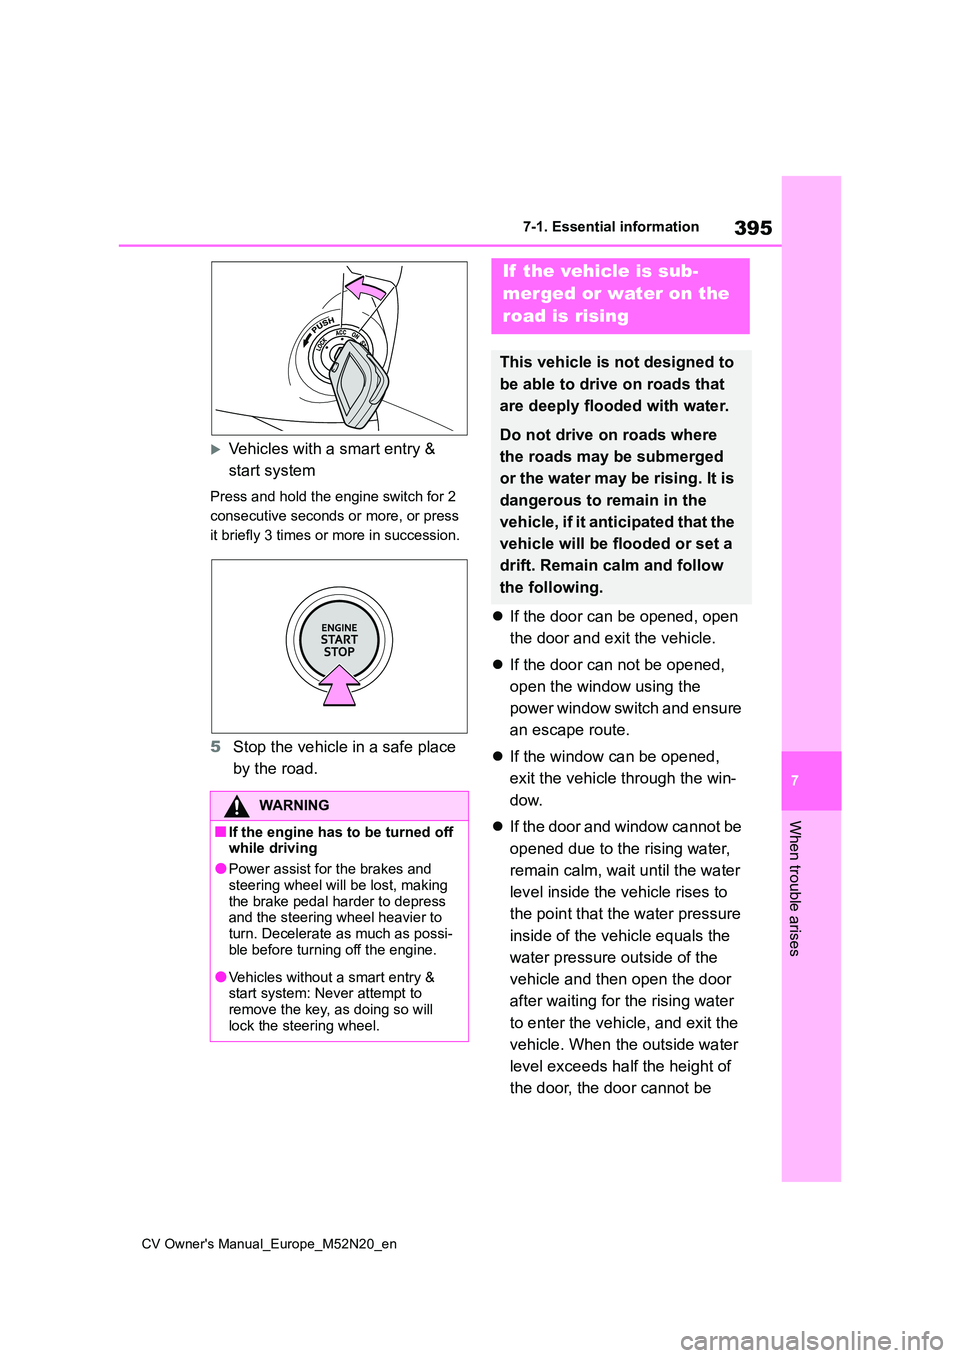
Vehicles with a smart entry &
start system
Press and hold the engine switch for 2
consecutive seconds or more, or press
it briefly 3 times or more in succession.
5 Stop the vehicle in a safe place
by the road.
If the door can be opened, open
the door and exit the vehicle.
If the door can not be opened,
open the window using the
power window switch and ensure
an escape route.
If the window can be opened,
exit the vehicle through the win-
dow.
If the door and window cannot be
opened due to the rising water,
remain calm, wait until the water
level inside the vehicle rises to
the point that the water pressure
inside of the vehicle equals the
water pressure outside of the
vehicle and then open the door
after waiting for the rising water
to enter the vehicle, and exit the
vehicle. When the outside water
level exceeds half the height of
the door, the door cannot be
WARNING
■If the engine has to be turned off while driving
●Power assist for the brakes and
steering wheel will be lost, making the brake pedal harder to depress and the steering wheel heavier to
turn. Decelerate as much as possi- ble before turning off the engine.
●Vehicles without a smart entry & start system: Never attempt to remove the key, as doing so will
lock the steering wheel.
If the vehicle is sub-
merged or water on the
road is rising
This vehicle is not designed to
be able to drive on roads that
are deeply flooded with water.
Do not drive on roads where
the roads may be submerged
or the water may be rising. It is
dangerous to remain in the
vehicle, if it anticipated that the
vehicle will be flooded or set a
drift. Remain calm and follow
the following.