2022 TOYOTA YARIS CROSS ECU
[x] Cancel search: ECUPage 57 of 618
55
1
CV Owner's Manual_Europe_M52N20_en
1-2. Child safety
For safety and security
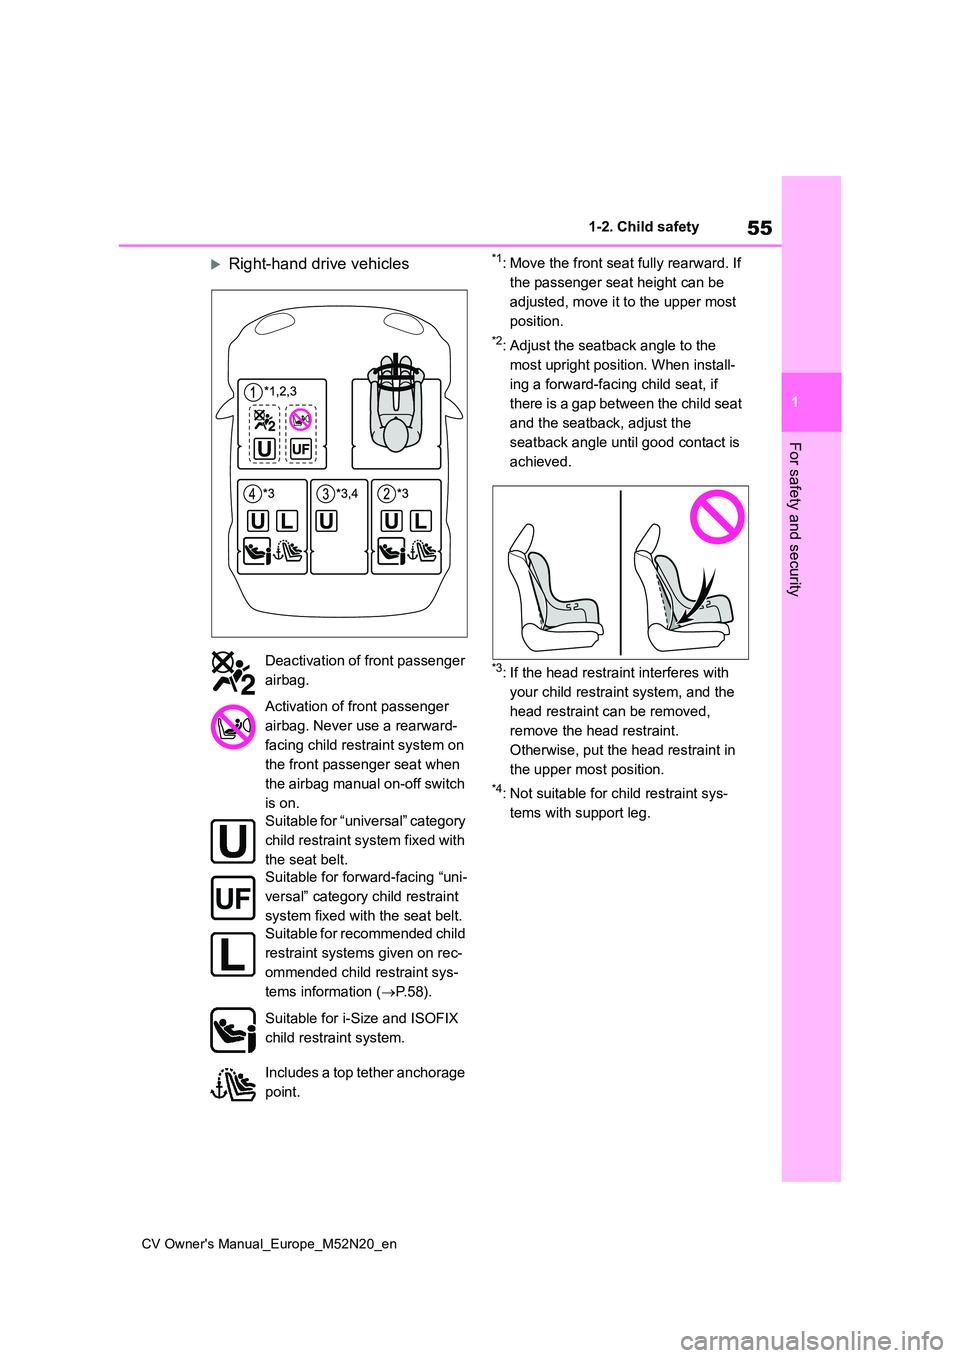
Right-hand drive vehicles*1: Move the front seat fully rearward. If
the passenger seat height can be
adjusted, move it to the upper most
position.
*2: Adjust the seatback angle to the
most upright position. When install-
ing a forward-facing child seat, if
there is a gap between the child seat
and the seatback, adjust the
seatback angle until good contact is
achieved.
*3: If the head restraint interferes with
your child restraint system, and the
head restraint can be removed,
remove the head restraint.
Otherwise, put the head restraint in
the upper most position.
*4: Not suitable for child restraint sys-
tems with support leg.
Deactivation of front passenger
airbag.
Activation of front passenger
airbag. Never use a rearward-
facing child restraint system on
the front passenger seat when
the airbag manual on-off switch
is on.
Suitable for “universal” category
child restraint system fixed with
the seat belt.
Suitable for forward-facing “uni-
versal” category child restraint
system fixed with the seat belt.
Suitable for recommended child
restraint systems given on rec-
ommended child restraint sys-
tems information ( P. 5 8 ) .
Suitable for i-Size and ISOFIX
child restraint system.
Includes a top tether anchorage
point.
Page 59 of 618
57
1
CV Owner's Manual_Europe_M52N20_en
1-2. Child safety
For safety and security
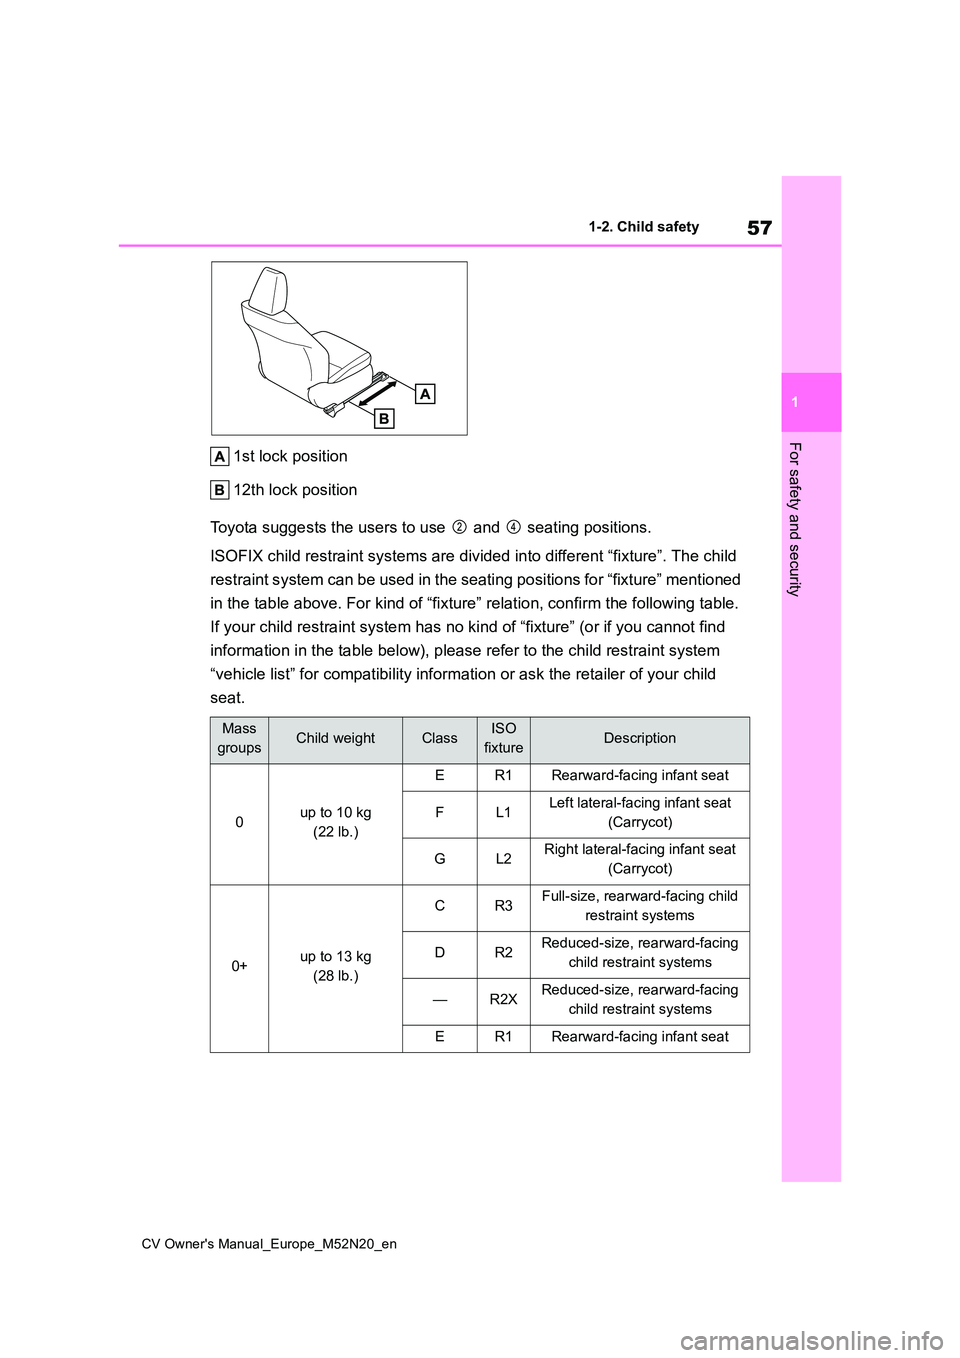
1st lock position
12th lock position
Toyota suggests the users to use and seating positions.
ISOFIX child restraint systems are divided into different “fixt ure”. The child
restraint system can be used in the seating positions for “fixt ure” mentioned
in the table above. For kind of “ fixture” relation, confirm the following table.
If your child restraint system ha s no kind of “fixture” (or if you cannot find
information in the table below), please refer to the child rest raint system
“vehicle list” for compatibility information or ask the retaile r of your child
seat.
Mass
groupsChild weightClassISO
fixtureDescription
0up to 10 kg
(22 lb.)
ER1Rearward-facing infant seat
FL1Left lateral-facing infant seat
(Carrycot)
GL2Right lateral-facing infant seat
(Carrycot)
0+up to 13 kg
(28 lb.)
CR3Full-size, rearward-facing child
restraint systems
DR2Reduced-size, rearward-facing
child restraint systems
—R2XReduced-size, rearward-facing
child restraint systems
ER1Rearward-facing infant seat
Page 60 of 618

58
CV Owner's Manual_Europe_M52N20_en
1-2. Child safety
■Recommended child restraint systems information
*1: Adjust the restraint system headrest, so that it does not interfere with the vehicle
interior.
*2: Be sure to attach the seat belt through the SecureGuard.
I9 to 18 kg
(20 to 39 lb.)
AF3Full-height, forward-facing child
restraint systems
BF2Reduced-height, forward-facing
child restraint systems
B1F2XReduced-height, forward-facing
child restraint systems
CR3Full-size, rearward-facing child
restraint systems
DR2Reduced-size, rearward-facing
child restraint systems
II15 to 25 kg
(34 to 55 lb.)—B2, B3Junior seat
III22 to 36 kg
(49 to 79 lb.)
Mass groupsRecommended child
restraint system
Fixation
fixed with a
seat belt
fixed with
lower
anchorages
Rearward-facing seat
Group 0 or 0+
Up to 10 kg or 13 kg
(Up to 22 lb. or 28 lb.)
TOYOTA
G0+, BABY SAFE
PLUS
Ye sNot Applica-
ble
Forward-facing seat
Group I
9 to 18 kg
(20 to 39 lb.)
TOYOTA
DUO PLUSYe sYe s
Booster seat
Group II and III
15 to 25 kg and 22 to 36 kg
(34 to 55 lb. and 49 to 79 lb.)
TOYOTA
KIDFIX 2S*1, 2Ye sYe s
TOYOTA
MAXI PLUSYe sYe s
Mass
groupsChild weightClassISO
fixtureDescription
Page 61 of 618
59
1
CV Owner's Manual_Europe_M52N20_en
1-2. Child safety
For safety and security
The child restraint systems mentioned in the table may not be available out-
side the EU countries and United Kingdom.
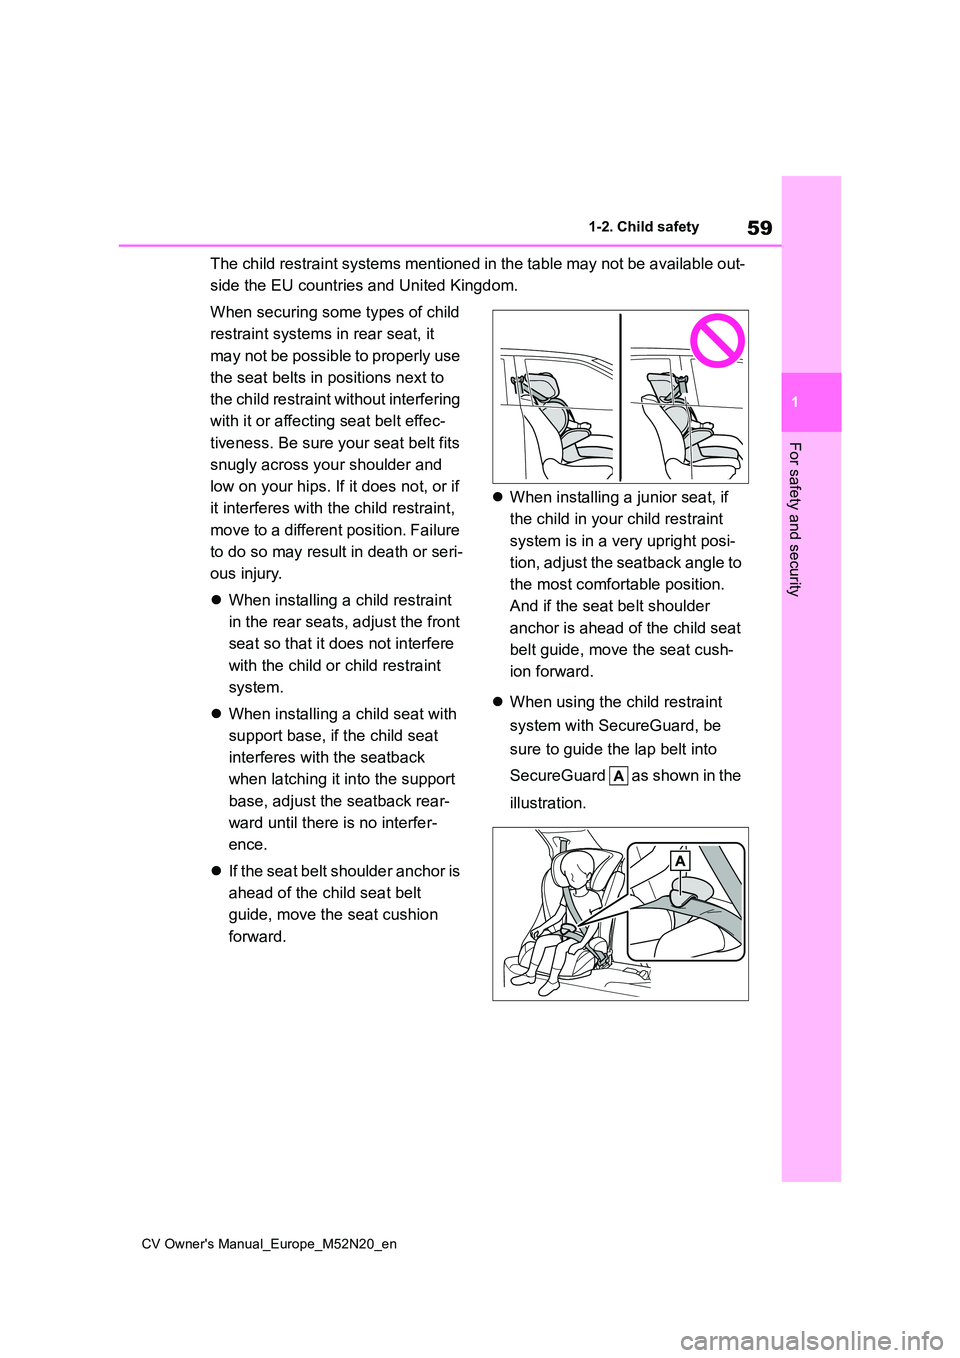
When securing some types of child
restraint systems in rear seat, it
may not be possible to properly use
the seat belts in positions next to
the child restraint without interfering
with it or affecting seat belt effec-
tiveness. Be sure your seat belt fits
snugly across your shoulder and
low on your hips. If it does not, or if
it interferes with the child restraint,
move to a different position. Failure
to do so may result in death or seri-
ous injury.
When installing a child restraint
in the rear seats, adjust the front
seat so that it does not interfere
with the child or child restraint
system.
When installing a child seat with
support base, if the child seat
interferes with the seatback
when latching it into the support
base, adjust the seatback rear-
ward until there is no interfer-
ence.
If the seat belt shoulder anchor is
ahead of the child seat belt
guide, move the seat cushion
forward.
When installing a junior seat, if
the child in your child restraint
system is in a very upright posi-
tion, adjust the seatback angle to
the most comfortable position.
And if the seat belt shoulder
anchor is ahead of the child seat
belt guide, move the seat cush-
ion forward.
When using the child restraint
system with SecureGuard, be
sure to guide the lap belt into
SecureGuard as shown in the
illustration.
Page 63 of 618

61
1
CV Owner's Manual_Europe_M52N20_en
1-2. Child safety
For safety and security
is not in the table), refer to the
“Vehicle List” provided by the child
restraint system maker for various
possible installation positions, or
check the compatibility after asking
the retailer of the child seat.
( P.53, 54)
1 If installing the child restraint
system to the front passenger
seat is unavoidable, refer to
P.50 for the front passenger seat
adjustment.
2 If the head restraint interferes
with your child restraint system,
and the head restraint can be
removed, remove the head
restraint. Otherwise, put the
head restraint in the upper most
position. ( P.144)
3 Run the seat belt through the
child restraint system and insert
the plate into the buckle. Make
sure that the belt is not twisted.
Securely fix the seat belt to the
child restraint system in accor-
dance to the directions enclosed
with the child restraint system.
4 If your child restraint system is
not equipped with a lock-off (a
seat belt locking feature),
s e c u r e t h e c h i l d r e s t r a i n t s y s t e m
using a locking clip.
5 After installing the child restraint
system, rock it back and forth to
ensure that it is installed
securely. ( P. 6 2 )
■Removing a child restraint
system installed with a seat
belt
Press the buckle release button
and fully retract the seat belt.
When releasing the buckle, the child
restraint system may spring up due to
the rebound of the seat cushion.
Release the buckle while holding down
the child restraint system.
Since the seat belt automatically reels
itself, slowly return it to the stowing
position.
■When installing a child restraint system
You may need a locking clip to install the child restraint system. Follow the
instructions provided by the manufac- turer of the system. If your child restraint system does not provide a locking clip,
you can purchase the following item from any authorized Toyota retailer or Toyota authorized repairer, or any reli-
able repairer: Locking clip for child restraint system
Page 64 of 618
62
CV Owner's Manual_Europe_M52N20_en
1-2. Child safety
(Part No. 73119-22010)
■ISOFIX lower anchorages
(ISOFIX child restraint system)
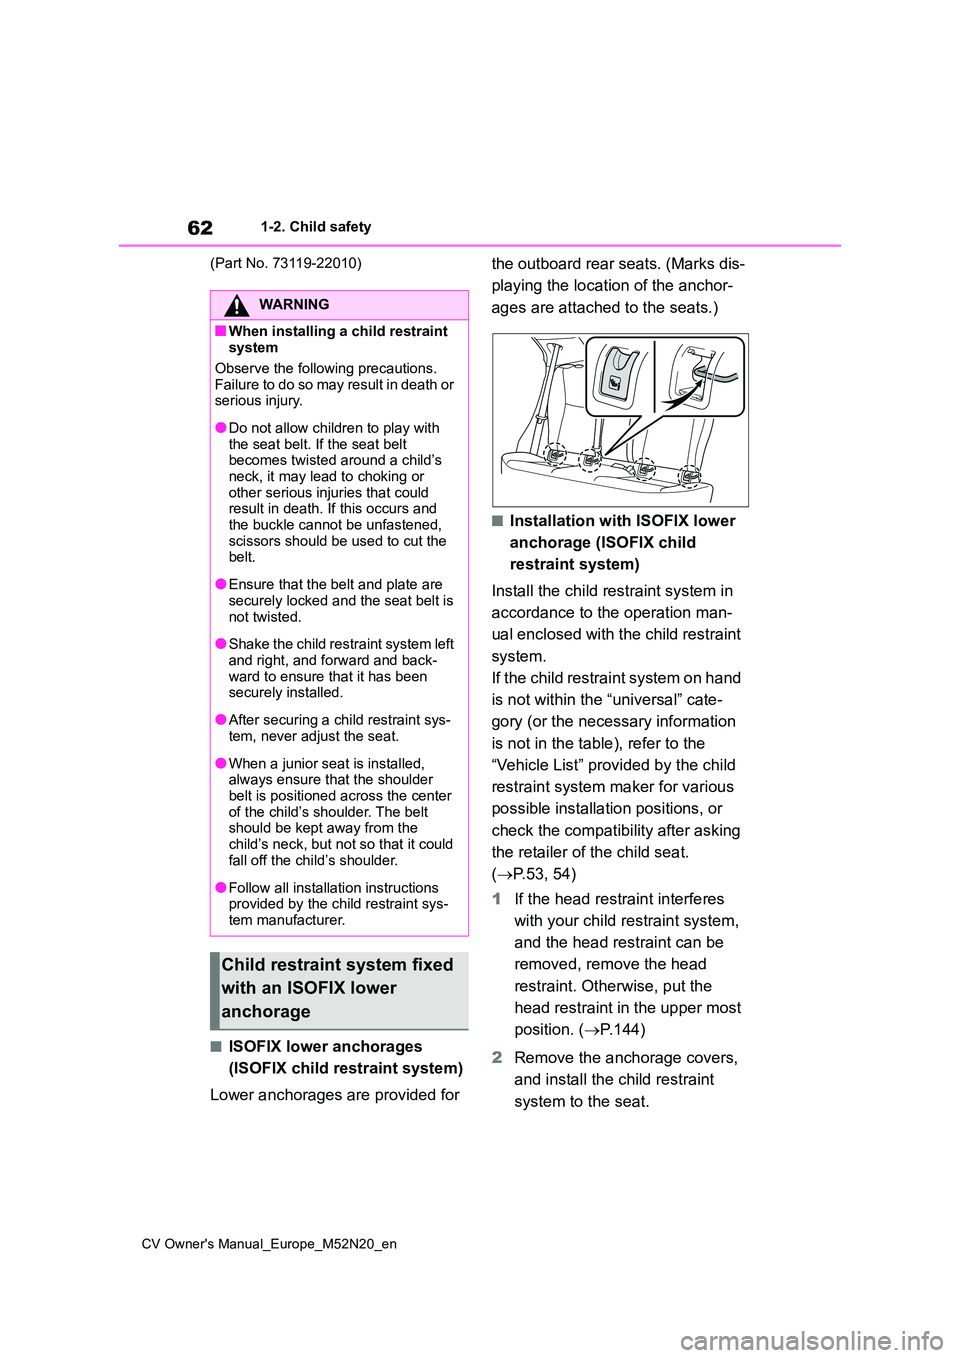
Lower anchorages are provided for
the outboard rear seats. (Marks dis-
playing the location of the anchor-
ages are attached to the seats.)
■Installation with ISOFIX lower
anchorage (ISOFIX child
restraint system)
Install the child restraint system in
accordance to the operation man-
ual enclosed with the child restraint
system.
If the child restraint system on hand
is not within the “universal” cate-
gory (or the necessary information
is not in the table), refer to the
“Vehicle List” provided by the child
restraint system maker for various
possible installation positions, or
check the compatibility after asking
the retailer of the child seat.
( P.53, 54)
1 If the head restraint interferes
with your child restraint system,
and the head restraint can be
removed, remove the head
restraint. Otherwise, put the
head restraint in the upper most
position. ( P.144)
2 Remove the anchorage covers,
and install the child restraint
system to the seat.
WARNING
■When installing a child restraint system
Observe the following precautions.
Failure to do so may result in death or serious injury.
●Do not allow children to play with the seat belt. If the seat belt becomes twisted around a child’s
neck, it may lead to choking or other serious injuries that could result in death. If this occurs and
the buckle cannot be unfastened, scissors should be used to cut the belt.
●Ensure that the belt and plate are securely locked and the seat belt is
not twisted.
●Shake the child restraint system left
and right, and forward and back- ward to ensure that it has been securely installed.
●After securing a child restraint sys-tem, never adjust the seat.
●When a junior seat is installed, always ensure that the shoulder
belt is positioned across the center of the child’s shoulder. The belt should be kept away from the
child’s neck, but not so that it could fall off the child’s shoulder.
●Follow all installation instructions provided by the child restraint sys-tem manufacturer.
Child restraint system fixed
with an ISOFIX lower
anchorage
Page 65 of 618
63
1
CV Owner's Manual_Europe_M52N20_en
1-2. Child safety
For safety and security
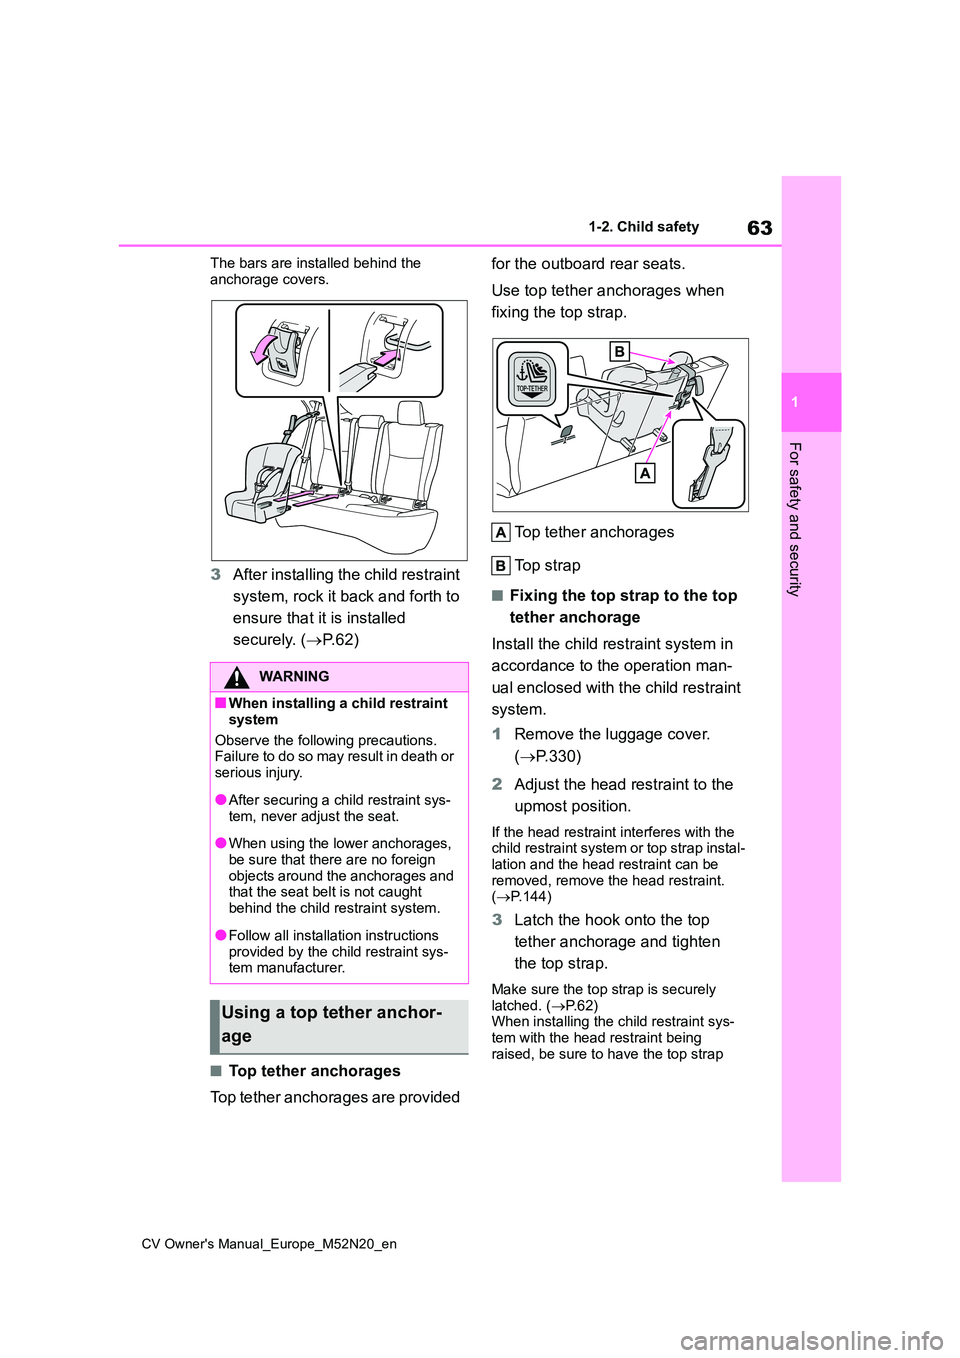
The bars are installed behind the
anchorage covers.
3 After installing the child restraint
system, rock it back and forth to
ensure that it is installed
securely. ( P. 6 2 )
■Top tether anchorages
Top tether anchorages are provided
for the outboard rear seats.
Use top tether anchorages when
fixing the top strap.
Top tether anchorages
Top strap
■Fixing the top strap to the top
tether anchorage
Install the child restraint system in
accordance to the operation man-
ual enclosed with the child restraint
system.
1 Remove the luggage cover.
( P.330)
2 Adjust the head restraint to the
upmost position.
If the head restraint interferes with the child restraint system or top strap instal-
lation and the head restraint can be removed, remove the head restraint. ( P.144)
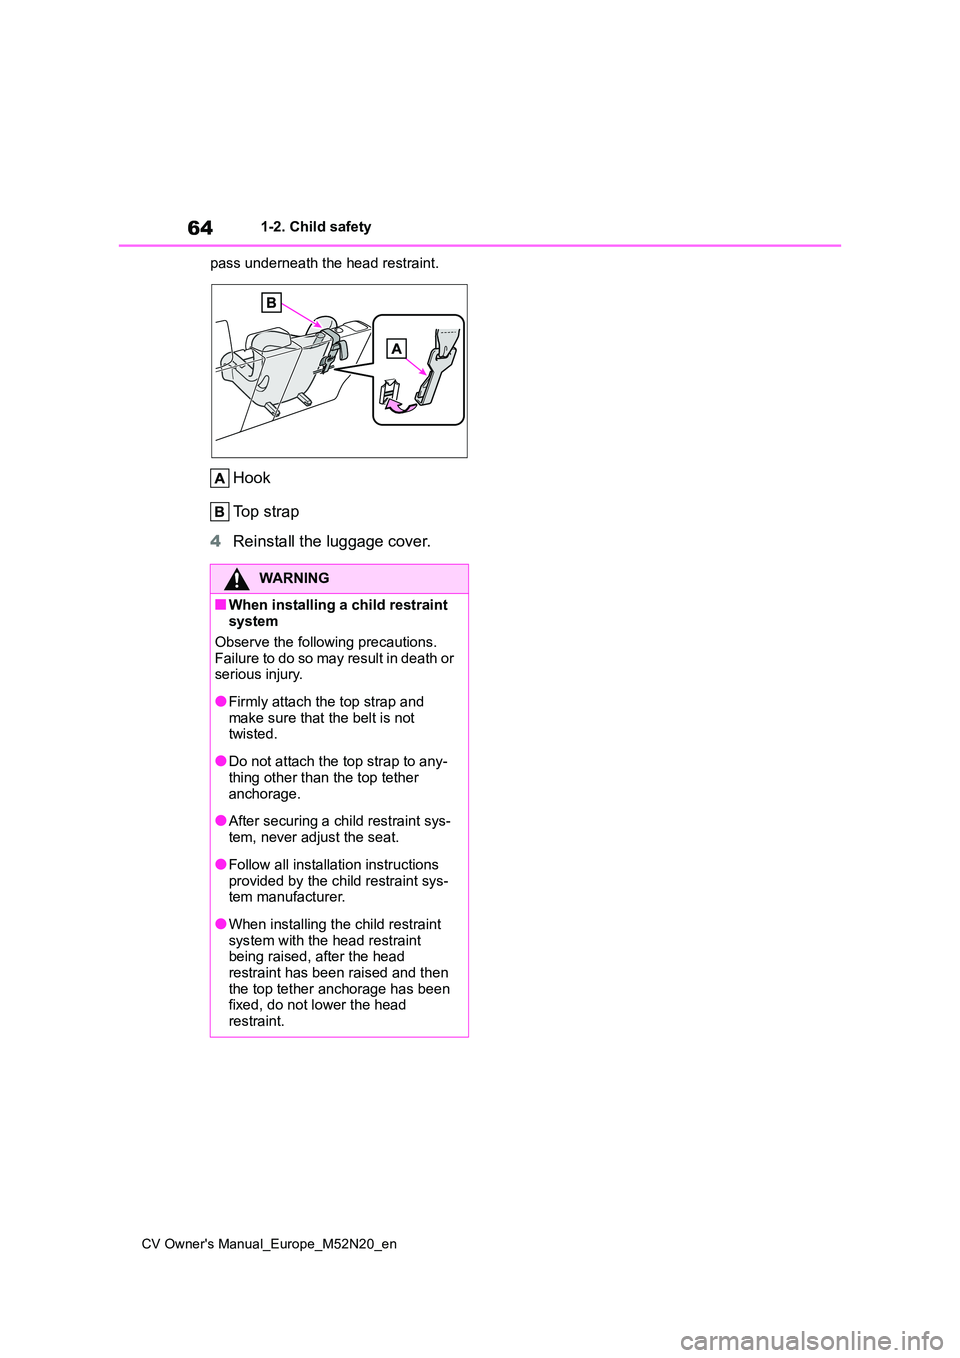
3Latch the hook onto the top
tether anchorage and tighten
the top strap.
Make sure the top strap is securely latched. ( P. 6 2 ) When installing the child restraint sys-
tem with the head restraint being raised, be sure to have the top strap
WARNING
■When installing a child restraint
system
Observe the following precautions. Failure to do so may result in death or
serious injury.
●After securing a child restraint sys-
tem, never adjust the seat.
●When using the lower anchorages,
be sure that there are no foreign objects around the anchorages and that the seat belt is not caught
behind the child restraint system.
●Follow all installation instructions
provided by the child restraint sys- tem manufacturer.
Using a top tether anchor-
age
Page 66 of 618
64
CV Owner's Manual_Europe_M52N20_en
1-2. Child safety
pass underneath the head restraint.
Hook
Top strap
4 Reinstall the luggage cover.
WARNING
■When installing a child restraint system
Observe the following precautions.
Failure to do so may result in death or serious injury.
●Firmly attach the top strap and make sure that the belt is not twisted.
●Do not attach the top strap to any-thing other than the top tether
anchorage.
●After securing a child restraint sys-
tem, never adjust the seat.
●Follow all installation instructions
provided by the child restraint sys- tem manufacturer.
●When installing the child restraint system with the head restraint being raised, after the head
restraint has been raised and then the top tether anchorage has been fixed, do not lower the head
restraint.