2022 HYUNDAI KONA EV warning light
[x] Cancel search: warning lightPage 463 of 548
Emergency situations
8-8
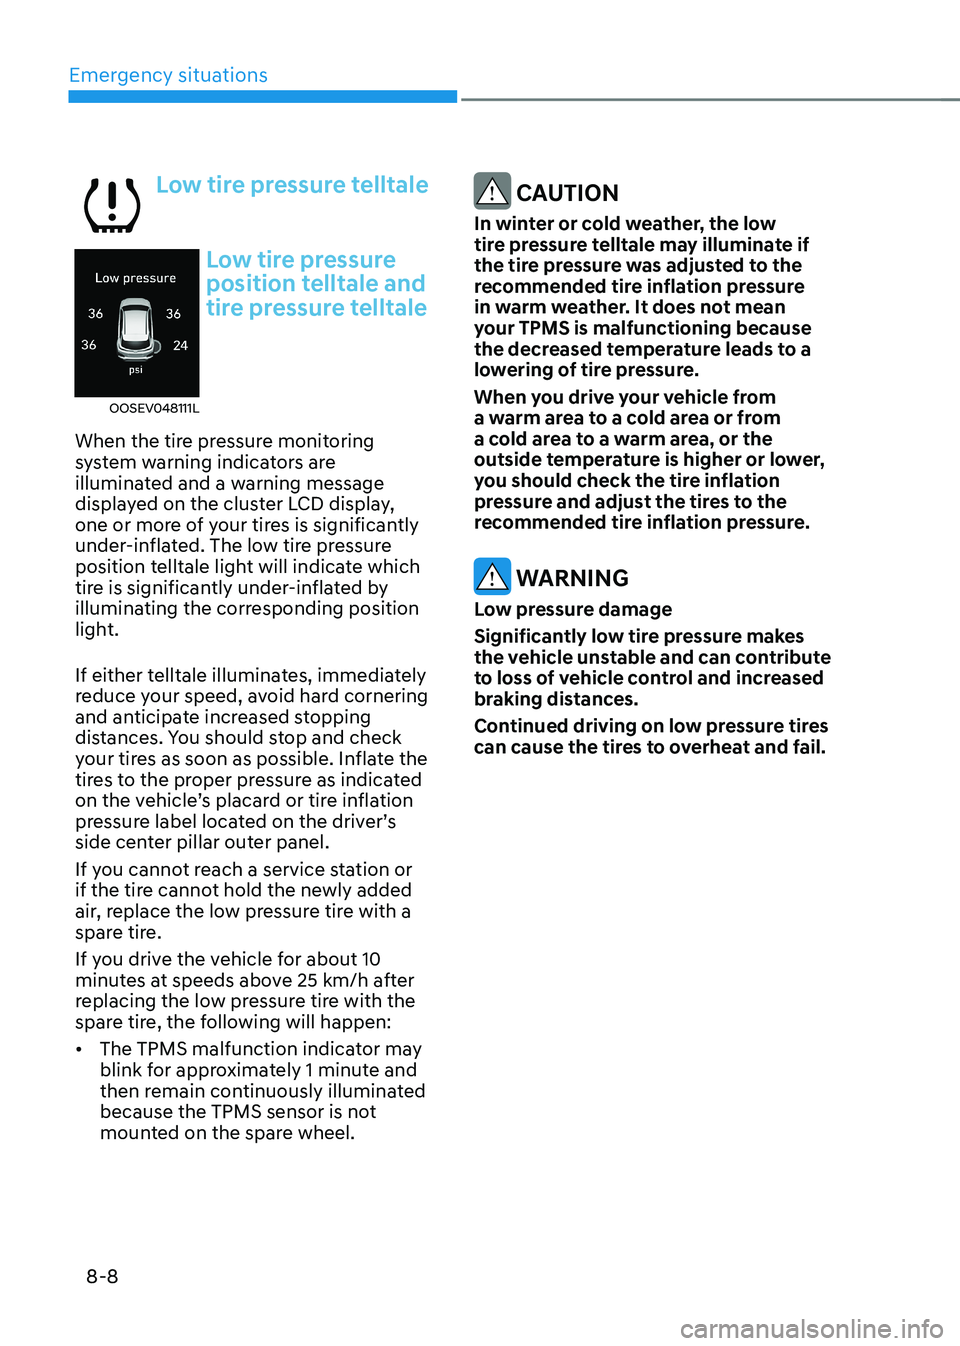
Low tire pressure telltale
OOSEV048111L
Low tire pressure
position telltale and
tire pressure telltale
When the tire pressure monitoring
system warning indicators are
illuminated and a warning message
displayed on the cluster LCD display,
one or more of your tires is significantly
under-inflated. The low tire pressure
position telltale light will indicate which
tire is significantly under-inflated by
illuminating the corresponding position
light.
If either telltale illuminates, immediately
reduce your speed, avoid hard cornering
and anticipate increased stopping
distances. You should stop and check
your tires as soon as possible. Inflate the
tires to the proper pressure as indicated
on the vehicle’s placard or tire inflation
pressure label located on the driver’s
side center pillar outer panel.
If you cannot reach a service station or
if the tire cannot hold the newly added
air, replace the low pressure tire with a
spare tire.
If you drive the vehicle for about 10
minutes at speeds above 25 km/h after
replacing the low pressure tire with the
spare tire, the following will happen: • The TPMS malfunction indicator may
blink for approximately 1 minute and
then remain continuously illuminated
because the TPMS sensor is not
mounted on the spare wheel.
CAUTION
In winter or cold weather, the low
tire pressure telltale may illuminate if
the tire pressure was adjusted to the
recommended tire inflation pressure
in warm weather. It does not mean
your TPMS is malfunctioning because
the decreased temperature leads to a
lowering of tire pressure.
When you drive your vehicle from
a warm area to a cold area or from
a cold area to a warm area, or the
outside temperature is higher or lower,
you should check the tire inflation
pressure and adjust the tires to the
recommended tire inflation pressure.
WARNING
Low pressure damage
Significantly low tire pressure makes
the vehicle unstable and can contribute
to loss of vehicle control and increased
braking distances.
Continued driving on low pressure tires
can cause the tires to overheat and fail.
Page 465 of 548
Emergency situations
8-10
WARNING
• The TPMS cannot alert you to severe
and sudden tire damage caused by
external factors such as nails or road debris.
• If you feel any vehicle instability,
immediately take your foot off
the accelerator, apply the brakes
gradually and with light force, and
slowly move to a safe position off the
road.
WARNING
Tampering with, modifying, or disabling
the Tire Pressure Monitoring System
(TPMS) components may interfere
with the system’s ability to warn the
driver of low tire pressure conditions
and/or TPMS malfunctions. Tampering
with, modifying, or disabling the Tire
Pressure Monitoring System (TPMS)
components may void the warranty for
that portion of the vehicle.
WARNING
This device complies with Industry
Canada RSS-210 standard.
Operation is subject to the following
three conditions: 1. This device may not cause harmful
interference.
2. This device must accept any
interference received, including
interference that may cause
undesired operation.
3. Changes or modifications not
expressly approved by the party
responsible for compliance could
void the user’s authority to operate
the equipment.
Page 482 of 548
Maintenance
9-6
While operating your vehicle: •
Check for vibrations in the steering
wheel. Notice if there is any increased
steering effort or looseness in the
steering wheel, or change in its
straight-ahead position.
• Notice if your vehicle constantly turns
slightly or “pulls” to one side when
traveling on smooth, level road.
• When stopping, listen and check for
unusual sounds, pulling to one side,
increased brake pedal travel or “hard-
to-push” brake pedal.
• If any slipping or changes in the
operation of your reduction gear
occurs, check the reduction gear fluid
level.
• Check the reduction gear p (park) function.
• Check the parking brake.
• Check for fluid leaks under your
vehicle (water dripping from the air
conditioning system during or after use is normal).
At least monthly: • Check coolant level in the coolant
reservoir.
• Check the operation of all exterior
lights, including the stoplights, turn
signals and hazard warning flashers.
• Check the inflation pressures of all
tires including the spare for tires that
are worn, show uneven wear, or are damaged.
• Check for loose wheel lug nuts.
• Do not add regular green coolant. •
At least twice a year:
(i.e., every Spring and Autumn)
• Check radiator, heater and air
conditioning hoses for leaks or damage.
• Check windshield washer spray and
wiper operation. Clean wiper blades
with a clean cloth dampened with
washer fluid.
• Check headlamp alignment.
• Check the seat belts for wear and function.
At least once a year: • Clean body and door drain holes.
• Lubricate door hinges and hood hinges.
• Lubricate door and hood locks and
latches.
• Lubricate door rubber weather strips.
• Check the air conditioning system.
• Inspect and lubricate reduction gear
linkage and controls.
• Clean the battery and terminals.
• Check the brake fluid level.
Page 494 of 548
Maintenance
9-18
Battery Usage
Recommendations
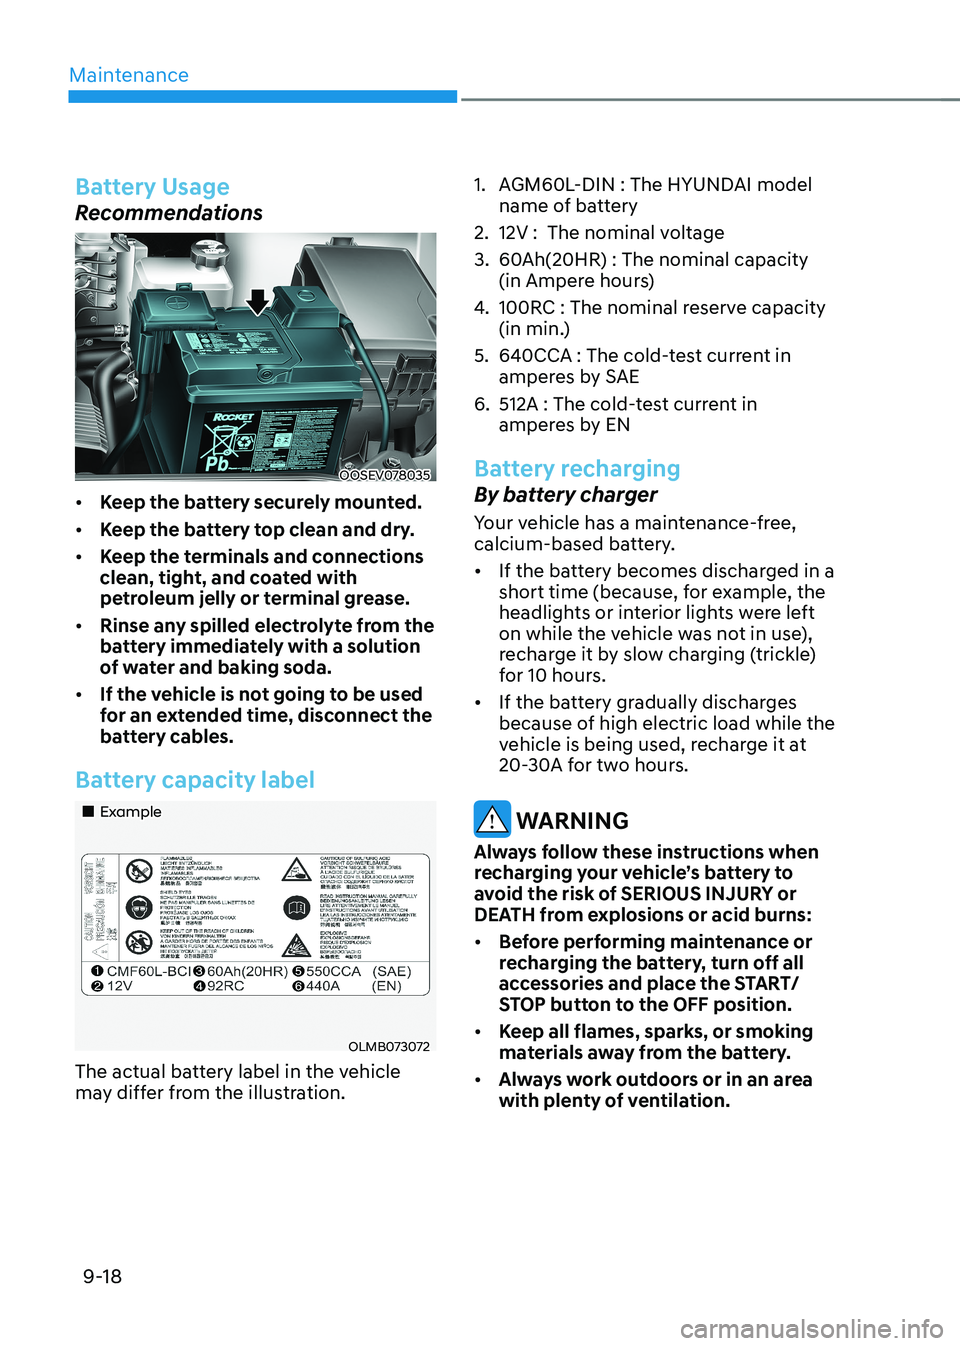
OOSEV078035
• Keep the battery securely mounted.
• Keep the battery top clean and dry.
• Keep the terminals and connections
clean, tight, and coated with
petroleum jelly or terminal grease.
• Rinse any spilled electrolyte from the
battery immediately with a solution
of water and baking soda.
• If the vehicle is not going to be used
for an extended time, disconnect the
battery cables.
Battery capacity label
„„Example
OLMB073072
The actual battery label in the vehicle
may differ from the illustration. 1. AGM60L-DIN : The HYUNDAI model
name of battery
2. 12V : The nominal voltage
3. 60Ah(20HR) : The nominal capacity (in Ampere hours)
4. 100RC : The no minal reserve capacity
(in min.)
5. 640CCA : The cold-test current in amperes by SAE
6. 512A : The cold-test current in amperes by EN
Battery recharging
By battery charger
Your vehicle has a maintenance-free,
calcium-based battery. • If the battery becomes discharged in a
short time (because, for example, the
headlights or interior lights were left
on while the vehicle was not in use),
recharge it by slow charging (trickle)
for 10 hours.
• If the battery gradually discharges
because of high electric load while the
vehicle is being used, recharge it at
20-30A for two hours.
WARNING
Always follow these instructions when
recharging your vehicle’s battery to
avoid the risk of SERIOUS INJURY or
DEATH from explosions or acid burns: • Before performing maintenance or
recharging the battery, turn off all
accessories and place the START/
STOP button to the OFF position.
• Keep all flames, sparks, or smoking
materials away from the battery.
• Always work outdoors or in an area
with plenty of ventilation.
Page 507 of 548
09
9-31
Longer wearing tires can be more
susceptible to irregular tread wear.
It is very important to follow the tire
rotation interval in this chapter to
achieve the tread life potential of
these tires. Cuts and punctures in
radial-ply tires are repairable only in
the tread area, because of sidewall
flexing. Consult your tire dealer for
radial-ply tire repairs.
WARNING
Do not mix bias ply and radial ply
tires under any circumstances.
This may cause unusual handling
characteristics that may cause loss
of vehicle control resulting in an
accident.
Low Aspect Ratio Tires
The aspect ratio is lower than 50 on
low aspect ratio tires.
Because low aspect ratio tires are
optimized for handling and braking, their
sidewall is a little stiffer than a standard
tire. Also low aspect ratio tires tend to be
wider and consequently have a greater
contact patch with the road surface. In
some instances they may generate more
road noise compared with standard tires.
CAUTION
The side wall of a low aspect ratio
tire is shorter than the normal one.
Thus, the low-aspect wheel and
tire are easily damaged. Follow the
below instructions. • When driving on a rough road or
driving off a road, be careful not to
damage the tires and wheels. After
driving, inspect the tires and wheels.
• When passing over a pothole, speed
bump, manhole, or curb stone, drive
the vehicle slowly so as not to damage
the tires and wheels.
• When there is an impact on a tire,
inspect the tire condition. Or,
you can contact an authorized
HYUNDAI dealer.
• Inspect the tire condition and
pressure every 3,000 km (1,800
miles) to prevent tire damage.
• It is difficult to recognize a tire damage
only with your eyes. When there is a
slight hint of a tire damage, check and
replace the tire to prevent the damage
caused by air leakage.
• When a tire is damaged while driving
on a rough road, off a road, or over
obstacles, such as a pothole, manhole,
or curb stone, your warranty does not
cover the damage.
• The tire information is specified
on the tire side wall.
Page 508 of 548
![HYUNDAI KONA EV 2022 Owners Manual Maintenance
9-32
FUSES
„„Blade type
AB
„
„Cartridge type
„
„Multi fuse
OTM078035
AB
AB
[A] : Normal, [B] : Blown
A vehicle’s electrical system is protected
from elect HYUNDAI KONA EV 2022 Owners Manual Maintenance
9-32
FUSES
„„Blade type
AB
„
„Cartridge type
„
„Multi fuse
OTM078035
AB
AB
[A] : Normal, [B] : Blown
A vehicle’s electrical system is protected
from elect](/manual-img/35/56171/w960_56171-507.png)
Maintenance
9-32
FUSES
„„Blade type
AB
„
„Cartridge type
„
„Multi fuse
OTM078035
AB
AB
[A] : Normal, [B] : Blown
A vehicle’s electrical system is protected
from electrical overload damage by fuses.
This vehicle has 2 (or 3) fuse panels, one
located in the driver’s side panel bolster,
the other in the motor compartment.
If any of your vehicle’s lights,
accessories, or controls do not work,
check the appropriate circuit fuse. If a
fuse has blown, the element inside the
fuse will be melted or broken.
If the electrical system does not work,
first check the driver’s side fuse panel.
Before replacing a blown fuse, turn the
vehicle and all switches off, and then
disconnect the negative battery cable.
Always replace a blown fuse with one of
the same rating.
If the replacement fuse blows, this
indicates an electrical problem.
Avoid using the system involved and it is
recommended to consult an authorized
dealer.
Information
Three kinds of fuses are used: blade type
for lower amperage rating, cartridge
type, and multi fuse for higher amperage ratings.
WARNING
NEVER replace a fuse with anything but
another fuse of the same rating. • A higher capacity fuse could cause
damage and possibly cause a fire.
• Do not install a wire or aluminum
foil instead of the proper fuse -
even as a temporary repair. It may
cause extensive wiring damage and
possibly a fire.
NOTICE
Do not use a screwdriver or any other
metal object to remove fuses because
it may cause a short circuit and damage
the system.
Page 520 of 548
Maintenance
9-44
LIgHT BULBS
We recommend to consult an authorized
dealer to replace most vehicle light
bulbs. It is difficult to replace vehicle
light bulbs because other parts of the
vehicle must be removed before you can
get to the bulb. This is especially true for
removing the headlamp assembly to get
to the bulb(s).
Removing/installing the headlamp
assembly can result in damage to the
vehicle.
WARNING
• Prior to working on a light, depress
the foot brake, shift to P (Park), apply
the parking brake, place the START/
STOP button in the OFF position
and take the key with you when
leaving the vehicle to avoid sudden
movement of the vehicle and to
prevent possible electric shock.
• Be aware the bulbs may be hot and
may burn your fingers.
NOTICE
Be sure to replace the burned-out bulb
with one of the same wattage rating.
Otherwise, it may cause damage to the
fuse or electrical wiring system.
NOTICE
To prevent damage, do not clean the
headlamp lens with chemical solvents
or strong detergents.
Information
The headlamp and tail lamp lenses could
appear frosty if the vehicle is washed after
driving or the vehicle is driven at night
in wet weather. This condition is caused
by temperature difference between the lamp inside and outside and, it does not
indicate a problem with your vehicle.
When moisture condenses in the lamp,
it will be removed after driving with the
headlamp on. The removable level may
differ depending on lamp size, lamp
position and environmental condition.
However, if moisture is not removed, we
recommend that your vehicle is inspected
by an authorized HYUNDAI dealer.
Information
• A normally functioning lamp may
flicker momentarily to stabilize the
vehicle’s electrical control system.
However, if the lamp goes out after
flickering momentarily, or continues to
flicker, we recommend the system be checked by an authorized HYUNDAI
dealer.
• The position lamp may not turn on when the position lamp switch is turned on, but the position lamp and headlamp switch may turn on when the headlamp
switch is turned on. This may be caused
by network failure or vehicle electrical
control system malfunction. If this
occurs, we recommend the system be checked by an authorized HYUNDAI
dealer.
Information
After an accident or head lamp
replacement we recommend to consult an
authorized HYUNDAI dealer to perform the headlamp aiming.
Page 521 of 548
09
9-45
Headlamp, position lamp, turn
signal lamp and daytime running
light bulb replacement
Type A
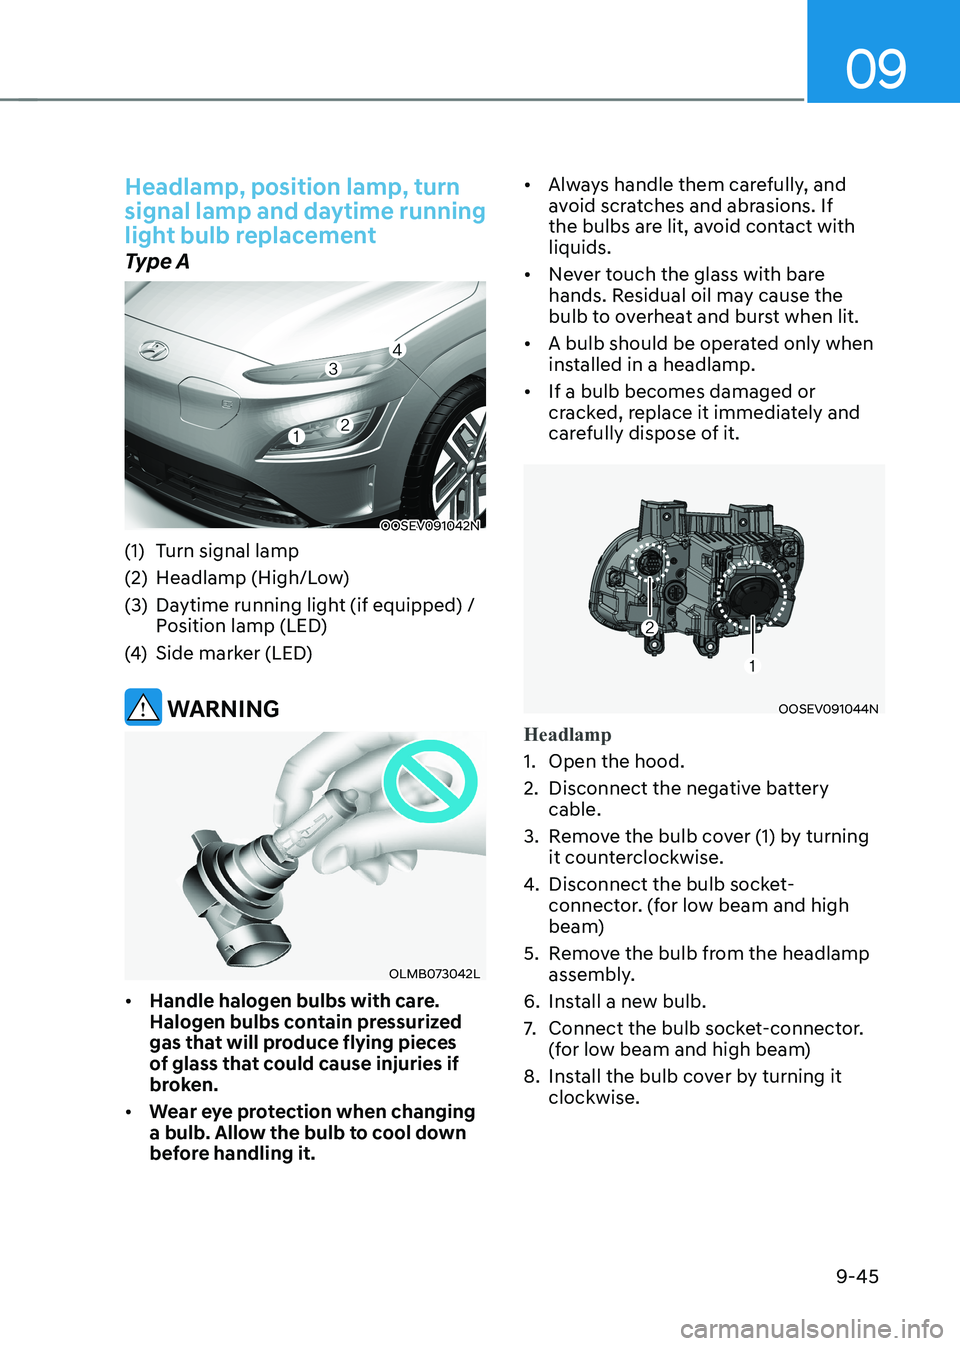
OOSEV091042N
(1) Turn signal lamp
(2) Headlamp (High/Low)
(3) Daytime running light (if equipped) / position lamp (LED)
(4) Side marker (LED)
WARNING
OLMB073042L
• Handle halogen bulbs with care.
Halogen bulbs contain pressurized
gas that will produce flying pieces
of glass that could cause injuries if
broken.
• Wear eye protection when changing
a bulb. Allow the bulb to cool down
before handling it. •
Always handle them carefully, and
avoid scratches and abrasions. If
the bulbs are lit, avoid contact with liquids.
• Never touch the glass with bare
hands. Residual oil may cause the
bulb to overheat and burst when lit.
• A bulb should be operated only when
installed in a headlamp.
• If a bulb becomes damaged or
cracked, replace it immediately and
carefully dispose of it.
OOSEV091044N
Headlamp
1. Open the hood.
2. Disconnect the negative battery
cable.
3. Remove the bulb cover (1) by turning it counterclockwise.
4. Disconnect the bulb socket-
connector. (for low beam and high
beam)
5. Remove the bulb from the headlamp assembly.
6. Install a new bulb.
7. Connect the bulb socket-connector.
(for low beam and high beam)
8. Install the bulb cover by turning it clockwise.