2021 RAM PROMASTER CITY stop start
[x] Cancel search: stop startPage 86 of 280
84STARTING AND OPERATING
DRIVING TIPS
Driving On Slippery Surfaces
Acceleration
Rapid acceleration on snow covered, wet, or
other slippery surfaces may cause the driving
wheels to pull erratically to the right or left. This
phenomenon occurs when there is a difference
in the surface traction under the front (driving)
wheels.
Traction
When driving on wet or slushy roads, it is
possible for a wedge of water to build up
between the tire and road surface. This is
hydroplaning and may cause partial or
complete loss of vehicle control and stopping
ability. To reduce this possibility, the following
precautions should be observed:
Slow down during rainstorms or when the
roads are slushy.
Slow down if the road has standing water or
puddles.
Replace the tires when tread wear indicators
first become visible.
Keep tires properly inflated.
Maintain sufficient distance between your
vehicle and the vehicle in front of you to avoid
a collision in a sudden stop.
Driving Through Water
Driving through water more than a few inches/
centimeters deep will require extra caution to
ensure safety and prevent damage to your
vehicle.
Flowing/Rising Water
WARNING!
Rapid acceleration on slippery surfaces is
dangerous. Unequal traction can cause
sudden pulling of the front wheels. You could
lose control of the vehicle and possibly have a
collision. Accelerate slowly and carefully
whenever there is likely to be poor traction
(ice, snow, wet, mud, loose sand, etc.).
WARNING!
Do not drive on or across a road or path
where water is flowing and/or rising (as in
storm run-off). Flowing water can wear away
the road or path's surface and cause your
vehicle to sink into deeper water.
Furthermore, flowing and/or rising water can
carry your vehicle away swiftly. Failure to
follow this warning may result in injuries that
are serious or fatal to you, your passengers,
and others around you.
21_VM_OM_EN_USC_t.book Page 84
Page 87 of 280

STARTING AND OPERATING85
(Continued)
Shallow Standing Water
Although your vehicle is capable of driving
through shallow standing water, consider the
following Cautions and Warnings before doing
so.
WARNING!
Driving through standing water limits your
vehicle’s traction capabilities. Do not
exceed 5 mph (8 km/h) when driving
through standing water.
Driving through standing water limits your
vehicle’s braking capabilities, which
increases stopping distances. Therefore,
after driving through standing water, drive
slowly and lightly press on the brake pedal
several times to dry the brakes.
Failure to follow these warnings may result
in injuries that are serious or fatal to you,
your passengers, and others around you.
CAUTION!
Always check the depth of the standing
water before driving through it. Never drive
through standing water that is deeper than
the bottom of the tire rims mounted on the
vehicle.
Determine the condition of the road or the
path that is under water and if there are any
obstacles in the way before driving through
the standing water.
Do not exceed 5 mph (8 km/h) when
driving through standing water. This will
minimize wave effects.
Driving through standing water may cause
damage to your vehicle’s drivetrain compo -
nents. Always inspect your vehicle’s fluids
(i.e., engine oil, transmission, axle, etc.) for
signs of contamination (i.e., fluid that is
milky or foamy in appearance) after driving
through standing water. Do not continue to
operate the vehicle if any fluid appears
contaminated, as this may result in further
damage. Such damage is not covered by
the New Vehicle Limited Warranty.
Getting water inside your vehicle’s engine
can cause it to lock up and stall out, and
cause serious internal damage to the
engine. Such damage is not covered by the
New Vehicle Limited Warranty.
CAUTION! (Continued)
4
21_VM_OM_EN_USC_t.book Page 85
Page 102 of 280
100MULTIMEDIA
UCONNECT MODES
Radio Mode
Operating Radio Mode
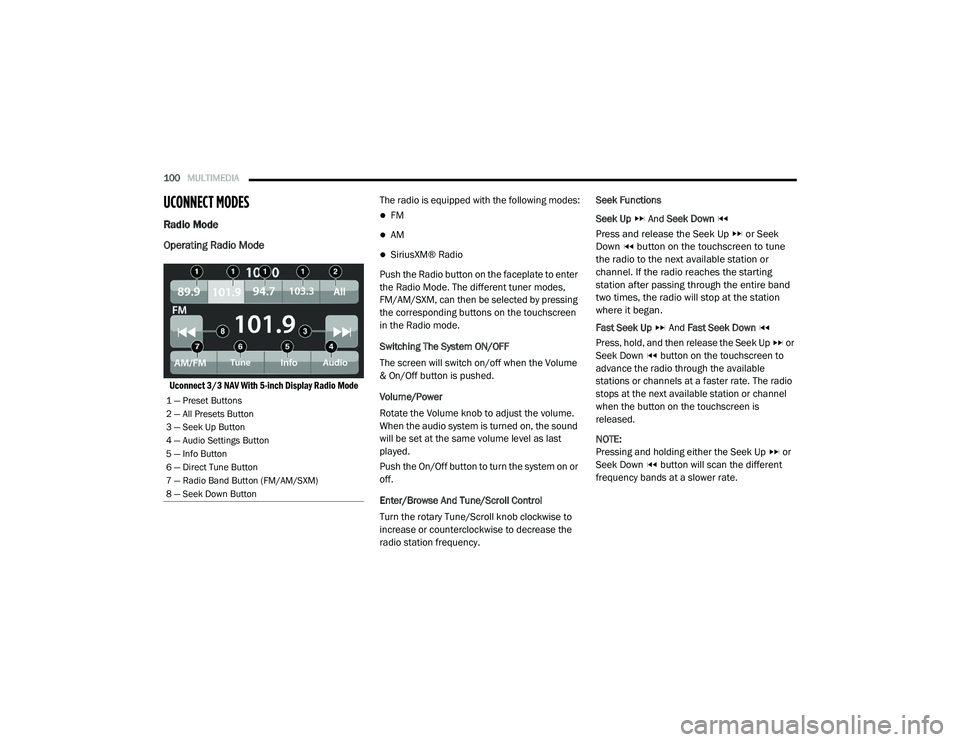
Uconnect 3/3 NAV With 5-inch Display Radio Mode
The radio is equipped with the following modes:
FM
AM
SiriusXM® Radio
Push the Radio button on the faceplate to enter
the Radio Mode. The different tuner modes,
FM/AM/SXM, can then be selected by pressing
the corresponding buttons on the touchscreen
in the Radio mode.
Switching The System ON/OFF
The screen will switch on/off when the Volume
& On/Off button is pushed.
Volume/Power
Rotate the Volume knob to adjust the volume.
When the audio system is turned on, the sound
will be set at the same volume level as last
played.
Push the On/Off button to turn the system on or
off.
Enter/Browse And Tune/Scroll Control
Turn the rotary Tune/Scroll knob clockwise to
increase or counterclockwise to decrease the
radio station frequency. Seek Functions
Seek Up
And Seek Down
Press and release the Seek Up or Seek
Down button on the touchscreen to tune
the radio to the next available station or
channel. If the radio reaches the starting
station after passing through the entire band
two times, the radio will stop at the station
where it began.
Fast Seek Up And Fast Seek Down
Press, hold, and then release the Seek Up or
Seek Down button on the touchscreen to
advance the radio through the available
stations or channels at a faster rate. The radio
stops at the next available station or channel
when the button on the touchscreen is
released.
NOTE:
Pressing and holding either the Seek Up or
Seek Down button will scan the different
frequency bands at a slower rate.
1 — Preset Buttons
2 — All Presets Button
3 — Seek Up Button
4 — Audio Settings Button
5 — Info Button
6 — Direct Tune Button
7 — Radio Band Button (FM/AM/SXM)
8 — Seek Down Button
21_VM_OM_EN_USC_t.book Page 100
Page 127 of 280
MULTIMEDIA125
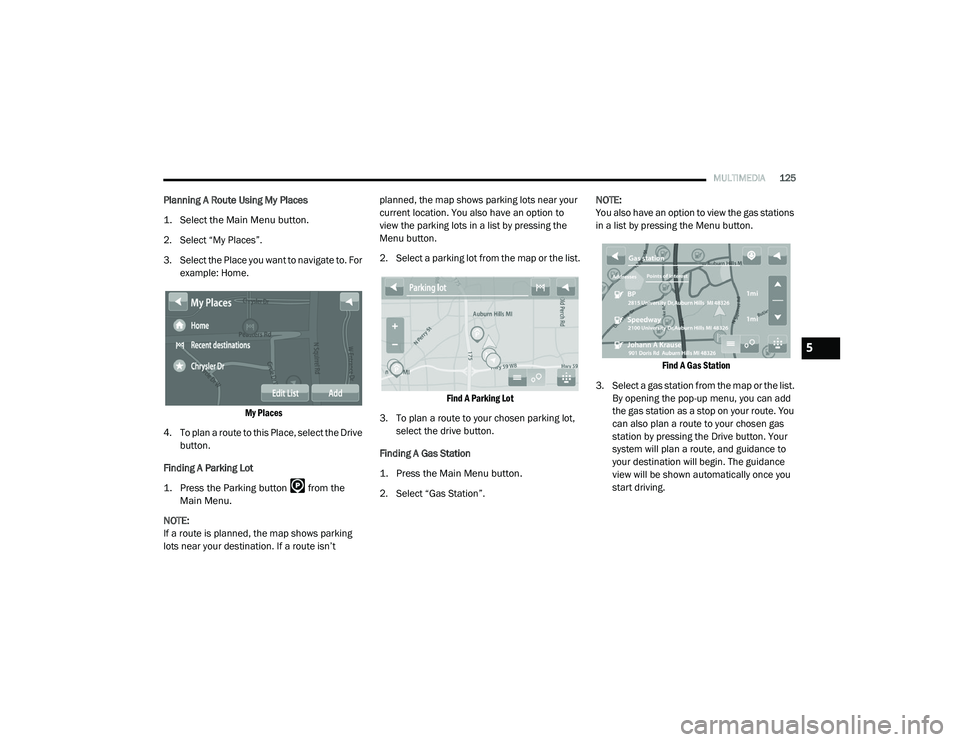
Planning A Route Using My Places
1. Select the Main Menu button.
2. Select “My Places”.
3. Select the Place you want to navigate to. For
example: Home.
My Places
4. To plan a route to this Place, select the Drive button.
Finding A Parking Lot
1. Press the Parking button from the Main Menu.
NOTE:
If a route is planned, the map shows parking
lots near your destination. If a route isn’t planned, the map shows parking lots near your
current location. You also have an option to
view the parking lots in a list by pressing the
Menu button.
2. Select a parking lot from the map or the list.
Find A Parking Lot
3. To plan a route to your chosen parking lot, select the drive button.
Finding A Gas Station
1. Press the Main Menu button.
2. Select “Gas Station”. NOTE:
You also have an option to view the gas stations
in a list by pressing the Menu button.
Find A Gas Station
3. Select a gas station from the map or the list. By opening the pop-up menu, you can add
the gas station as a stop on your route. You
can also plan a route to your chosen gas
station by pressing the Drive button. Your
system will plan a route, and guidance to
your destination will begin. The guidance
view will be shown automatically once you
start driving.
5
21_VM_OM_EN_USC_t.book Page 125
Page 132 of 280
130MULTIMEDIA
Voice Command — If Equipped
About Voice command
Instead of pressing the touchscreen to control
your navigation system, you can use your voice
to control navigation.
For example, to switch to 2D view, you can say
“2D view”.
To view a list of available commands, press the
“Help” button in the Main menu and then press
“What can I say?”.
Using Voice Control The following example shows how to use voice
control to plan a journey to your Home address:
1. Push the Voice Recognition button on
the steering wheel to turn on the
microphone.
A screen will pop up with examples of com -
mands.
NOTE:
Press the Help button in the Main menu then
press “What can I say?” to see a full list of
commands.
2. When you hear a beep, say a command of your choice. For example, you can say
“Navigate home”.
NOTE:
For accurate results, speak normally without
trying to articulate words in an unnatural way. If
there is excessive road noise, for example, you
may need to speak directly into the microphone.
3. If the command is correct, say “Yes”. NOTE:
If the command is incorrect, say “No” and
repeat the command after you hear the prompt
and tone again. Your navigation system plans a
route from your current location to your destina-
tion. To stop your navigation system from
listening out for further commands, say
“Cancel”.
Guidance View
The guidance view is used to guide you along
the route to your destination. As soon as you
start driving, your navigation system will
immediately start guiding you to your
destination with spoken instructions and visual
instructions on the touchscreen. You can also
see your current location and details along your
route, including 3D buildings in some cities. The
guidance view is normally in 3D. To show a 2D
map with the map moving in your direction of
travel, change the 2D and 3D settings
Ú
page 135.
WARNING!
ALWAYS drive safely with your hands on the
wheel. You have full responsibility and
assume all risks related to the use of the
Uconnect features and applications in this
vehicle. Only use Uconnect when it is safe to
do so. Failure to do so may result in an
accident involving serious injury or death.
21_VM_OM_EN_USC_t.book Page 130
Page 138 of 280
136MULTIMEDIA
Appearance
To change how your navigation screen looks,
select “Appearance” in the settings menu. From
here, you can change these features:
Switch To Night Colors When Dark : Select
this setting to make your system automati -
cally switch to night colors when it gets dark.
Automatic Zoom : Select “Automatic Zoom” to
change how your system zooms in guidance
view when you approach a turn or intersec -
tion. Zooming in can make the turn or inter -
section easier to drive. The following options
are available:
Zoom in to next turn
Based on road type
None
Arrival Information
In the settings menu, select “Arrival
Information” to change the following settings:
Show Remaining Distance : Select this setting
to show the remaining distance left to travel
in the arrival information panel during navi -
gation.
Show Remaining Time : Select this setting to
show the remaining time left to travel in the
arrival information panel during navigation.
Switch Between Distance And Time Automat -
ically : Select this setting to control the auto -
matic switching between remaining distance
and remaining time in the arrival information
panel.
Show On Route
In the settings menu, select “Show On Route” to
see any of the following options in the route bar:
Parking : Select this setting to see parking lots
on your route.
Gas Stations: Select this setting to see gas
stations on your route.
Stops : Select this setting to see stops on your
route.
Show Previews Of Highway Exits
Select this setting to control the full screen
preview when you approach highway exits. Automatic Map View Switching
Automatic changing of views is on by default.
For example, when an alternative route is being
suggested, the map will automatically switch to
map view, and when you start driving, your map
will automatically switch to guidance view. You
can turn this feature off by selecting “Automatic
Map View Switching” in the settings.
Automatic Zoom
Select this setting to control the full screen
preview when you approach highway exits.
Guidance View Style
Select this setting to choose between 3D and
2D versions of the guidance view. Both the 2D
and 3D guidance views move in your direction
of travel.
In 3D guidance view, you can choose to use the
3D car icon or an arrowhead as the current
location indicator. By default, the 3D guidance
view shows the 3D car icon.
Voices Setting
Select this setting to change how instructions
are read out loud Ú
page 135.
21_VM_OM_EN_USC_t.book Page 136
Page 140 of 280
138MULTIMEDIA
Points Of Interest
About Points Of Interest
Points Of Interest (POI) are useful places on the
map.
Here are some examples:
Restaurants
Hotels
Museums
Parking lots
Gas stations
Emergency Services
Using POIs To Plan A Route
When you plan a route, you can use a POI for the
destination or as a stop along the route.
Using Search
1. Select “Search” on the Main Menu to begin a search. The search screen will open,
displaying the keyboard. Enter the name of
your desired destination. Your search
results will be displayed in two lists.
Addresses and city matches are shown in the list called “Addresses.” POIs, types of
POIs, and Places are shown in the list
called “Points of Interest.” You can also
select a POI category to only see POI
search results from that category.
2. Select the desired POI. The location will appear on the map. From here, you can
save the POI to “My Places,” use this POI as
a starting point, begin navigation to this
destination, or view more details about this
POI. By pressing “More Information,” you
can view the phone number and full
address of the POI.
3. If a route is already planned, you can add the location to your current route. To plan a
route to this destination, press the Drive
button on the touchscreen.
NOTE:
Your navigation system will calculate a route,
and guidance to your destination will begin.
Guidance view will begin as soon as you start
driving.
My Places
About My Places My Places provides an easy way to
select a location without the need to
enter the address or search for the
location. You can use My Places to
create a collection of useful or favorite
addresses.
The following items are always in My Places:
Home : Your home location can be your home
address or somewhere you often visit. This
feature provides an easy way to navigate
there.
Recent Destinations: Select this button to
select your destination from a list of locations
you have recently navigated to.
21_VM_OM_EN_USC_t.book Page 138
Page 148 of 280

146SAFETY
Electronic Brake Control (EBC) System
Your vehicle is equipped with an advanced
Electronic Brake Control (EBC) system that
includes the Brake Assist System (BAS),
Traction Control System (TCS), Hill Start Assist
(HSA), Electronic Stability Control (ESC),
Electronic Roll Mitigation (ERM) and Trailer
Sway Control (TSC). All systems work together to
enhance vehicle stability and control in various
driving conditions and are commonly referred to
as ESC.
Brake Assist System (BAS)
BAS is designed to optimize the vehicle’s
braking capability during emergency braking
maneuvers. The system detects an emergency
braking situation by sensing the rate and
amount of brake application and then applies
optimum pressure to the brakes. This can help
reduce braking distances. The BAS
complements the Anti-Lock Brake System
(ABS). Applying the brakes very quickly results
in the best BAS assistance. To receive the
benefit of the system, you must apply continuous braking pressure during the
stopping sequence (do not “pump” the brakes).
Do not reduce brake pedal pressure unless
braking is no longer desired. Once the brake
pedal is released, the BAS is deactivated.
Electronic Stability Control (ESC)
ESC enhances directional control and stability
of the vehicle under various driving conditions.
ESC corrects for over/under steering of the
vehicle by applying the brake of the appropriate
wheel to counteract the above conditions.
Engine power may also be reduced to help the
vehicle maintain the desired path.
Oversteer - when the vehicle is turning more
than appropriate for the steering wheel posi
-
tion.
Understeer - when the vehicle is turning less
than appropriate for the steering wheel posi -
tion.
ESC uses sensors in the vehicle to determine
the vehicle path intended by the driver and
compares it to the actual path of the vehicle.
When the actual path does not match the
intended path, ESC applies the brake of the
appropriate wheel to assist in counteracting the
oversteer or understeer condition.
WARNING!
The Brake Assist System (BAS) cannot
prevent the natural laws of physics from
acting on the vehicle, nor can it increase the
traction afforded by prevailing road
conditions. BAS cannot prevent collisions,
including those resulting from excessive
speed in turns, driving on very slippery
surfaces, or hydroplaning. The capabilities of
a BAS-equipped vehicle must never be
exploited in a reckless or dangerous manner,
which could jeopardize the user's safety or
the safety of others.
21_VM_OM_EN_USC_t.book Page 146