2021 CHRYSLER 300 oil filter
[x] Cancel search: oil filterPage 7 of 268

5
SAFETY
SAFETY FEATURES .............................................. 137
Anti-Lock Brake System (ABS) .. ................... 137
Electronic Brake Control (EBC) System . . ..... 138
AUXILIARY DRIVING SYSTEMS . . ........................ 142
Blind Spot Monitoring (BSM) —
If Equipped. .
................................................... 142
Forward Collision Warning (FCW) With
Mitigation Operation — If Equipped. .
............ 146
Tire Pressure Monitoring System (TPMS) . . .. 148
OCCUPANT RESTRAINT SYSTEMS . . .................. 151
Occupant Restraint Systems Features .. ..... 151
Important Safety Precautions. . ..................... 152
Seat Belt Systems . . ...................................... 152
Supplemental Restraint Systems (SRS) . . .... 158
Child Restraints . . ........................................... 166
SAFETY TIPS . . ....................................................... 176
Transporting Passengers .. ............................ 176
Transporting Pets . . ........................................ 176
Safety Checks You Should Make Inside
The Vehicle . .
................................................. 176
Periodic Safety Checks You Should Make
Outside The Vehicle . .
.................................... 177
Exhaust Gas . . ................................................ 178
Carbon Monoxide Warnings . . ....................... 178
IN CASE OF EMERGENCY
HAZARD WARNING FLASHERS......................... 179
ASSIST AND SOS MIRROR — IF EQUIPPED .. ... 179
JACKING AND TIRE CHANGING .. ....................... 182
Preparations For Jacking .. ........................... 182
Jack Location/Spare Tire Stowage . . ............ 183
Jacking And Changing A Tire . . ..................... 184
JUMP STARTING . . ............................................... 186
Preparations For Jump Start .. ...................... 187
Jump Starting Procedure . . ............................ 188
REFUELING IN AN EMERGENCY –
IF EQUIPPED . .
..................................................... 189
IF YOUR ENGINE OVERHEATS .. ........................ 190
MANUAL PARK RELEASE .. ................................ 190
FREEING A STUCK VEHICLE .. ............................ 192
TOWING A DISABLED VEHICLE .. ....................... 193
All Wheel Drive (AWD) Models .. .................... 194
Rear Wheel Drive (RWD) Models . . ............... 194
ENHANCED ACCIDENT RESPONSE SYSTEM
(EARS) . ................................................................. 194
E
VENT DATA RECORDER (EDR) .. ...................... 194
SERVICING AND MAINTENANCE
SCHEDULED SERVICING ................................... 195
Maintenance Plan .. ....................................... 196
ENGINE COMPARTMENT . . .................................. 199
3.6L Engine .. ................................................ 199
5.7L Engine . . ................................................ 200
Checking Oil Level . . ....................................... 201 Adding Washer Fluid .
.
................................... 201
Maintenance-Free Battery . . ......................... 201
Pressure Washing . . ....................................... 202
VEHICLE MAINTENANCE . . .................................. 202
Engine Oil ...................................................... 202
E ngine Oil Filter . . ........................................... 203
Engine Air Cleaner Filter . . ............................. 203
Air Conditioner Maintenance. . ...................... 204
Accessory Drive Belt Inspection . . ................. 205
Body Lubrication . . ......................................... 206
Windshield Wiper Blades. . ............................ 206
Exhaust System . . ........................................... 208
Cooling System . . ........................................... 209
Brake System . . ............................................. 212
Automatic Transmission . . ............................ 212
All Wheel Drive (AWD) — If Equipped . . ........ 213
Rear Axle. ....................................................... 213
F uses. ............................................................. 214
B ulb Replacement . . ...................................... 221
TIRES . .................................................................... 225
T ire Safety Information .. ............................... 225
Tires — General Information . . ...................... 232
Tire Types. ...................................................... 235
S pare Tires — If Equipped. . ........................... 236
Wheel And Wheel Trim Care. . ....................... 238
Snow Traction Devices. . ................................ 239
Tire Rotation Recommendations . . .............. 240
Page 198 of 268
196 SERVICING AND MAINTENANCE
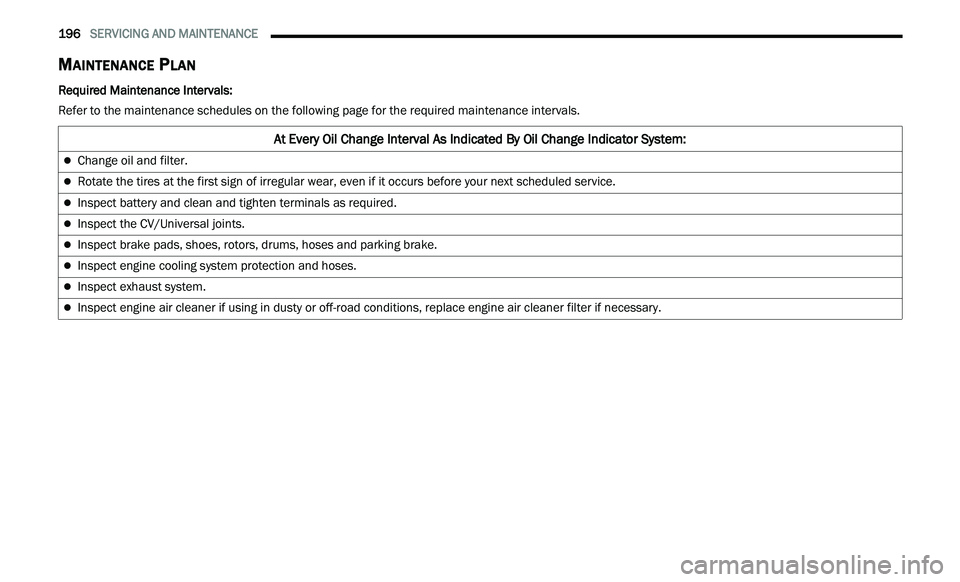
MAINTENANCE PLAN
Required Maintenance Intervals:
Refer to the maintenance schedules on the following page for the required maintenance intervals.
At Every Oil Change Interval As Indicated By Oil Change Indicator System:
Change oil and filter.
Rotate the tires at the first sign of irregular wear, even if it occurs before your next scheduled service.
Inspect battery and clean and tighten terminals as required.
Inspect the CV/Universal joints.
Inspect brake pads, shoes, rotors, drums, hoses and parking brake.
Inspect engine cooling system protection and hoses.
Inspect exhaust system.
Inspect engine air cleaner if using in dusty or off-road conditions, replace engine air cleaner filter if necessary.
Page 201 of 268
SERVICING AND MAINTENANCE 199
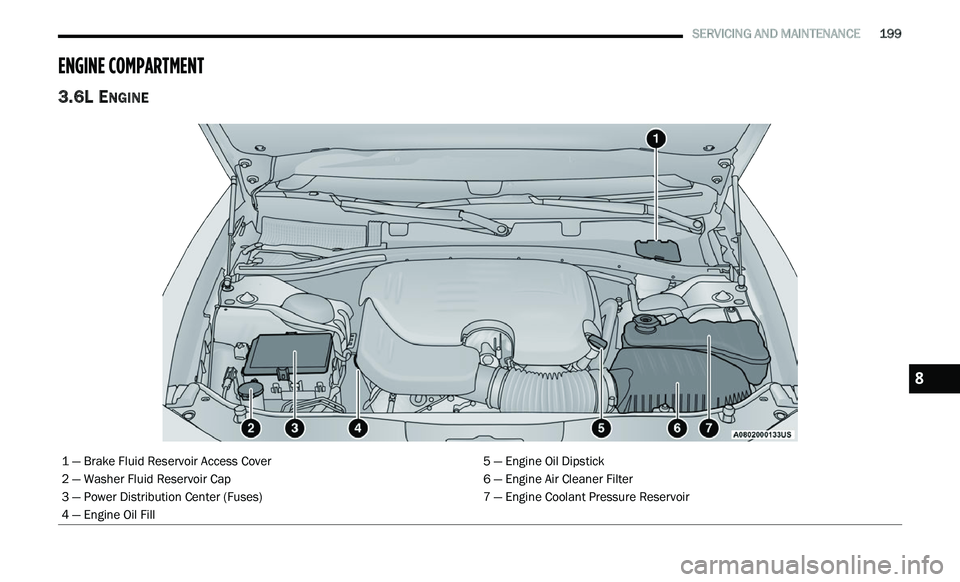
ENGINE COMPARTMENT
3.6L ENGINE
1 — Brake Fluid Reservoir Access Cover 5 — Engine Oil Dipstick
2 — Washer Fluid Reservoir Cap 6 — Engine Air Cleaner Filter
3 — Power Distribution Center (Fuses) 7 — Engine Coolant Pressure Reservoir
4 — Engine Oil Fill
8
Page 202 of 268
200 SERVICING AND MAINTENANCE
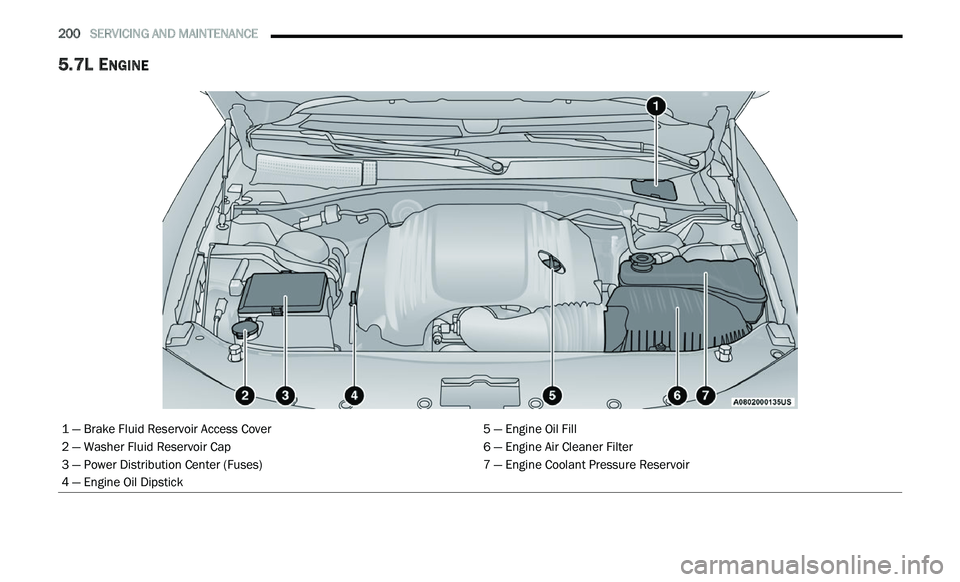
5.7L ENGINE
1 — Brake Fluid Reservoir Access Cover 5 — Engine Oil Fill
2 — Washer Fluid Reservoir Cap 6 — Engine Air Cleaner Filter
3 — Power Distribution Center (Fuses) 7 — Engine Coolant Pressure Reservoir
4 — Engine Oil Dipstick
Page 205 of 268
SERVICING AND MAINTENANCE 203
Other causes could be if the vehicle is unused for
an extended period of time, incorrect oil, extended
oil changes or extended idling. If the engine
continues to tick or if the Malfunction Indicator
Light (MIL) comes on, see the nearest authorized
dealer.
American Petroleum Institute (API) Engine
Oil Identification Symbol
This symbol means that the oil has been
certified by the American Petroleum
In
stitute (API). The manufacturer only
recommends API Certified engine oils.
This symbol certifies 0W-20, 5W-20, 0W-30,
5 W
-30 and 10W-30 engine oils.
Synthetic Engine Oils
You may use synthetic engine oils provided the
recommended oil quality requirements are met,
and the recommended maintenance intervals for
oil and filter changes are followed. Synthetic engine oils which do not have both the
e
n
gine oil certification mark and the correct SAE
viscosity grade number should not be used.
Materials Added To Engine Oil
The manufacturer strongly recommends against
the addition of any additives (other than leak
detection dyes) to the engine oil. Engine oil is an
engineered product and its performance may be
impaired by supplemental additives.
Disposing Of Used Engine Oil And Oil
Filters
Care should be taken in disposing of used engine
oil and oil filters from your vehicle. Used oil and oil
filters, indiscriminately discarded, can present a
problem to the environment. Contact an
authorized dealer, service station or governmental
agency for advice on how and where used oil and
oil filters can be safely discarded in your area.
ENGINE OIL FILTER
The engine oil filter should be replaced with a new
filter at every engine oil change.
Engine Oil Filter Selection
This manufacturer's engines have a full-flow type
d i
sposable oil filter. Use a filter of this type for
replacement. The quality of replacement filters
varies considerably. Only high quality filters should be used to ensure most efficient service. Mopar®
engine oil filters are high quality oil filters and are
recommended.
ENGINE AIR CLEANER FILTER
For the proper maintenance intervals
Ú page 195.
Engine Air Cleaner Filter Selection
The quality of replacement engine air cleaner
f i
lters varies considerably. Only high quality filters
should be used to ensure most efficient service.
Mopar® engine air cleaner filters are a high quality
filter and are recommended.
CAUTION!
Do not use chemical flushes in your engine oil as
the chemicals can damage your engine. Such
damage is not covered by the New Vehicle
Limited Warranty.
WARNING!
The air induction system (air cleaner, hoses,
etc.) can provide a measure of protection in the
case of engine backfire. Do not remove the air
induction system (air cleaner, hoses, etc.) unless
such removal is necessary for repair or
maintenance. Make sure that no one is near the
engine compartment before starting the vehicle
with the air induction system (air cleaner, hoses,
etc.) removed. Failure to do so can result in
serious personal injury.
8
Page 206 of 268
204 SERVICING AND MAINTENANCE
AIR CONDITIONER MAINTENANCE
For best possible performance, your air conditioner
should be checked and serviced by an authorized
dealer at the start of each warm season. This
service should include cleaning of the condenser
fins and a performance test. Drive belt tension
should also be checked at this time.
Refrigerant Recovery And Recycling
R-134a — If Equipped
R-134a Air Conditioning Refrigerant is a hydrofluo -
rocarbon (HFC) that is an ozone-friendly
s u
bstance. The manufacturer recommends that
air conditioning service be performed by an
authorized dealer or other service facilities using
recovery and recycling equipment.
NOTE:
Use only manufacturer approved A/C system PAG
c om
pressor oil and refrigerants.
Refrigerant Recovery And Recycling
R-1234yf — If Equipped
R-1234yf Air Conditioning Refrigerant is a hydroflu -
oroolefin (HFO) that is endorsed by the
E n
vironmental Protection Agency and is an
ozone-friendly substance with a low global-
warming potential. The manufacturer recommends that air conditioning service be
performed by an authorized dealer using recovery
and recycling equipment.
NOTE:
Use only manufacturer approved A/C system PAG
c om
pressor oil, and refrigerants.
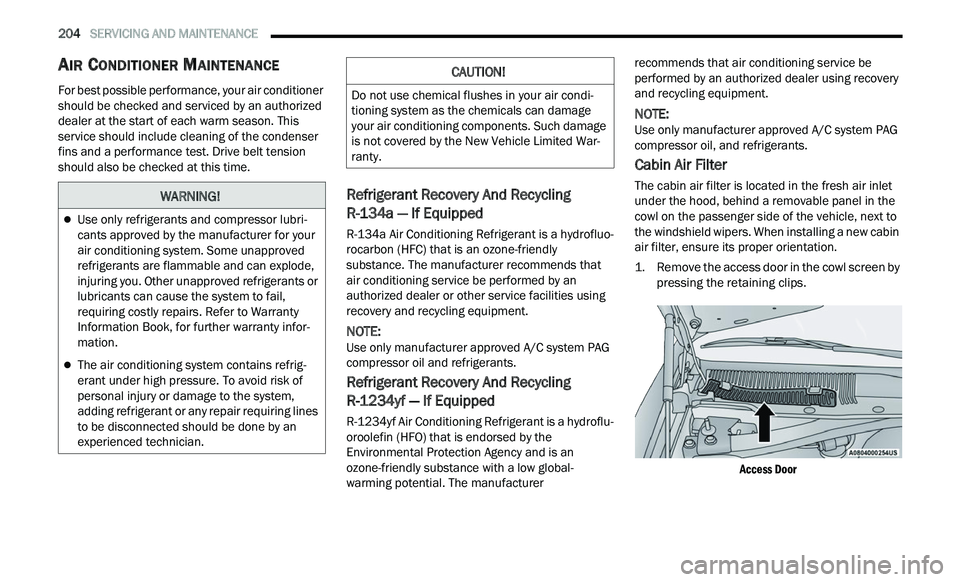
Cabin Air Filter
The cabin air filter is located in the fresh air inlet
under the hood, behind a removable panel in the
cowl on the passenger side of the vehicle, next to
the windshield wipers. When installing a new cabin
air filter, ensure its proper orientation.
1. R emove the access door in the cowl screen by
p
ressing the retaining clips.
Access Door
WARNING!
Use only refrigerants and compressor lubri -
cants approved by the manufacturer for your
a i
r conditioning system. Some unapproved
refrigerants are flammable and can explode,
injuring you. Other unapproved refrigerants or
lubricants can cause the system to fail,
requiring costly repairs. Refer to Warranty
Information Book, for further warranty infor -
mation.
The air conditioning system contains refrig -
erant under high pressure. To avoid risk of
p e
rsonal injury or damage to the system,
adding refrigerant or any repair requiring lines
to be disconnected should be done by an
experienced technician.
CAUTION!
Do not use chemical flushes in your air condi -
tioning system as the chemicals can damage
y ou
r air conditioning components. Such damage
is not covered by the New Vehicle Limited War -
ranty.
Page 215 of 268
SERVICING AND MAINTENANCE 213
Fluid Level Check
The fluid level is preset at the factory and does not
require adjustment under normal operating
conditions. Routine fluid level checks are not
required; therefore the transmission has no
dipstick. An authorized dealer can check your
transmission fluid level using special service tools.
If you notice fluid leakage or transmission
malfunction, visit an authorized dealer
immediately to have the transmission fluid level
checked. Operating the vehicle with an improper
fluid level can cause severe transmission damage.
Fluid And Filter Changes
Under normal operating conditions, the fluid
installed at the factory will provide satisfactory
lubrication for the life of the vehicle.
Routine fluid and filter changes are not required.
How e
ver, change the fluid and filter if the fluid
becomes contaminated (with water, etc.), or if the
transmission is disassembled for any reason.
Selection Of Lubricant
It is important to use the proper transmission fluid
to ensure optimum transmission performance and
life. Use only the manufacturer's specified
transmission fluid
Ú page 250. It is important to
maintain the transmission fluid at the correct level
u s
ing the recommended fluid.
NOTE:
No chemical flushes should be used in any trans -
mission; only the approved lubricant should be
u s
ed.
ALL WHEEL DRIVE (AWD) —
I
F EQUIPPED
The All Wheel Drive system consists of a transfer
case and front differential. The exterior surface of
these components should be inspected for
evidence of fluid leaks. Confirmed leaks should be
repaired as soon as possible.
The transfer case fluid fill/inspection plug is
l oc
ated in the middle of the rear housing. To
inspect the transfer case fluid level, remove the
fill/inspection plug. The fluid level should be even
with the bottom of the hole. Use this plug to add
fluid as required.
The front differential fill plug is located on the outer
cov
er near the half shaft attachment. To inspect
the differential fluid level, remove the fill plug. The
fluid level should be even with or slightly below the
bottom of the hole.
Fluid Changes
For the proper maintenance intervals Ú page 195.
REAR AXLE
For normal service, periodic fluid level checks are
not required. When the vehicle is serviced for other
reasons the exterior surfaces of the axle assembly
should be inspected. If gear oil leakage is
suspected inspect the fluid level
Ú page 250.
CAUTION!
Do not use chemical flushes in your
transmission as the chemicals can damage your
transmission components. Such damage is not
covered by the New Vehicle Limited Warranty.
CAUTION!
If a transmission fluid leak occurs, visit an
authorized dealer immediately. Severe
transmission damage may occur. An authorized
dealer has the proper tools to adjust the fluid
level accurately.CAUTION!
Using a transmission fluid other than the
manufacturer’s recommended fluid may cause
deterioration in transmission shift quality and/or
torque converter shudder
Ú page 250.
8
Page 225 of 268
SERVICING AND MAINTENANCE 223
BI-HALOGEN LOW BEAM AND HIGH BEAM
HEADLAMP — IF EQUIPPED
See steps below to replace:
1. O pen the hood.
NOTE:
Removal of the air cleaner filter housing may be
n e
cessary prior to replacing bulbs in the headlamp
assembly on the driver side of the vehicle.
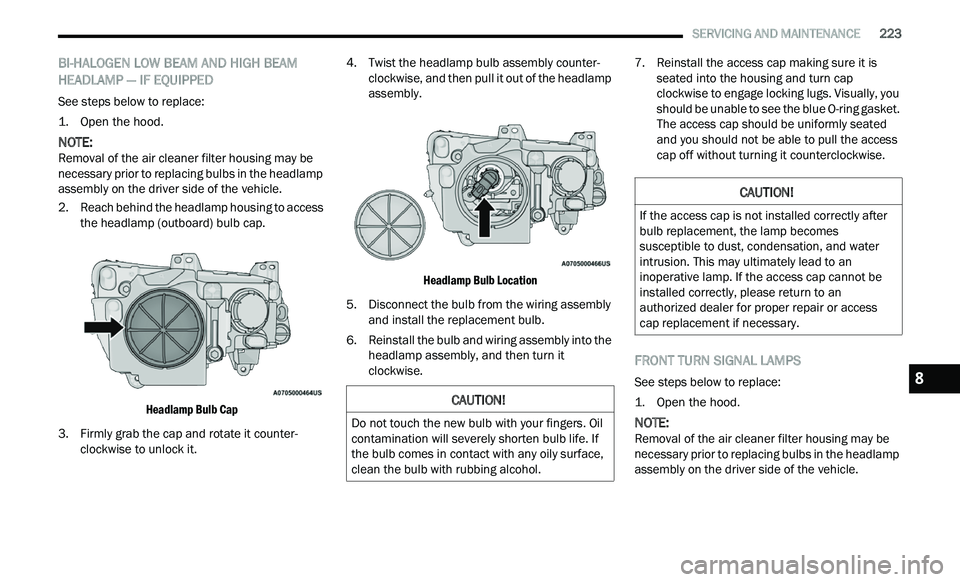
2. R each behind the headlamp housing to access
t
he headlamp (outboard) bulb cap.
Headlamp Bulb Cap
3. F irmly grab the cap and rotate it counter -
c
lockwise to unlock it. 4. Twist the headlamp bulb assembly counter
-
c
lockwise, and then pull it out of the headlamp
a s
sembly.
Headlamp Bulb Location
5. D isconnect the bulb from the wiring assembly
a
nd install the replacement bulb.
6. Reinstall the bulb and wiring assembly into the h
eadlamp assembly, and then turn it
clockwise. 7. Reinstall the access cap making sure it is
s
eated into the housing and turn cap
clockwise to engage locking lugs. Visually, you
should be unable to see the blue O-ring gasket.
The access cap should be uniformly seated
and you should not be able to pull the access
cap off without turning it counterclockwise.
FRONT TURN SIGNAL LAMPS
See steps below to replace:
1. O pen the hood.
NOTE:
Removal of the air cleaner filter housing may be
n e
cessary prior to replacing bulbs in the headlamp
assembly on the driver side of the vehicle.
CAUTION!
Do not touch the new bulb with your fingers. Oil
contamination will severely shorten bulb life. If
the bulb comes in contact with any oily surface,
clean the bulb with rubbing alcohol.
CAUTION!
If the access cap is not installed correctly after
bulb replacement, the lamp becomes
susceptible to dust, condensation, and water
intrusion. This may ultimately lead to an
inoperative lamp. If the access cap cannot be
installed correctly, please return to an
authorized dealer for proper repair or access
cap replacement if necessary.
8