2021 CHRYSLER 300 belt
[x] Cancel search: beltPage 7 of 268

5
SAFETY
SAFETY FEATURES .............................................. 137
Anti-Lock Brake System (ABS) .. ................... 137
Electronic Brake Control (EBC) System . . ..... 138
AUXILIARY DRIVING SYSTEMS . . ........................ 142
Blind Spot Monitoring (BSM) —
If Equipped. .
................................................... 142
Forward Collision Warning (FCW) With
Mitigation Operation — If Equipped. .
............ 146
Tire Pressure Monitoring System (TPMS) . . .. 148
OCCUPANT RESTRAINT SYSTEMS . . .................. 151
Occupant Restraint Systems Features .. ..... 151
Important Safety Precautions. . ..................... 152
Seat Belt Systems . . ...................................... 152
Supplemental Restraint Systems (SRS) . . .... 158
Child Restraints . . ........................................... 166
SAFETY TIPS . . ....................................................... 176
Transporting Passengers .. ............................ 176
Transporting Pets . . ........................................ 176
Safety Checks You Should Make Inside
The Vehicle . .
................................................. 176
Periodic Safety Checks You Should Make
Outside The Vehicle . .
.................................... 177
Exhaust Gas . . ................................................ 178
Carbon Monoxide Warnings . . ....................... 178
IN CASE OF EMERGENCY
HAZARD WARNING FLASHERS......................... 179
ASSIST AND SOS MIRROR — IF EQUIPPED .. ... 179
JACKING AND TIRE CHANGING .. ....................... 182
Preparations For Jacking .. ........................... 182
Jack Location/Spare Tire Stowage . . ............ 183
Jacking And Changing A Tire . . ..................... 184
JUMP STARTING . . ............................................... 186
Preparations For Jump Start .. ...................... 187
Jump Starting Procedure . . ............................ 188
REFUELING IN AN EMERGENCY –
IF EQUIPPED . .
..................................................... 189
IF YOUR ENGINE OVERHEATS .. ........................ 190
MANUAL PARK RELEASE .. ................................ 190
FREEING A STUCK VEHICLE .. ............................ 192
TOWING A DISABLED VEHICLE .. ....................... 193
All Wheel Drive (AWD) Models .. .................... 194
Rear Wheel Drive (RWD) Models . . ............... 194
ENHANCED ACCIDENT RESPONSE SYSTEM
(EARS) . ................................................................. 194
E
VENT DATA RECORDER (EDR) .. ...................... 194
SERVICING AND MAINTENANCE
SCHEDULED SERVICING ................................... 195
Maintenance Plan .. ....................................... 196
ENGINE COMPARTMENT . . .................................. 199
3.6L Engine .. ................................................ 199
5.7L Engine . . ................................................ 200
Checking Oil Level . . ....................................... 201 Adding Washer Fluid .
.
................................... 201
Maintenance-Free Battery . . ......................... 201
Pressure Washing . . ....................................... 202
VEHICLE MAINTENANCE . . .................................. 202
Engine Oil ...................................................... 202
E ngine Oil Filter . . ........................................... 203
Engine Air Cleaner Filter . . ............................. 203
Air Conditioner Maintenance. . ...................... 204
Accessory Drive Belt Inspection . . ................. 205
Body Lubrication . . ......................................... 206
Windshield Wiper Blades. . ............................ 206
Exhaust System . . ........................................... 208
Cooling System . . ........................................... 209
Brake System . . ............................................. 212
Automatic Transmission . . ............................ 212
All Wheel Drive (AWD) — If Equipped . . ........ 213
Rear Axle. ....................................................... 213
F uses. ............................................................. 214
B ulb Replacement . . ...................................... 221
TIRES . .................................................................... 225
T ire Safety Information .. ............................... 225
Tires — General Information . . ...................... 232
Tire Types. ...................................................... 235
S pare Tires — If Equipped. . ........................... 236
Wheel And Wheel Trim Care. . ....................... 238
Snow Traction Devices. . ................................ 239
Tire Rotation Recommendations . . .............. 240
Page 11 of 268

9
Door Open Warning Light
Ú page 73
Electric Power Steering Fault Warning Light
Ú page 73
Electronic Throttle Control (ETC) Warning Light
Ú page 73
Engine Coolant Temperature Warning Light
Ú page 73
Oil Pressure Warning Light
Ú page 74
Oil Temperature Warning Light
Ú page 74
Seat Belt Reminder Warning Light
Ú page 73
Transmission Temperature Warning Light
Ú page 74
Red Warning Lights
Trunk Open Warning Light
Ú page 74
Vehicle Security Warning Light
Ú page 74
Yellow Warning Lights
Engine Check/Malfunction Indicator Warning Light (MIL)
Ú page 75
Electronic Stability Control (ESC) Active Warning Light
Ú page 75
Electronic Stability Control (ESC) OFF Warning Light
Ú page 75
Low Washer Fluid Warning Light
Ú page 75
Tire Pressure Monitoring System (TPMS) Warning Light
Ú page 76
Red Warning Lights
1
Page 29 of 268

GETTING TO KNOW YOUR VEHICLE 27
(Continued)
LINKING AND UNLINKING THE KEY FOB
T
O MEMORY
Your key fobs can be programmed to recall one of
two saved memory profiles.
NOTE:
Before programming your key fobs you must select
t h
e “Memory Linked To Fob” feature through the
Uconnect system
Ú page 122.
To program your key fobs, perform the following:
1. P lace the vehicle’s ignition in the OFF
p
osition.
2. Select a desired memory profile, 1 or 2.
3
. O nce the profile has been recalled, push and
r
elease the set (S) button on the memory
switch.
4. W ithin five seconds, push and release button
(
1) or (2) accordingly. “Memory Profile Set”
(1 or 2) will display in the instrument cluster.
5. P ush and release the lock button on the key
f
ob within 10 seconds.
NOTE:
Your key fob can be unlinked from your memory
s e
ttings by pushing the set (S) button, followed by
pushing the unlock button on the key fob within
10 seconds.
MEMORY POSITION RECALL
NOTE:
If a recall is attempted when the vehicle is not in
P A
RK, a message will be displayed in the
instrument cluster display.
To recall the memory settings for driver one or two,
p u
sh the desired memory button number (1 or 2)
or the unlock button on the key fob linked to the
desired memory position.
A recall can be canceled by pushing any of the
me
mory buttons (S, 1, or 2) during a recall. When
a recall is canceled, the driver seat will stop
moving. A delay of one second will occur before
another recall can be selected.
SEATS
Seats are a part of the Occupant Restraint system
of the vehicle.
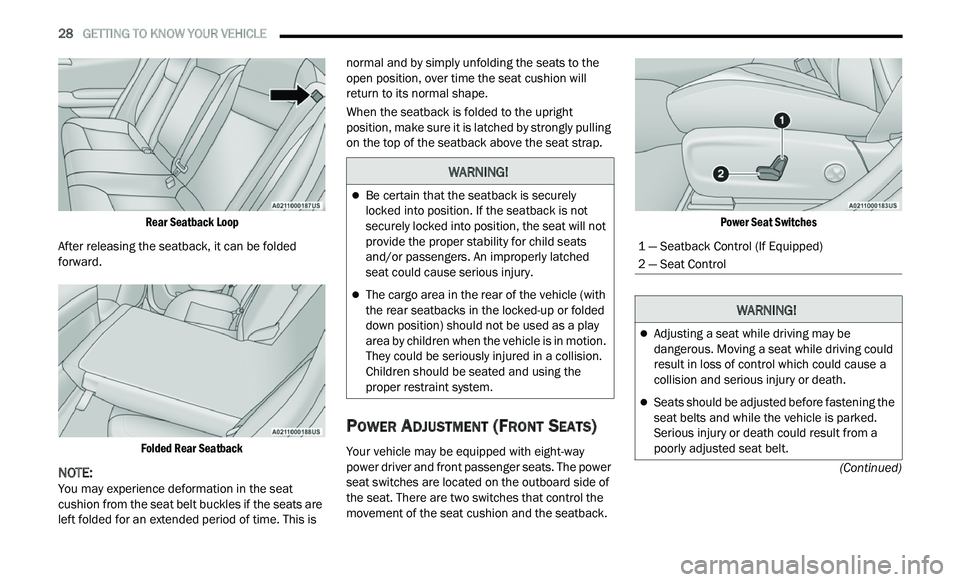
MANUAL ADJUSTMENT (REAR SEATS)
Folding Rear Seat
The rear seatbacks can be folded forward to
provide an additional storage area. To fold the rear
seatback, pull on the loops located on the upper
seatback.
NOTE:
These loops can be tucked away when not in use.
WARNING!
It is dangerous to ride in a cargo area, inside
or outside of a vehicle. In a collision, people
riding in these areas are more likely to be seri -
ously injured or killed.
Do not allow people to ride in any area of your
vehicle that is not equipped with seats and
seat belts. In a collision, people riding in these
areas are more likely to be seriously injured or
killed.
Be sure everyone in your vehicle is in a seat
and using a seat belt properly.
WARNING!
2
Page 30 of 268
28 GETTING TO KNOW YOUR VEHICLE
(Continued)
Rear Seatback Loop
After releasing the seatback, it can be folded
for
ward.
Folded Rear Seatback
NOTE:
You may experience deformation in the seat
c u
shion from the seat belt buckles if the seats are
left folded for an extended period of time. This is normal and by simply unfolding the seats to the
open position, over time the seat cushion will
return to its normal shape.
When the seatback is folded to the upright
p
os
ition, make sure it is latched by strongly pulling
on the top of the seatback above the seat strap.
POWER ADJUSTMENT (FRONT SEATS)
Your vehicle may be equipped with eight-way
power driver and front passenger seats. The power
seat switches are located on the outboard side of
the seat. There are two switches that control the
movement of the seat cushion and the seatback.
Power Seat Switches
WARNING!
Be certain that the seatback is securely
locked into position. If the seatback is not
securely locked into position, the seat will not
provide the proper stability for child seats
and/or passengers. An improperly latched
seat could cause serious injury.
The cargo area in the rear of the vehicle (with
the rear seatbacks in the locked-up or folded
down position) should not be used as a play
area by children when the vehicle is in motion.
They could be seriously injured in a collision.
Children should be seated and using the
proper restraint system.
1 — Seatback Control (If Equipped)
2 — Seat Control
WARNING!
Adjusting a seat while driving may be
dangerous. Moving a seat while driving could
result in loss of control which could cause a
collision and serious injury or death.
Seats should be adjusted before fastening the
seat belts and while the vehicle is parked.
Serious injury or death could result from a
poorly adjusted seat belt.
Page 31 of 268
GETTING TO KNOW YOUR VEHICLE 29
Adjusting The Seat Forward Or Rearward
The seat can be adjusted both forward and
rearward by using the power seat switch. The seat
will move in the direction of the switch. Release the
switch when the desired position has been
reached.
Adjusting The Seat Up Or Down
The height of the seats can be adjusted up or down
by using the power seat switch. The seat will move
in the direction of the switch. Release the switch
when the desired position has been reached.
Tilting The Seat Up Or Down
The angle of the seat cushion can be adjusted up
or down using the power seat switch. The front of
the seat cushion will move in the direction of the
switch. Release the switch when the desired
position has been reached.
Reclining The Seatback
The angle of the seatback can be adjusted forward
or rearward by using the power seat switch. The
seat will move in the direction of the switch.
Release the switch when the desired position is
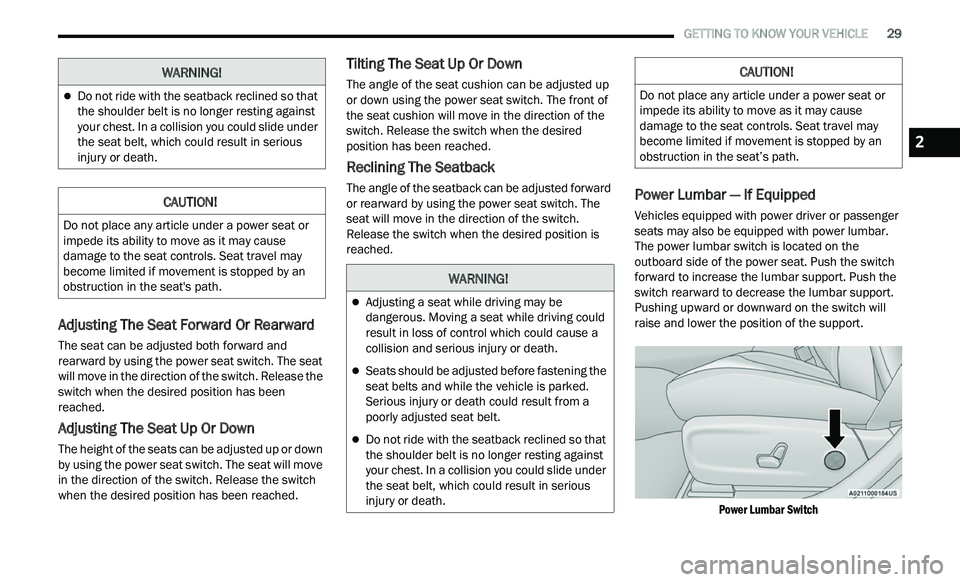
reached.Power Lumbar — If Equipped
Vehicles equipped with power driver or passenger
seats may also be equipped with power lumbar.
The power lumbar switch is located on the
outboard side of the power seat. Push the switch
forward to increase the lumbar support. Push the
switch rearward to decrease the lumbar support.
Pushing upward or downward on the switch will
raise and lower the position of the support.
Power Lumbar Switch
Do not ride with the seatback reclined so that
the shoulder belt is no longer resting against
your chest. In a collision you could slide under
the seat belt, which could result in serious
injury or death.
CAUTION!
Do not place any article under a power seat or
impede its ability to move as it may cause
damage to the seat controls. Seat travel may
become limited if movement is stopped by an
obstruction in the seat's path.
WARNING!
WARNING!
Adjusting a seat while driving may be
dangerous. Moving a seat while driving could
result in loss of control which could cause a
collision and serious injury or death.
Seats should be adjusted before fastening the
seat belts and while the vehicle is parked.
Serious injury or death could result from a
poorly adjusted seat belt.
Do not ride with the seatback reclined so that
the shoulder belt is no longer resting against
your chest. In a collision you could slide under
the seat belt, which could result in serious
injury or death.
CAUTION!
Do not place any article under a power seat or
impede its ability to move as it may cause
damage to the seat controls. Seat travel may
become limited if movement is stopped by an
obstruction in the seat’s path.
2
Page 60 of 268
58 GETTING TO KNOW YOUR VEHICLE
PANORAMIC SUNROOF — IF EQUIPPED
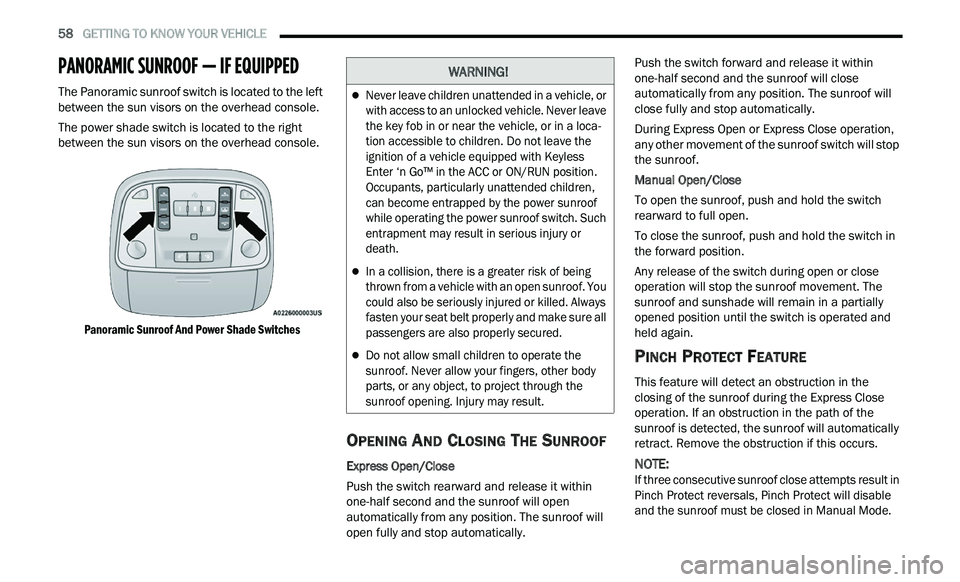
The Panoramic sunroof switch is located to the left
between the sun visors on the overhead console.
The power shade switch is located to the right
be
tween the sun visors on the overhead console.
Panoramic Sunroof And Power Shade Switches
OPENING AND CLOSING THE SUNROOF
Express Open/Close
Push the switch rearward and release it within
on e
-half second and the sunroof will open
automatically from any position. The sunroof will
open fully and stop automatically. Push the switch forward and release it within
on
e
-half second and the sunroof will close
automatically from any position. The sunroof will
close fully and stop automatically.
During Express Open or Express Close operation,
an
y other movement of the sunroof switch will stop
the sunroof.
Manual Open/Close
To open the sunroof, push and hold the switch
r e
arward to full open.
To close the sunroof, push and hold the switch in
th
e forward position.
Any release of the switch during open or close
ope
ration will stop the sunroof movement. The
sunroof and sunshade will remain in a partially
opened position until the switch is operated and
held again.
PINCH PROTECT FEATURE
This feature will detect an obstruction in the
closing of the sunroof during the Express Close
operation. If an obstruction in the path of the
sunroof is detected, the sunroof will automatically
retract. Remove the obstruction if this occurs.
NOTE:
If three consecutive sunroof close attempts result in
P i
nch Protect reversals, Pinch Protect will disable
and the sunroof must be closed in Manual Mode.
WARNING!
Never leave children unattended in a vehicle, or
with access to an unlocked vehicle. Never leave
the key fob in or near the vehicle, or in a loca -
tion accessible to children. Do not leave the
i g
nition of a vehicle equipped with Keyless
Enter ‘n Go™ in the ACC or ON/RUN position.
Occupants, particularly unattended children,
can become entrapped by the power sunroof
while operating the power sunroof switch. Such
entrapment may result in serious injury or
death.
In a collision, there is a greater risk of being
thrown from a vehicle with an open sunroof. You
could also be seriously injured or killed. Always
fasten your seat belt properly and make sure all
passengers are also properly secured.
Do not allow small children to operate the
sunroof. Never allow your fingers, other body
parts, or any object, to project through the
sunroof opening. Injury may result.
Page 63 of 268
GETTING TO KNOW YOUR VEHICLE 61
(Continued)
NOTE:
Before closing the trunk lid make sure your key fob
i s
n’t inside the trunk area. The trunk will latch then
automatically unlock if the key fob is detected, not
allowing the key fob to be locked in the trunk area.
TRUNK SAFETY
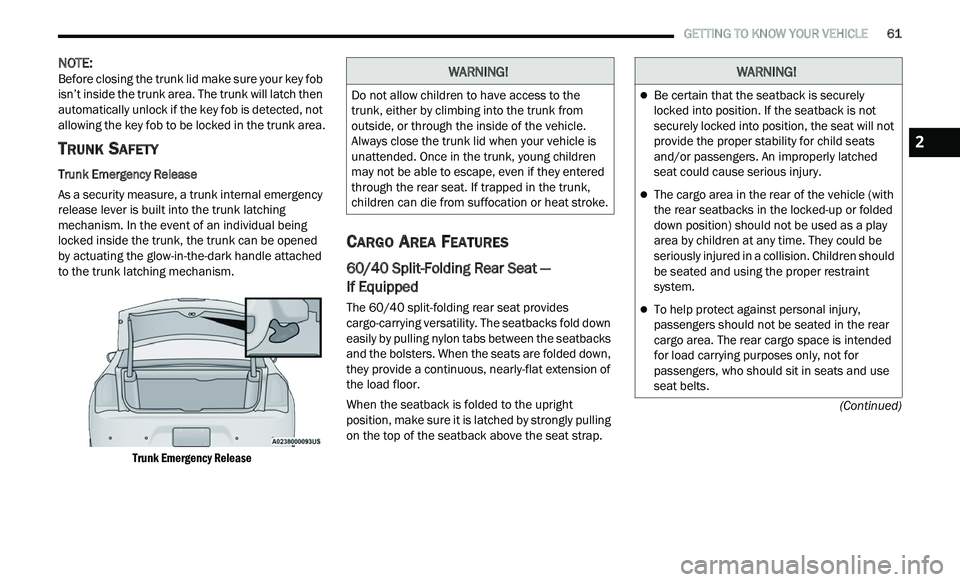
Trunk Emergency Release
As a security measure, a trunk internal emergency
r e
lease lever is built into the trunk latching
mechanism. In the event of an individual being
locked inside the trunk, the trunk can be opened
by actuating the glow-in-the-dark handle attached
to the trunk latching mechanism.
Trunk Emergency Release
CARGO AREA FEATURES
60/40 Split-Folding Rear Seat —
If Equipped
The 60/40 split-folding rear seat provides
cargo-carrying versatility. The seatbacks fold down
easily by pulling nylon tabs between the seatbacks
and the bolsters. When the seats are folded down,
they provide a continuous, nearly-flat extension of
the load floor.
When the seatback is folded to the upright
pos
ition, make sure it is latched by strongly pulling
on the top of the seatback above the seat strap.
WARNING!
Do not allow children to have access to the
trunk, either by climbing into the trunk from
outside, or through the inside of the vehicle.
Always close the trunk lid when your vehicle is
unattended. Once in the trunk, young children
may not be able to escape, even if they entered
through the rear seat. If trapped in the trunk,
children can die from suffocation or heat stroke.
WARNING!
Be certain that the seatback is securely
locked into position. If the seatback is not
securely locked into position, the seat will not
provide the proper stability for child seats
and/or passengers. An improperly latched
seat could cause serious injury.
The cargo area in the rear of the vehicle (with
the rear seatbacks in the locked-up or folded
down position) should not be used as a play
area by children at any time. They could be
seriously injured in a collision. Children should
be seated and using the proper restraint
system.
To help protect against personal injury,
passengers should not be seated in the rear
cargo area. The rear cargo space is intended
for load carrying purposes only, not for
passengers, who should sit in seats and use
seat belts.
2
Page 75 of 268
GETTING TO KNOW YOUR INSTRUMENT PANEL 73
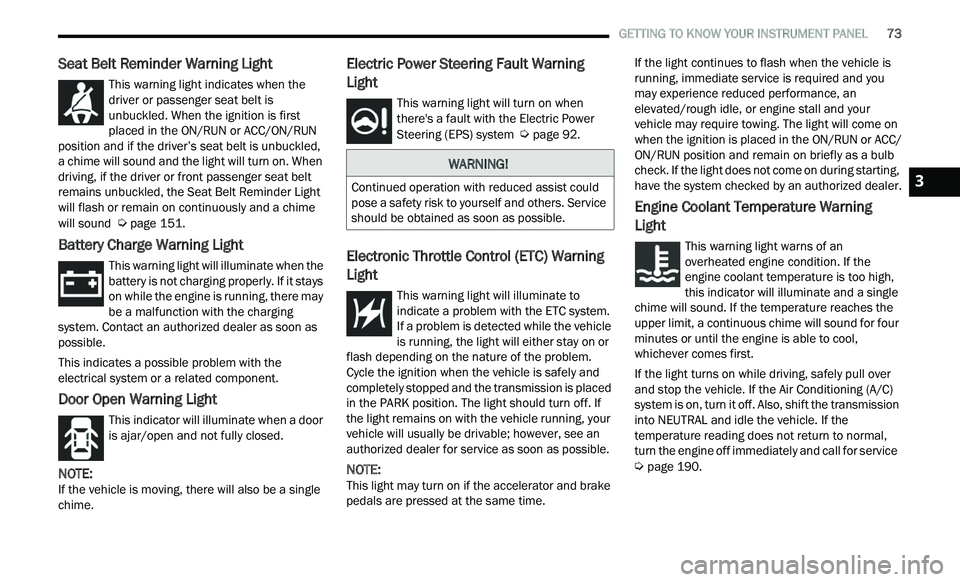
Seat Belt Reminder Warning Light
This warning light indicates when the
driver or passenger seat belt is
un
buckled. When the ignition is first
placed in the ON/RUN or ACC/ON/RUN
position and if the driver’s seat belt is unbuckled,
a chime will sound and the light will turn on. When
driving, if the driver or front passenger seat belt
remains unbuckled, the Seat Belt Reminder Light
will flash or remain on continuously and a chime
will sound
Ú page 151.
Battery Charge Warning Light
This warning light will illuminate when the
battery is not charging properly. If it stays
on
while the engine is running, there may
be a malfunction with the charging
system. Contact an authorized dealer as soon as
possible.
This indicates a possible problem with the
e l
ectrical system or a related component.
Door Open Warning Light
This indicator will illuminate when a door
is ajar/open and not fully closed.
NOTE:
If the vehicle is moving, there will also be a single
c h
ime.
Electric Power Steering Fault Warning
Light
This warning light will turn on when
there's a fault with the Electric Power
St
eering (EPS) system Ú page 92.
Electronic Throttle Control (ETC) Warning
Light
This warning light will illuminate to
indicate a problem with the ETC system.
I
f
a problem is detected while the vehicle
is running, the light will either stay on or
flash depending on the nature of the problem.
Cycle the ignition when the vehicle is safely and
completely stopped and the transmission is placed
in the PARK position. The light should turn off. If
the light remains on with the vehicle running, your
vehicle will usually be drivable; however, see an
authorized dealer for service as soon as possible.
NOTE:
This light may turn on if the accelerator and brake
p e
dals are pressed at the same time. If the light continues to flash when the vehicle is
r
u
nning, immediate service is required and you
may experience reduced performance, an
elevated/rough idle, or engine stall and your
vehicle may require towing. The light will come on
when the ignition is placed in the ON/RUN or ACC/
ON/RUN position and remain on briefly as a bulb
check. If the light does not come on during starting,
have the system checked by an authorized dealer.
Engine Coolant Temperature Warning
Light
This warning light warns of an
overheated engine condition. If the
e n
gine coolant temperature is too high,
this indicator will illuminate and a single
chime will sound. If the temperature reaches the
upper limit, a continuous chime will sound for four
minutes or until the engine is able to cool,
whichever comes first.
If the light turns on while driving, safely pull over
a n
d stop the vehicle. If the Air Conditioning (A/C)
system is on, turn it off. Also, shift the transmission
into NEUTRAL and idle the vehicle. If the
temperature reading does not return to normal,
turn the engine off immediately and call for service
Ú page 190.
WARNING!
Continued operation with reduced assist could
pose a safety risk to yourself and others. Service
should be obtained as soon as possible.3