2021 CHRYSLER 300 service reset
[x] Cancel search: service resetPage 28 of 268

26 GETTING TO KNOW YOUR VEHICLE
Uconnect System Support:
US residents visit www.DriveUconnect.com or
call: 1-877-855-8400 (24 hours a day 7 days a
w e
ek)
Canadian residents visit www.DriveUconnect.ca
or call: 1-800-465-2001 (English) or
1 -
800-387-9983 (French)
SiriusXM Guardian™ services support:
US residents visit www.driveuconnect.com/
sirius-xm-guardian or call: 1-844-796-4827
Canadian residents visit https://www.driveuco-
nnect.ca/en/sirius-xm-guardian or call:
1-877-324-9091
DRIVER MEMORY SETTINGS — IF EQUIPPED
This feature allows the driver to save up to two
different memory profiles for easy recall through a
memory switch. Each memory profile saves
desired position settings for the following features:
Driver seat
Easy Entry/Exit seat operation (if equipped)
Side mirrors
Power tilt and telescopic steering column (if
equipped)
A set of desired radio station presets
NOTE:
Your vehicle is equipped with two key fobs, each
can be linked to either memory position 1 or 2.
Be sure to program the radio presets prior to
programming the memory settings.
The memory settings switch is located on the
dr
iver’s door trim panel. The switch consists of
three buttons:
The set (S) button, which is used to activate the
memory save function.
The (1) and (2) buttons which are used to recall
either of two saved memory profiles.
Memory Switch
PROGRAMMING THE MEMORY FEATURE
To create a new memory profile, perform the
following:
NOTE:
Saving a new memory profile will erase the
s e
lected profile from memory.
1. Place the vehicle’s ignition in the ON/RUN p
osition (do not start the engine).
2. Adjust all memory profile settings to desired p
references (i.e., seat, side mirror, power tilt
and telescopic steering column [if equipped],
and radio station presets).
3. Push and release the set (S) button on the m
emory switch, and then push the desired
memory button (1 or 2) within five seconds.
The instrument cluster display will display
which memory position has been set.
NOTE:
Memory profiles can be set without the vehicle in
P A
RK, but the vehicle must be in PARK to recall a
memory profile.
Page 92 of 268
90 STARTING AND OPERATING
Transmission Limp Home Mode
Transmission function is monitored electronically
for abnormal conditions. If a condition is detected
that could result in transmission damage,
Transmission Limp Home Mode is activated. In this
mode, the transmission may operate only in
certain gears, or may not shift at all. Vehicle
performance may be severely degraded and the
engine may stall. In some situations, the
transmission may not re-engage if the engine is
turned off and restarted. The Malfunction Indicator
Light (MIL) may be illuminated. A message in the
instrument cluster will inform the driver of the
more serious conditions, and indicate what actions
may be necessary.
In the event of a momentary problem, the
tr
ansmission can be reset to regain all forward
gears by performing the following steps:
NOTE:
In cases where the instrument cluster message
i n
dicates the transmission may not re-engage after
engine shutdown, perform this procedure only in a
desired location (preferably, at an authorized
dealer).
1. S top the vehicle.
2
. S hift the transmission into PARK, if possible. If
n
ot, shift the transmission to NEUTRAL.
3. Push and hold the ignition switch until the e
ngine turns off. 4. W
ait approximately 30 seconds.
5
. R estart the engine.
6
. S hift into the desired gear range. If the
p
roblem is no longer detected, the
transmission will return to normal operation.
NOTE:
Even if the transmission can be reset, we
r e
commend that you visit an authorized dealer at
your earliest possible convenience. An authorized
dealer has diagnostic equipment to assess the
condition of your transmission.
If the transmission cannot be reset, authorized
d e
aler service is required.
AutoStick — If Equipped
AutoStick is a driver-interactive transmission
feature providing manual shift control, giving you
more control of the vehicle. AutoStick allows you to
maximize engine braking, eliminate undesirable
upshifts and downshifts, and improve overall
vehicle performance.
This system can also provide you with more control
du
ring passing, city driving, cold slippery
conditions, mountain driving, trailer towing, and
many other situations.
Operation
When the transmission is in DRIVE or SPORT mode,
i t
will operate automatically, shifting between the
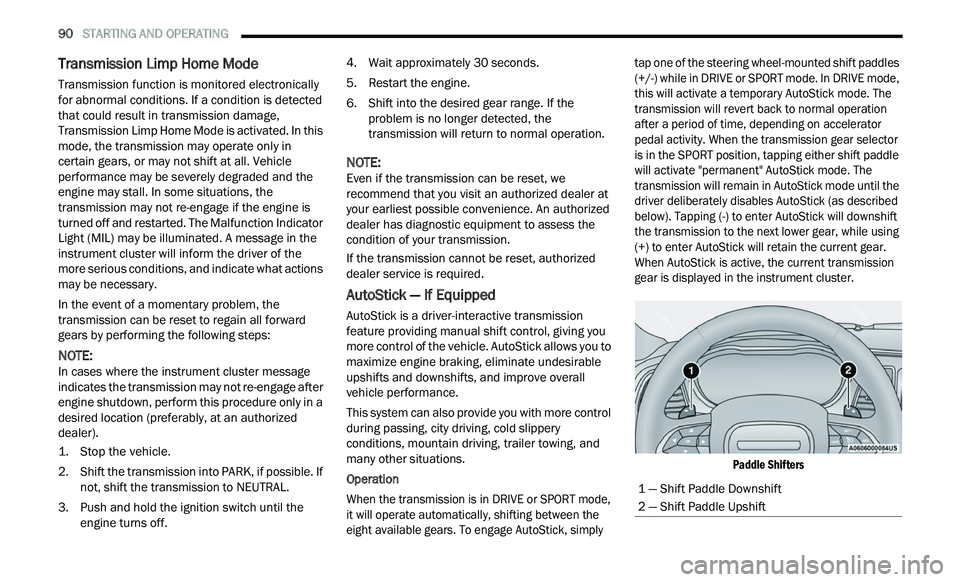
eight available gears. To engage AutoStick, simply tap one of the steering wheel-mounted shift paddles
(+/-) while in DRIVE or SPORT mode. In DRIVE mode,
this will activate a temporary AutoStick mode. The
transmission will revert back to normal operation
after a period of time, depending on accelerator
pedal activity. When the transmission gear selector
is in the SPORT position, tapping either shift paddle
will activate "permanent" AutoStick mode. The
transmission will remain in AutoStick mode until the
driver deliberately disables AutoStick (as described
below). Tapping (-) to enter AutoStick will downshift
the transmission to the next lower gear, while using
(+) to enter AutoStick will retain the current gear.
When AutoStick is active, the current transmission
gear is displayed in the instrument cluster.
Paddle Shifters
1 — Shift Paddle Downshift
2 — Shift Paddle Upshift
Page 94 of 268
92 STARTING AND OPERATING
FUEL SAVER TECHNOLOGY 5.7L ONLY —
IF EQUIPPED
This feature offers improved fuel economy by
shutting off four of the engine's eight cylinders
during light load and cruise conditions. The system
is automatic with no driver inputs or additional
driving skills required.
NOTE:
This system may take some time to return to full
f u
nctionality after a battery disconnect.
POWER STEERING
The Electric Power Steering system will give you
good vehicle response and increased ease of
maneuverability in tight spaces. The system will
vary its assist to provide light efforts while parking
and good feel while driving. If the electric steering
system experiences a fault that prevents it from
providing assist, you will still have the ability to
steer the vehicle manually. Alternate electric power steering efforts can be
s
e
lected through the Uconnect system
Ú page 122.
If the Electric Power Steering Fault
Warning Light is displayed and the
“ S
ERVICE POWER STEERING” or the
“POWER STEERING ASSIST OFF –
SERVICE SYSTEM” message is displayed within the
instrument cluster display, this indicates the
vehicle needs to be taken to the dealer for service
Ú page 71.
NOTE:
Even if the power steering assistance is no longer
operational, it is still possible to steer the vehicle.
Under these conditions there will be a substan
-
tial increase in steering effort, especially at low
s p
eeds and during parking maneuvers.
If the condition persists, see an authorized
dealer for service.
If the Electric Power Steering Fault Warning Light is
di
splayed and the “POWER STEERING SYSTEM
OVER TEMP” message is displayed on the
instrument cluster screen, they indicate that
extreme steering maneuvers may have occurred
which caused an over temperature condition in the
power steering system. Once driving conditions are
safe, pull over and let the vehicle idle for a few
moments until the Electric Power Steering Fault
Warning Light and message turn off.
CRUISE CONTROL SYSTEMS — IF EQUIPPED
Your vehicle may be equipped with the Cruise
Control system, or the Adaptive Cruise Control
(ACC) system:
Cruise Control will keep your vehicle at a
constant preset speed.
Adaptive Cruise Control (ACC) will adjust the
vehicle speed up to the preset speed to main -
tain a distance with the vehicle ahead.
NOTE:
In vehicles equipped with ACC, if ACC is not
enabled, Fixed Speed Cruise Control will not
detect vehicles directly ahead of you. Always be
aware of the feature selected.
Only one Cruise Control feature can operate at a
time. For example, if Fixed Speed Cruise Control
is enabled, Adaptive Cruise Control will be
unavailable, and vice versa.
CRUISE CONTROL
When engaged, the Cruise Control system takes
over accelerator operations at speeds greater than
25 mph (40 km/h), or 20 mph (32 km/h)
de
pending on engine size and axle ratio.
The Cruise Control buttons are located on the right
si
de of the steering wheel.
WARNING!
Continued operation with reduced assist could
pose a safety risk to yourself and others. Service
should be obtained as soon as possible.
Page 167 of 268
SAFETY 165
NOTE:
After an accident, remember to cycle the ignition to
t h
e STOP (OFF/LOCK) position and remove the key
from the ignition switch to avoid draining the
battery. Carefully check the vehicle for fuel leaks in
the engine compartment and on the ground near
the engine compartment and fuel tank before
resetting the system and starting the engine. If
there are no fuel leaks or damage to the vehicle
electrical devices (e.g. headlights) after an
accident, reset the system by following the
procedure described below. If you have any doubt,
contact an authorized dealer.
Enhanced Accident Response System
Reset Procedure
In order to reset the Enhanced Accident Response
System functions after an event, the ignition switch
must be changed from ignition START or ON/RUN
to ignition OFF. Carefully check the vehicle for fuel
leaks in the engine compartment and on the
ground near the engine compartment and fuel
tank before resetting the system and starting the
engine.
After an accident, if the vehicle will not start after
p e
rforming the reset procedure, the vehicle must
be towed to an authorized dealer to be inspected
and to have the Enhanced Accident Response
System reset.
Maintaining Your Air Bag System Event Data Recorder (EDR)
This vehicle is equipped with an event data
recorder (EDR). The main purpose of an EDR is to
record, in certain crash or near crash-like
situations, such as an air bag deployment or hitting
a road obstacle, data that will assist in
understanding how a vehicle’s systems performed.
The EDR is designed to record data related to
vehicle dynamics and safety systems for a short
period of time, typically 30 seconds or less. The
EDR in this vehicle is designed to record such data
as:
How various systems in your vehicle were oper -
ating;
Whether or not the driver and passenger safety
belts were buckled/fastened;
How far (if at all) the driver was depressing the
accelerator and/or brake pedal; and,
How fast the vehicle was traveling.
These data can help provide a better
u n
derstanding of the circumstances in which
crashes and injuries occur.
NOTE:
EDR data are recorded by your vehicle only if a
n on
-trivial crash situation occurs; no data are
recorded by the EDR under normal driving condi -
tions and no personal data (e.g., name, gender,
a g
e, and crash location) are recorded. However,
other parties, such as law enforcement, could
WARNING!
Modifications to any part of the air bag system
could cause it to fail when you need it. You
could be injured if the air bag system is not
there to protect you. Do not modify the compo -
nents or wiring, including adding any kind of
ba
dges or stickers to the steering wheel hub
trim cover or the upper passenger side of the
instrument panel. Do not modify the front
fascia/bumper, vehicle body structure, or add
aftermarket side steps or running boards.
It is dangerous to try to repair any part of the
air bag system yourself. Be sure to tell anyone
who works on your vehicle that it has an air
bag system.
Do not attempt to modify any part of your air
bag system. The air bag may inflate accidentally
or may not function properly if modifications are
made. Take your vehicle to an authorized dealer
for any air bag system service. If your seat,
including your trim cover and cushion, needs to
be serviced in any way (including removal or
loosening/tightening of seat attachment bolts),
take the vehicle to an authorized dealer. Only
manufacturer approved seat accessories may
be used. If it is necessary to modify the air bag
system for persons with disabilities, contact an
authorized dealer.
6
Page 197 of 268
195
SERVICING AND MAINTENANCE
SCHEDULED SERVICING
This vehicle is equipped with an automatic oil
change indicator system. The oil change indicator
system will remind you that it is time to take your
vehicle in for scheduled maintenance.
Based on engine operation conditions, the oil
ch
ange indicator message will illuminate. This
means that service is required for the vehicle.
Operating conditions such as frequent short-trips,
trailer tow, and extremely hot or cold ambient
temperatures will influence when the “Change Oil”
or “Oil Change Required” message is displayed.
Have your vehicle serviced as soon as possible,
within the next 500 miles (805 km). The “Oil Change Required” message will be
di
splayed in the instrument cluster and a single
chime will sound, indicating that an oil change is
necessary.
An authorized dealer will reset the oil change
in
dicator message after completing the scheduled
oil change.
NOTE:
Under no circumstances should oil change
i n
tervals exceed 10,000 miles (16,000 km),
1 2
months or 350 hours of engine run time,
w h
ichever comes first. The 350 hours of engine
run or idle time is generally only a concern for fleet
customers. Once A Month Or Before A Long Trip:
Check engine oil level.
Check windshield washer fluid level.
Check tire pressure and look for unusual wear
or damage. Rotate tires at the first sign of irreg
-
ular wear, even if it occurs before your next
s c
heduled service.
Check the fluid levels of the coolant reservoir,
brake master cylinder, and power steering (if
equipped) and fill as needed.
Check function of all interior and exterior lights.
8
Page 215 of 268
SERVICING AND MAINTENANCE 213
Fluid Level Check
The fluid level is preset at the factory and does not
require adjustment under normal operating
conditions. Routine fluid level checks are not
required; therefore the transmission has no
dipstick. An authorized dealer can check your
transmission fluid level using special service tools.
If you notice fluid leakage or transmission
malfunction, visit an authorized dealer
immediately to have the transmission fluid level
checked. Operating the vehicle with an improper
fluid level can cause severe transmission damage.
Fluid And Filter Changes
Under normal operating conditions, the fluid
installed at the factory will provide satisfactory
lubrication for the life of the vehicle.
Routine fluid and filter changes are not required.
How e
ver, change the fluid and filter if the fluid
becomes contaminated (with water, etc.), or if the
transmission is disassembled for any reason.
Selection Of Lubricant
It is important to use the proper transmission fluid
to ensure optimum transmission performance and
life. Use only the manufacturer's specified
transmission fluid
Ú page 250. It is important to
maintain the transmission fluid at the correct level
u s
ing the recommended fluid.
NOTE:
No chemical flushes should be used in any trans -
mission; only the approved lubricant should be
u s
ed.
ALL WHEEL DRIVE (AWD) —
I
F EQUIPPED
The All Wheel Drive system consists of a transfer
case and front differential. The exterior surface of
these components should be inspected for
evidence of fluid leaks. Confirmed leaks should be
repaired as soon as possible.
The transfer case fluid fill/inspection plug is
l oc
ated in the middle of the rear housing. To
inspect the transfer case fluid level, remove the
fill/inspection plug. The fluid level should be even
with the bottom of the hole. Use this plug to add
fluid as required.
The front differential fill plug is located on the outer
cov
er near the half shaft attachment. To inspect
the differential fluid level, remove the fill plug. The
fluid level should be even with or slightly below the
bottom of the hole.
Fluid Changes
For the proper maintenance intervals Ú page 195.
REAR AXLE
For normal service, periodic fluid level checks are
not required. When the vehicle is serviced for other
reasons the exterior surfaces of the axle assembly
should be inspected. If gear oil leakage is
suspected inspect the fluid level
Ú page 250.
CAUTION!
Do not use chemical flushes in your
transmission as the chemicals can damage your
transmission components. Such damage is not
covered by the New Vehicle Limited Warranty.
CAUTION!
If a transmission fluid leak occurs, visit an
authorized dealer immediately. Severe
transmission damage may occur. An authorized
dealer has the proper tools to adjust the fluid
level accurately.CAUTION!
Using a transmission fluid other than the
manufacturer’s recommended fluid may cause
deterioration in transmission shift quality and/or
torque converter shudder
Ú page 250.
8