2021 CHRYSLER 300 brake light
[x] Cancel search: brake lightPage 10 of 268
8
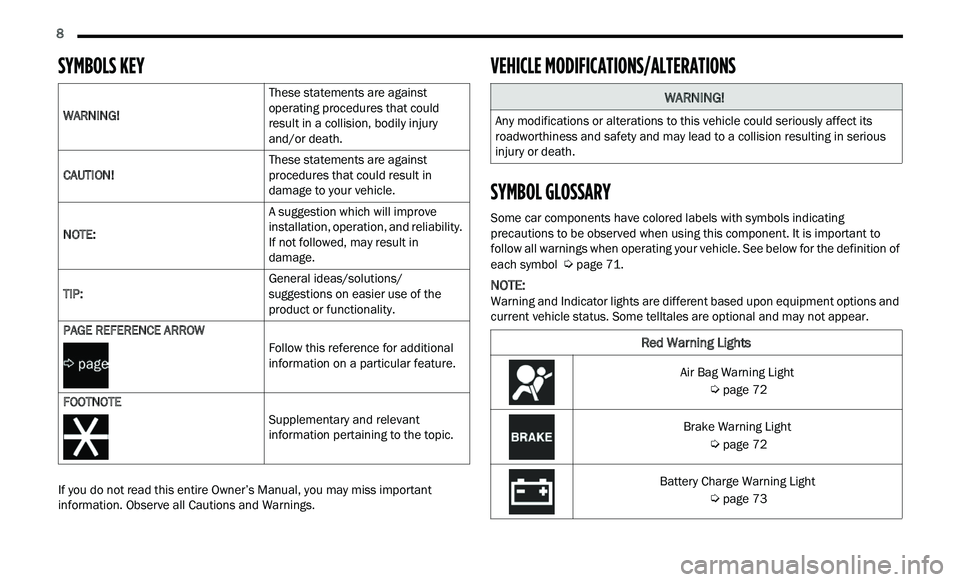
SYMBOLS KEY
If you do not read this entire Owner’s Manual, you may miss important
information. Observe all Cautions and Warnings.
VEHICLE MODIFICATIONS/ALTERATIONS
SYMBOL GLOSSARY
Some car components have colored labels with symbols indicating
precautions to be observed when using this component. It is important to
follow all warnings when operating your vehicle. See below for the definition of
each symbol
Ú page 71.
NOTE:
Warning and Indicator lights are different based upon equipment options and
c u
rrent vehicle status. Some telltales are optional and may not appear.
WARNING!
These statements are against
o
p
erating procedures that could
result in a collision, bodily injury
and/or death.
CAUTION! These statements are against
p
r
ocedures that could result in
damage to your vehicle.
NOTE: A suggestion which will improve
in
stallation, operation, and reliability.
If not followed, may result in
damage.
TIP: General ideas/solutions/
s
u
ggestions on easier use of the
product or functionality.
PAGE REFERENCE ARROW
Follow this reference for additional
in
formation on a particular feature.
FOOTNOTE Supplementary and relevant
in
formation pertaining to the topic.
WARNING!
Any modifications or alterations to this vehicle could seriously affect its
roadworthiness and safety and may lead to a collision resulting in serious
injury or death.
Red Warning Lights
Air Bag Warning Light
Ú page 72
Brake Warning Light
Ú page 72
Battery Charge Warning Light
Ú page 73
Page 12 of 268
10
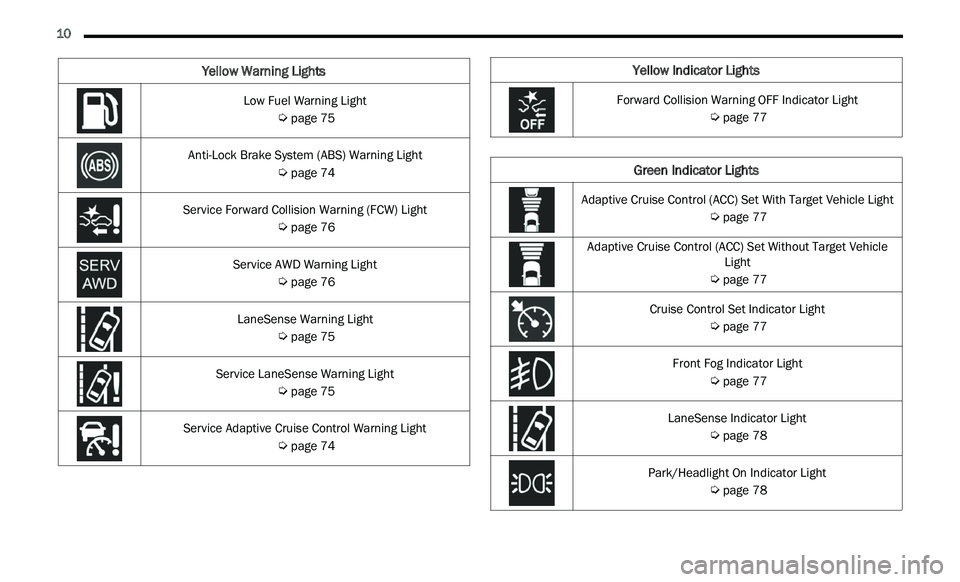
Low Fuel Warning Light
Ú page 75
Anti-Lock Brake System (ABS) Warning Light
Ú page 74
Service Forward Collision Warning (FCW) Light
Ú page 76
Service AWD Warning Light
Ú page 76
LaneSense Warning Light
Ú page 75
Service LaneSense Warning Light
Ú page 75
Service Adaptive Cruise Control Warning Light
Ú page 74
Yellow Warning LightsYellow Indicator Lights
Forward Collision Warning OFF Indicator Light
Ú page 77
Green Indicator Lights
Adaptive Cruise Control (ACC) Set With Target Vehicle Light
Ú page 77
Adaptive Cruise Control (ACC) Set Without Target Vehicle Lig
ht
Ú page 77
Cruise Control Set Indicator Light
Ú page 77
Front Fog Indicator Light
Ú page 77
LaneSense Indicator Light
Ú page 78
Park/Headlight On Indicator Light
Ú page 78
Page 17 of 268

GETTING TO KNOW YOUR VEHICLE 15
If the Vehicle Security Light turns on during normal
vehicle operation (vehicle running for longer than
10 seconds), it indicates that there is a fault in the
electronics. Should this occur, have the vehicle
serviced as soon as possible by an authorized
dealer.
All of the key fobs provided with your new vehicle
ha
ve been programmed to the vehicle electronics
Ú page 254.
IGNITION SWITCH
KEYLESS ENTER ‘N GO™ — IGNITION
This feature allows the driver to operate the
ignition switch with the push of a button as long as
the key fob is in the passenger compartment.
The START/STOP ignition button has several
ope
rating modes that are labeled and will
illuminate when in position. These modes are OFF,
ACC, ON/RUN, and START.
START/STOP Ignition Button
The push button ignition can be placed in the
f ol
lowing modes:
OFF
The engine is stopped.
Some electrical devices (e.g. central locking,
alarm, etc.) are still available.
ACC
Engine is not started.
Some electrical devices are available (e.g.
power windows). ON/RUN
Driving position.
All electrical devices are available (e.g. climate
controls, etc.).
START
The engine will start (when foot is on the brake
pedal).
NOTE:
If the ignition switch does not change the mode by
p u
shing the button, the key fob may have a low or
depleted battery. In this situation, a back up
method can be used to operate the ignition switch.
Put the nose side (side opposite of the emergency
key) of the key fob against the START/STOP
ignition button and push to operate the ignition
switch.
Depleted Key Fob Battery Procedure
CAUTION!
The Sentry Key Immobilizer system is not
compatible with some aftermarket Remote Start
systems. Use of these systems may result in
vehicle starting problems and loss of security
protection.
1 — OFF
2 — ACC
3 — ON/RUN
2
Page 18 of 268
16 GETTING TO KNOW YOUR VEHICLE
(Continued)
NOTE:
When opening the driver's door with the ignition in
ON/RUN (engine not running), a chime will sound
to remind you to place the ignition in the OFF posi-
tion. In addition to the chime, the message will
d i
splay “Ignition Or Accessory On” in the cluster.
For more information on proper engine starting
procedures, see Ú page 81.
REMOTE START — IF EQUIPPED
This system uses the key fob to start the
engine conveniently from outside the
v
e
hicle while still maintaining security.
Remote Start is used to defrost windows in cold
we
ather, and to reach a comfortable climate in all
ambient conditions before the driver enters the
vehicle.
NOTE:
Obstructions between the vehicle and key fob may
r e
duce this range Ú page 254.
HOW TO USE REMOTE START
Push and release the Remote Start button on the
key fob twice within five seconds. The vehicle
doors will lock, the parking lights will flash, and the
horn will chirp twice (if programmed through the
Uconnect Settings). Then, the engine will start, and
the vehicle will remain in the Remote Start mode
for a 15
minute cycle. Pushing the Remote Start
bu
tton a third time shuts the engine off.
To drive the vehicle, push the unlock button, and
wi
th a valid Keyless Enter ‘n Go™ key fob in the
vehicle, press the brake pedal and place the
ignition in the ON/RUN position.
NOTE:
With Remote Start, the engine will only run for
15 minutes.
If an engine fault is present or fuel level is low,
the vehicle will start and then shut down in 10
seconds.
The parking lights will turn on and remain on
during Remote Start mode.
WARNING!
When exiting the vehicle, always remove the
key fob from the vehicle and lock your vehicle.
Never leave children alone in a vehicle, or with
access to an unlocked vehicle.
Allowing children to be in a vehicle unattended
is dangerous for a number of reasons. A child
or others could be seriously or fatally injured.
Children should be warned not to touch the
parking brake, brake pedal or the gear
selector.
Do not leave the key fob in or near the vehicle,
or in a location accessible to children, and do
not leave the ignition of a vehicle equipped
with Keyless Enter ‘n Go™ in the ON/RUN
position. A child could operate power
windows, other controls, or move the vehicle.
Do not leave children or animals inside parked
vehicles in hot weather. Interior heat buildup
may cause serious injury or death.
CAUTION!
An unlocked vehicle is an invitation for thieves.
Always remove key fob from the vehicle and lock
all doors when leaving the vehicle unattended.
WARNING!
Do not start or run an engine in a closed garage
or confined area. Exhaust gas contains Carbon
Monoxide (CO) which is odorless and colorless.
Carbon Monoxide is poisonous and can cause
serious injury or death when inhaled.
Keep key fobs away from children. Operation
of the Remote Start system, windows, door
locks or other controls could cause serious
injury or death.
WARNING!
Page 19 of 268

GETTING TO KNOW YOUR VEHICLE 17
For security, power window operation is
disabled when the vehicle is in the Remote Start
mode.
Remote Start can only be used twice. The igni -
tion must be placed in the ON/RUN position
b e
fore the Remote Start sequence can be
repeated for a third cycle.
All of the following conditions must be met before
t h
e engine will remote start:
Gear selector in PARK
Doors closed
Hood closed
Trunk closed
Hazard switch off
Brake switch inactive (brake pedal not pressed)
Battery at an acceptable charge level
PANIC button not pushed
System not disabled from previous Remote
Start event
Vehicle Security Light is flashing
Ignition in OFF position
Fuel level meets minimum requirement
Vehicle Security system is not signaling an intru -
sion
Malfunction Indicator Light is not illuminated
TO EXIT REMOTE START MODE
To drive the vehicle after starting the Remote Start
system, either push and release the unlock button
on the key fob to unlock the doors, or unlock the
vehicle using Keyless Enter ‘n Go™ — Passive Entry
via the door handles, and disarm the Vehicle
Security system (if equipped). Then, prior to the
end of the 15 minute cycle, push and release the
S T
ART/STOP ignition button.
The Remote Start system will turn the engine off
wi
th another push and release of the Remote Start
button on the key fob, or if the engine is allowed to
run for the entire 15 minute cycle. Once the
i g
nition is placed in the ON/RUN position, the
climate controls will resume the previously set
operations (temperature, blower control, etc.).
NOTE:
To avoid unintentional shutdowns, the system
will disable for two seconds after receiving a
valid Remote Start request.
For vehicles equipped with the Keyless Enter ‘n
Go™ — Passive Entry feature, the message
“Remote Start Active — Push Start Button” will
display in the instrument cluster display until
you push the START/STOP ignition button.
REMOTE START FRONT DEFROST
A
CTIVATION — IF EQUIPPED
When Remote Start is active, and the outside
ambient temperature is 40°F (4.5°C) or below, the
system will automatically activate front defrost for
15 minutes or less. The time is dependent on the
a m
bient temperature. Once the timer expires, the
system will automatically adjust the settings
depending on ambient conditions. See “Remote
Start Comfort Systems — If Equipped” in the next
section for detailed operation.
REMOTE START COMFORT SYSTEMS —
I
F EQUIPPED
When Remote Start is activated, the front and rear
defrost will automatically turn on in cold weather.
The heated steering wheel and driver heated seat
feature will turn on if selected in the comfort menu
screen within Uconnect Settings
Ú page 122.
WARNING!
Do not start or run an engine in a closed
garage or confined area. Exhaust gas contains
Carbon Monoxide (CO) which is odorless and
colorless. Carbon Monoxide is poisonous and
can cause serious injury or death when
inhaled.
Keep key fobs away from children. Operation
of the Remote Start system, windows, door
locks or other controls could cause serious
injury or death.
2
Page 43 of 268
GETTING TO KNOW YOUR VEHICLE 41
DAYTIME RUNNING LIGHTS (DRLS)
The Daytime Running Lights will turn on when the
engine is started and will remain on unless the
headlights are turned to the on position, the
parking brake is applied, or the ignition is placed in
the OFF position.
NOTE:
For vehicles sold in Canada, the Daytime
Running Lights will automatically deactivate
when the front fog lights are turned on.
If allowed by law in the country in which the
vehicle was purchased, the Daytime Running
Lights can be turned on and off using the
Uconnect system
Ú page 122.
On some vehicles, the Daytime Running Lights
may deactivate or reduce intensity on one side
of the vehicle (when a turn signal is activated on
that side), or on both sides of the vehicle (when
the hazard warning lights are activated).
HIGH/LOW BEAM SWITCH
Push the multifunction lever toward the instrument
panel to switch the headlights to high beams.
Pulling the multifunction lever back will turn the
low beams on.
AUTOMATIC HIGH BEAM — IF EQUIPPED
The Automatic High Beam Headlamp Control
system provides increased forward lighting at night
by automating high beam control through the use
of a digital camera mounted on the inside rearview
mirror. This camera detects vehicle specific light
and automatically switches from high beams to low
beams until the approaching vehicle is out of view.
NOTE:
The Automatic High Beam Headlamp Control
can be turned on or off by selecting or dese
-
lecting “Auto High Beam” within Uconnect
Se
ttings Ú page 122, as well as turning the
headlight switch to the AUTO position.
Broken, muddy, or obstructed headlights and
taillights of vehicles in the field of view will
cause headlights to remain on longer (closer to
the vehicle). Also, dirt, film, and other obstruc -
tions on the windshield or camera lens will
c a
use the system to function improperly.
If the windshield or Automatic High Beam Head -
lamp Control mirror is replaced, the mirror must
b e
re-aimed to ensure proper performance. See
a local authorized dealer.
FLASH-TO-PASS
You can signal another vehicle with your headlights
by lightly pulling the multifunction lever toward you. This will cause the high beam headlights to turn on,
and remain on, until the lever is released.
AUTOMATIC HEADLIGHTS
This system automatically turns the headlights on
or off according to ambient light levels. To turn the
system on, rotate the headlight switch
counterclockwise to the AUTO position. When the
system is on, the headlight time delay feature is
also on. This means the headlights will stay on for
up to 90 seconds after placing the ignition in the
OFF position. The headlight time delay can be
programmed 0/30/60/90 seconds within
Uconnect Settings
Ú page 122.
To turn the automatic system off, move the
h e
adlight switch out of the AUTO position.
NOTE:
The engine must be running before the headlights
w i
ll come on in the automatic mode.
PARKING LIGHTS
To turn on the parking lights and instrument panel
lights, rotate the headlight switch clockwise. To
turn off the parking lights, rotate the headlight
switch back to the O (off) position.
NOTE:
For vehicles sold in Canada, rotate the headlight
s w
itch to the AUTO position to turn off the parking
lights.
2
Page 74 of 268
72 GETTING TO KNOW YOUR INSTRUMENT PANEL
and as such must not be considered as exhaustive
and/or alternative to the information contained in
the Owner’s Manual, which you are advised to read
carefully in all cases. Always refer to the
information in this chapter in the event of a failure
indication. All active warning lights will display first
if applicable. The system check menu may appear
different based upon equipment options and
current vehicle status. Some warning lights are
optional and may not appear.
RED WARNING LIGHTS
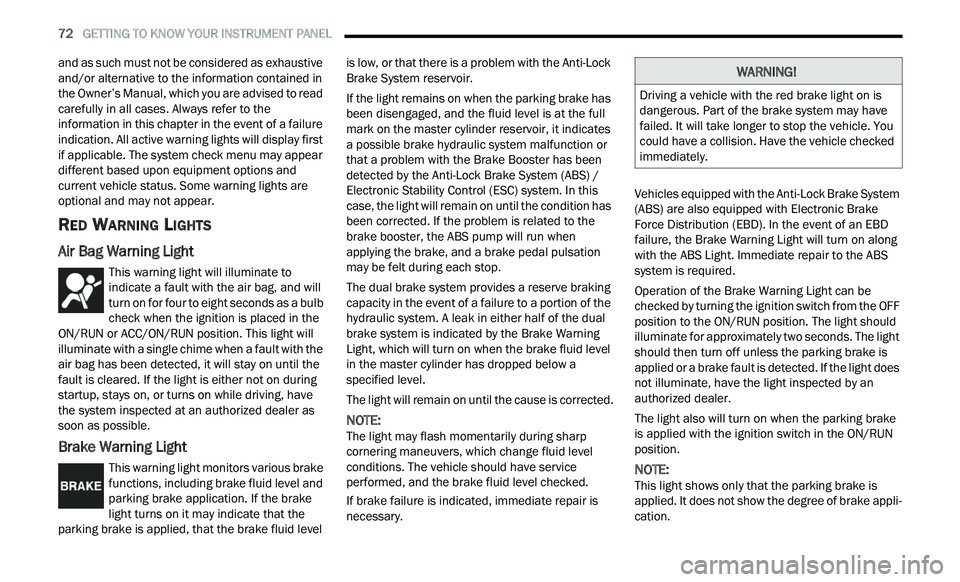
Air Bag Warning Light
This warning light will illuminate to
indicate a fault with the air bag, and will
t
u
rn on for four to eight seconds as a bulb
check when the ignition is placed in the
ON/RUN or ACC/ON/RUN position. This light will
illuminate with a single chime when a fault with the
air bag has been detected, it will stay on until the
fault is cleared. If the light is either not on during
startup, stays on, or turns on while driving, have
the system inspected at an authorized dealer as
soon as possible.
Brake Warning Light
This warning light monitors various brake
functions, including brake fluid level and
p a
rking brake application. If the brake
light turns on it may indicate that the
parking brake is applied, that the brake fluid level is low, or that there is a problem with the Anti-Lock
Brake System reservoir.
If the light remains on when the parking brake has
b
e
en disengaged, and the fluid level is at the full
mark on the master cylinder reservoir, it indicates
a possible brake hydraulic system malfunction or
that a problem with the Brake Booster has been
detected by the Anti-Lock Brake System (ABS) /
Electronic Stability Control (ESC) system. In this
case, the light will remain on until the condition has
been corrected. If the problem is related to the
brake booster, the ABS pump will run when
applying the brake, and a brake pedal pulsation
may be felt during each stop.
The dual brake system provides a reserve braking
c a
pacity in the event of a failure to a portion of the
hydraulic system. A leak in either half of the dual
brake system is indicated by the Brake Warning
Light, which will turn on when the brake fluid level
in the master cylinder has dropped below a
specified level.
The light will remain on until the cause is corrected.
NOTE:
The light may flash momentarily during sharp
c or
nering maneuvers, which change fluid level
conditions. The vehicle should have service
performed, and the brake fluid level checked.
If brake failure is indicated, immediate repair is
ne
cessary. Vehicles equipped with the Anti-Lock Brake System
(
A
BS) are also equipped with Electronic Brake
Force Distribution (EBD). In the event of an EBD
failure, the Brake Warning Light will turn on along
with the ABS Light. Immediate repair to the ABS
system is required.
Operation of the Brake Warning Light can be
c h
ecked by turning the ignition switch from the OFF
position to the ON/RUN position. The light should
illuminate for approximately two seconds. The light
should then turn off unless the parking brake is
applied or a brake fault is detected. If the light does
not illuminate, have the light inspected by an
authorized dealer.
The light also will turn on when the parking brake
i s
applied with the ignition switch in the ON/RUN
position.
NOTE:
This light shows only that the parking brake is
a p
plied. It does not show the degree of brake appli -
cation.
WARNING!
Driving a vehicle with the red brake light on is
dangerous. Part of the brake system may have
failed. It will take longer to stop the vehicle. You
could have a collision. Have the vehicle checked
immediately.
Page 75 of 268
GETTING TO KNOW YOUR INSTRUMENT PANEL 73
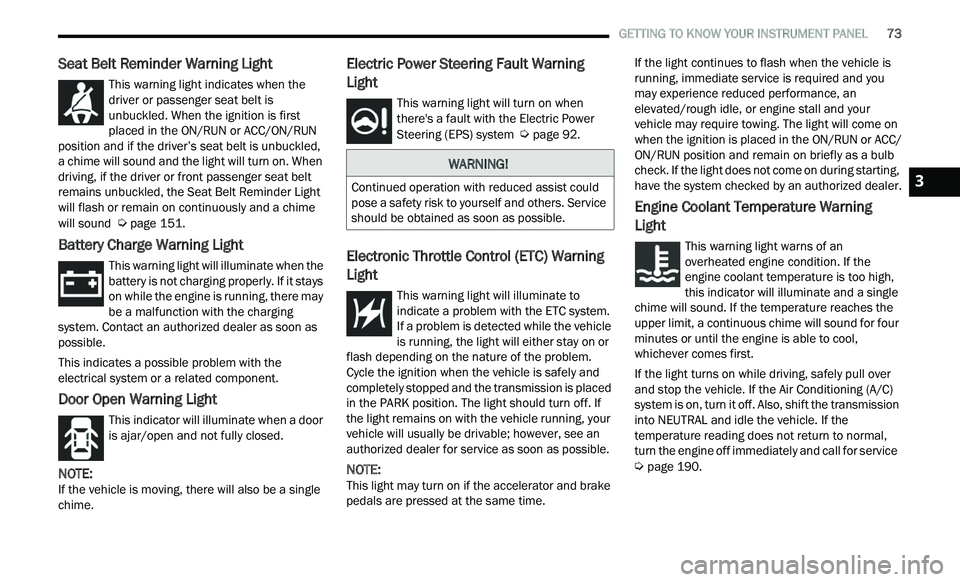
Seat Belt Reminder Warning Light
This warning light indicates when the
driver or passenger seat belt is
un
buckled. When the ignition is first
placed in the ON/RUN or ACC/ON/RUN
position and if the driver’s seat belt is unbuckled,
a chime will sound and the light will turn on. When
driving, if the driver or front passenger seat belt
remains unbuckled, the Seat Belt Reminder Light
will flash or remain on continuously and a chime
will sound
Ú page 151.
Battery Charge Warning Light
This warning light will illuminate when the
battery is not charging properly. If it stays
on
while the engine is running, there may
be a malfunction with the charging
system. Contact an authorized dealer as soon as
possible.
This indicates a possible problem with the
e l
ectrical system or a related component.
Door Open Warning Light
This indicator will illuminate when a door
is ajar/open and not fully closed.
NOTE:
If the vehicle is moving, there will also be a single
c h
ime.
Electric Power Steering Fault Warning
Light
This warning light will turn on when
there's a fault with the Electric Power
St
eering (EPS) system Ú page 92.
Electronic Throttle Control (ETC) Warning
Light
This warning light will illuminate to
indicate a problem with the ETC system.
I
f
a problem is detected while the vehicle
is running, the light will either stay on or
flash depending on the nature of the problem.
Cycle the ignition when the vehicle is safely and
completely stopped and the transmission is placed
in the PARK position. The light should turn off. If
the light remains on with the vehicle running, your
vehicle will usually be drivable; however, see an
authorized dealer for service as soon as possible.
NOTE:
This light may turn on if the accelerator and brake
p e
dals are pressed at the same time. If the light continues to flash when the vehicle is
r
u
nning, immediate service is required and you
may experience reduced performance, an
elevated/rough idle, or engine stall and your
vehicle may require towing. The light will come on
when the ignition is placed in the ON/RUN or ACC/
ON/RUN position and remain on briefly as a bulb
check. If the light does not come on during starting,
have the system checked by an authorized dealer.
Engine Coolant Temperature Warning
Light
This warning light warns of an
overheated engine condition. If the
e n
gine coolant temperature is too high,
this indicator will illuminate and a single
chime will sound. If the temperature reaches the
upper limit, a continuous chime will sound for four
minutes or until the engine is able to cool,
whichever comes first.
If the light turns on while driving, safely pull over
a n
d stop the vehicle. If the Air Conditioning (A/C)
system is on, turn it off. Also, shift the transmission
into NEUTRAL and idle the vehicle. If the
temperature reading does not return to normal,
turn the engine off immediately and call for service
Ú page 190.
WARNING!
Continued operation with reduced assist could
pose a safety risk to yourself and others. Service
should be obtained as soon as possible.3