Page 329 of 364

Mobility
CO
rN
IV
rN
•-i
00
Removing the spare wheel
• Lift the floor panel up by the plastic handle un
til the panel is fixed in position behind the re
taining tabs on the two side sections
©
*
Fig.
266.
• Applies to vehicles with bass box in spare wheel
well:
Remove the bass box*. Please first check
the connector to establish which bass box is fit
ted in your vehicle: version 1)
*page
325 or
version 2)
*page
326.
• Turn the plastic knob anti-clockwise.
• Take out the spare wheel.
Snow chains
For technical reasons, snow chains must not be
used on the compact temporary spare wheel.
Should you have a puncture on one of the front
wheels when using snow chains, fit the compact
temporary spare wheel in place of one of the rear
wheels. You can then attach the snow chains to
the wheel taken from the rear and use this wheel
to replace the punctured front wheel.
A WARNING
- The tyre pressure must be checked as soon
as possible after fitting the spare wheel - an
incorrectly inflated tyre can increase the risk
of accident. You can find the tyre pressures
here
*page
307, Fig. 253.
- Do not drive faster than 80 km/h when the
compact temporary spare wheel is fitted -
higher speeds can cause an accident.
-Avoid heavy acceleration, hard braking and
fast cornering when the compact temporary
spare wheel is fitted - risk of accident!
- Never use two or more compact spare tyres
at the same time - risk of accident!
- No other type of tyre (normal summer or
winter tyres) may be fitted on the compact
temporary spare wheel.
Removing the bass box (version 1)
Applies to: vehicles with bass box in spare wheel well
You
must remove the bass box before you can
take out the spare wheel*.
«
Fig.
268 Spare wheel
well:
Bass box
Removing the bass box
• Lift the floor panel
<=>page
324, Fig. 266.
• Compress the retaining
tabs©*Fig.
268 on
the connector.
• Unplug the connector © and move the discon
nected cable clear to one side.
• Unscrew
bolt©.
• Carefully take out the bass box.
Installing the bass box
• Carefully place the bass box in the well of the
rim.
Make sure that the inscription "FRONT" on
the bass box points to the front of the vehicle.
• Plug the connector back in again.
• Secure the bass box with the screw.
• Fold the floor panel back down.
(T) Note
The bass box can be fitted even if there is no
wheel in the spare wheel
well.
325
Page 330 of 364

Mobility
Removing the bass box (version 2)
Applies to: vehicles with bass box in spare wheel well
You
must remove the bass box before you can
take out the spare wheel*.
f
Fig.
269 Spare wheel
well:
Bass box
Removing the bass box
• Lift the floor panel
*page
324, Fig. 266.
•
Pull
the
catch
Q^F/g.
269 towards the cable.
• Press the retaining tab © down.
• Unplug the connector © and move the discon
nected cable clear to one side.
• Unscrew
bolt
(4).
• Carefully take out the bass box.
Installing the bass box
• Carefully place the bass box in the well of the
rim.
Make sure that the inscription "FRONT" on
the bass box points to the front of the vehicle.
• Plug the connector back in again.
• Push the catch © back towards the bass box.
• Secure the bass box with the screw.
• Fold the floor panel back down.
Note
The bass box can be fitted even if there is no
wheel in the spare wheel
welL.
Jump-starting
Before starting the engine
If
necessary,
the engine can be started by con
necting it to the battery of another vehicle.
If the engine fails to start because of
a
dis
charged battery, the vehicle battery can be
con
nected to the battery of another vehicle to start
the engine. Suitable jump leads are required.
Both vehicle batteries must be rated at 12 V. The
capacity (Ah) of the booster battery should not
be significantly lower than that of the discharged
battery.
Jump leads
The jump Leads must be heavy enough to carry
the starter current. Refer to the details given by
the manufacturer.
Only
use
jump leads with insulated battery
clamps.
Positive cable - usually red.
Negative cable - usually black.
WARNING
- When it is discharged the vehicle battery
can freeze at temperatures around 0°C. A
frozen vehicle battery must first be thawed
out before connecting the jump leads - risk
of explosion and chemical burns! After
jump-starting the vehicle, drive to a quali
fied workshop without delay and have the
vehicle battery checked.
- The engine compartment is a potentially
hazardous area and working here can lead
to serious injuries. Before carrying out any
work in the engine compartment please
read and observe the warnings
*page
295.
- Incorrect handling of the jump leads may
result in the vehicLe battery exploding (risk
of serious injury). Please observe the follow
ing rules to minimise the risk of injury:
- The non-insulated parts of the battery
clamps must not be allowed to touch. The
jump lead attached to the positive terminal
must not touch metal parts of the vehicle:
this can cause short circuiting.
- Position the jump leads in such a way that
they cannot come into contact with any
moving parts in the engine compartment.
- Do not lean over the vehicle battery - risk of
chemical burns!
- The screw plugs on the battery cells must be
screwed in firmly.
326
Page 331 of 364

Mobility
CO
rN
IV
rN
•-i
00
- Keep sparks, flame and lit cigarettes away
from vehicle batteries: the gases given off
can cause an explosion.
- Do not attach the negative cable to parts of
the fuel system or to the brake pipes.
© CAUTION
- The vehicles must not touch each other,
otherwise electricity could flow as soon as
the positive terminals are connected and
the boosting battery could be discharged.
- If the jump leads are not connected correct
ly this can result in serious damage to the
electrical system of the vehicle.
- The discharged vehicle battery must be
properly connected to the vehicle's electri
cal system.
- Please note that the method described
be
low for connecting the leads is intended for
jump-starting your vehicle. If jump-starting
another vehicle, you should not connect the
negative lead (-) to the negative terminal of
the discharged battery, but directly to the
engine block or
a
solid metal part bolted to
the engine block. If the battery of the other
vehicle does not have a gas vent, there is a
risk that
a
mixture of oxygen and hydrogen
gas can accumulate and cause an explosion.
© Note
Switch off the car telephone if necessary. De
tails will be given in the manufacturer's in
structions for the car telephone.
Starting the engine
The two
jump leads must be connected in the
correct
sequence.
Fig.
270 jump-starting with the vehicle battery of another
vehicle:
®
- Discharged battery, ® - Boosting battery
The vehicle battery is located at the front Left of
the engine compartment. Open the cover to ac
cess the positive terminal of the vehicle battery.
Please note that the described method of
con
necting the leads is meant for jump-starting your
vehicle.
Please observe the general notes on the vehicle
battery
*page
302.
Preparations
1.
Please read
*page
326, Before starting the
engine carefully before proceeding.
2.
Apply the parking brake and move the gear
lever to neutral (on vehicles with manual
gearbox) or move the selector lever to
P
(on
vehicles with automatic gearbox).
3. Switch off all electrical equipment and the
ignition on both vehicles.
Connecting and disconnecting the jump
leads
4.
Open the battery cover.
5. Connect one end of the red jump lead to the
positive
terminal®
*Fig.
270 of the dis
charged battery
© oQ)
in Before starting
the engine on page 327.
6. Connect the other end of the red jump lead
to the positive terminal
©
of the boosting
battery®.
327
Page 332 of 364

Mobility
7. Connect one end of the black lead preferably
to the earth point or alternatively to the
neg
ative battery terminal © on the vehicle pro
viding assistance®.
8. Connect the other end of the
black
jump lead
only to the earth point © of the jump-start
connection on your vehicle ©
<=>(£).
9. Position the jump leads in such a way that
they cannot come into contact with any mov
ing parts in the engine compartment.
Starting the engine
10.
Start the engine of the vehicle with the
boosting battery and let it run at idling
speed.
11.
Start the engine of the
car
with the dis
charged battery and wait two or three mi
nutes until the engine is running smoothly.
12.
If the engine fails to start: do not operate the
starter for longer than 10 seconds. Wait for
about 30 seconds and try again.
13.
Switch on the blower and the rear window
heating on the vehicle which has been jump-
started in order to offset excessive voltage
which may occur when disconnecting the
leads.
The headlights must be switched off!
14.
Disconnect the leads in exactly the opposite
sequence to that described in
*page
327
with the engines running. Make sure that the
Leads cannot come into contact with any
moving parts in the engine compartment.
15.
Fold the cover back onto the battery in its
correct position.
16.
Switch off the blower and the rear window
heating again.
PLease refer to
<=>
A in Before starting the engine
on page 326 and
•=>©
in Before starting the en
gine on page 327.
© CAUTION
Do not use the negative battery terminal
when jump-starting (this could cause a
mal
function in the on-board electrical system).
- Connect the battery clamps so they have
good metal-to-metal contact with the bat
tery terminals.
- The vehicle battery is vented to the outside
to prevent gases entering the vehicle's inte
rior.
Tow-
start
ing / towing
away
General notes
Some experience is required to tow or tow-start a
vehicle, especially when using a tow-rope. Both
drivers should be familiar with the technique re
quired for towing. Inexperienced drivers should
not attempt to tow-start or tow away another ve
hicle.
Do not pull too hard with the towing vehicle and
take care to avoid jerking the tow-rope. When
towing off-road, there is aLways a risk that the
anchorage points may be overloaded.
Tow-bar / tow-rope
It is easier and safer to tow the vehicle with a
tow-bar. You should only use a tow-rope if you do
not have a tow-bar. It is advisable to use a tow-
rope made of elastic synthetic fibre or similarly
elastic material.
Notes on towing vehicles
The vehicle can be towed with a tow-bar or tow-
rope.
When the engine is not running, the
gear
box will not be adequately lubricated if the
fol
lowing speed/distance restrictions are not ob
served:
- The vehicle must not be towed faster than
50 km/h.
- The vehicle must not be towed further than
50 km. •
328
Page 333 of 364

Mobility
CO
rN
IV
rN
•-i
00
Additional notes on towing by breakdown
truck
If one of the axles has to be raised in order to
tow the vehicLe, please refer to the following ta
ble to determine the appropriate axle
for
your
gearbox/drive combination:
Manual
gearbox
Automatic
gearbox
Front-wheel
drive
Front or rear
axle
Front axle
Four-wheel
drive
Front or rear
axle
Front axle
Applies to vehicles with four-wheel drive: If the
vehicle is to be towed with one of the axles
raised,
the ignition must be switched off; other
wise the drive train can be damaged.
Notes on tow-starting
Applies to vehicles with automatic gearbox: For
technical reasons, your vehicle must not be tow-
started.
Applies to vehicles with manual gearbox: As a
general rule, tow-starting is not recommended.
If the engine will not start, it is best to try start
ing it using the battery of another vehicle
*>page
326 before attempting to tow start. If
this is not possible, you can try to push-start or
tow-start the vehicle
*page
330, Tow-starting.
A WARNING
There is a high risk of accidents when towing/
tow-starting, as the towed vehicle can easily
be driven into the towing vehicle.
UTION
- If it is not possible to tow the vehicle as de
scribed above (e.g. due to a gearbox failure
or if the vehicle has to be towed further
than 50 km), it must be transported on a
special car transporter or trailer.
- Towing a vehicle with the wrong axle raised
can cause serious damage to the gearbox.
- Applies to vehicles with automatic gearbox:
It is not possible to move the selector lever
out of position
P
if the electrical power sup
ply fails. Before the vehicle can be recov
ered/manoeuvred you must manually re
lease the selector lever; left-hand drive
vehicles
*page
93, right-hand drive
vehicles
*page
94.
- Please observe the relevant regulations
when towing or tow-starting.
Towing away
Please observe the important safety warnings on
*
page 328.
Preparations
• Attach the tow-rope or the tow-bar only to the
towing anchorages provided
for
this purpose
opage
330,
*page
331.
• Please ensure that the tow-rope is not twisted
as it could otherwise unscrew the towline an
chorage while the vehicle is being towed.
• The hazard warning lights of both vehicles
must normally be switched on
*page
52. How
ever, observe any regulations to the contrary.
Towing vehicle (front)
• Ensure that the tow-rope is taut before you
drive off.
• Manual gearbox: Engage the clutch very gently
when starting to move and accelerate with par
ticular care.
• Automatic gearbox: Accelerate slowly and
grad
ually.
• Avoid unnecessary braking and manoeuvres.
Vehicle being towed (rear)
• Ensure that the ignition is switched on, the
steering wheel is not locked, and
that
you can
operate the turn signals, horn or windscreen
wipers if necessary
<=>/t\-
• The brake servo only works when the engine is
running.
The power steering only works when
329
Page 334 of 364

Mobility
the ignition is on and the vehicle is moving1'.
Otherwise you will need to press the brake
ped
al significantly harder and apply more force to
move the steering wheel.
• Please ensure that the steering wheel is un
locked and that it moves freely.
• Release the parking brake
*page
82.
• Applies to vehicles with manual gearbox: Put
the gear lever in neutral.
• Applies to vehicles with automatic gearbox:
Move the selector lever to position N.
• Ensure that the tow-rope remains taut at all
times when towing.
© CAUTION
A WARNING
If the vehicle has no electrical power, do NOT
use a tow-bar or tow-rope to tow the vehicle
© Note
You can use the turn signals to indicate a
change of direction (or lane) even when the
hazard warning lights are on. The hazard
warning lights will be interrupted temporari-
Ly.
Tow-starting
Please observe the important safety warnings on
*page
328.
Important: Your vehicle must be fitted with a
manual gearbox. If your vehicle has a petrol en
gine,
it must not be towed further than 50 me
tres
*(J).
• Attach the tow-rope or the tow-bar only to the
towing anchorages provided
for
this purpose
*page
330,
*
page 331.
• Engage second or third gear before moving off.
• Press the clutch and hold the pedal down.
• Switch on the ignition.
• Once both vehicles are moving, release the
clutch.
• As soon as the engine starts, press the clutch
pedal and put the gear lever in neutral.
When tow-starting the vehicle, do not tow it
further than 50 metres; otherwise the cata
lytic converter could be damaged.
Front towline anchorage
»
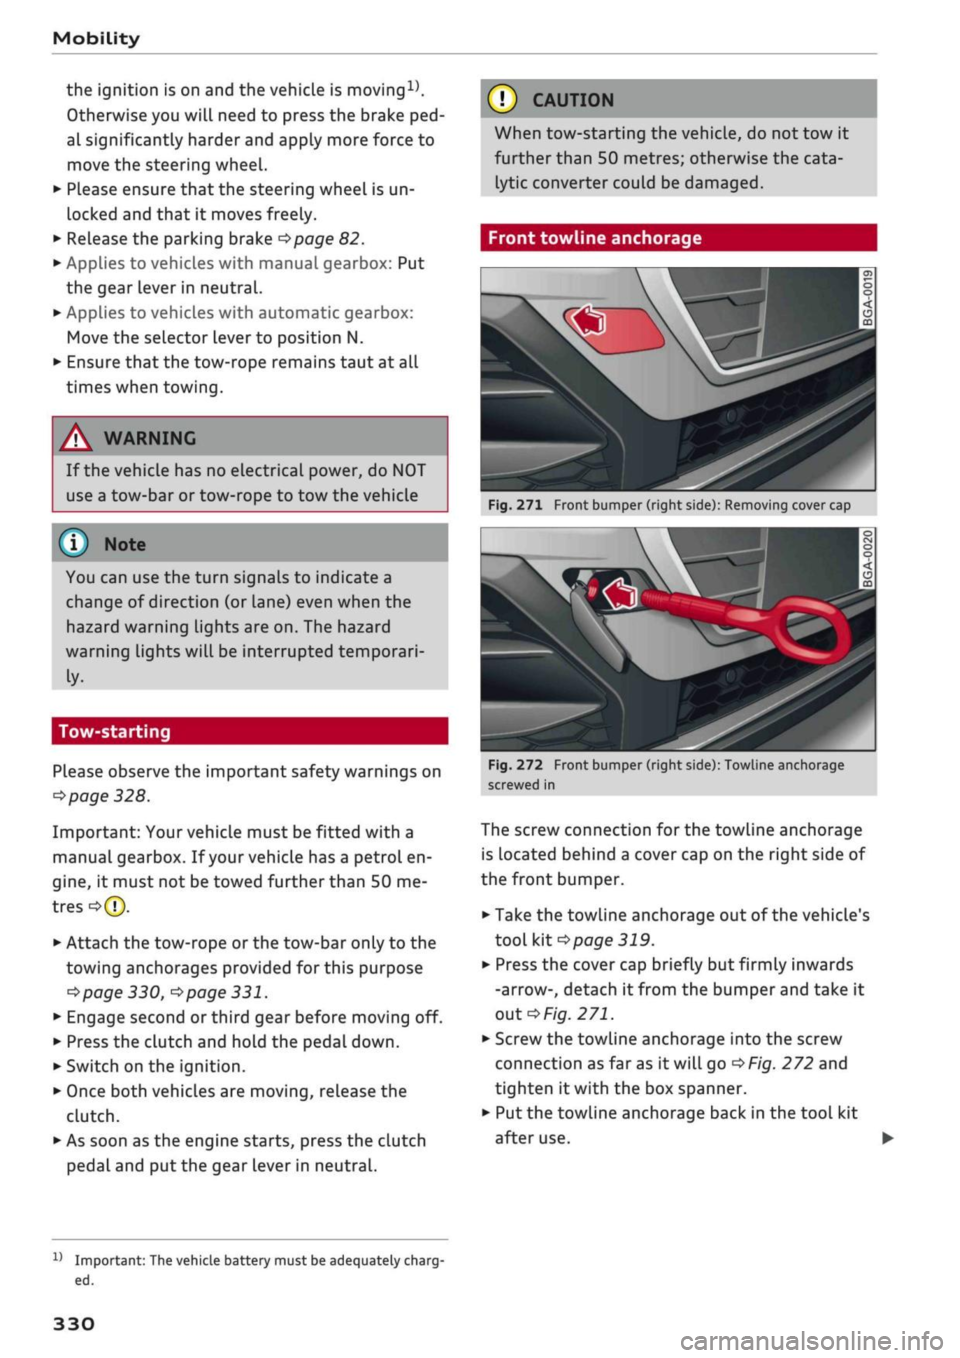
Fig.
271 Front bumper (right side): Removing cover cap
Fig.
272 Front bumper (right side): Towline anchorage
screwed in
The screw connection for the towline anchorage
is located behind a cover cap on the right side of
the front bumper.
• Take the towline anchorage out of the vehicle's
tool kit
*
page 319.
• Press the cover cap briefly but firmly inwards
-arrow-, detach it from the bumper and take it
out*Fig.
271.
• Screw the towline anchorage into the screw
connection as far as
it
will go
*Fig.
272 and
tighten it with the box spanner.
• Put the towline anchorage back in the tool kit
after use.
11
Important: The vehicle battery must be adequately charg
ed.
330
Page 335 of 364

Mobility
CO
< o rN
iv
rN
•-i
00
A WARNING
If the towline anchorage is not screwed in as
far as the stop, there is a risk of the screw
connection shearing off during towing - risk
of accident!
Rear towline anchorage
&
Fig.
273 Rear bumper (right side): Removing cover cap
(versions 1 and 2)
Si
Fig.
274 Rear bumper (right side): Towline anchorage
screwed in
Vehicles with towline anchorage
On vehicles which do not have a factory-fitted
towing bracket*, a screw connection is located
behind a cover cap on the right side of the rear
bumper.
• Take the towline anchorage out of the vehicle
tool kit
*page
319.
• Press the cover cap briefly but firmly
down
wards
(T)/inwards
© -arrow-, detach it from
the bumper and take it out
*Fig.
273.
• Screw the towline anchorage into the screw
connection as far as it will go
*Fig.
274 and
tighten it with the box spanner.
• Put the towline anchorage back in the tool kit
after use.
Vehicles with towing bracket*
The removable
ball
joint must be attached before
you can use the towing bracket:
• Insert the ball joint
*page
99.
• Attach the tow-bar or the tow-rope to the ball
joint.
On some models, the shape of the cap can vary.
Vehicles which have a factory-fitted towing
bracket* do not have a screw connection at the
rear for the towline anchorage.
WARNING
If the towline anchorage is not screwed in as
far as the stop, there is a risk of the screw
connection shearing off during towing - risk
of accident!
© CAUTION
To avoid damaging the towing bracket*, only
use tow-bars with suitable attachments. If
a
tow-bar is not available, a tow-rope may be
used.
331
Page 336 of 364

Fuses and bulbs
Fuses and bulbs
Fuses
Changing fuses
To see whether a fuse has blown, check whether
the metal strip has melted.
3
Fig.
275
(T)
Steering column area (LHD vehicles): cover, (2)
Clove box (RHD vehicles): cover
Fig.
276
@
Engine compartment (left side): Fuse cover
The fuses are located behind a cover in the steer
ing column area (on LHD vehicles) ©
*Fig.
275
or behind a cover in the glove box (on RHD
vehicles) ©. Further fuses are located beneath a
cover in the engine compartment (Left side) ©
*
Fig.
276.
• Switch off the ignition and all electrical equip
ment.
• Refer to the following tables to identify the
fuse for the failed component
*page
333.
• Remove the appropriate cover.
• Take the plastic clip from inside the fuse cover
in the engine compartment
*Fig.
276.
• Use the plastic clip to pull out the fuse.
• Blown fuses should always be replaced with a
fuse of the same rating.
• Replace the cover again.
Colour coding for fuses
Colour
black
purple
light brown
brown
red
blue
yellow
white or transparent
green
orange
Rating
in amperes
1
3
5
7.5
10
15
20
25
30
40
A WARNING
Never attempt to repair a fuse or replace a
blown fuse by fitting a fuse with a higher am
pere rating. This could damage the electrical
system - risk of fire!
© CAUTION
If a newly replaced fuse blows again after a
short time, the electrical system must be
checked by a qualified workshop as soon as
possible.
©
- Unassigned fuse locations are not shown in
the tables below.
- Some of the items of equipment listed in
the tables below are only fitted on certain
models or are optional extras.
332