2021 ALFA ROMEO STELVIO park assist
[x] Cancel search: park assistPage 11 of 280
9
Automatic High Beam Headlights —
If Equipped ............................................. 43 Parking Lights ....................................... 44
Headlight Off Delay ................................ 44
Rear Fog Lights ...................................... 44
Adaptive Headlight System (AFS) —
If Equipped ............................................. 44 Turn Signals ........................................ 44
Lane Change Assist ............................... 44
INTERIOR LIGHTS .....................................44
Front Map Reading Lights ..................... 45
Interior Ambient Lighting ...................... 45
Rear Overhead Light ............................. 46
Instrument Panel Dimmer Control ....... 46
WINDSHIELD WIPERS AND WASHERS....46
Windshield Wiper Operation ............... 46
Rain Sensing Wipers.............................. 47
Rear Window Wiper/Washer................. 48
Headlamp Washers — If Equipped ....... 48
CLIMATE CONTROLS ................................48
Automatic Dual-Zone Climate Control
System ................................................. 49
INTERIOR STORAGE AND EQUIPMENT....55
Glove Compartment............................... 55
Center Console ...................................... 56
Rear Armrest .......................................... 56
Power Outlets ...................................... 56
Cigar Lighter And Ash Tray —
If Equipped ............................................. 57 Wireless Charging Pad — If Equipped... 57
POWER WINDOWS ................................... 58
Power Window Controls ........................ 58
Auto-Up Feature With Anti-Pinch
Protection............................................... 59 Power Window System Initialization .... 59
Wind Buffeting ...................................... 59
POWER SUNROOF — IF EQUIPPED.......... 59
Power Sunroof ....................................... 59
Opening And Closing The Sunroof ........ 60
Venting Sunroof ..................................... 60
Sunshade Operation ............................. 60
Pinch Protect Feature ........................... 60
Re-Initialization Procedure.................... 60
Sunroof Maintenance ........................... 61
HOOD ........................................................ 61
Opening The Hood ................................. 61
Closing The Hood................................... 62
POWER LIFTGATE..................................... 62
Opening .................................................. 62
Closing.................................................... 63
Liftgate Initialization .............................. 64
Cargo Area Features ............................. 64
GETTING TO KNOW YOUR INSTRUMENT
PANEL
INSTRUMENT PANEL FEATURES............. 67
Instrument Cluster ............................... 67
Instrument Cluster Descriptions .......... 68
INSTRUMENT CLUSTER DISPLAY ............69
Instrument Cluster Display
Description .............................................69 Reconfigurable Instrument Cluster
Display ....................................................69 Reconfigurable Display Items ............... 69
Customer Programmable Settings........ 72
WARNING LIGHTS AND MESSAGES
ON THE INSTRUMENT PANEL ..................74
Red Warning Lights ................................74
Amber Warning Lights............................ 75
Green Indicator Lights ...........................78
Blue Indicator Lights ..............................78
Red Symbols...........................................78
Amber Symbols ......................................80
Green Symbols .......................................84
Blue Symbols .......................................... 84
ONBOARD DIAGNOSTIC SYSTEM ............84
Onboard Diagnostic System (OBD II)
Cybersecurity .......................................... 84
EMISSIONS INSPECTION AND
MAINTENANCE PROGRAM .......................85
21_GU_OM_EN_USC_t.book Page 9
Page 12 of 280

10
STARTING AND OPERATING
STARTING THE ENGINE ............................86
Starting Procedure................................. 86
Remote Starting System ....................... 86
Cold Weather Operation ........................ 87
Extended Park Starting.......................... 87
If Engine Fails To Start .......................... 87
After Starting — Warming Up The
Engine ..................................................... 88 Stopping The Engine.............................. 88
Turbocharger Cool Down ....................... 88
ENGINE BLOCK HEATER —
IF EQUIPPED .............................................89
ENGINE BREAK-IN
RECOMMENDATIONS ...............................89
Engine Break-In...................................... 89
ELECTRIC PARK BRAKE (EPB) .................90
Electric Park Brake (EPB) Operating
Modes ..................................................... 91 Safe Hold ................................................ 91
AUTOMATIC TRANSMISSION....................92
Display .................................................... 93
Gear Selector ......................................... 93
Transmission Operating Modes ............ 94
Automatic Transmission Limp Home
Mode....................................................... 96 Brake Transmission Shift Interlock
(BTSI) System ......................................... 96 Important Notes ..................................... 97
ALFA DNA SELECTOR ...............................98
Alfa DNA System .................................... 98
Driving Modes ........................................ 98
ALFA ACTIVE SUSPENSION (AAS) —
IF EQUIPPED .......................................... 101 STOP/START SYSTEM............................ 101
Operating Mode ................................... 101
System Manual Activation/
Deactivation ......................................... 102 Possible Reasons The Engine Does
Not Autostop ........................................ 102 Engine Restarting Conditions ............. 102
Safety Functions .................................. 102
Energy Saving Function....................... 102
Irregular Operation .............................. 103
Vehicle Inactivity .................................. 103
SPEED LIMITER ...................................... 103
Description ........................................... 103
Activation ............................................. 103
Speed Limit Programming .................. 103
Exceeding The Programmed Speed ... 104
Programmed Speed Icon Flashing ..... 104
Deactivation ......................................... 104
CRUISE CONTROL SYSTEMS —
IF EQUIPPED........................................... 104
Cruise Control — If Equipped .............. 104
Adaptive Cruise Control (ACC) —
If Equipped .......................................... 106
HIGHWAY ASSIST SYSTEM (HAS) —
IF EQUIPPED........................................... 114
To Activate/Deactivate........................ 114
Operation ............................................. 114
Indications On The Display ................. 115
System Status...................................... 115
Limited System Availability/
Operation ............................................. 116
TRAFFIC JAM ASSIST (TJA) SYSTEM —
IF EQUIPPED........................................... 117
To Activate/Deactivate........................ 117
Operation ............................................. 118 Indications On The Display ................. 118
System Status ..................................... 119
Limited System Availability/
Operation ............................................. 119
TRAFFIC SIGN RECOGNITION (TSR)
SYSTEM — IF EQUIPPED........................ 120
To Activate/Deactivate ....................... 120
Indications On The Display ................. 121
INTELLIGENT SPEED CONTROL (ISC)
SYSTEM — IF EQUIPPED........................ 121
To Activate/Deactivate ....................... 122
Indications On The Display ................. 122
Acceptance/Rejection Of The
Suggested Speed ................................ 122
PARKSENSE FRONT/REAR PARK ASSIST
SYSTEM — IF EQUIPPED........................ 123
ParkSense Sensors............................. 123
ParkSense Display .............................. 124
Enabling And Disabling ParkSense .... 124
ParkSense Warning Display ............... 125
Operation With A Trailer...................... 125
ParkSense System Usage
Precautions ......................................... 126
LANE DEPARTURE WARNING (LDW)
SYSTEM.................................................. 126
Lane Departure Warning Operation... 126
Turning Lane Departure Warning On
Or Off .................................................... 127 Lane Departure Warning Message .... 127
Changing Lane Departure Warning
Status................................................... 128
21_GU_OM_EN_USC_t.book Page 10
Page 17 of 280
15
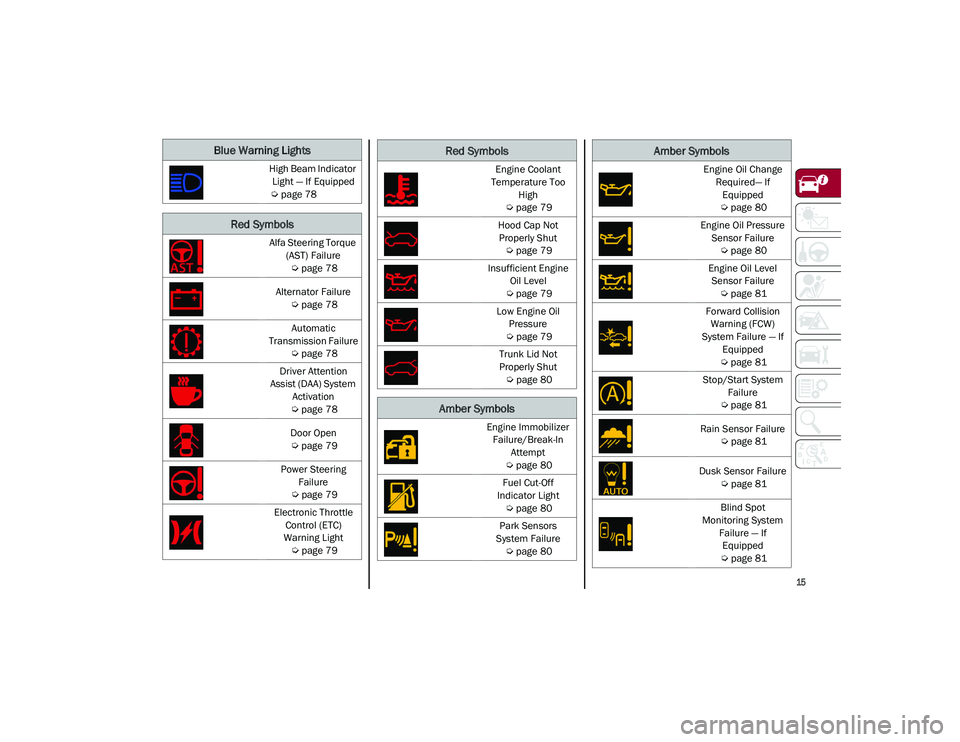
Blue Warning Lights
High Beam Indicator Light — If Equipped
Ú
page 78
Red Symbols
Alfa Steering Torque
(AST) Failure
Ú
page 78
Alternator Failure
Ú
page 78
Automatic
Transmission Failure
Ú
page 78
Driver Attention
Assist (DAA) System Activation
Ú
page 78
Door Open
Ú
page 79
Power Steering Failure
Ú
page 79
Electronic Throttle Control (ETC)
Warning Light
Ú
page 79
Engine Coolant
Temperature Too High
Ú
page 79
Hood Cap Not Properly Shut
Ú
page 79
Insufficient Engine Oil Level
Ú
page 79
Low Engine Oil Pressure
Ú
page 79
Trunk Lid Not
Properly Shut
Ú
page 80
Amber Symbols
Engine Immobilizer
Failure/Break-In Attempt
Ú
page 80
Fuel Cut-Off
Indicator Light
Ú
page 80
Park Sensors
System Failure
Ú
page 80
Red Symbols
Engine Oil Change
Required— If Equipped
Ú
page 80
Engine Oil Pressure Sensor Failure
Ú
page 80
Engine Oil Level Sensor Failure
Ú
page 81
Forward Collision Warning (FCW)
System Failure — If Equipped
Ú
page 81
Stop/Start System Failure
Ú
page 81
Rain Sensor Failure
Ú
page 81
Dusk Sensor Failure
Ú
page 81
Blind Spot
Monitoring System Failure — If Equipped
Ú
page 81
Amber Symbols
21_GU_OM_EN_USC_t.book Page 15
Page 46 of 280
GETTING TO KNOW YOUR VEHICLE
44
Parking Lights
To turn on the parking lights and instrument
panel lights, rotate the headlight switch clock-
wise to the position. All of the parking lights
will turn on for eight minutes, and opening the
door activates an audible warning.
To leave only the lights on one side (right/left)
illuminated, move the multifunction lever
(located on the left side of the steering wheel)
to the side that you want to remain on. With
the parking lights on, the indicator light on
the instrument panel will illuminate.
To turn off the parking lights, rotate the head -
light switch back to the O (off) position.
Headlight Off Delay
To assist when exiting the vehicle, the “Head -
light Off Delay” feature will leave the head -
lights on for up to 90 seconds. This delay is
initiated when the ignition is placed in the OFF
position while the headlight switch is on, and
then the headlight switch is cycled off. Head -
light delay can be canceled by either turning
on the headlights or side lights, or by placing
the ignition in the ON position.
The function can be activated from the radio
system by selecting the following functions in
sequence on the main menu:
1. “Settings.”
2. “Lights.”
3. “Headlight Off Delay.”
Rear Fog Lights
The rear fog light switch is located within the
headlight switch.
Push the button, located in the center of
the headlight switch, to turn the rear fog lights
on/off.
The rear fog lights turn on only when the head -
lights or parking lights are also turned on. The
lights can be turned off by pushing the
button again or by turning the headlight switch
to the O (off) position.
When the engine is stopped with the rear fog
lights on, they will be off the next time the
engine is started.
Adaptive Headlight System (AFS) — If
Equipped
This is a system combined with Xenon head -
lights (Bi-Xenon 35 W headlamp, if equipped)
which directs the headlights horizontally, and
continuously and automatically adapts them
to the driving conditions around bends or
when cornering.
The system directs the headlights to light up
the road in the best way, taking into account
the speed of the vehicle and the bend or
corner angle, as well as the speed at which the
steering wheel is turned.
The adaptive lights are automatically activated
when the vehicle is started.
Turn Signals
Move the multifunction lever up or down to
activate the turn signals. The arrows on each
side of the instrument cluster flash to show
proper operation.
The or turn signal will blink on the instru -
ment panel.
Lane Change Assist
Lightly push the lever up or down once, without
moving beyond the detent, and the turn signal
will flash five times then automatically turn off.
To turn off the flashing before the end of the
cycle, move the lever in the opposite direction
until the first click (about half way).
INTERIOR LIGHTS
Courtesy lights are turned on when the front
doors are opened or when the dimmer control
is rotated to its farthest upward position. The
glove compartment light turns on automati -
cally when the glove compartment is opened
and turn off when it is closed. The door cour -
tesy lights illuminate when one of the front
doors is opened, and turn off when it is closed.
The liftgate courtesy lights turn on automati -
cally when the liftgate is opened and turn off
when it is closed. All of these lights turn on and
off regardless of the ignition status.
21_GU_OM_EN_USC_t.book Page 44
Page 63 of 280
61
Proceed as follows:
1. With the ignition in the ON/RUN position,make sure the sunroof glass is fully closed
(sunshade open).
2. Open the driver’s side door, and place the ignition in the OFF position.
3. Within five seconds, place the ignition in the ACC or ON/RUN position.
4. Within 10 seconds, push and hold the sunroof close switch (forward). After 8 -
10 seconds of holding the switch, the
re-initialization process will begin.
Continue to hold the switch while the
sunroof motor cycles, and the sunshade
will fully close.
5. Once the sunroof glass and the power sunshade have stopped motion, release
the sunroof close switch, then push and
hold it again within five seconds. Continue
to hold the switch while the sunshade fully
opens, the sunroof glass fully opens,
followed by the glass fully closing then the
sunshade fully closing.
6. Release the switch once all of the opera -
tions stop. Re-initialization of the sunroof
motors is now complete.
NOTE:
If the switch is released prior to full completion
of the operations described, the entire
re-initialization procedure must be repeated
from step 1. 7. Confirm express operations for the
sunroof glass and sunshade are functional
for opening and closing operations.
Sunroof Maintenance
Use only a non-abrasive cleaner and a soft
cloth to clean the glass panel. Periodically
check for and clear out any debris that may
have collected in the tracks.
HOOD
Opening The Hood
To open the hood, two latches must be
released.
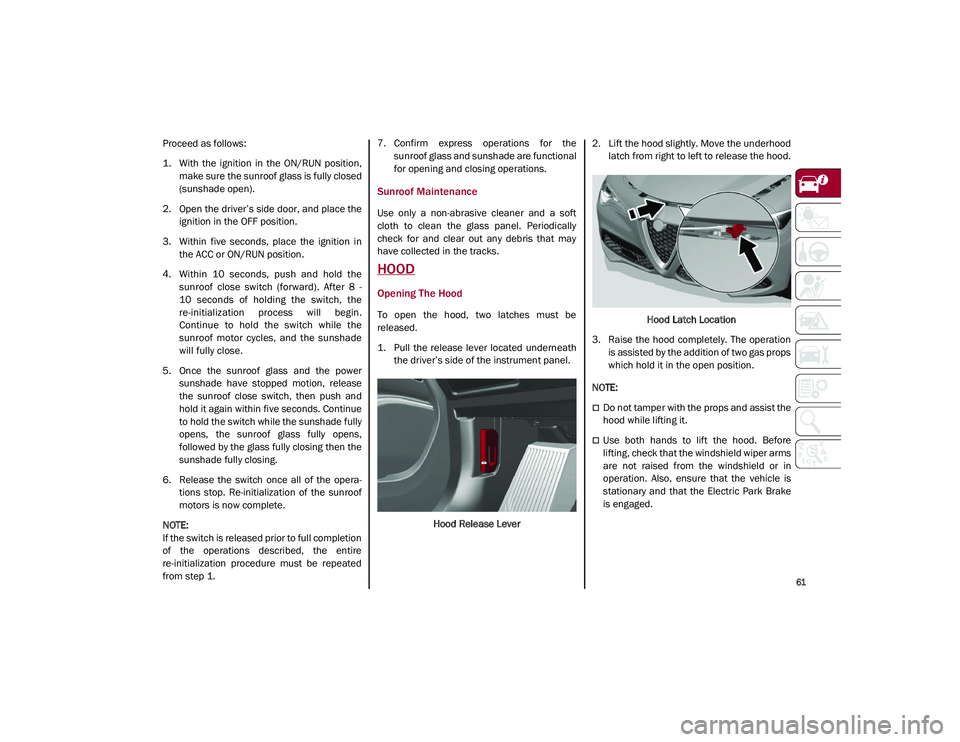
1. Pull the release lever located underneaththe driver’s side of the instrument panel.
Hood Release Lever 2. Lift the hood slightly. Move the underhood
latch from right to left to release the hood.
Hood Latch Location
3. Raise the hood completely. The operation is assisted by the addition of two gas props
which hold it in the open position.
NOTE:
Do not tamper with the props and assist the
hood while lifting it.
Use both hands to lift the hood. Before
lifting, check that the windshield wiper arms
are not raised from the windshield or in
operation. Also, ensure that the vehicle is
stationary and that the Electric Park Brake
is engaged.
21_GU_OM_EN_USC_t.book Page 61
Page 80 of 280
GETTING TO KNOW YOUR INSTRUMENT PANEL
78
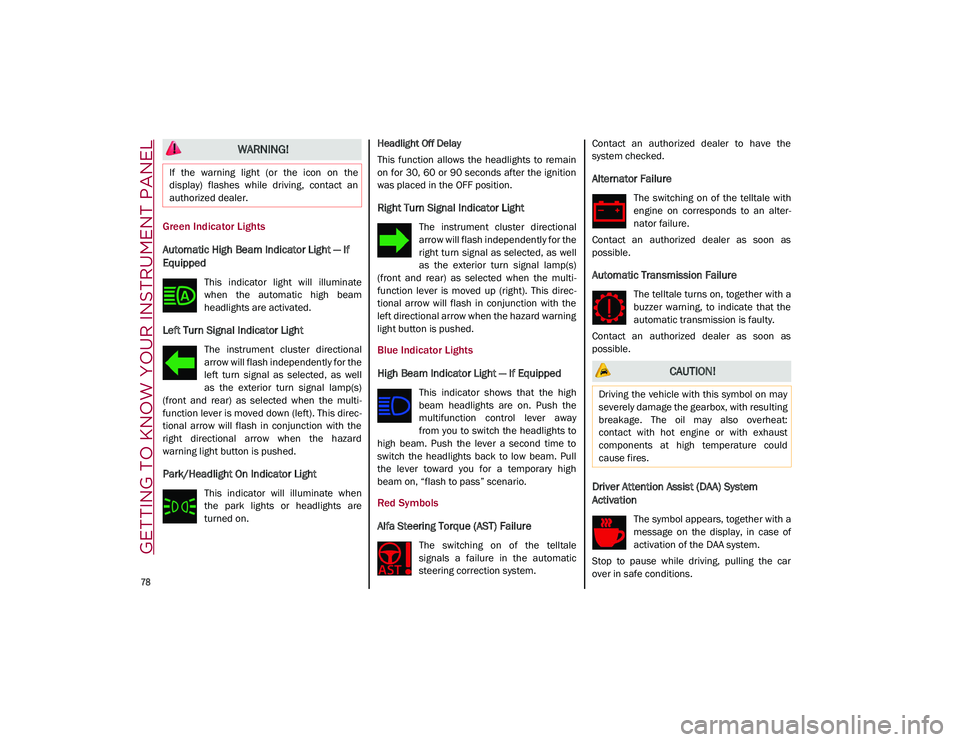
Green Indicator Lights
Automatic High Beam Indicator Light — If
Equipped
This indicator light will illuminate
when the automatic high beam
headlights are activated.
Left Turn Signal Indicator Light
The instrument cluster directional
arrow will flash independently for the
left turn signal as selected, as well
as the exterior turn signal lamp(s)
(front and rear) as selected when the multi -
function lever is moved down (left). This direc -
tional arrow will flash in conjunction with the
right directional arrow when the hazard
warning light button is pushed.
Park/Headlight On Indicator Light
This indicator will illuminate when
the park lights or headlights are
turned on. Headlight Off Delay
This function allows the headlights to remain
on for 30, 60 or 90 seconds after the ignition
was placed in the OFF position.
Right Turn Signal Indicator Light
The instrument cluster directional
arrow will flash independently for the
right turn signal as selected, as well
as the exterior turn signal lamp(s)
(front and rear) as selected when the multi -
function lever is moved up (right). This direc -
tional arrow will flash in conjunction with the
left directional arrow when the hazard warning
light button is pushed.
Blue Indicator Lights
High Beam Indicator Light — If Equipped
This indicator shows that the high
beam headlights are on. Push the
multifunction control lever away
from you to switch the headlights to
high beam. Push the lever a second time to
switch the headlights back to low beam. Pull
the lever toward you for a temporary high
beam on, “flash to pass” scenario.
Red Symbols
Alfa Steering Torque (AST) Failure
The switching on of the telltale
signals a failure in the automatic
steering correction system. Contact an authorized dealer to have the
system checked.
Alternator Failure
The switching on of the telltale with
engine on corresponds to an alter
-
nator failure.
Contact an authorized dealer as soon as
possible.
Automatic Transmission Failure
The telltale turns on, together with a
buzzer warning, to indicate that the
automatic transmission is faulty.
Contact an authorized dealer as soon as
possible.
Driver Attention Assist (DAA) System
Activation
The symbol appears, together with a
message on the display, in case of
activation of the DAA system.
Stop to pause while driving, pulling the car
over in safe conditions.
WARNING!
If the warning light (or the icon on the
display) flashes while driving, contact an
authorized dealer.
CAUTION!
Driving the vehicle with this symbol on may
severely damage the gearbox, with resulting
breakage. The oil may also overheat:
contact with hot engine or with exhaust
components at high temperature could
cause fires.
21_GU_OM_EN_USC_t.book Page 78
Page 81 of 280
79
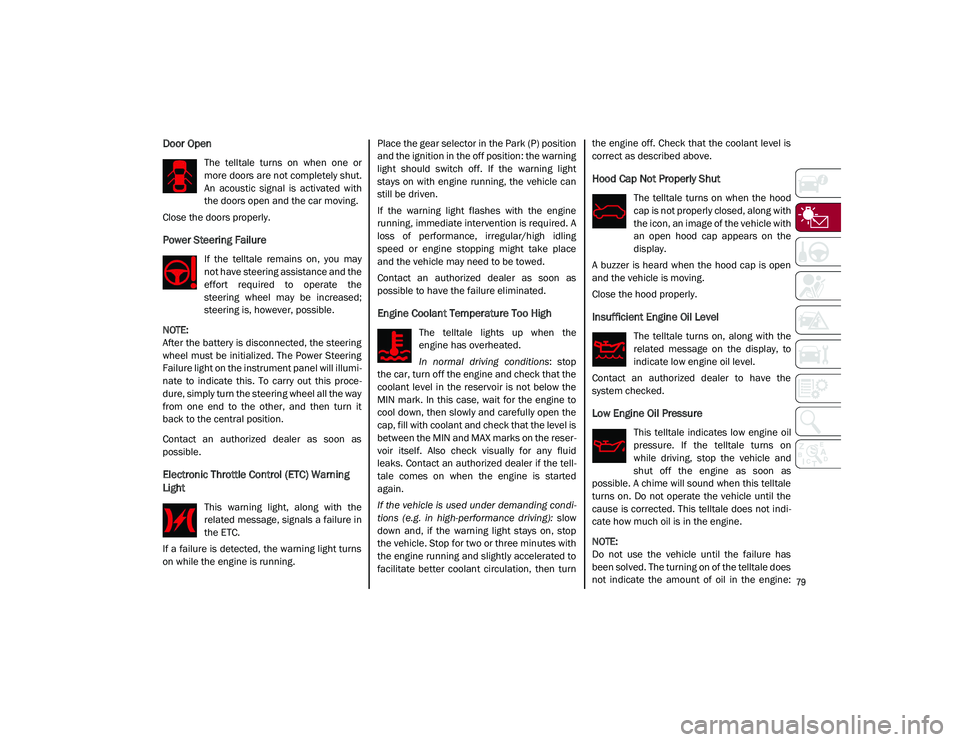
Door Open
The telltale turns on when one or
more doors are not completely shut.
An acoustic signal is activated with
the doors open and the car moving.
Close the doors properly.
Power Steering Failure
If the telltale remains on, you may
not have steering assistance and the
effort required to operate the
steering wheel may be increased;
steering is, however, possible.
NOTE:
After the battery is disconnected, the steering
wheel must be initialized. The Power Steering
Failure light on the instrument panel will illumi -
nate to indicate this. To carry out this proce -
dure, simply turn the steering wheel all the way
from one end to the other, and then turn it
back to the central position.
Contact an authorized dealer as soon as
possible.
Electronic Throttle Control (ETC) Warning
Light
This warning light, along with the
related message, signals a failure in
the ETC.
If a failure is detected, the warning light turns
on while the engine is running. Place the gear selector in the Park (P) position
and the ignition in the off position: the warning
light should switch off. If the warning light
stays on with engine running, the vehicle can
still be driven.
If the warning light flashes with the engine
running, immediate intervention is required. A
loss of performance, irregular/high idling
speed or engine stopping might take place
and the vehicle may need to be towed.
Contact an authorized dealer as soon as
possible to have the failure eliminated.
Engine Coolant Temperature Too High
The telltale lights up when the
engine has overheated.
In normal driving conditions
: stop
the car, turn off the engine and check that the
coolant level in the reservoir is not below the
MIN mark. In this case, wait for the engine to
cool down, then slowly and carefully open the
cap, fill with coolant and check that the level is
between the MIN and MAX marks on the reser -
voir itself. Also check visually for any fluid
leaks. Contact an authorized dealer if the tell -
tale comes on when the engine is started
again.
If the vehicle is used under demanding condi -
tions (e.g. in high-performance driving): slow
down and, if the warning light stays on, stop
the vehicle. Stop for two or three minutes with
the engine running and slightly accelerated to
facilitate better coolant circulation, then turn the engine off. Check that the coolant level is
correct as described above.
Hood Cap Not Properly Shut
The telltale turns on when the hood
cap is not properly closed, along with
the icon, an image of the vehicle with
an open hood cap appears on the
display.
A buzzer is heard when the hood cap is open
and the vehicle is moving.
Close the hood properly.
Insufficient Engine Oil Level
The telltale turns on, along with the
related message on the display, to
indicate low engine oil level.
Contact an authorized dealer to have the
system checked.
Low Engine Oil Pressure
This telltale indicates low engine oil
pressure. If the telltale turns on
while driving, stop the vehicle and
shut off the engine as soon as
possible. A chime will sound when this telltale
turns on. Do not operate the vehicle until the
cause is corrected. This telltale does not indi -
cate how much oil is in the engine.
NOTE:
Do not use the vehicle until the failure has
been solved. The turning on of the telltale does
not indicate the amount of oil in the engine:
21_GU_OM_EN_USC_t.book Page 79
Page 92 of 280
STARTING AND OPERATING
90
For the first 1,500 miles (2,414 km):
Do not participate in track events, sport
driving schools, or similar activities during
the first 1,500 miles (2,414 km).
NOTE:
Monitor engine oil with every refueling and add
if necessary. Oil and fuel consumption may be
higher through the first oil change interval.
ELECTRIC PARK BRAKE (EPB)
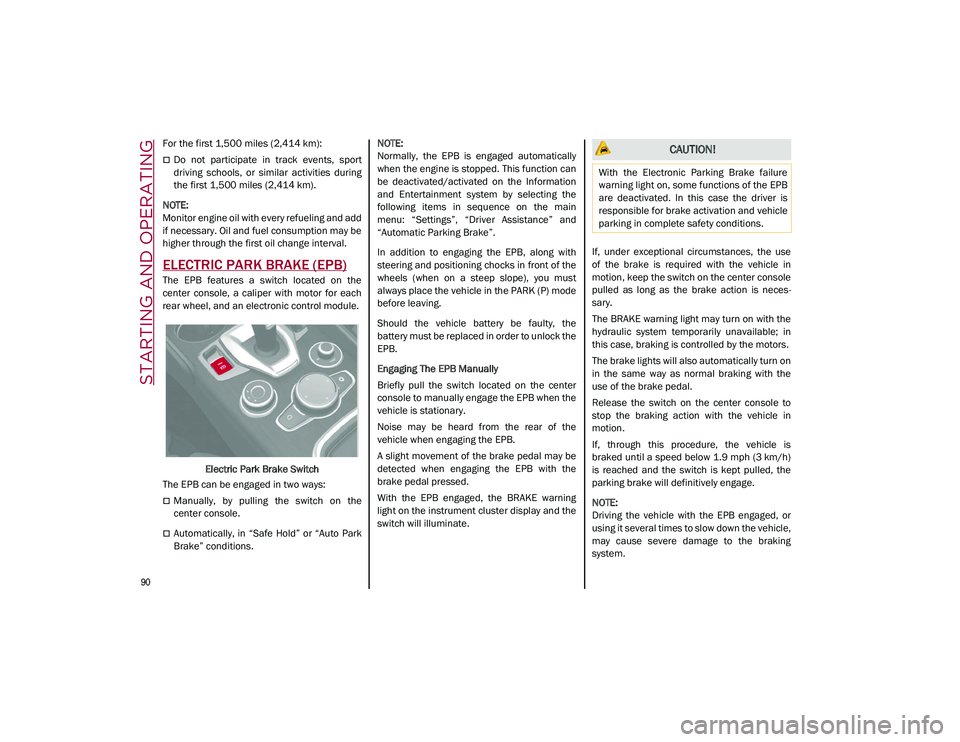
The EPB features a switch located on the
center console, a caliper with motor for each
rear wheel, and an electronic control module.
Electric Park Brake Switch
The EPB can be engaged in two ways:
Manually, by pulling the switch on the
center console.
Automatically, in “Safe Hold” or “Auto Park
Brake” conditions.
NOTE:
Normally, the EPB is engaged automatically
when the engine is stopped. This function can
be deactivated/activated on the Information
and Entertainment system by selecting the
following items in sequence on the main
menu: “Settings”, “Driver Assistance” and
“Automatic Parking Brake”.
In addition to engaging the EPB, along with
steering and positioning chocks in front of the
wheels (when on a steep slope), you must
always place the vehicle in the PARK (P) mode
before leaving.
Should the vehicle battery be faulty, the
battery must be replaced in order to unlock the
EPB.
Engaging The EPB Manually
Briefly pull the switch located on the center
console to manually engage the EPB when the
vehicle is stationary.
Noise may be heard from the rear of the
vehicle when engaging the EPB.
A slight movement of the brake pedal may be
detected when engaging the EPB with the
brake pedal pressed.
With the EPB engaged, the BRAKE warning
light on the instrument cluster display and the
switch will illuminate.
If, under exceptional circumstances, the use
of the brake is required with the vehicle in
motion, keep the switch on the center console
pulled as long as the brake action is neces
-
sary.
The BRAKE warning light may turn on with the
hydraulic system temporarily unavailable; in
this case, braking is controlled by the motors.
The brake lights will also automatically turn on
in the same way as normal braking with the
use of the brake pedal.
Release the switch on the center console to
stop the braking action with the vehicle in
motion.
If, through this procedure, the vehicle is
braked until a speed below 1.9 mph (3 km/h)
is reached and the switch is kept pulled, the
parking brake will definitively engage.
NOTE:
Driving the vehicle with the EPB engaged, or
using it several times to slow down the vehicle,
may cause severe damage to the braking
system.
CAUTION!
With the Electronic Parking Brake failure
warning light on, some functions of the EPB
are deactivated. In this case the driver is
responsible for brake activation and vehicle
parking in complete safety conditions.
21_GU_OM_EN_USC_t.book Page 90