2021 ALFA ROMEO STELVIO check engine light
[x] Cancel search: check engine lightPage 212 of 280
SERVICING AND MAINTENANCE
210
(o) Recommended operations
(●) Mandatory operations
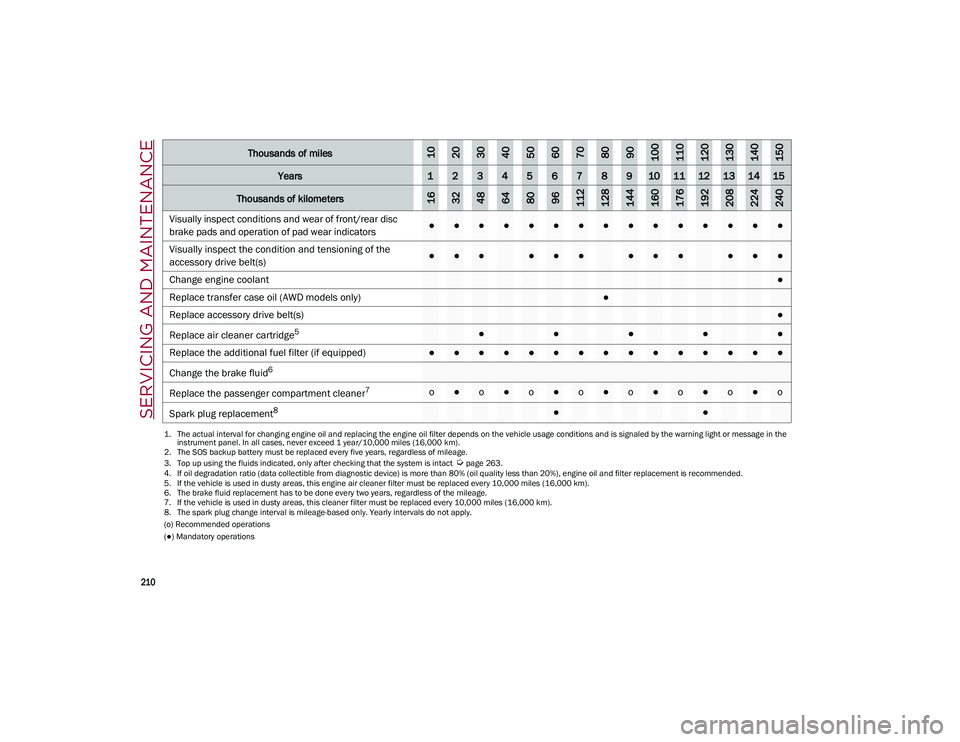
Visually inspect conditions and wear of front/rear disc
brake pads and operation of pad wear indicators●●●●●●●●●●●●●●●
Visually inspect the condition and tensioning of the
accessory drive belt(s)
●●●●●●●●●●●●
Change engine coolant
●
Replace transfer case oil (AWD models only)
●
Replace accessory drive belt(s)●
Replace air cleaner cartridge
5●●●●●
Replace the additional fuel filter (if equipped)
●●●●●●●●●●●●●●●
Change the brake fluid
6
Replac
e the passenger compartment cleaner
7o●o●o●o●o●o●o●o
Spark plug replacement
8●●
1. The actual interval for changing engine oil and replacing the engine oil filter depends on the vehicle usage conditions and is signaled by the warning light or message in the instrument panel. In all cases, never exceed 1 year/10,000 miles (16,000 km).
2. The SOS backup battery must be replaced every five years, regardless of mileage.
3. Top up using the fluids indicated, only after checking that the system is intact
Ú
page 263.
4. If oil degradation ratio (data collectible from diagnostic device) is more than 80% (oil quality less than 20%), engine oil and filter replacement is recommended.
5. If the vehicle is used in dusty areas, this engine air cleaner filter must be replaced every 10,000 miles (16,000 km).
6. The brake fluid replacement has to be done every two years, regardless of the mileage.
7. If the vehicle is used in dusty areas, this cleaner filter must be replaced every 10,000 miles (16,000 km). 8. The spark plug change interval is mileage-based only. Yearly intervals do not apply.
Thousands of miles102030405060708090100110120130140150
Years123456789101112131415
Thousands of kilometers163248648096112128144160176192208224240
21_GU_OM_EN_USC_t.book Page 210
Page 214 of 280
SERVICING AND MAINTENANCE
212
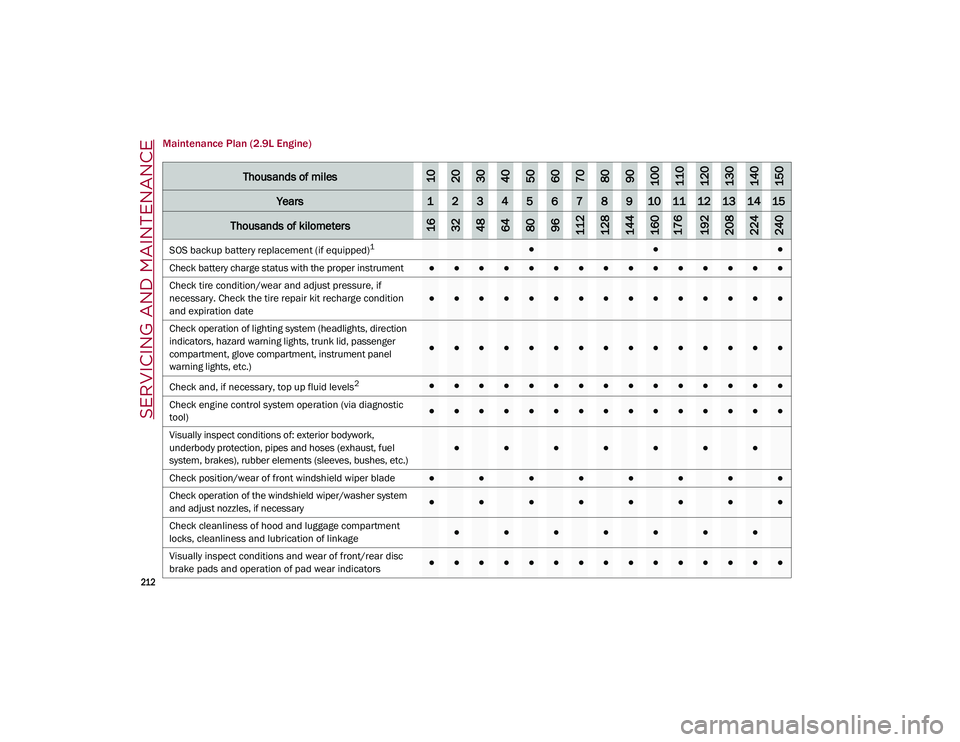
Maintenance Plan (2.9L Engine)
Thousands of miles102030405060708090100110120130140150
Years123456789101112131415
Thousands of kilometers163248648096112128144160176192208224240
SOS backup battery replacement (if equipped)1●●●
Check battery charge status with the proper instrument
●●●●●●●●●●●●●●●
Check tire condition/wear and adjust pressure, if
necessary. Check the tire repair kit recharge condition
and expiration date
●●●●●●●●●●●●●●●
Check operation of lighting system (headlights, direction
indicators, hazard warning lights, trunk lid, passenger
compartment, glove compartment, instrument panel
warning lights, etc.)
●●●●●●●●●●●●●●●
Check and, if necessary, top up fluid levels
2●●●●●●●●●●●●●●●
Check engine control system operation (via diagnostic
tool)
●●●●●●●●●●●●●●●
Visually inspect conditions of: exterior bodywork,
underbody protection, pipes and hoses (exhaust, fuel
system, brakes), rubber elements (sleeves, bushes, etc.)
●●●●●●●
Check position/wear of front windshield wiper blade●●●●●●●●
Check operation of the windshield wiper/washer system
and adjust nozzles, if necessary
●●●●●●●●
Check cleanliness of hood and luggage compartment
locks, cleanliness and lubrication of linkage
●●●●●●●
Visually inspect conditions and wear of front/rear disc
brake pads and operation of pad wear indicators●●●●●●●●●●●●●●●
21_GU_OM_EN_USC_t.book Page 212
Page 215 of 280
213
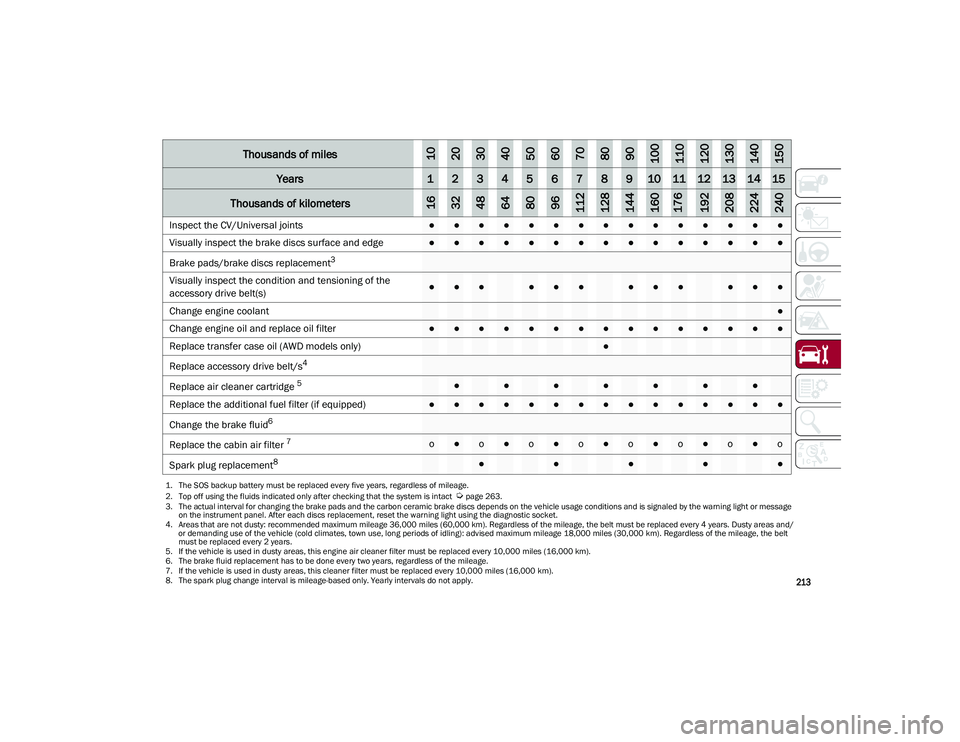
Inspect the CV/Universal joints●●●●●●●●●●●●●●●
Visually inspect the brake discs surface and edge
●●●●●●●●●●●●●●●
Brake pads/brake discs replacement
3
Visually
inspect the condition and tensioning of the
accessory drive belt(s)
●●●●●●●●●●●●
Change engine coolant
●
Change engine oil and replace oil filter
●●●●●●●●●●●●●●●
Replace transfer case oil (AWD models only)
●
Replace accessory drive belt/s4
Replace
air cleaner cartridge
5●●●●●●●
Replace the additional fuel filter (if equipped)●●●●●●●●●●●●●●●
Change the brake fluid
6
Replace
the cabin air filter
7 o●o●o●o●o●o●o●o
Spark plug replacement
8●●●●●
1. The SOS backup battery must be replaced every five years, regardless of mileage.
2. Top off using the fluids indicated only after checking that the system is intact
Ú
page 263.
3. The actual interval for changing the brake pads and the carbon ceramic brake discs depends on the vehicle usage conditions and is signaled by the warning light or message on the instrument panel. After each discs replacement, reset the warning light using the diagnostic socket.
4. Areas that are not dusty: recommended maximum mileage 36,000 miles (60,000 km). Regardless of the mileage, the belt must be replaced every 4 years. Dusty areas and/ or demanding use of the vehicle (cold climates, town use, long periods of idling): advised maximum mileage 18,000 miles (30,000 km). Regardless of the mileage, the belt must be replaced every 2 years.
5. If the vehicle is used in dusty areas, this engine air cleaner filter must be replaced every 10,000 miles (16,000 km).
6. The brake fluid replacement has to be done every two years, regardless of the mileage.
7. If the vehicle is used in dusty areas, this cleaner filter must be replaced every 10,000 miles (16,000 km). 8. The spark plug change interval is mileage-based only. Yearly intervals do not apply.
Thousands of miles102030405060708090100110120130140150
Years123456789101112131415
Thousands of kilometers163248648096112128144160176192208224240
21_GU_OM_EN_USC_t.book Page 213
Page 216 of 280
SERVICING AND MAINTENANCE
214
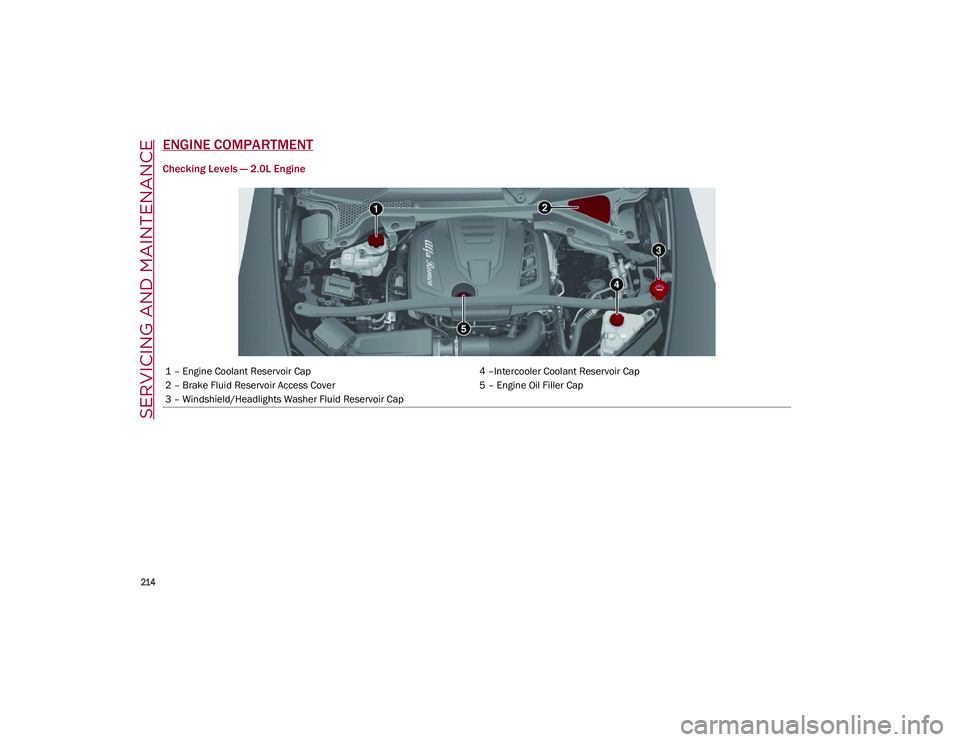
ENGINE COMPARTMENT
Checking Levels — 2.0L Engine
1 – Engine Coolant Reservoir Cap4 –Intercooler Coolant Reservoir Cap
2 – Brake Fluid Reservoir Access Cover 5 – Engine Oil Filler Cap
3 – Windshield/Headlights Washer Fluid Reservoir Cap
21_GU_OM_EN_USC_t.book Page 214
Page 217 of 280
215
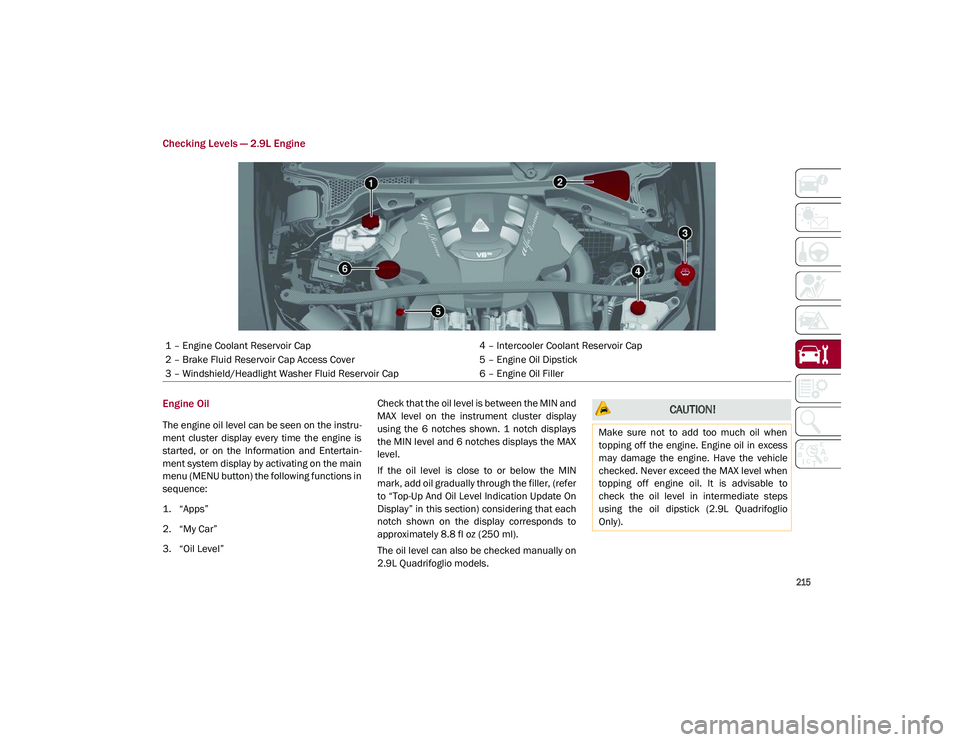
Checking Levels — 2.9L Engine
Engine Oil
The engine oil level can be seen on the instru-
ment cluster display every time the engine is
started, or on the Information and Entertain -
ment system display by activating on the main
menu (MENU button) the following functions in
sequence:
1. “Apps”
2. “My Car”
3. “Oil Level” Check that the oil level is between the MIN and
MAX level on the instrument cluster display
using the 6 notches shown. 1 notch displays
the MIN level and 6 notches displays the MAX
level.
If the oil level is close to or below the MIN
mark, add oil gradually through the filler, (refer
to “Top-Up And Oil Level Indication Update On
Display” in this section) considering that each
notch shown on the display corresponds to
approximately 8.8 fl oz (250 ml).
The oil level can also be checked manually on
2.9L Quadrifoglio models.
1 – Engine Coolant Reservoir Cap
4 – Intercooler Coolant Reservoir Cap
2 – Brake Fluid Reservoir Cap Access Cover 5 – Engine Oil Dipstick
3 – Windshield/Headlight Washer Fluid Reservoir Cap 6 – Engine Oil Filler
CAUTION!
Make sure not to add too much oil when
topping off the engine. Engine oil in excess
may damage the engine. Have the vehicle
checked. Never exceed the MAX level when
topping off engine oil. It is advisable to
check the oil level in intermediate steps
using the oil dipstick (2.9L Quadrifoglio
Only).
21_GU_OM_EN_USC_t.book Page 215
Page 219 of 280
217
Washer Fluid For Windshield/Headlights
The windshield and headlight (if equipped)
washer fluid reservoir is equipped with a tele-
scopic filler neck.
If the level is too low, remove reservoir cap and
lift the filler neck. Then, add the fluid
described
Ú
page 263. After filling the reser -
voir, lower the filler neck and install the reser -
voir cap until you hear it click.
NOTE:
The headlight washers are activated every 10
activations of the windshield washer.
note:
The headlight washing system will not work if
the liquid level is low (situation indicated by
the symbol on the instrument cluster display
Ú
page 69). The windshield washer will keep
working.
On vehicles equipped with headlight washers,
there is a reference notch on the dipstick:
ONLY the windshield/rear window washer
operates with the level below this reference.
Brake Fluid
Check that the fluid is at the maximum level. If
the fluid level in the tank is low, contact an
authorized dealer to have the system checked.
Automatic Transmission Activation System
Oil
The transmission control oil level should only
be checked at an authorized dealer.
Useful Advice For Extending The Life Of
Your Battery
To avoid draining your battery and make it last
longer, observe the following instructions:
When you park the vehicle, ensure that the
doors and liftgate are closed properly to
prevent any lights from remaining on inside
the passenger's compartment.
Do not keep accessories (e.g. radio, hazard
warning lights, etc.) switched on for a long
time when the engine is not running.
Before performing any operation on the
electrical system, disconnect the negative
battery cable.
If you wish to install electrical accessories
after purchasing the vehicle that require
permanent electrical supply (e.g. alarm, etc.),
or accessories which influence the electrical
supply requirements, contact an authorized
dealer, who’s qualified staff will evaluate the
overall electrical consumption.
NOTE:
After the battery is disconnected, the steering
must be initialized. The warning light on the
instrument cluster display switches on to indi
-
cate this. To carry out this procedure, simply
turn the steering wheel all the way from one
end to the other, and then turn it back to the
central position.Battery
The battery does not require the electrolyte to
be topped up with distilled water. A periodic
check carried out at an authorized dealer,
however, is necessary to check efficiency.
Follow the battery manufacturer's instructions
for maintenance.
CAUTION!
If the charge level remains under 50% for a
long time, the battery may be damaged by
sulfation, reducing its capacity and
efficiency during the vehicle start. The
battery is also more prone to the risk of
freezing (at temperatures as high as 14°F
(-10°C).
21_GU_OM_EN_USC_t.book Page 217
Page 251 of 280
249
test wheel. Sustained high temperature
can cause the material of the tire to
degenerate and reduce tire life, and
excessive temperature can lead to
sudden tire failure. The grade C corre-
sponds to a level of performance, which
all passenger vehicle tires must meet
under the Federal Motor Vehicle Safety
Standard No. 109. Grades B and A
represent higher levels of performance
on the laboratory test wheel, than the
minimum required by law.
STORING THE VEHICLE
If the vehicle is left inactive for longer than a
month, the following precautions should be
observed:
Park the vehicle in an area that is covered
and dry, and well-ventilated if possible.
Slightly open the windows.
Check that the Electric Park Brake (EPB) is
not activated.
Carry out the “Liftgate Emergency Opening”
procedure
Ú
page 62.
Disconnect the negative battery terminal
and check the battery charge. Repeat this
check once every three months during
storage.
If the battery is not disconnected from the
electrical system, check its state of charge
every 30 days.
Clean and protect the painted parts using
protective wax.
Clean and protect the shiny metal parts using
special compounds available commercially.
Sprinkle talcum powder on the windshield
wiper rubber blades, and lift them off the
glass.
Cover the vehicle with a fabric or perforated
plastic sheet, paying particular care not to
damage the painted surface by dragging
any dust that may have accumulated on it.
Do not use compact plastic sheets, as they
do not allow humidity to evaporate from the
surface of the vehicle.
Inflate tires to +7.25 psi (+0.5 bar) above
the standard prescribed pressure and
check it periodically.
Do not drain the engine cooling system.
Any time the vehicle is left inactive for two
weeks or more, operate the air conditioning
system with engine idling for at least five minutes, setting external air and with fan
set to maximum speed. This operation will
ensure appropriate lubrication for the
system, thus minimizing the possibility of
damage to the compressor when the
system is operated again.
NOTE:
After cycling the ignition to STOP and having
closed the driver side door, wait at least one
minute before disconnecting the electrical
supply from the battery. When reconnecting
the electrical supply to the battery, make sure
that the ignition is in the STOP position and the
driver’s side door is closed.
BODYWORK
Protection Against Atmospheric Agents
The vehicle is equipped with the best available
technological solutions to protect the body -
work against corrosion.
These include:
Painting products and systems which give
the vehicle resistance to corrosion and
abrasion.
Use of galvanized (or pre-treated) steel
sheets, with high resistance to corrosion.
Spraying of plastic parts, with a protective
function in the more exposed points: under
door, inner wing, edges, etc.
WARNING!
The temperature grade for this tire is
established for a tire that is properly inflated
and not overloaded. Excessive speed,
underinflation, or excessive loading, either
separately or in combination, can cause
heat buildup and possible tire failure.
21_GU_OM_EN_USC_t.book Page 249
Page 253 of 280
251
NOTE:
Never use aromatic substances (e.g. gaso-
line) or ketones (e.g. acetone) for cleaning
the plastic lenses of the headlights.
When cleaning with a pressure washer,
keep the pressure washer at least eight
inches (20 cm) away from the headlights.
Engine Compartment
At the end of every Winter, wash the engine
compartment thoroughly, taking care not to
aim the jet of water directly at the electronic
control units or at the windshield wiper
motors. Have this operation performed at a
specialized workshop
Ú
page 218.
NOTE:
The washing should take place with the engine
cold and the ignition device in the STOP posi -
tion. After the washing operation, make sure
that the various protections (e.g. rubber caps
and guards) have not been removed or
damaged.
INTERIORS
Periodically check the cleanliness of the inte -
rior, beneath the mats, which could cause
oxidation of the sheet metal.
Seats And Fabric Parts
Remove dust with a soft brush or a vacuum
cleaner. It is advised to use a moist brush on
velvet upholstery. Rub the seats with a sponge
moistened with a solution of water and neutral
detergent. Cleaning heat press images on seats — if
equipped:
Due to the color, opacity and wear-resistant
protection with which the heat press images
on some seats are made, they may be subject
to temporary scratching if they are touched by
finger nails, keys, or other hard objects. In
such cases, the visible signs do not impair the
profiled images, and can easily be removed by
wiping the affected area with a microfiber
cloth moistened with water (not dry) to restore
the seat to its original condition. The micro
-
fiber cloth must not have been previously
soaked in other substances or detergents.
Leather Seats
Remove the dry dirt with a chamois or slightly
damp cloth, without exerting too much pres -
sure.
Remove any liquid or grease stains using an
absorbent dry cloth, without rubbing. Then
clean with a soft cloth or buckskin cloth damp -
ened with water and mild soap. If the stain
persists, use specific products and observe
the instructions carefully.
NOTE:
Never use alcohol. Make sure that the
cleaning products used contain no alcohol or
alcohol derivatives, even in small quantities.
Plastic And Coated Parts
Clean interior plastic parts with a damp cloth (if
possible made from microfiber), and a solution
of water and neutral, non-abrasive detergent. To clean oily or persistent stains, use specific
products free from solvents and designed to
maintain the original appearance and color of
the components.
Remove any dust using a microfiber cloth, if
necessary moistened with water. The use of
paper tissues is not recommended as these
may leave residues.
Alcantara Parts — If Equipped
Alcantara parts maintenance procedure:
Treat the surface with a microfiber cloth
moistened with mild marseille soap and
water, taking care to apply a uniform light
pressure over the entire area (do not rub
vigorously).
Rinse and wring out the microfiber cloth,
and pass it over the entire area again.
Let it dry, and then brush gently with a soft
brush.
Genuine Leather Parts
Use only water and mild soap to clean these
parts. Never use alcohol or alcohol-based
products.
CAUTION!
Precautions have been taken to safeguard
all parts and connections however, the
pressures generated by these machines is
such that complete protection against
water ingress cannot be guaranteed.
21_GU_OM_EN_USC_t.book Page 251