Page 33 of 118

Instrument and control functions
4-7
4 Oil change tripmeter “Oil Trip”
The oil change tripmeter shows the
distance traveled since the oil was last
changed.
The oil change indicator “OIL” flashes
at the initial 1000 km (600 mi), then at
4000 km (2400 mi) and every 5000 km
(3000 mi) thereafter to indicate that the
engine oil should be changed.
After changing the engine oil, reset the
oil change indicator and the oil change
tripmeter. To reset them both, select
the oil change tripmeter, and then push
the “TRIP” switch for three seconds.
While the oil change tripmeter is flash-
ing, push the “TRIP” switch for 15 to 20
seconds. Release the “TRIP” switch,
and the oil trip value will reset to zero.
TIP
If the engine oil is changed before the
oil change indicator comes on (i.e., be-
fore the periodic oil change interval has
been reached), the oil change tripmeter
must be reset for the oil change indica-
tor to come on at the correct time.
V-belt replacement tripmeter “V-
Belt Trip”
The V-belt replacement tripmeter
shows the distance traveled since the
V-belt was last replaced.
The V-belt replacement indicator “V-
Belt” will flash every 20000 km (12000
mi) to indicate that the V-belt should be
replaced.
After replacing the V-belt, reset the V-
belt replacement indicator and the V-
belt replacement tripmeter. To reset
them both, select the V-belt replace-
ment tripmeter, and then push the
“TRIP” switch for three seconds.
While the V-belt replacement tripmeter
is flashing, push the “TRIP” switch for
15 to 20 seconds. Release the “TRIP”
switch, and the V-belt trip value will re-
set to zero.
TIP
If the V-belt is replaced before the V-
belt replacement indicator comes on
(i.e., before the periodic V-belt replace-
ment interval has been reached), the V-
belt replacement tripmeter must be re-
set for the V-belt replacement indicator
to come on at the correct time.
1.
2. Oil change tripmeter
ZAUM1488
1
2
1.
2. V-belt replacement tripmeter
ZAUM1489
1
2
UBL1E0E0.book Page 7 Thursday, May 11, 2017 8:51 AM
Page 34 of 118

Instrument and control functions
4-8
4Information display
The information display is equipped
with the following:
air temperature display
battery voltage display
traction control system display
average fuel consumption display
instantaneous fuel consumption
display
average speed display
warning message function
Navigating the information display
Push the “INFO” switch to change the
display between the air temperature
display “Air-temp”, battery voltage dis-
play “Battery”, traction control system
display “TCS ON” or “TCSOFF”, aver-
age fuel consumption display “Con-
sumption/Average_ _._ km/L” or
“Consumption/Average_ _._ L/100
km”, instantaneous fuel consumption
display “Consumption_ _._ km/L” or
“Consumption_ _._ L/100 km” and av-
erage speed display “Average” in the
following order:
Air-temp → Battery → TCS ON or TC-
SOFF → Consumption/Average_ _._
km/L → Consumption/Average_ _._L/100 km → Consumption_ _._ km/L
→ Consumption_ _._ L/100 km → Av-
erage → Air-temp
For the UK:
Push the “TRIP” switch to change the
display between the air temperature
display “Air-temp”, battery voltage dis-
play “Battery”, traction control system
display “TCS ON” or “TCSOFF”, aver-
age fuel consumption display “Con-
sumption/Average_ _._ km/L”,
“Consumption/Average_ _._ L/100
km” or “Consumption/Average_ _
_._MPG”, instantaneous fuel con-
sumption display “Consumption_ _._
km/L”, “Consumption_ _._ L/100 km”
or “Consumption_ _ _._MPG” and av-
erage speed display “Average” in the
following order:
Air-temp → Battery → TCS ON or TC-
SOFF → Consumption/Average_ _._
km/L → Consumption/Average_ _._
L/100 km → Consumption/Average_ _
_._ MPG → Consumption_ _._ km/L →
Consumption_ _._ L/100 km →
Consumption_ _ _._ MPG → Average
→ Air-temp
TIP
When kilometers are selected for
the display units, “Consump-
tion/Average_ _ _._MPG” and
“Consumption_ _ _._MPG” are not
displayed.
When miles are selected for the
display units, “Consump-
tion/Average_ _._ km/L”, “Con-
sumption/Average_ _._ L/100
1. Information display
ZAUM1490
1
UBL1E0E0.book Page 8 Thursday, May 11, 2017 8:51 AM
Page 35 of 118

Instrument and control functions
4-9
4 km”, “Consumption_ _._ km/L”,
and “Consumption_ _._ L/100 km”
are not displayed.
Air temperature display
This display shows the air temperature
from –10 °C to 50 °C in 1 °C incre-
ments.
The icy road warning indicator “ ” will
flash when the temperature is below 4
°C.
The temperature displayed may vary
from the actual ambient temperature.
TIP
The accuracy of the temperature read-
ing may be affected by engine heat
when riding slowly (under 20 km/h [12
mi/h]) or when stopped at traffic sig-
nals, etc.
Battery voltage display
This display shows the current charge
state of the battery.
TIP
If the engine turns over slowly
when using the start switch, have
a Yamaha dealer charge the bat-
tery.
If “---” appears in the battery volt-
age display, have a Yamaha deal-
er check the battery.
Traction control system display
This display shows the current status
of the traction control system. (See
page 4-16.)
“TCS ON”: the system is on
“TCSOFF”: the system is off
1. Air temperature display
2. Icy road warning indicator “ ”
ZAUM1491
1
21. Battery voltage display
1. Traction control system display
ZAUM1492
1
ZAUM1493
1
UBL1E0E0.book Page 9 Thursday, May 11, 2017 8:51 AM
Page 36 of 118

Instrument and control functions
4-10
4
TIP
If only “TCS” is displayed, there is a
communication error within the vehi-
cle. Have a Yamaha dealer check the
vehicle as soon as possible.
Average fuel consumption display
This function calculates the average
fuel consumption since it was last re-
set.
The average fuel consumption can be
displayed as either “Consump-
tion/Average_ _._ km/L”, “Consump-
tion/Average_ _._ L/100 km” or
“Consumption/Average_ _ _._ MPG”
(for the UK).
“Consumption/Average_ _._
km/L”: The average distance that
can be traveled on 1.0 L of fuel is
shown.
“Consumption/Average_ _._
L/100 km”: The average amount
of fuel necessary to travel 100 km
is shown.
“Consumption/Average_ _ _._
MPG” (for the UK): The average
distance that can be traveled on
1.0 Imp.gal of fuel is shown.
To reset the average fuel consumption,
push the “INFO” switch for at least
three seconds.
TIP
After resetting the average fuel con-
the vehicle has traveled 1 km (0.6 mi).
Instantaneous fuel consumption
display
This function calculates the fuel con-
sumption under current riding condi-
tions.
The instantaneous fuel consumption
can be displayed as either
“Consumption_ _._km/L”,
“Consumption_ _._L/100 km” or
“Consumption_ _ _._MPG” (for the
UK).
“Consumption_ _._km/L”: The
distance that can be traveled on
1.0 L of fuel under the current rid-
ing conditions is shown.
“Consumption_ _._L/100 km”:
The amount of fuel necessary to
travel 100 km under the current
riding conditions is shown.
“Consumption_ _ _._MPG” (for the
UK): The distance that can be
traveled on 1.0 Imp.gal of fuel un-
der the current riding conditions is
shown.
1. Average fuel consumption display
ZAUM1494
1
1. Instantaneous fuel consumption display
ZAUM1495
1
UBL1E0E0.book Page 10 Thursday, May 11, 2017 8:51 AM
Page 37 of 118
, “_ _._” is displayed.
Average speed display
The average speed “Average_ _ _kmh”
or “Average_ _ _MPH")
Instrument and control functions
4-11
4
TIP
If traveling at speeds under 10 km/h (6
mi/h), “_ _._” is displayed.
Average speed display
The average speed “Average_ _ _kmh”
or “Average_ _ _MPH” (for the UK) is
displayed.
The average speed is the total distance
divided by the total time (with the main
switch in the “ON” position) since the
display was last reset to zero.
This display shows the average speed
since it was last reset.
To reset the average speed display,
select it by pushing the “INFO” switch,
and then push the “INFO” switch for
three seconds.
Warning message function
This function displays a warning mes-
sage corresponding to the current
warning.
“L FUEL”: Appears when the last seg-
ment of the fuel meter starts flashing. If
“L FUEL” is displayed, refuel as soon
as possible.“H TEMP”: Appears when the top seg-
ment of the coolant temperature meter
starts flashing. If “H TEMP” is dis-
played, stop the vehicle, then stop the
engine, and let the engine cool.
“ICE”: Appears when the icy road
warning indicator “ ” starts flashing. If
“ICE” is displayed, be careful of icy
roads.
“OIL SERV”: Appears when the oil
change indicator “OIL” starts flashing.
If “OIL SERV” is displayed, change the
engine oil, and then reset the oil
change indicator and oil change trip-
meter.
“V-BELT SERV”: Appears when the V-
belt replacement indicator “V-Belt”
starts flashing. If “V-BELT SERV” is
displayed, replace the V-belt, and then
reset the V-belt replacement indicator
and V-belt replacement tripmeter.
When there are two or more warnings,
the warning messages are displayed in
the following order:
L FUEL → H TEMP → ICE → OIL SERV
→ VBELT SERV → L FUEL
1. Average speed display
ZAUM1496
1
UBL1E0E0.book Page 11 Thursday, May 11, 2017 8:51 AM
Page 38 of 118

Instrument and control functions
4-12
4
EAU1234M
Handlebar switches
Left
Right
EAU54201Dimmer/Pass switch “ / /PASS”
Set this switch to “ ” for the high
beam and to “ ” for the low beam.
To flash the high beam, push the pass
side “PASS” of the switch while the
headlights are on low beam.
EAU12461Turn signal switch “ / ”
To signal a right-hand turn, push this
switch to “ ”. To signal a left-hand
turn, push this switch to “ ”. When
released, the switch returns to the cen-ter position. To cancel the turn signal
lights, push the switch in after it has re-
turned to the center position.
EAU12501Horn switch “ ”
Press this switch to sound the horn.
EAU54212Stop/Run/Start switch “ / / ”
To crank the engine with the starter,
set this switch to “ ”, and then push
the switch down towards “ ”. See
page 6-2 for starting instructions prior
to starting the engine.
Set this switch to “ ” to stop the en-
gine in case of an emergency, such as
when the vehicle overturns or when the
throttle cable is stuck.
EAU78190Hazard switch “ ”
With the main switch in the “ON”
or “ ” position, use this switch to turn
on the hazard lights (simultaneous
flashing of all turn signal lights).
The hazard lights are used in case of an
emergency or to warn other drivers
when your vehicle is stopped where it
might be a traffic hazard.
NOTICE
ECA10062
Do not use the hazard lights for an
extended length of time with the en-
gine not running, otherwise the bat-
tery may discharge.
EAU78491“TRIP/INFO” switch
This switch is used to make setting and
display changes in the multi-function
meter unit. See page 4-3 for more in-
formation.
1. Dimmer/Pass switch “ / /PASS”
2. Turn signal switch “ / ”
3. Horn switch “ ”
1. Stop/Run/Start switch “ / / ”
2. Hazard switch “ ”
3. “TRIP/INFO” switch
1
2
3
1
2
3
UBL1E0E0.book Page 12 Thursday, May 11, 2017 8:51 AM
Page 39 of 118
Instrument and control functions
4-13
4 To use the “TRIP” switch, move the
“TRIP/INFO” switch in direction (a). To
use the “INFO” switch, move the
“TRIP/INFO” switch in direction (b).
EAU12902
Front brake lever
The front brake lever is located on the
right side of the handlebar. To apply
the front brake, pull this lever toward
the throttle grip.1. “TRIP/INFO” switch
1(b) (a)
1. Front brake lever
1
UBL1E0E0.book Page 13 Thursday, May 11, 2017 8:51 AM
Page 40 of 118

Instrument and control functions
4-14
4
EAU12952
Rear brake lever
The rear brake lever is located on the
left side of the handlebar. To apply the
rear brake, pull this lever toward the
handlebar grip.
EAU12964
Rear brake lock lever
This vehicle is equipped with a rear
brake lock lever to prevent the rear
wheel from moving while stopped at
traffic signals, railroad crossings, etc.
To lock the rear wheel
Push the rear brake lock lever to the
left until it snaps into place.
To unlock the rear wheel
Push the rear brake lock lever back to
the original position.
TIP
Be sure to check that the rear
wheel does not move when the
rear brake lock lever is applied.
To provide secure locking of the
rear wheel, apply the rear brake le-
ver first before moving the rear
brake lock lever to the left.
WARNING
EWA12362
Never move the rear brake lock lever
to the left while the vehicle is mov-
ing, otherwise loss of control or an
accident may result. Make sure that
1. Rear brake lever
1
1. Rear brake lock lever
1
UBL1E0E0.book Page 14 Thursday, May 11, 2017 8:51 AM
 1
1 2
2 3
3 4
4 5
5 6
6 7
7 8
8 9
9 10
10 11
11 12
12 13
13 14
14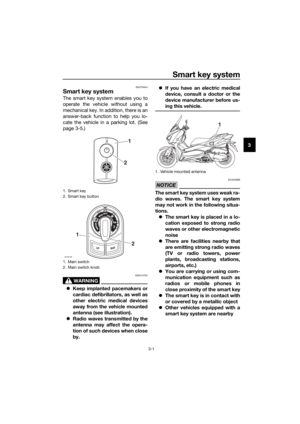 15
15 16
16 17
17 18
18 19
19 20
20 21
21 22
22 23
23 24
24 25
25 26
26 27
27 28
28 29
29 30
30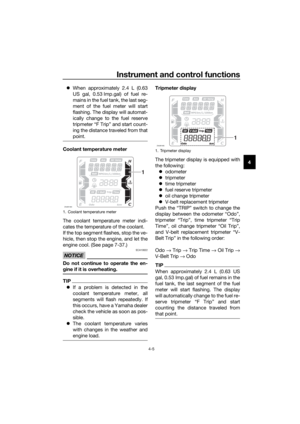 31
31 32
32 33
33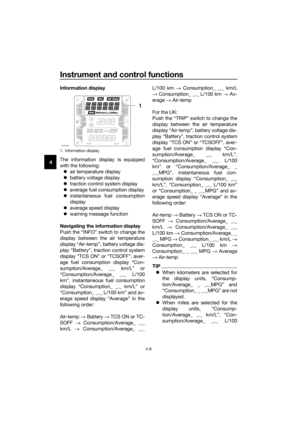 34
34 35
35 36
36 37
37 38
38 39
39 40
40 41
41 42
42 43
43 44
44 45
45 46
46 47
47 48
48 49
49 50
50 51
51 52
52 53
53 54
54 55
55 56
56 57
57 58
58 59
59 60
60 61
61 62
62 63
63 64
64 65
65 66
66 67
67 68
68 69
69 70
70 71
71 72
72 73
73 74
74 75
75 76
76 77
77 78
78 79
79 80
80 81
81 82
82 83
83 84
84 85
85 86
86 87
87 88
88 89
89 90
90 91
91 92
92 93
93 94
94 95
95 96
96 97
97 98
98 99
99 100
100 101
101 102
102 103
103 104
104 105
105 106
106 107
107 108
108 109
109 110
110 111
111 112
112 113
113 114
114 115
115 116
116 117
117. To
use the “INFO” switch, move the
“TRIP/INFO” switch in direction (b).")