Page 196 of 350
STARTING AND OPERATING 193
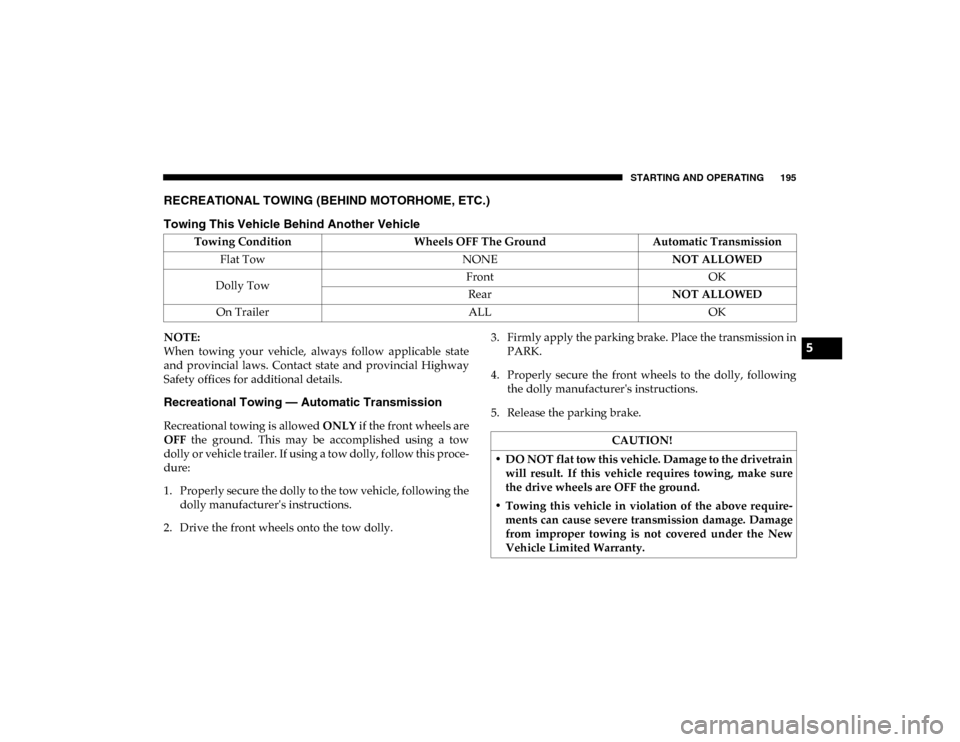
Seven-Pin Connector
Towing Tips
Before setting out on a trip, practice turning, stopping, and
backing up the trailer in an area located away from heavy
traffic.
Automatic Transmission
The DRIVE range can be selected when towing. The trans-
mission controls include a drive strategy to avoid frequent
shifting when towing. However, if frequent shifting does
occur while in DRIVE, use the Electronic Range Select (ERS)
shift control to select a lower gear range.
NOTE:
Using a lower gear range while operating the vehicle under
heavy loading conditions will improve performance and
extend transmission life by reducing excessive shifting and
heat build up. This action will also provide better engine
braking.
1 — Battery
2 — Backup Lamps
3 — Right Stop/Turn
4 — Electric Brakes
5 — Ground
6 — Left Stop/Turn
7 — Running Lamps
5
2020_RAM_PROMASTER_CITY_OM_USA=GUID-7B6A7FCA-79B0-423F-95C5-ED2A949C3D13=1=en=.book Page 193
Page 198 of 350

STARTING AND OPERATING 195
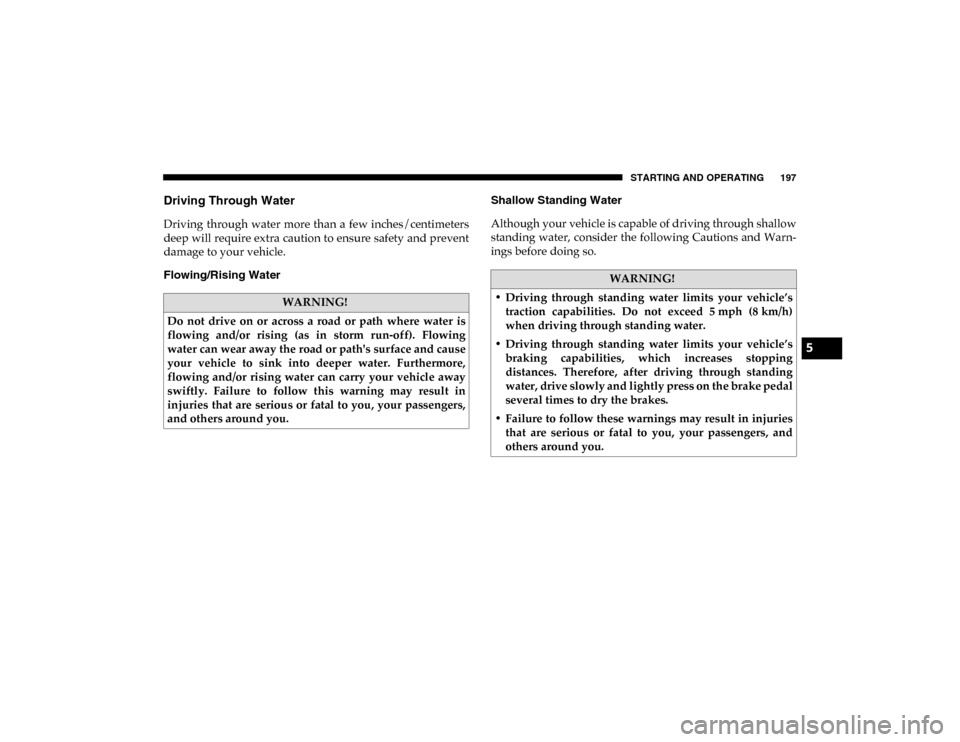
RECREATIONAL TOWING (BEHIND MOTORHOME, ETC.)
Towing This Vehicle Behind Another Vehicle
NOTE:
When towing your vehicle, always follow applicable state
and provincial laws. Contact state and provincial Highway
Safety offices for additional details.
Recreational Towing — Automatic Transmission
Recreational towing is allowed ONLY if the front wheels are
OFF the ground. This may be accomplished using a tow
dolly or vehicle trailer. If using a tow dolly, follow this proce -
dure:
1. Properly secure the dolly to the tow vehicle, following the dolly manufacturer's instructions.
2. Drive the front wheels onto the tow dolly. 3. Firmly apply the parking brake. Place the transmission in
PARK.
4. Properly secure the front wheels to the dolly, following the dolly manufacturer's instructions.
5. Release the parking brake.
Towing Condition
Wheels OFF The Ground Automatic Transmission
Flat Tow NONENOT ALLOWED
Dolly Tow Front
OK
Rear NOT ALLOWED
On Trailer ALLOK
CAUTION!
• DO NOT flat tow this vehicle. Damage to the drivetrain will result. If this vehicle requires towing, make sure
the drive wheels are OFF the ground.
• Towing this vehicle in violation of the above require -
ments can cause severe transmission damage. Damage
from improper towing is not covered under the New
Vehicle Limited Warranty.
5
2020_RAM_PROMASTER_CITY_OM_USA=GUID-7B6A7FCA-79B0-423F-95C5-ED2A949C3D13=1=en=.book Page 195
Page 200 of 350

STARTING AND OPERATING 197
Driving Through Water
Driving through water more than a few inches/centimeters
deep will require extra caution to ensure safety and prevent
damage to your vehicle.
Flowing/Rising WaterShallow Standing Water
Although your vehicle is capable of driving through shallow
standing water, consider the following Cautions and Warn
-
ings before doing so.
WARNING!
Do not drive on or across a road or path where water is
flowing and/or rising (as in storm run-off). Flowing
water can wear away the road or path's surface and cause
your vehicle to sink into deeper water. Furthermore,
flowing and/or rising water can carry your vehicle away
swiftly. Failure to follow this warning may result in
injuries that are serious or fatal to you, your passengers,
and others around you.
WARNING!
• Driving through standing water limits your vehicle’s traction capabilities. Do not exceed 5 mph (8 km/h)
when driving through standing water.
• Driving through standing water limits your vehicle’s braking capabilities, which increases stopping
distances. Therefore, after driving through standing
water, drive slowly and lightly press on the brake pedal
several times to dry the brakes.
• Failure to follow these warnings may result in injuries that are serious or fatal to you, your passengers, and
others around you.
5
2020_RAM_PROMASTER_CITY_OM_USA=GUID-7B6A7FCA-79B0-423F-95C5-ED2A949C3D13=1=en=.book Page 197
Page 204 of 350

IN CASE OF EMERGENCY 201
Replacing Exterior Bulbs
Headlamps
To change the bulb, proceed as follows:
1. Remove the plastic cap from the back of the headlamphousing.
2. Rotate the bulb counterclockwise.
3. Remove the bulb and replace as needed. 4. Install the bulb and rotate clockwise to lock in place.
5. Reinstall the plastic cap.
Front Turn Signal Lamps
To change the bulb, proceed as follows:
1. Remove the cap from the back of the outer upper head
-
lamp housing.
2. Rotate the bulb counterclockwise and remove.
Rear Stop Lamp
P21W
Rear Turn Signal Lamps PY21W
Rear Tail Lamps P21/5W
Rear Side Marker Lamps LED (See an authorized dealer)
Center Mount Brake Lamp W5W
Reverse Light W16W
Front Fog Lamps H11
NOTE:
Numbers refer to commercial bulb types that can be purchased from your authorized dealer. If a bulb needs to be replaced
visit an authorized dealer or refer to the applicable Service Manual. Exterior Bulbs
Lamps Bulb Number
6
2020_RAM_PROMASTER_CITY_OM_USA=GUID-7B6A7FCA-79B0-423F-95C5-ED2A949C3D13=1=en=.book Page 201
Page 205 of 350

202 IN CASE OF EMERGENCY
3. Install the bulb into socket.
4. Rotate the bulb/socket clockwise into the lamp locking itin place.
5. Reinstall the plastic cap.
Parking And Daytime Running Lights
To change the bulb, proceed as follows:
1. Remove the cap from the back of the outer lower head -
lamp housing.
2. Rotate the bulb counterclockwise and remove.
3. Install the bulb into socket, and rotate bulb/socket clock -
wise into lamp locking it in place.
4. Reinstall the plastic cap.
Front/Rear Side Marker Lamps
To change the bulb, proceed as follows:
The front/rear side marker lamps are LED and not serviced
separately. See an authorized dealer for replacement of these
lights. Rear Tail, Stop, Backup And Turn Signal Lamps
The rear light clusters contain taillight, brake light, direction
indicator and reverse/rear fog light bulbs. To access the light
clusters, proceed as follows:
1. Open the rear doors.
2. Remove the screws and remove the tail lamp assembly.
3. Remove the screws and separate the backplate from the
lamp housing.
4. Remove the tail, stop, or turn signal bulbs by pushing them slightly and turning counterclockwise.
5. Remove the backup lamp bulb by pulling straight out.
6. Replace lamps as required and reinstall lamp.
The bulbs are arranged inside the light cluster as follows:
2020_RAM_PROMASTER_CITY_OM_USA=GUID-7B6A7FCA-79B0-423F-95C5-ED2A949C3D13=1=en=.book Page 202
Page 206 of 350

IN CASE OF EMERGENCY 203
Third Brake Light (Center Mount)
To change the bulb, proceed as follows:
1. For versions with tailgate, loosen the two fasteningscrews and extract the cluster.
2. For versions with swing doors, remove rubber plugs, remove retaining tabs and extract the cluster.
3. For versions with high roof and swing doors, remove the pressure-fit plastic guard and rubber cap using a screw -
driver, release the retaining tags as shown in the figure
and remove the unit.
4. Remove the appropriate tabs and remove the bulb holder.
5. Remove the snap-fitted bulb and replace it.
License Plate Lights
Proceed as follows to replace the bulbs:
1. Disengage the holding tabs and remove the lens by lifting to the left.
2. Remove the bulbs by releasing them from the side contacts; insert the new bulbs and make sure they are
correctly clamped between these contacts.Replacing Interior Bulbs
Dome Lamp With Spot Lights
To change the bulbs, proceed as follows:
1. Remove dome lamp by depressing the tabs, using a suit -
able tool.
Dome Lamp Assembly
6
2020_RAM_PROMASTER_CITY_OM_USA=GUID-7B6A7FCA-79B0-423F-95C5-ED2A949C3D13=1=en=.book Page 203
Page 213 of 350
210 IN CASE OF EMERGENCY
CavityMini Fuse Description
F53 5 Amp BeigeKL 30 (+30) - IPC, FTM
F38 20 Amp YellowCentral Doors Locking
F36 15 Amp BlueKL 30 (+30) - TPMS, EOBD, HVAC,
Radio, SGW
F43 15 Amp BlueBi-Directional Washer Pump
F48 20 Amp YellowPassenger Power Windows
F50 7.5 Amp BrownKL 15 (+15) - Air-Bag
F51 7.5 Amp BrownKL 15 (+15) - External Mirror
Adjustment Command, HVAC, RVC,
HWB Coils
F37 5 Amp BeigeKL 15 (+15) - Brake Pedal Switch (N.O.),
IPC, Brake Pedal Switch (N.C.)
F49 5 Amp BeigeKL 15 (+15) - PAM, CSS Lighting, TTM,
SGW, and Heaters Light
F31 5 Amp BeigeKL 15a (INT A) - HWB, MCO
F47 20 Amp YellowDriver Power Windows
2020_RAM_PROMASTER_CITY_OM_USA=GUID-7B6A7FCA-79B0-423F-95C5-ED2A949C3D13=1=en=.book Page 210
Page 220 of 350
IN CASE OF EMERGENCY 217
7. Pull the retainer through the center of the wheel.RetainerPreparations For Jacking
1. Park the vehicle on a firm level surface as far from theedge of the roadway as possible. Avoid icy or slippery
areas.
2. Turn on the Hazard Warning flasher.
3. Apply the parking brake.
4. Place the gear selector into PARK (P).
5. Turn the ignition to the STOP (OFF/LOCK) position.
WARNING!
Do not attempt to change a tire on the side of the vehicle
close to moving traffic. Pull far enough off the road to
avoid being hit when operating the jack or changing the
wheel.
6
2020_RAM_PROMASTER_CITY_OM_USA=GUID-7B6A7FCA-79B0-423F-95C5-ED2A949C3D13=1=en=.book Page 217