2020 PEUGEOT PARTNER TEPEE weight
[x] Cancel search: weightPage 5 of 216

3
.
.
Driving recommendations 103
Starting and stopping 1 04
Electronic engine immobiliser
1
05
Parking brake
1
05
Manual gearbox
1
05
6-speed electronic gearbox
1
06
Gear shift indicator
1
08
Stop & Start
1
08
Hill start assist
1
11
Tyre under-inflation detection
1
12
Tyre under-inflation detection with
reinitialisation
113
Speed limiter
1
15
Cruise control
1
17
Active City Brake
1
20
Parking sensors
1
22
Reversing camera
1
24Fuel 1
26
Fuel system cut-off 1 27
Compatibility of fuels
1
28
Snow chains
1
29
Removable snow shield
1
30
Changing a wiper blade
1
30
Towing device
1
31
Towbar with a swan neck towball
1
31
Roof bars
1
33
Zenith roof bars
1
33
Maximum weights on bars
1
34
Other accessories
1
34
Bonnet
13 5
Engines
1
36
Checking levels
1
36
Chec ks
13 8
AdBlue
® (BlueHDi engines) 1 40
Temporary puncture repair kit
1
43
Changing a wheel
1
43
Fitting the wheel trim on the rim
1
47
Changing a bulb
1
49
Changing a fuse
1
54
Battery
158
Economy mode
1
59
Towing your vehicle
1
59
Running out of fuel (Diesel)
1
60
Characteristics of engines and towed loads 1 61Petrol engines/weights 162
Diesel engines/weights 1 63
Dimensions
165
Identification markings
1
74
DrivingPractical information
In the event of a breakdown Technical data
Alphabetical index
Audio and Telematics
7-inch touch screen
Peugeot Connect Sound (RD5)
.
Contents
Page 20 of 216

18
Indicators
Service indicator
This adjusts the ser vice inter val based on the
vehicle usage.
Operation
For a few seconds after the ignition is switched
on, the spanner indicating a ser vice operation
comes on. The distance recorder display line
indicates the distance remaining before the
next ser vice is due (rounded up by default).
The ser vice due dates are calculated from the
last reset of the ser vice indicator.
The due date is determined based on two
parameters:
-
t
he total distance travelled,
-
t
he time since the last ser vice.The distance remaining may be weighted
by the time factor, depending on the type
of driving.
More than 1,000 miles/km remain
b efore the next ser vice is due
Example: there are 4,800 miles/km remaining
before the next ser vice is due. For a few
seconds after the ignition is switched on, the
screen indicates:
Less than 1,000 miles/km remain
b efore the next ser vice is due
Each time the ignition is switched on and for a
few seconds, the spanner symbol flashes and
the distance remaining is displayed:
Service overdue
Each time the ignition is
switched on and for a few
seconds, the spanner symbol
flashes and the excess
distance travelled is displayed.
With the engine running, the spanner symbol
remains on until the ser vice has been per formed.
For BlueHDi Diesel versions, this alert is also
accompanied by the continuous illumination of
the Ser vice warning lamp when the ignition is
switched on.
For BlueHDi Diesel versions, the spanner
can also come on early, according to the
degree of deterioration of the engine oil.
The degree of deterioration of the engine
oil depends on the driving conditions in
which the vehicle is used.
A few seconds after the ignition is switched
on, the oil level is displayed, depending on
the version, and then the distance recorder
resumes its normal operation, indicating the
total and trip distances.
A few seconds after the ignition is switched
on, the oil level is displayed, depending on
the version, and then the distance recorder resumes its normal operation. The spanner
symbol remains on as a reminder that a ser vice
is required soon.
Zero reset
Your PEUGEOT dealer or a qualified workshop
will per form this operation after each ser vice.
If you carry out the ser vicing of your vehicle
yourself, the reset procedure is as follows:
F
s
witch off the ignition,
Instruments
Page 41 of 216
39
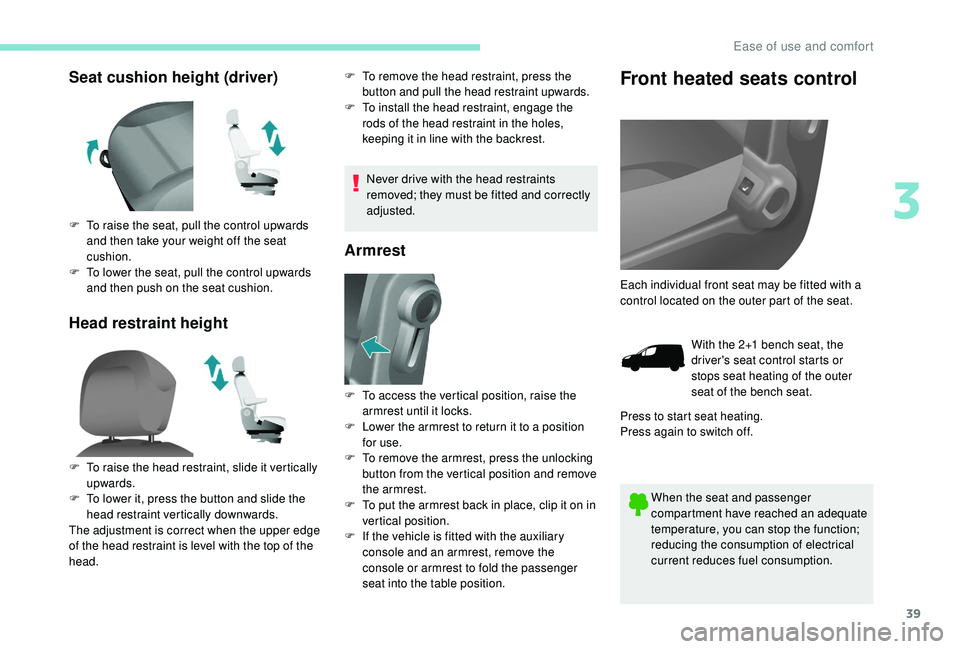
Seat cushion height (driver)
Head restraint heightF To remove the head restraint, press the button and pull the head restraint upwards.
F
T
o install the head restraint, engage the
rods of the head restraint in the holes,
keeping it in line with the backrest.
Never drive with the head restraints
removed; they must be fitted and correctly
adjusted.
Armrest
Front heated seats control
When the seat and passenger
compartment have reached an adequate
temperature, you can stop the function;
reducing the consumption of electrical
current reduces fuel consumption.
F
T
o raise the seat, pull the control upwards
and then take your weight off the seat
cushion.
F
T
o lower the seat, pull the control upwards
and then push on the seat cushion.
F
T
o raise the head restraint, slide it vertically
upwards.
F
T
o lower it, press the button and slide the
head restraint vertically downwards.
The adjustment is correct when the upper edge
of the head restraint is level with the top of the
head. F
T
o access the vertical position, raise the
armrest until it locks.
F
L
ower the armrest to return it to a position
for use.
F
T
o remove the armrest, press the unlocking
button from the vertical position and remove
the armrest.
F
T
o put the armrest back in place, clip it on in
vertical position.
F
I
f the vehicle is fitted with the auxiliary
console and an armrest, remove the
console or armrest to fold the passenger
seat into the table position. Each individual front seat may be fitted with a
control located on the outer part of the seat.
With the 2+1 bench seat, the
driver's seat control starts or
stops seat heating of the outer
seat of the bench seat.
Press to start seat heating.
Press again to switch off.
3
Ease of use and comfort
Page 43 of 216
41
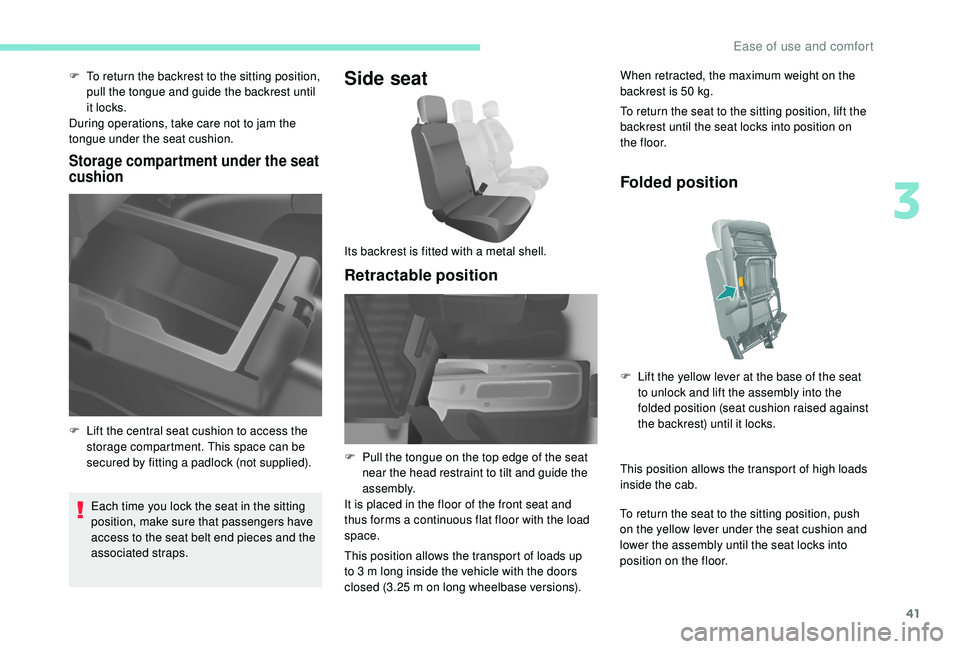
F To return the backrest to the sitting position, pull the tongue and guide the backrest until
it locks.
During operations, take care not to jam the
tongue under the seat cushion.
Storage compartment under the seat
cushion
Each time you lock the seat in the sitting
position, make sure that passengers have
access to the seat belt end pieces and the
associated straps.
Side seat
Retractable position
When retracted, the maximum weight on the
backrest is 50 kg.
To return the seat to the sitting position, lift the
backrest until the seat locks into position on
t h e f l o o r.
F
L
ift the central seat cushion to access the
storage compartment. This space can be
secured by fitting a padlock (not supplied). Its backrest is fitted with a metal shell.
F
P
ull the tongue on the top edge of the seat
near the head restraint to tilt and guide the
assembly.
It is placed in the floor of the front seat and
thus forms a continuous flat floor with the load
space.
This position allows the transport of loads up
to 3
m long inside the vehicle with the doors
closed (3.25
m on long wheelbase versions).
Folded position
This position allows the transport of high loads
inside the cab.
To return the seat to the sitting position, push
on the yellow lever under the seat cushion and
lower the assembly until the seat locks into
position on the floor. F
L
ift the yellow lever at the base of the seat
to unlock and lift the assembly into the
folded position (seat cushion raised against
the backrest) until it locks.
3
Ease of use and comfort
Page 57 of 216
55
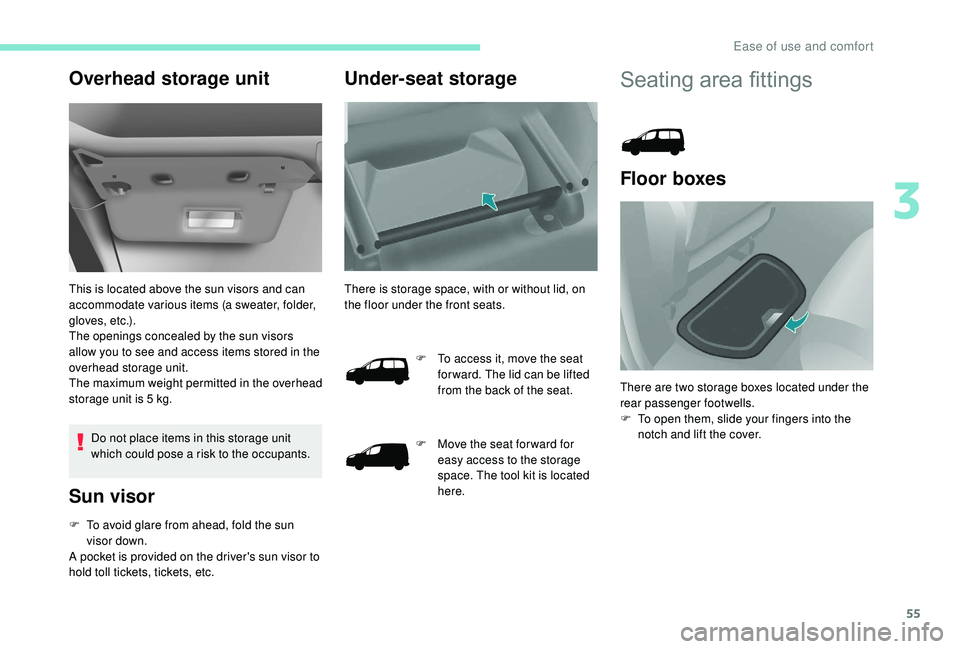
Overhead storage unit
This is located above the sun visors and can
accommodate various items (a sweater, folder,
gloves, etc.).
The openings concealed by the sun visors
allow you to see and access items stored in the
overhead storage unit.
The maximum weight permitted in the overhead
storage unit is 5 kg.
Do not place items in this storage unit
which could pose a risk to the occupants.
Sun visor
F To avoid glare from ahead, fold the sun visor down.
A pocket is provided on the driver's sun visor to
hold toll tickets, tickets, etc.
Under-seat storage
There is storage space, with or without lid, on
the floor under the front seats.
F
T
o access it, move the seat
for ward. The lid can be lifted
from the back of the seat.
F
M
ove the seat for ward for
easy access to the storage
space. The tool kit is located
here.
Seating area fittings
Floor boxes
There are two storage boxes located under the
rear passenger footwells.
F
T
o open them, slide your fingers into the
notch and lift the cover.
3
Ease of use and comfort
Page 91 of 216
89
General points relating to
child seats
The regulations on carrying children are
specific to each country. Refer to the
legislation in force in your country.
For maximum safety, please obser ve the
following recommendations:
-
i
n accordance with European regulations,
all children under the age of 12 or less
than one and a half metres tall must
travel in approved child seats suited to
their weight , on seats fitted with a seat belt
or ISOFIX mountings,
-
s
tatistically, the safest seats in your
vehicle for carr ying children are the rear
seats,
-
a c
hild weighing less than 9 kg must
travel in the rear ward facing position
both in the front and in the rear.
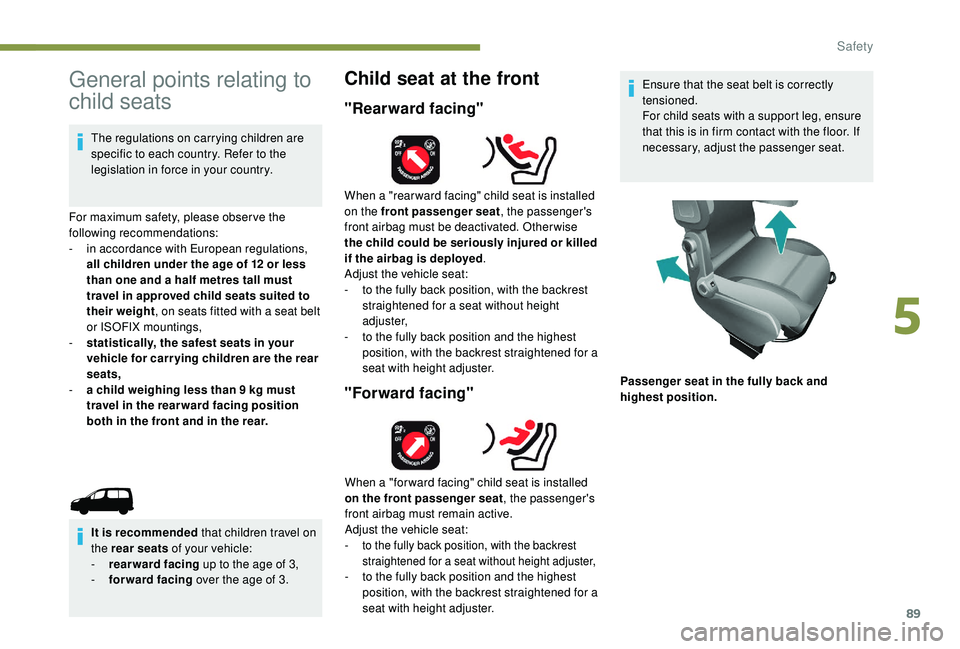
Child seat at the front
"Rearward facing"
"Forward facing"
Ensure that the seat belt is correctly
tensioned.
For child seats with a support leg, ensure
that this is in firm contact with the floor. If
necessary, adjust the passenger seat.
Passenger seat in the fully back and
highest position.
It is recommended that children travel on
the rear seats of your vehicle:
-
re
arward facing up to the age of 3,
-
fo
rward facing over the age of 3. When a "rear ward facing" child seat is installed
on the front passenger seat
, the passenger's
front airbag must be deactivated. Other wise
the child could be seriously injured or killed
if the airbag is deployed .
Adjust the vehicle seat:
-
t
o the fully back position, with the backrest
straightened for a seat without height
adjuster,
-
t
o the fully back position and the highest
position, with the backrest straightened for a
seat with height adjuster.
When a "for ward facing" child seat is installed
on the front passenger seat , the passenger's
front airbag must remain active.
Adjust the vehicle seat:
- to the fully back position, with the backrest straightened for a seat without height adjuster,
- to the fully back position and the highest position, with the backrest straightened for a
seat with height adjuster.
5
Safety
Page 97 of 216
95
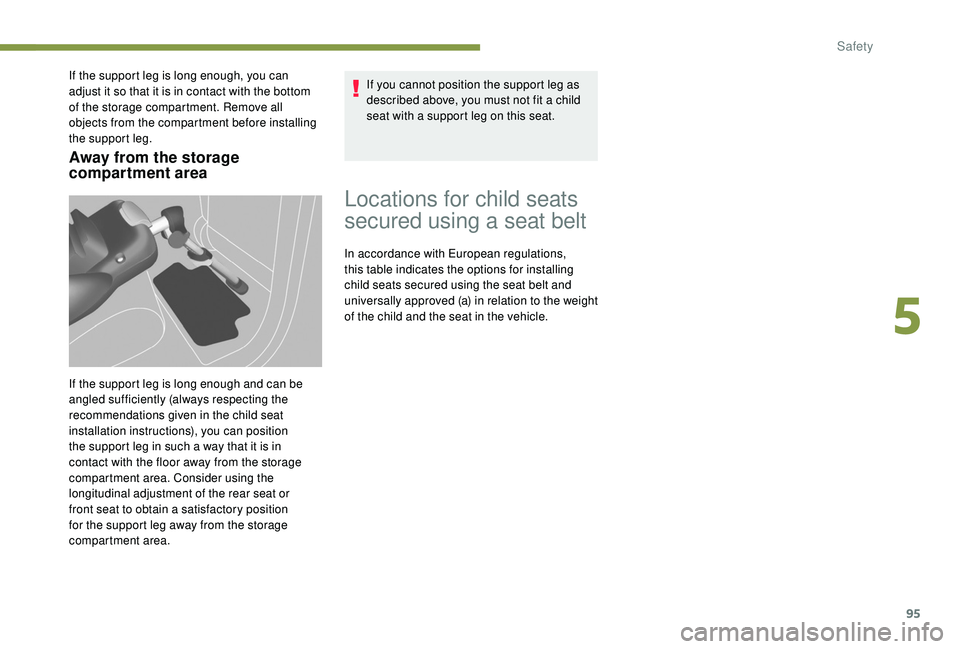
Away from the storage
compartment area
If the support leg is long enough, you can
adjust it so that it is in contact with the bottom
of the storage compartment. Remove all
objects from the compartment before installing
the support leg.
If the support leg is long enough and can be
angled sufficiently (always respecting the
recommendations given in the child seat
installation instructions), you can position
the support leg in such a way that it is in
contact with the floor away from the storage
compartment area. Consider using the
longitudinal adjustment of the rear seat or
front seat to obtain a satisfactory position
for the support leg away from the storage
compartment area.If you cannot position the support leg as
described above, you must not fit a child
seat with a support leg on this seat.
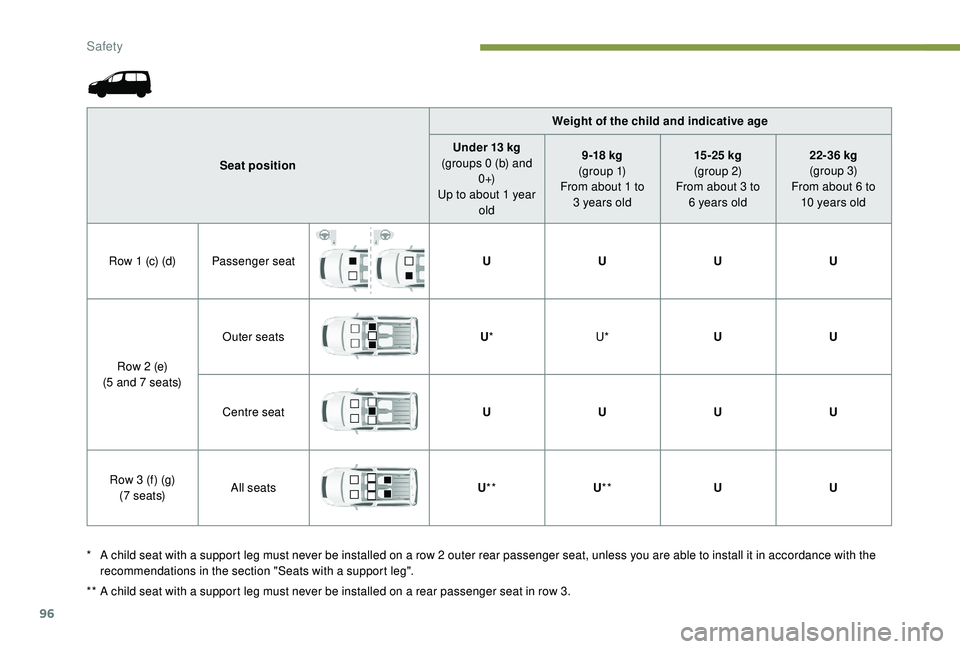
Locations for child seats
secured using a seat belt
In accordance with European regulations,
this table indicates the options for installing
child seats secured using the seat belt and
universally approved (a) in relation to the weight
of the child and the seat in the vehicle.
5
Safety
Page 98 of 216
96
Weight of the child and indicative age
Seat position Under 13
kg
(groups 0 (b) and 0 +)
Up to about 1 year old 9 -18
kg
(g r o u p 1)
From about 1 to 3
years old 15 -25
kg
(group 2)
From about 3 to 6
years old22-36
kg
(group 3)
From about 6 to 10
years old
Row 1 (c) (d) Passenger seat UUUU
Row 2 (e)
(5 and 7 seats) Outer seats
U* U* UU
Centre seat UUUU
Row 3 (f) (g) (7 seats) All seats
U** U** U U
*
A c
hild seat with a support leg must never be installed on a row 2 outer rear passenger seat, unless you are able to install it in accordance with the
recommendations in the section "Seats with a support leg".
**
A c
hild seat with a support leg must never be installed on a rear passenger seat in row 3.
Safety