2020 PEUGEOT PARTNER TEPEE charging
[x] Cancel search: chargingPage 11 of 216

9
Warning/indicator lampStateCause Action/Observations
Red warning/indicator lamps
STOPFixed, associated with
another warning lamp
and accompanied
by a message in the
screen. Major faults linked with the "Brake
fluid level", "Engine oil pressure
and temperature", "Engine
coolant temperature", "Electronic
brake force distribution" and
"Power steering" warning lamps. You must stop as soon as it is safe to do so.
Park, switch off the ignition and call a PEUGEOT
dealer or qualified workshop.
Engine coolant
temperature and
level Fixed, with the needle
in the red zone.
An abnormal increase in
temperature.
Park and switch off the ignition, then allow to cool down.
Check the level visually.
Flashing.
A drop in the engine coolant level. Contact a PEUGEOT dealer or a qualified workshop.
Engine oil pressure
and temperature Fixed while driving. Insufficient pressure or excessive
temperature.
Park and switch off the ignition, then allow to cool down.
Check the level visually. For more information on
Checking levels, refer to the corresponding section.
Fixed, even though the
level is correct. A major fault.
Have it checked by a PEUGEOT dealer or a qualified
workshop.
Battery charge Fixed. A fault in the charging circuit. Check the battery terminals. For more information on
the Battery, refer to the corresponding section.
Flashing. Active functions set to standby
(economy mode). For more information on the Battery
, refer to the
corresponding section.
Fixed, despite the
checks. A fault with the ignition or
injection system. Have it checked by a PEUGEOT dealer or a qualified
workshop.
1
Instruments
Page 62 of 216
60
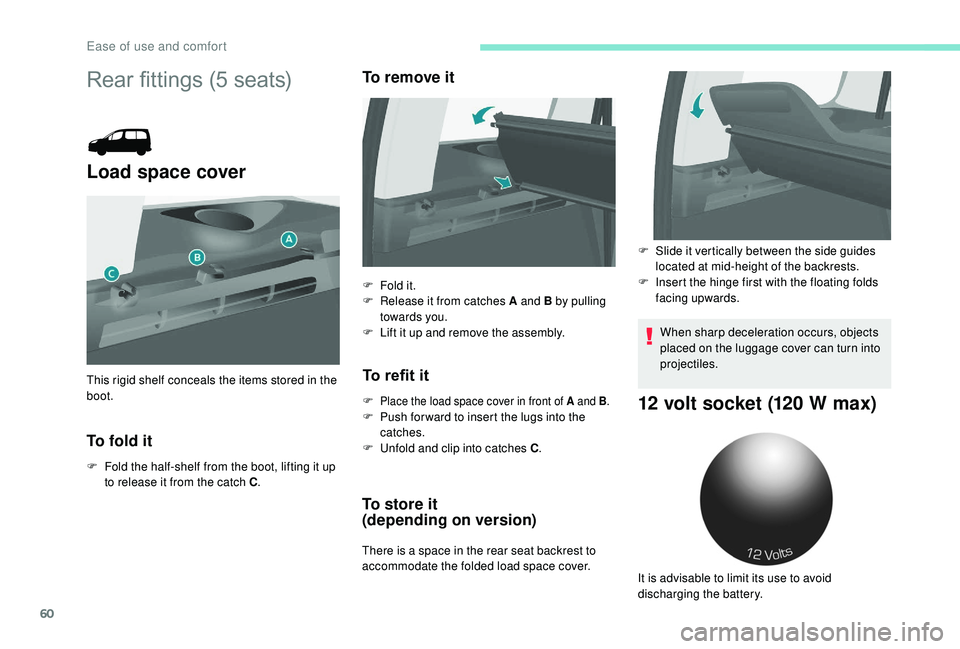
Rear fittings (5 seats)
Load space cover
To fold it
F Fold the half-shelf from the boot, lifting it up to release it from the catch C .
To remove it
To refit it
F Place the load space cover in front of A and B .F Push for ward to insert the lugs into the
catches.
F
U
nfold and clip into catches C .
To store it
(depending on version)
There is a space in the rear seat backrest to
accommodate the folded load space cover.
This rigid shelf conceals the items stored in the
boot.
F
F
old it.
F
R
elease it from catches A and B by pulling
towards you.
F
L
ift it up and remove the assembly.
When sharp deceleration occurs, objects
placed on the luggage cover can turn into
projectiles.
12 volt socket (120 W max)
F Slide it vertically between the side guides
located at mid-height of the backrests.
F
I
nsert the hinge first with the floating folds
facing upwards.
It is advisable to limit its use to avoid
discharging the battery.
Ease of use and comfort
Page 63 of 216
61
The connection of an electrical device
not approved by PEUGEOT, such as a
USB charger, may adversely affect the
operation of vehicle electrical systems,
causing faults such as poor radio
reception or inter ference with displays in
the screens.
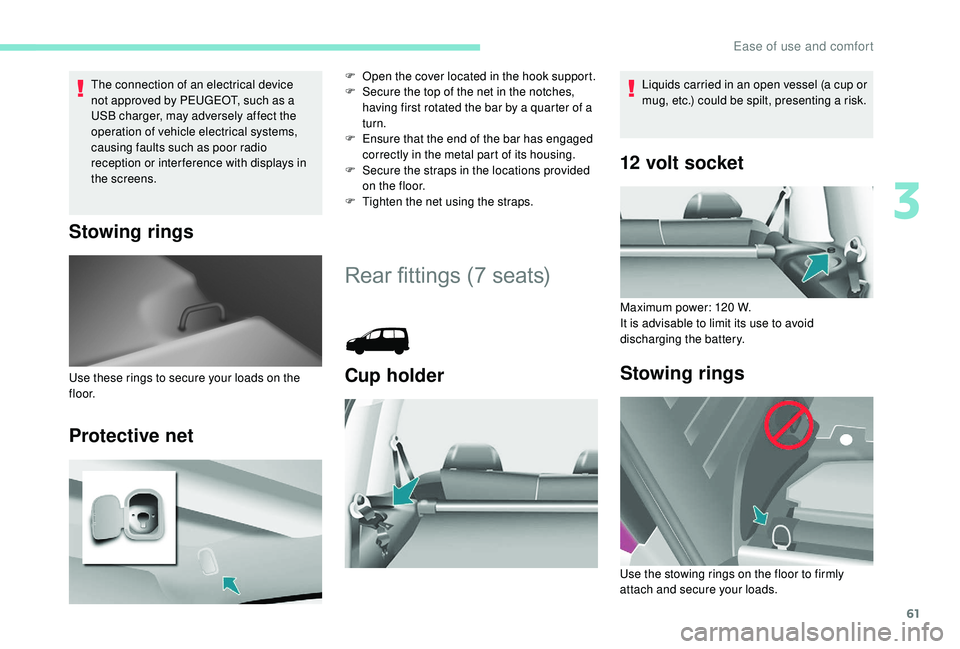
Stowing rings
Protective net
F Open the cover located in the hook support.
F S ecure the top of the net in the notches,
having first rotated the bar by a quarter of a
turn.
F
E
nsure that the end of the bar has engaged
correctly in the metal part of its housing.
F
S
ecure the straps in the locations provided
on the floor.
F
T
ighten the net using the straps.
Rear fittings (7 seats)
Cup holderUse these rings to secure your loads on the
f l o o r.
12 volt socket
Maximum power: 120 W.
I t is advisable to limit its use to avoid
discharging the battery.
Stowing rings
Liquids carried in an open vessel (a cup or
mug, etc.) could be spilt, presenting a risk.
Use the stowing rings on the floor to firmly
attach and secure your loads.
3
Ease of use and comfort
Page 66 of 216
64
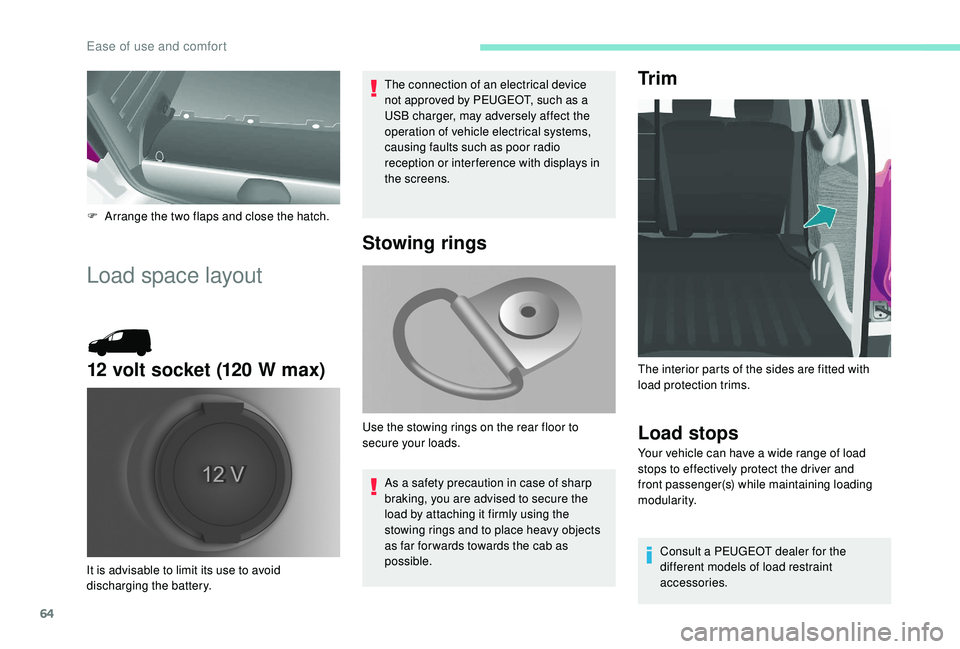
F Arrange the two flaps and close the hatch.
Load space layout
12 volt socket (120 W max)
The connection of an electrical device
not approved by PEUGEOT, such as a
USB charger, may adversely affect the
operation of vehicle electrical systems,
causing faults such as poor radio
reception or inter ference with displays in
the screens.
It is advisable to limit its use to avoid
discharging the battery.
Stowing rings
As a safety precaution in case of sharp
braking, you are advised to secure the
load by attaching it firmly using the
stowing rings and to place heavy objects
as far for wards towards the cab as
possible.
Use the stowing rings on the rear floor to
secure your loads.
Tr i m
Load stops
Your vehicle can have a wide range of load
stops to effectively protect the driver and
front passenger(s) while maintaining loading
modularity.
Consult a PEUGEOT dealer for the
different models of load restraint
accessories.
The interior parts of the sides are fitted with
load protection trims.
Ease of use and comfort
Page 73 of 216

71
Lighting control stalk
Front and rear lamps
Lamps off
Lamps with automatic illumination
Sidelamps
Dipped headlamps (green)
Main beam (blue)
Switching between dipped and
main beam
F Pull the stalk fully towards you.
Reminder, lamps on
When switching off the ignition, all of the lamps
turn off, except for dipped beam if the guide-
me-home lighting is activated.
F
T
o activate the lighting control stalk, set the
ring to position 0 (lamps off), then to the
desired position.
When the driver's door is opened, if the lamps
are on, an audible signal will sound.
To avoid discharging the battery, the Economy
mode is triggered after thirty minutes without
any action by the user. The functions are put on
standby and the battery warning lamp flashes.
The sidelamps are not affected by the
Economy mode.
For more information on the Economy
mode , refer to the corresponding section.
Front and rear foglamps
These work with the sidelamps and dipped
headlamps.
They are selected by rotating the ring for wards to
switch on and to the rear to switch off.
The state is indicated by the indicator lamp in the
instrument panel.
Front foglamps (green, the ring is
turned forwards once).
Rear foglamps (amber, the ring is
turned for wards twice).
To turn the rear and front foglamps off, turn the
ring twice to the rear.
In clear weather or in rain, both day and
night, rear foglamps dazzle and their use
is prohibited.
Do not forget to switch them off when they
are no longer necessary.
Automatic illumination of headlamps
switches the rear foglamps off, but the
front foglamps stay on.
Selection is made by rotating this ring.
4
Lighting and visibility
Page 90 of 216

88
Advice
For the airbags to be fully effective,
observe the safety recommendations
below.
Adopt a normal and upright sitting position.
Fasten your seat belt, ensuring it is positioned
c o r r e c t l y.
Do not leave anything between the occupants
and the airbags (a child, pet, object, etc.), nor
fix or attach anything close to the inflation
trajectory of the airbags; this could cause
injuries if they are deployed.
Never modify the original definition of your
vehicle, particularly in the area directly
around the airbags.
After an accident or if the vehicle has been
stolen or broken into, have the airbag systems
checked.
All work on the airbag systems must be
carried out by a PEUGEOT dealer or a
qualified workshop.
Even if all of the precautions mentioned
are obser ved, a risk of injury or of minor
burns to the head, chest or arms when an
airbag is deployed cannot be ruled out. The
bag inflates almost instantly (within a few
milliseconds) then deflates within the same
time discharging the hot gas via openings
provided for this purpose.Front airbags
Do not drive holding the steering wheel by its
spokes or resting your hands on the centre
part of the wheel.
Passengers must not place their feet on the
dashboard.
Do not smoke as deployment of the airbags
can cause burns or the risk of injury from a
cigarette or pipe.
Never remove or pierce the steering wheel or
hit it violently.
Do not fit or attach anything to the steering
wheel or dashboard, this could cause injuries
if the airbags are deployed.
Lateral airbags
Use only approved covers on the seats,
compatible with the deployment the lateral
airbags. For information on the range of seat
covers suitable for your vehicle, you can
contact a PEUGEOT
dealer.
Do not fix or attach anything to the seat
backrests (clothes, etc.) as this could cause
injuries to the chest or arm if the lateral airbag
is deployed.
Do not sit with the upper part of the body any
nearer to the door than necessary. Curtain airbags
Do not fix or attach anything to the roof, as
this could cause head injuries if the curtain
airbag is deployed.
If fitted on your vehicle, do not remove the
grab handles installed on the roof, they play a
part in securing the curtain airbags.
Safety
Page 160 of 216
158
Battery
Procedure for starting the engine using another
battery or charging a discharged battery.After refitting the battery, the Stop & Start
will only be active after a continuous
period of immobilisation of the vehicle, the
duration of which depends on the climatic
conditions and the state of charge of the
battery (up to about 8
hours).
The Stop & Start battery does not have to
be disconnected for charging.
Charging the battery using
a battery charger
F Disconnect the battery.
F F ollow the instructions for use provided by
the manufacturer of the charger.
F
R
econnect starting with the negative (-)
terminal.
F
C
heck the condition of the terminals and
clamps. If they are covered with sulphate
(whitish or greenish deposits), disconnect
them and clean them all.
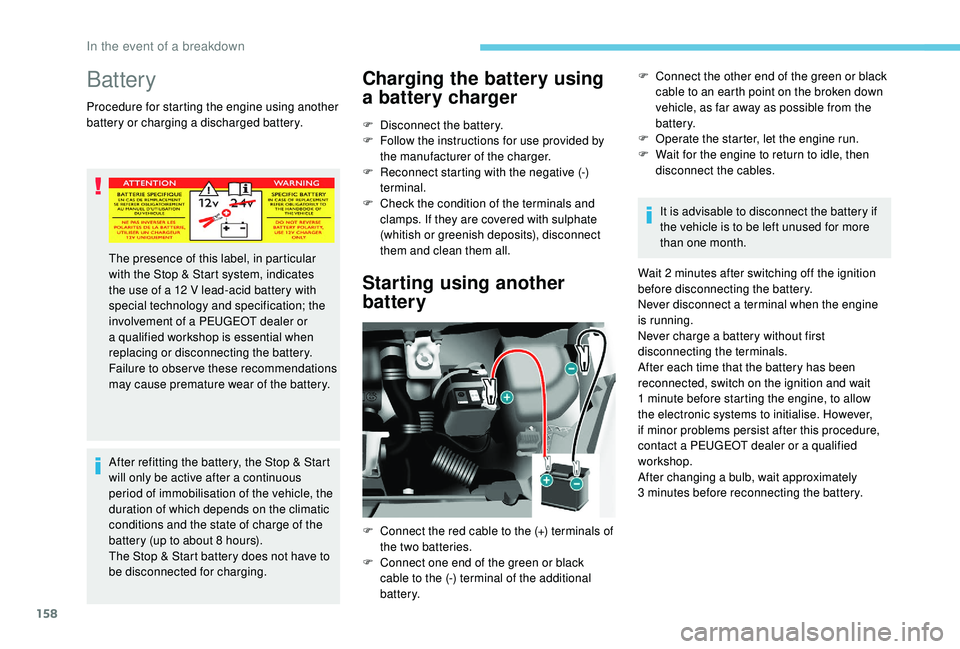
Starting using another
battery
F Connect the other end of the green or black cable to an earth point on the broken down
vehicle, as far away as possible from the
battery.
F
O
perate the starter, let the engine run.
F
W
ait for the engine to return to idle, then
disconnect the cables.
It is advisable to disconnect the battery if
the vehicle is to be left unused for more
than one month.
Wait 2
minutes after switching off the ignition
before disconnecting the battery.
Never disconnect a terminal when the engine
is running.
Never charge a battery without first
disconnecting the terminals.
After each time that the battery has been
reconnected, switch on the ignition and wait
1
minute before starting the engine, to allow
the electronic systems to initialise. However,
if minor problems persist after this procedure,
contact a PEUGEOT dealer or a qualified
workshop.
After changing a bulb, wait approximately
3
minutes before reconnecting the battery.
The presence of this label, in particular
with the Stop & Start system, indicates
the use of a 12
V lead-acid battery with
special technology and specification; the
involvement of a PEUGEOT dealer or
a qualified workshop is essential when
replacing or disconnecting the battery.
Failure to observe these recommendations
may cause premature wear of the battery.
F
C
onnect the red cable to the (+) terminals of
the two batteries.
F
C
onnect one end of the green or black
cable to the (-) terminal of the additional
battery.
In the event of a breakdown
Page 199 of 216
1
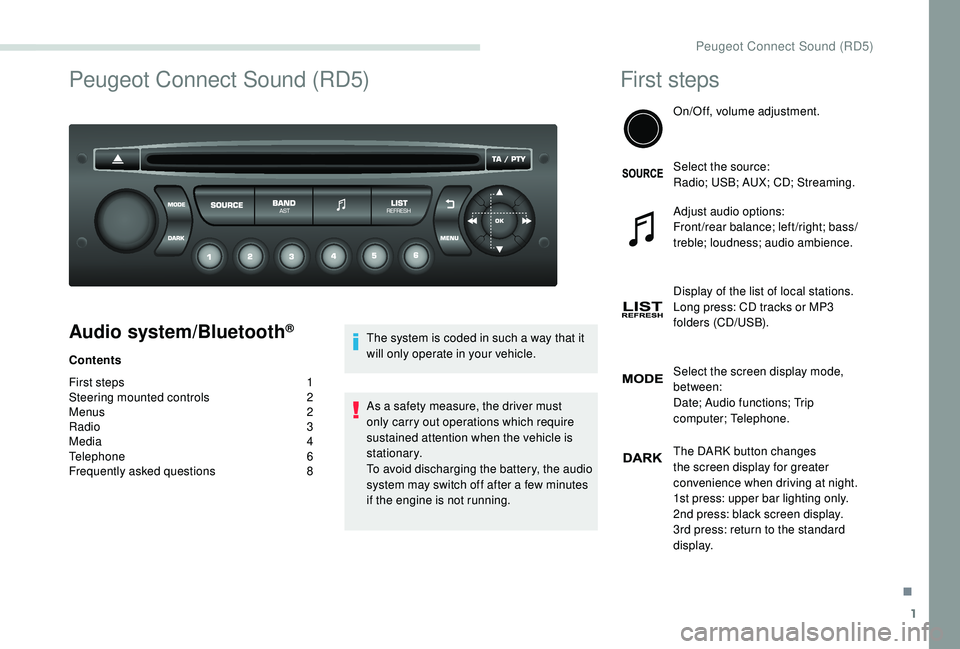
Peugeot Connect Sound (RD5)
Audio system/Bluetooth®
Contents
First steps
1
S
teering mounted controls
2
M
enus
2
R
adio 3
Media
4
Telephone
6
Frequently asked questions
8T
he system is coded in such a way that it
will only operate in your vehicle.
As a safety measure, the driver must
only carry out operations which require
sustained attention when the vehicle is
stationary.
To avoid discharging the battery, the audio
system may switch off after a few minutes
if the engine is not running.
First steps
On/Off, volume adjustment.
Select the source:
Radio; USB; AUX; CD; Streaming.
Adjust audio options:
Front/rear balance; left/right; bass/
treble; loudness; audio ambience.
Display of the list of local stations.
Long press: CD tracks or MP3
folders (CD/USB).
Select the screen display mode,
between:
Date; Audio functions; Trip
computer; Telephone.
The DARK button changes
the screen display for greater
convenience when driving at night.
1st press: upper bar lighting only.
2nd press: black screen display.
3rd press: return to the standard
display.
.
Peugeot Connect Sound (RD5)