2020 PEUGEOT PARTNER TEPEE clock
[x] Cancel search: clockPage 25 of 216

23
Each press of the button on the end of the
wiper control stalk allows you to scroll through
the various trip computer information displays,
depending on the screen.
The "vehicle" tab with the range, current fuel
consumption and remaining distance to travel.
The "1" tab (trip 1) with the average speed,
average fuel consumption and distance
travelled in trip 1 .
The "2" tab (trip 2) with the same information
for a 2
nd trip.
Zero reset
F When the desired trip is displayed, press the control for more than two seconds.
A few definitions
Range: displays the distance that can still be
travelled with the fuel detected in the tank on
the basis of the average consumption over the
last few miles (kilometres) travelled. If dashes instead of figures continue to
be displayed when driving, contact a
PEUGEOT dealer.
This displayed value can vary greatly
following a change in the vehicle's driving
conditions or the terrain. When the range falls below 19
miles (30 km),
dashes are displayed. After filling with at least
10 litres of fuel, the range is recalculated and is
displayed if it exceeds 62 miles (100 km).
Current fuel consumption: calculated
and displayed only when exceeding 19 mph
(30
km/h).
Average consumption: this is the average
fuel consumption since the last trip computer
zero reset.
Distance travelled: calculated from the last
trip computer zero reset.
Remaining distance: calculated according
to the final destination entered by the user. If
navigation is activated, the navigation system
calculates it instantaneously.
Average speed: this is the average speed
calculated since the last trip computer zero
reset (with the ignition on).
Date and time setting
Centre console without
screen
To adjust the time on the clock, use the left-
hand button on the instrument panel.
F
T
urn to the left: the minutes flash.
F
T
urn to the right to increase the minutes
(hold the button towards the right to scroll
through faster).
F
T
urn to the left: the hours flash.
F
T
urn to the right to increase the hours (hold
the button towards the right to scroll through
faster).
F
T
urn to the left: 24H or 12H is displayed.
F
T
urn to the right to select 24H or 12H.
F
T
urn to the left to finish setting the time.
The usual screen displays again when the
button has not been pressed for approximately
30
seconds.
1
Instruments
Page 144 of 216
142
Procedure
Before topping up, ensure that the vehicle is
parked on a flat and level sur face.
In wintry conditions, ensure that the
temperature of the vehicle is above -11°C.
Otherwise the AdBlue
® may be frozen and
so cannot be poured into its tank. Park your
vehicle in a warmer area for a few hours to
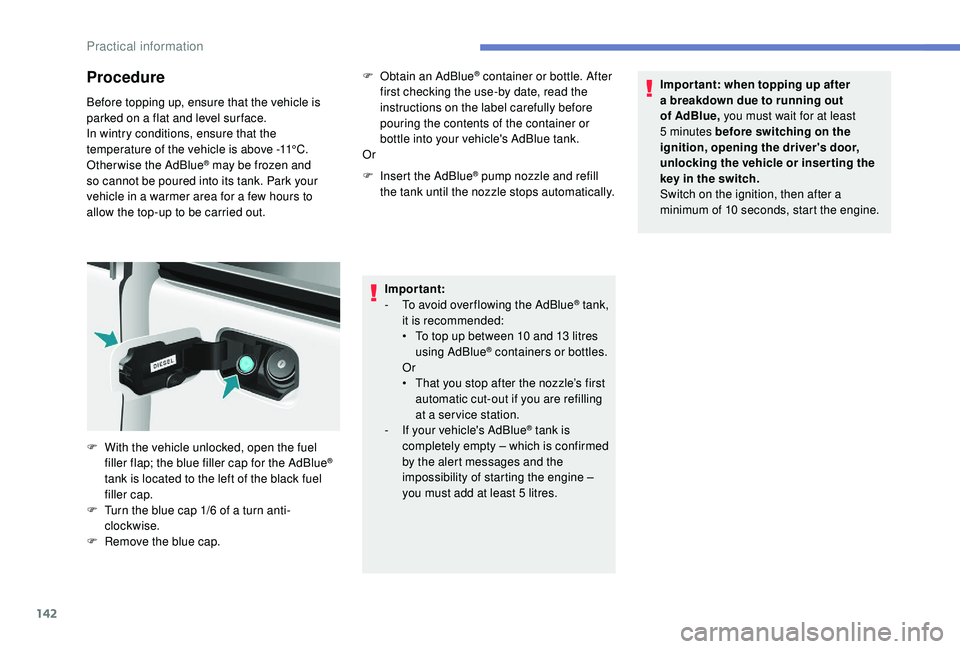
allow the top-up to be carried out. F
O
btain an AdBlue
® container or bottle. After
first checking the use-by date, read the
instructions on the label carefully before
pouring the contents of the container or
bottle into your vehicle's AdBlue tank.
Or
F
I
nsert the AdBlue
® pump nozzle and refill
the tank until the nozzle stops automatically.
Important:
-
T
o avoid over flowing the AdBlue
® tank,
i
t is recommended:
•
T
o top up between 10 and 13
litres
using AdBlue
® containers or bottles.
Or
•
T
hat you stop after the nozzle’s first
automatic cut-out if you are refilling
at a ser vice station.
-
I
f your vehicle's AdBlue
® tank is
completely empty – which is confirmed
by the alert messages and the
impossibility of starting the engine –
you must add at least 5
litres. Impor tant: when topping up after
a breakdown due to running out
of AdBlue,
you must wait for at least
5 minutes before switching on the
ignition, opening the driver's door,
unlocking the vehicle or inser ting the
key in the switch.
Switch on the ignition, then after a
minimum of 10 seconds, start the engine.
F
W
ith the vehicle unlocked, open the fuel
filler flap; the blue filler cap for the AdBlue
®
tank is located to the left of the black fuel
filler cap.
F
T
urn the blue cap 1/6 of a turn anti-
clockwise.
F
R
emove the blue cap.
Practical information
Page 151 of 216
149
Comply with the wheel trim fitting
procedure to avoid breaking of the
fixing tab and distor tion on the edge of
the wheel trim.
Correct
valve position: above the ring.
Changing a bulb
Types of bulb
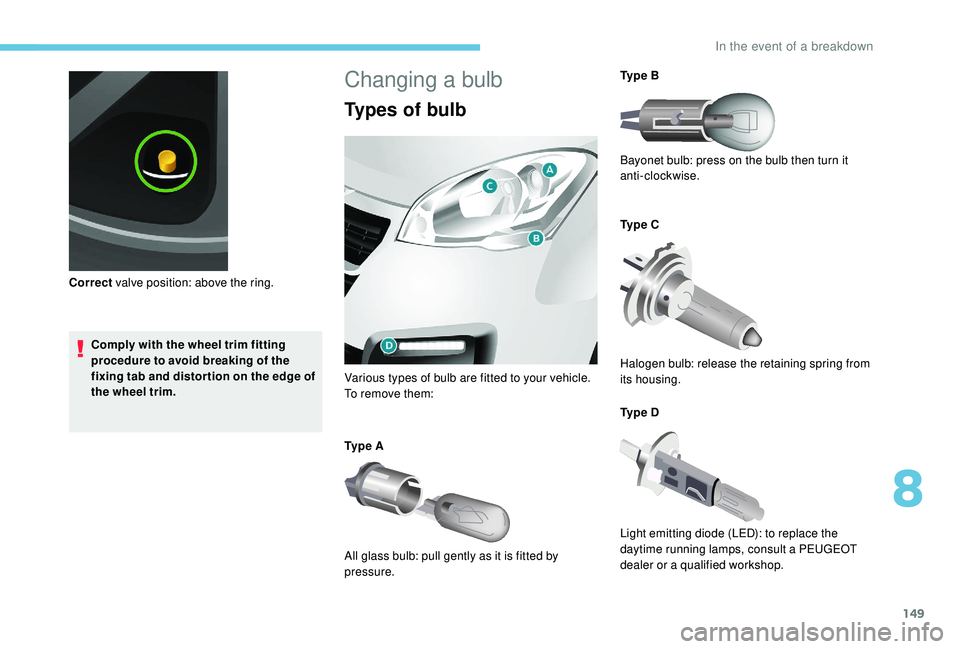
Various types of bulb are fitted to your vehicle.
To remove them:
Ty p e A
All glass bulb: pull gently as it is fitted by
pressure. Ty p e B
Bayonet bulb: press on the bulb then turn it
anti-clockwise.
Ty p e C
Halogen bulb: release the retaining spring from
its housing.
Ty p e D
Light emitting diode (LED): to replace the
daytime running lamps, consult a PEUGEOT
dealer or a qualified workshop.
8
In the event of a breakdown
Page 152 of 216
150
Open the bonnet. To access the bulbs, reach
behind the headlamp unit.
Carry out the operations in reverse order to
refit each bulb and check that the bonnet is
closed securely.Halogen bulbs must be changed with the
headlamps off. Wait a few minutes (risk
of serious burns). Do not touch the bulb
directly with your fingers, use a lint-free
cloth.
It is normal for condensation to form inside
the headlamps. Regular use of the vehicle
eliminates this misting.
The bulbs must be changed with the
ignition off or the battery disconnected.
Wait approximately three minutes after
changing the bulb before reconnecting the
battery.
Check that the lamps are working properly
after each operation.
High-pressure jet wash
When using this type of washer on
stubborn dirt, do not persist on the
headlamps, the lamps and their edges to
avoid damaging their coating and seals.
Front lampsDipped beam headlamps/Main
beam headlamps
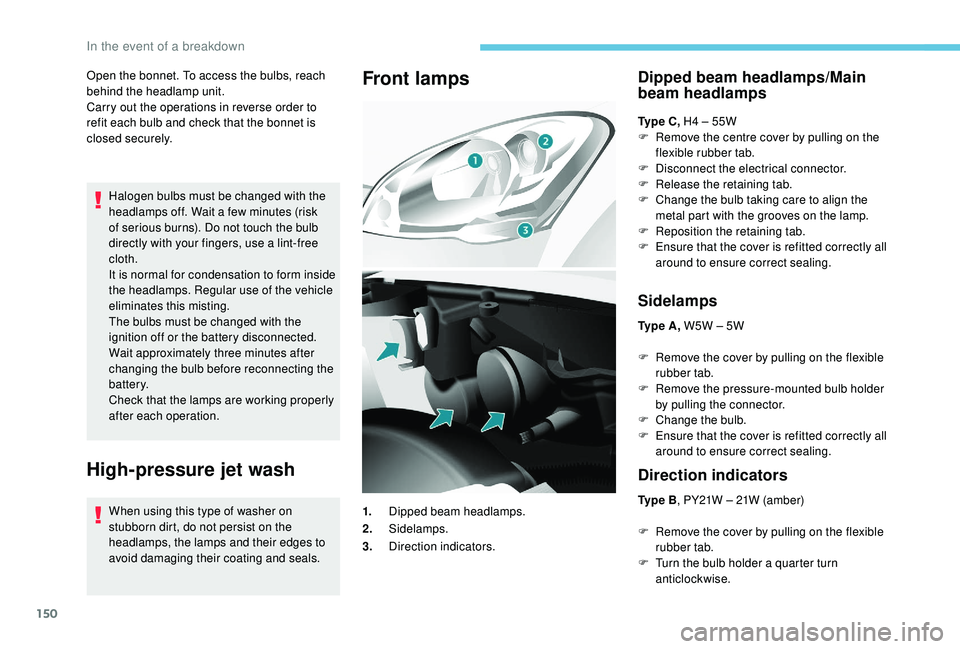
Ty p e C , H4 – 55W
F R emove the centre cover by pulling on the
flexible rubber tab.
F
D
isconnect the electrical connector.
F
R
elease the retaining tab.
F
C
hange the bulb taking care to align the
metal part with the grooves on the lamp.
F
R
eposition the retaining tab.
F
E
nsure that the cover is refitted correctly all
around to ensure correct sealing.
Sidelamps
Ty p e A , W5W – 5W
F
R
emove the cover by pulling on the flexible
rubber tab.
F
R
emove the pressure-mounted bulb holder
by pulling the connector.
F
C
hange the bulb.
F
E
nsure that the cover is refitted correctly all
around to ensure correct sealing.
Direction indicators
Ty p e B , PY21W – 21W (amber)
F
R
emove the cover by pulling on the flexible
rubber tab.
F
T
urn the bulb holder a quarter turn
anticlockwise.
1.
Dipped beam headlamps.
2. Sidelamps.
3. Direction indicators.
In the event of a breakdown
Page 153 of 216
151
Foglamps
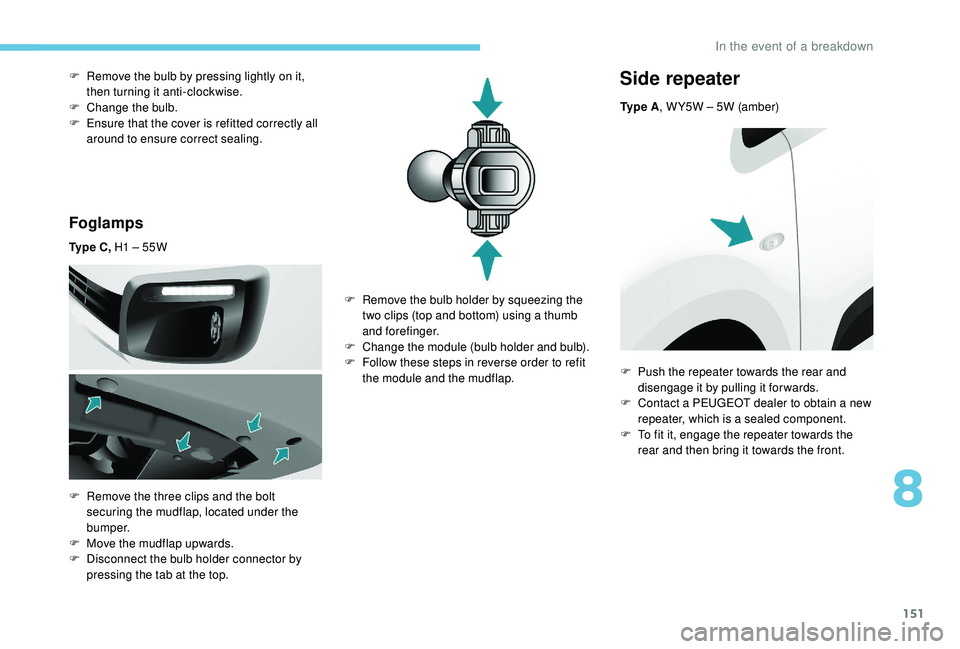
Ty p e C , H1 – 55W
F
R
emove the three clips and the bolt
securing the mudflap, located under the
b u m p e r.
F
M
ove the mudflap upwards.
F
D
isconnect the bulb holder connector by
pressing the tab at the top.
F
R
emove the bulb by pressing lightly on it,
then turning it anti-clockwise.
F
C
hange the bulb.
F
E
nsure that the cover is refitted correctly all
around to ensure correct sealing.
Side repeater
Ty p e A , W Y5W – 5W (amber)
F
R
emove the bulb holder by squeezing the
two clips (top and bottom) using a thumb
and forefinger.
F
C
hange the module (bulb holder and bulb).
F
F
ollow these steps in reverse order to refit
the module and the mudflap. F
P
ush the repeater towards the rear and
disengage it by pulling it forwards.
F
C
ontact a PEUGEOT dealer to obtain a new
repeater, which is a sealed component.
F
T
o fit it, engage the repeater towards the
rear and then bring it towards the front.
8
In the event of a breakdown
Page 155 of 216
153
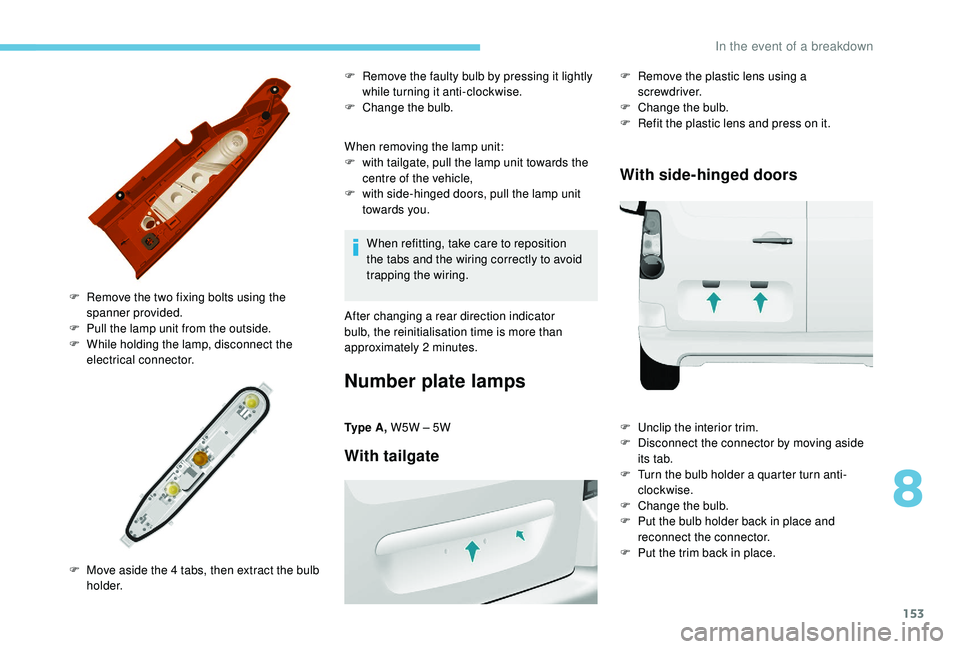
When removing the lamp unit:
F w ith tailgate, pull the lamp unit towards the
centre of the vehicle,
F
w
ith side-hinged doors, pull the lamp unit
towards you.
F
R
emove the two fixing bolts using the
spanner provided.
F
P
ull the lamp unit from the outside.
F
W
hile holding the lamp, disconnect the
electrical connector.
F
M
ove aside the 4 tabs, then extract the bulb
h o l d e r. F
R
emove the faulty bulb by pressing it lightly
while turning it anti-clockwise.
F
C
hange the bulb.
When refitting, take care to reposition
the tabs and the wiring correctly to avoid
trapping the wiring.
After changing a rear direction indicator
bulb, the reinitialisation time is more than
approximately 2
minutes.
Number plate lamps
Ty p e A , W5W – 5W
With tailgate
F Remove the plastic lens using a
screwdriver.
F
C
hange the bulb.
F
R
efit the plastic lens and press on it.
With side-hinged doors
F Unclip the interior trim.
F D isconnect the connector by moving aside
its tab.
F
T
urn the bulb holder a quarter turn anti-
clockwise.
F
C
hange the bulb.
F
P
ut the bulb holder back in place and
reconnect the connector.
F
P
ut the trim back in place.
8
In the event of a breakdown