2020 PEUGEOT PARTNER TEPEE seat adjustment
[x] Cancel search: seat adjustmentPage 4 of 216

2
.
.
Instrument panel 7
W arning and indicator lamps 8
I
ndic ators
18
Lighting dimmer
2
2
Trip computer
2
2
Date and time setting
2
3
Instruments and controls
4
K
ey
25
Remote control
2
5
Front doors
2
8
Sliding side door(s)
2
8
Operation in the event of a battery failure
2
9
Tailgate
29
Side-hinged rear doors
3
0
Rear roof flap
3
2
Central locking
3
3
Alarm
34
Rear windows
3
5
Electric windows
3
5Steering wheel adjustment
3
7
Mirrors
37
Surveillance mirror
3
8
Front seats
3
8
Individual passenger seat
4
0
Multi-Flex bench seat
4
0
Rear bench seat
4
2
Rear seats (5 seats) 4 3
Rear seats (7 seats) 4 6
Crew cab
5
0
Seat modularity and configurations
5
2
Front fittings
5
4
Seating area fittings
5
5
Zenith
56
Fragrance diffuser
5
7
Courtesy lamps
5
9
Rear fittings (5 seats)
6
0
Rear fittings (7 seats)
6
1
Load space layout
6
4
Heating/Manual air conditioning
6
6
Dual-zone automatic air conditioning
6
7
Recommendations for ventilation
and air conditioning
6
9
Demisting and defrosting
7
0Lighting control stalk
7
1
Automatic illumination of headlamps
7
2
LED daytime running lamps
7
2
Guide-me-home lighting
7
2
Cornering lighting
7
3
Direction indicators
7
3
Headlamp beam
7
3
Wiper control stalk 7 3
General safety recommendations
7
6
Hazard warning lamps
7
7
Horn
77
Emergency or assistance call
7
7
Anti-lock braking system (ABS/EBFD)
7
9
Emergency braking assistance (EBA)
7
9
Anti-slip regulation (ASR) and electronic
stability control (ESC)
7
9
Grip control
8
0
Seat belts
8
2
Airbags
85
Child seats
8
9
Deactivating the passenger's front airbag
9
0
Reactivating the passenger's front airbag
9
1
Recommended child seats
9
4
Locations for child seats secured using
a seat belt
9
5
ISOFIX mountings and child seats
9
8
Instructions for child seats
1
01
Child lock
1
02
Over view
Instruments
Access Ease of use and comfort
Safety
Lighting and visibility
Eco-driving
Contents
Page 40 of 216
38
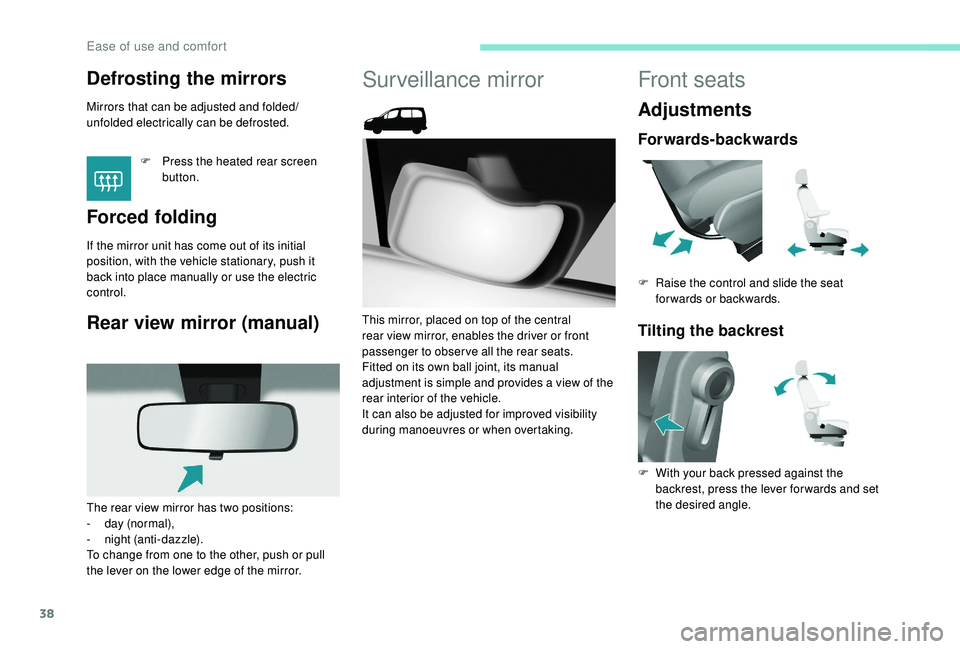
Defrosting the mirrors
Mirrors that can be adjusted and folded/
unfolded electrically can be defrosted.F
P
ress the heated rear screen
button.
Forced folding
If the mirror unit has come out of its initial
position, with the vehicle stationary, push it
back into place manually or use the electric
control.
Rear view mirror (manual)
Surveillance mirror
This mirror, placed on top of the central
rear view mirror, enables the driver or front
passenger to observe all the rear seats.
Fitted on its own ball joint, its manual
adjustment is simple and provides a view of the
rear interior of the vehicle.
It can also be adjusted for improved visibility
during manoeuvres or when overtaking.
The rear view mirror has two positions:
-
d
ay (normal),
-
n
ight (anti-dazzle).
To change from one to the other, push or pull
the lever on the lower edge of the mirror.
Front seats
Adjustments
Forwards-backwards
F Raise the control and slide the seat forwards or backwards.
Tilting the backrest
F With your back pressed against the backrest, press the lever for wards and set
the desired angle.
Ease of use and comfort
Page 41 of 216
39
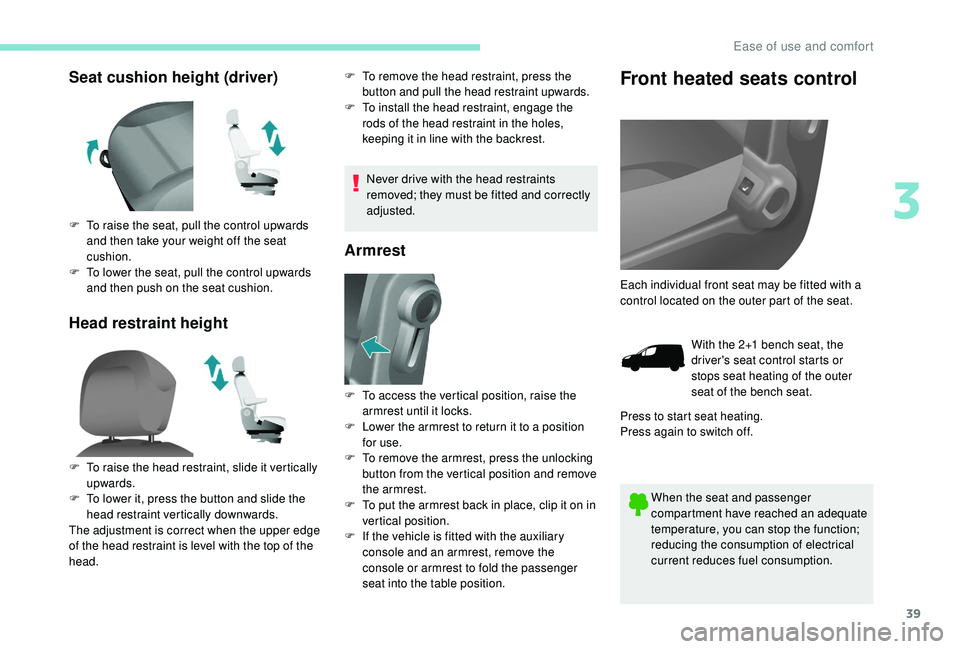
Seat cushion height (driver)
Head restraint heightF To remove the head restraint, press the button and pull the head restraint upwards.
F
T
o install the head restraint, engage the
rods of the head restraint in the holes,
keeping it in line with the backrest.
Never drive with the head restraints
removed; they must be fitted and correctly
adjusted.
Armrest
Front heated seats control
When the seat and passenger
compartment have reached an adequate
temperature, you can stop the function;
reducing the consumption of electrical
current reduces fuel consumption.
F
T
o raise the seat, pull the control upwards
and then take your weight off the seat
cushion.
F
T
o lower the seat, pull the control upwards
and then push on the seat cushion.
F
T
o raise the head restraint, slide it vertically
upwards.
F
T
o lower it, press the button and slide the
head restraint vertically downwards.
The adjustment is correct when the upper edge
of the head restraint is level with the top of the
head. F
T
o access the vertical position, raise the
armrest until it locks.
F
L
ower the armrest to return it to a position
for use.
F
T
o remove the armrest, press the unlocking
button from the vertical position and remove
the armrest.
F
T
o put the armrest back in place, clip it on in
vertical position.
F
I
f the vehicle is fitted with the auxiliary
console and an armrest, remove the
console or armrest to fold the passenger
seat into the table position. Each individual front seat may be fitted with a
control located on the outer part of the seat.
With the 2+1 bench seat, the
driver's seat control starts or
stops seat heating of the outer
seat of the bench seat.
Press to start seat heating.
Press again to switch off.
3
Ease of use and comfort
Page 85 of 216
83
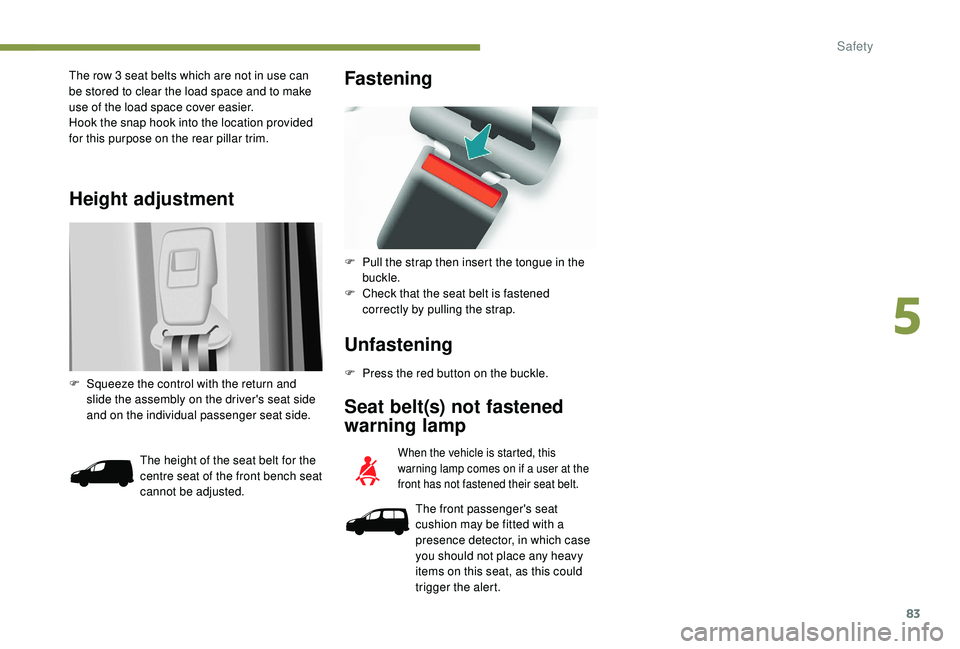
Height adjustment
The row 3 seat belts which are not in use can
be stored to clear the load space and to make
use of the load space cover easier.
Hook the snap hook into the location provided
for this purpose on the rear pillar trim.
F
S
queeze the control with the return and
slide the assembly on the driver's seat side
and on the individual passenger seat side.
Unfastening
F Press the red button on the buckle.
Seat belt(s) not fastened
warning lamp
When the vehicle is started, this
warning lamp comes on if a user at the
front has not fastened their seat belt.
The front passenger's seat
cushion may be fitted with a
presence detector, in which case
you should not place any heavy
items on this seat, as this could
trigger the alert.
Fastening
F Pull the strap then insert the tongue in the buckle.
F
C
heck that the seat belt is fastened
correctly by pulling the strap.
The height of the seat belt for the
centre seat of the front bench seat
cannot be adjusted.
5
Safety
Page 86 of 216

84
Advice
The driver must ensure that passengers use
the seat belts correctly and that they are all
fastened before setting off.
Wherever you are seated in the vehicle,
always fasten your seat belt, even for short
journeys.
Do not interchange the seat belt buckles as
they will not fulfil their role fully.
The seat belts are fitted with an inertia reel
permitting automatic adjustment of the length
of the strap to your size. The seat belt is
stowed automatically when not in use.
Before and after use, ensure that the seat belt
is reeled in correctly.
The lower part of the strap must be positioned
as low as possible on the pelvis.
The upper part must be positioned in the
hollow of the shoulder.
The inertia reels have a device for automatic
locking in the event of a collision, sudden
braking or if the vehicle turns over. You can
release the device by pulling the strap firmly
and then releasing it so that it reels in slightly.In order to be effective, a seat belt must:
-
b e tightened as close to the body as
possible,
-
b
e pulled in front of you with a smooth
movement, checking that it does not twist,
-
b
e used to restrain only one person,
-
n
ot show any signs of cuts or fraying,
-
n
ot be converted or modified to avoid
affecting its performance.
In accordance with current safety regulations,
for all repairs on your vehicle's seat belts, go
to a qualified workshop with the skills and
equipment needed, which a PEUGEOT dealer
is able to provide.
Have your seat belts checked regularly by a
PEUGEOT dealer or a qualified workshop,
particularly if the straps show signs of
damage.
Clean the seat belt straps with soapy water or
a textile cleaning product, sold by PEUGEOT
dealers.
After folding or moving a seat or rear bench
seat, ensure that the seat belt is positioned
and reeled in correctly. Recommendations for children
Use a suitable child seat if the passenger is
less than 12
years old or shorter than one and
a half metres.
Never use the same seat belt to secure more
than one person.
Never allow a child to travel on your lap.
For more information on Child seats , refer to
the corresponding section.
In the event of an impact
Depending on the nature and seriousness
of the impact , the pyrotechnic device may
be deployed before and independently of the
airbags. Deployment of the pretensioners
is accompanied by a slight discharge of
harmless smoke and a noise, due to the
activation of the pyrotechnic cartridge
incorporated in the system.
In all cases, the airbag warning lamp comes
on.
Following an impact, have the seat belts
system checked and, if necessary, replaced,
by a PEUGEOT dealer or a qualified
workshop.
Safety
Page 96 of 216
94
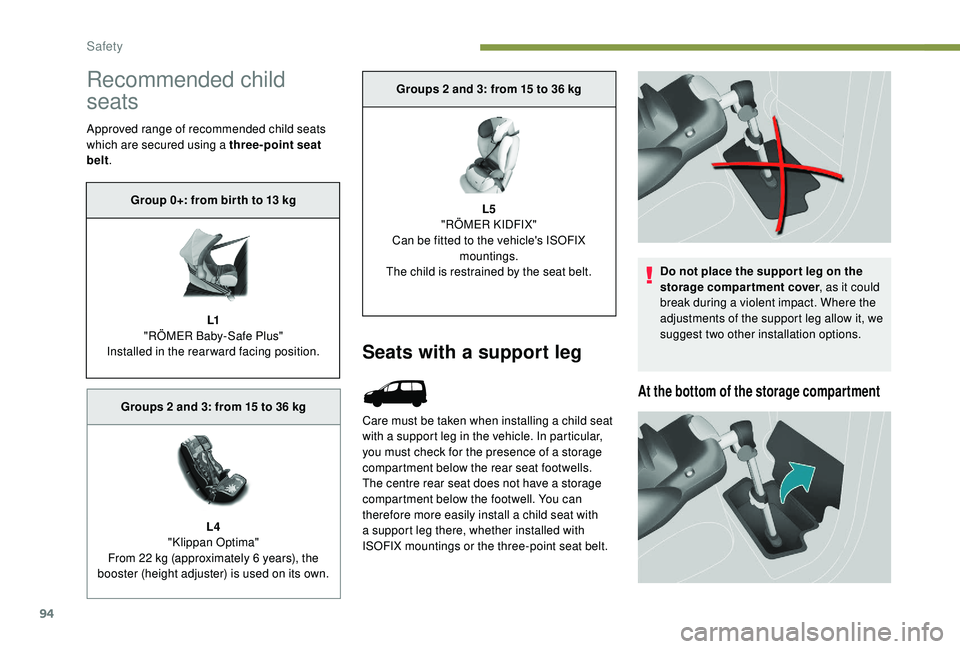
Recommended child
seats
Approved range of recommended child seats
which are secured using a three-point seat
belt.
Seats with a support leg
Care must be taken when installing a child seat
with a support leg in the vehicle. In particular,
you must check for the presence of a storage
compartment below the rear seat footwells.
The centre rear seat does not have a storage
compartment below the footwell. You can
therefore more easily install a child seat with
a support leg there, whether installed with
ISOFIX mountings or the three-point seat belt. Do not place the suppor t leg on the
storage compartment cover
, as it could
break during a violent impact. Where the
adjustments of the support leg allow it, we
suggest two other installation options.
At the bottom of the storage compartment
Group 0+: from bir th to 13 kg
L1
"
RÖMER Baby-Safe Plus"
Installed in the rearward facing position.
Groups 2 and 3: from 15 to 36
kg
L4
"Klippan Optima"
From 22
kg (approximately 6 years), the
booster (height adjuster) is used on its own. Groups 2 and 3: from 15 to 36
kg
L5
"RÖMER KIDFIX"
Can be fitted to the vehicle's ISOFIX mountings.
The child is restrained by the seat belt.
Safety
Page 97 of 216
95
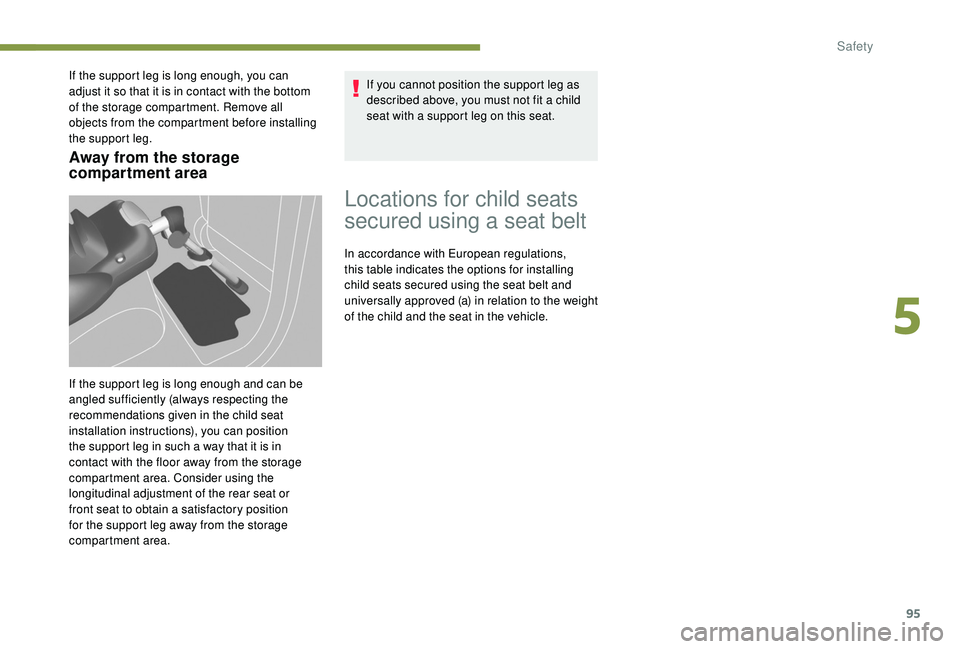
Away from the storage
compartment area
If the support leg is long enough, you can
adjust it so that it is in contact with the bottom
of the storage compartment. Remove all
objects from the compartment before installing
the support leg.
If the support leg is long enough and can be
angled sufficiently (always respecting the
recommendations given in the child seat
installation instructions), you can position
the support leg in such a way that it is in
contact with the floor away from the storage
compartment area. Consider using the
longitudinal adjustment of the rear seat or
front seat to obtain a satisfactory position
for the support leg away from the storage
compartment area.If you cannot position the support leg as
described above, you must not fit a child
seat with a support leg on this seat.
Locations for child seats
secured using a seat belt
In accordance with European regulations,
this table indicates the options for installing
child seats secured using the seat belt and
universally approved (a) in relation to the weight
of the child and the seat in the vehicle.
5
Safety