2020 PEUGEOT PARTNER TEPEE tow bar
[x] Cancel search: tow barPage 5 of 216

3
.
.
Driving recommendations 103
Starting and stopping 1 04
Electronic engine immobiliser
1
05
Parking brake
1
05
Manual gearbox
1
05
6-speed electronic gearbox
1
06
Gear shift indicator
1
08
Stop & Start
1
08
Hill start assist
1
11
Tyre under-inflation detection
1
12
Tyre under-inflation detection with
reinitialisation
113
Speed limiter
1
15
Cruise control
1
17
Active City Brake
1
20
Parking sensors
1
22
Reversing camera
1
24Fuel 1
26
Fuel system cut-off 1 27
Compatibility of fuels
1
28
Snow chains
1
29
Removable snow shield
1
30
Changing a wiper blade
1
30
Towing device
1
31
Towbar with a swan neck towball
1
31
Roof bars
1
33
Zenith roof bars
1
33
Maximum weights on bars
1
34
Other accessories
1
34
Bonnet
13 5
Engines
1
36
Checking levels
1
36
Chec ks
13 8
AdBlue
® (BlueHDi engines) 1 40
Temporary puncture repair kit
1
43
Changing a wheel
1
43
Fitting the wheel trim on the rim
1
47
Changing a bulb
1
49
Changing a fuse
1
54
Battery
158
Economy mode
1
59
Towing your vehicle
1
59
Running out of fuel (Diesel)
1
60
Characteristics of engines and towed loads 1 61Petrol engines/weights 162
Diesel engines/weights 1 63
Dimensions
165
Identification markings
1
74
DrivingPractical information
In the event of a breakdown Technical data
Alphabetical index
Audio and Telematics
7-inch touch screen
Peugeot Connect Sound (RD5)
.
Contents
Page 34 of 216
32
When parked with the rear
doors open to 90°, the doors
conceal the rear lamps. To
signal your position to other
road users driving in the
same direction who may
not have seen your vehicle,
use a warning triangle or
other device required by the
legislation in your country.
From inside
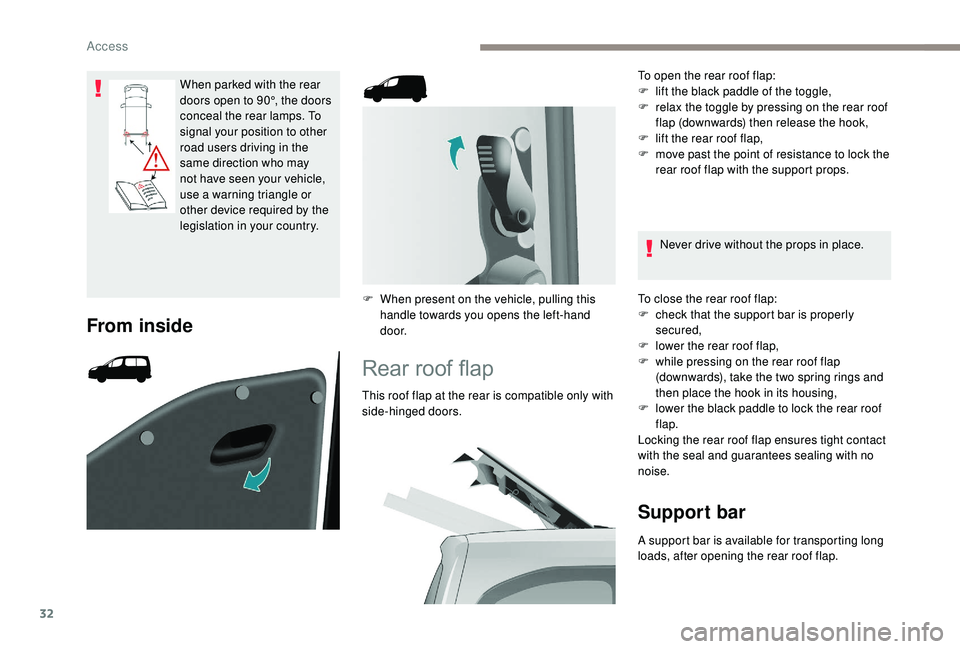
F When present on the vehicle, pulling this handle towards you opens the left-hand
d o o r.
Rear roof flap
This roof flap at the rear is compatible only with
side-hinged doors. To open the rear roof flap:
F
l
ift the black paddle of the toggle,
F
r
elax the toggle by pressing on the rear roof
flap (downwards) then release the hook,
F
l
ift the rear roof flap,
F
m
ove past the point of resistance to lock the
rear roof flap with the support props.
Never drive without the props in place.
To close the rear roof flap:
F
c
heck that the support bar is properly
secured,
F
l
ower the rear roof flap,
F
w
hile pressing on the rear roof flap
(downwards), take the two spring rings and
then place the hook in its housing,
F l ower the black paddle to lock the rear roof
flap.
Locking the rear roof flap ensures tight contact
with the seal and guarantees sealing with no
noise.
Support bar
A support bar is available for transporting long
loads, after opening the rear roof flap.
Access
Page 51 of 216
49
Ensure that the centre seat belt is stowed
correctly in its housing in the headlining.
Operating the Row 2 seats
Removing the seat
Refitting the seat
The label on the seat indicates the position in
which it must be installed.
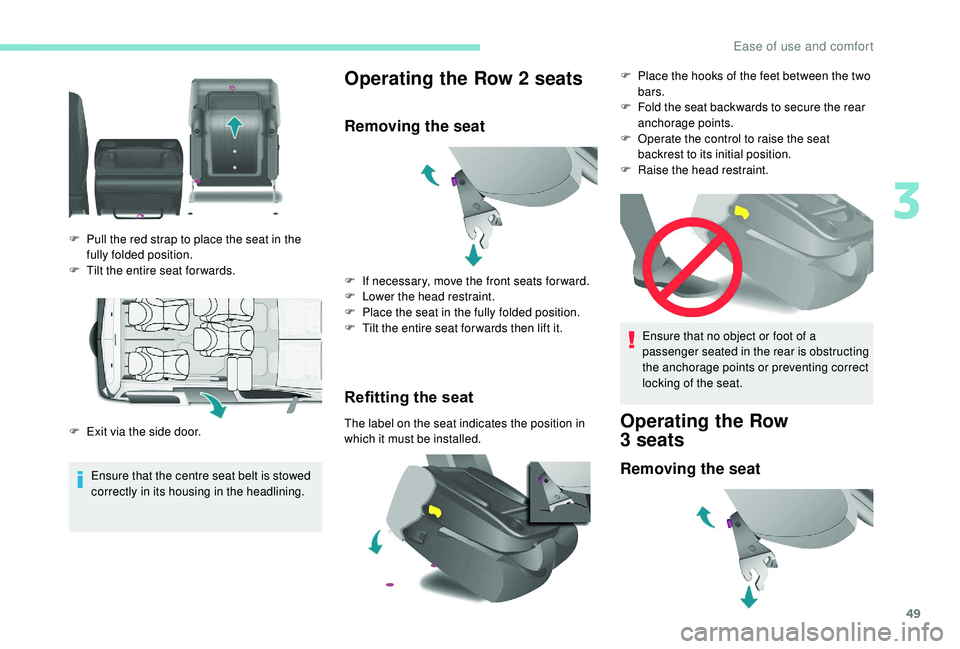
F
P
ull the red strap to place the seat in the
fully folded position.
F
T
ilt the entire seat for wards.
F
E
xit via the side door. F
I
f necessary, move the front seats for ward.
F
L
ower the head restraint.
F
P
lace the seat in the fully folded position.
F
T
ilt the entire seat for wards then lift it.
Ensure that no object or foot of a
passenger seated in the rear is obstructing
the anchorage points or preventing correct
locking of the seat.Operating the Row
3 seats
Removing the seat
F Place the hooks of the feet between the two
bars.
F
F
old the seat backwards to secure the rear
anchorage points.
F
O
perate the control to raise the seat
backrest to its initial position.
F
Ra
ise the head restraint.
3
Ease of use and comfort
Page 52 of 216
50
Refitting the seat
The label on the seat indicates the position in
which it must be installed. F
L
ower the head restraint.
F
P
lace the seat in fully folded position.
F
T
ilt the assembly forwards.
F
T
ake hold of each side of the uprights of the
folded seat while tilting it gently for wards
and lift it.
F
P
lace the hooks of the front feet between
the two bars.
F
E
nsure that no object or feet are obstructing
the rear anchorage points and that the seat
belt is properly positioned and available.
F
F
old the seat backwards to fix its rear
anchorage feet.
F
O
perate the control to raise the backrest
into the initial position.
F
R
efit the head restraint. Do not place hard or heavy objects on
the backrests forming a table. They could
become dangerous projectiles in the event
of sharp braking or collision.
Following the various operations:
-
d
o not remove a head restraint without
stowing it; secure it inside the vehicle,
-
e
nsure that passengers can always
access the seat belts and fasten them
easily,
-
p
assengers must never take their seat
without adjusting and fastening their
seat belt.
-
a p
assenger seated in row 3 must
ensure that they do not obstruct the
row 2 seat anchorage points,
-
a p
assenger seated in row 3 must
not have the seat in front of them in
row 2 in the fully folded position; this
is in case the seat tips towards the
passenger unexpectedly, which could
cause injury.
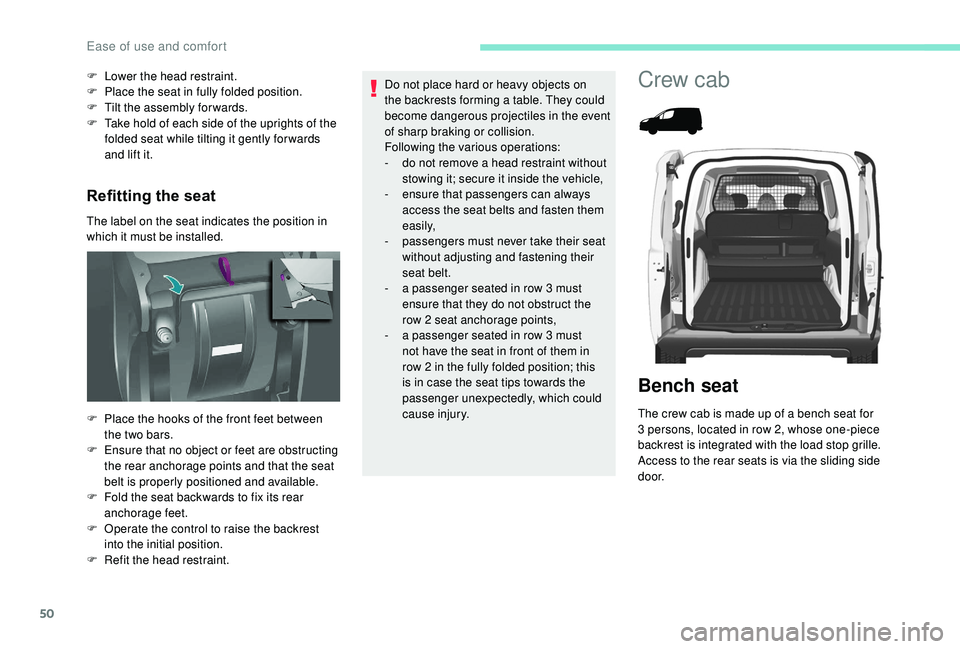
Crew cab
Bench seat
The crew cab is made up of a bench seat for
3 persons, located in row 2, whose one-piece
backrest is integrated with the load stop grille.
Access to the rear seats is via the sliding side
d o o r.
Ease of use and comfort
Page 63 of 216
61
The connection of an electrical device
not approved by PEUGEOT, such as a
USB charger, may adversely affect the
operation of vehicle electrical systems,
causing faults such as poor radio
reception or inter ference with displays in
the screens.
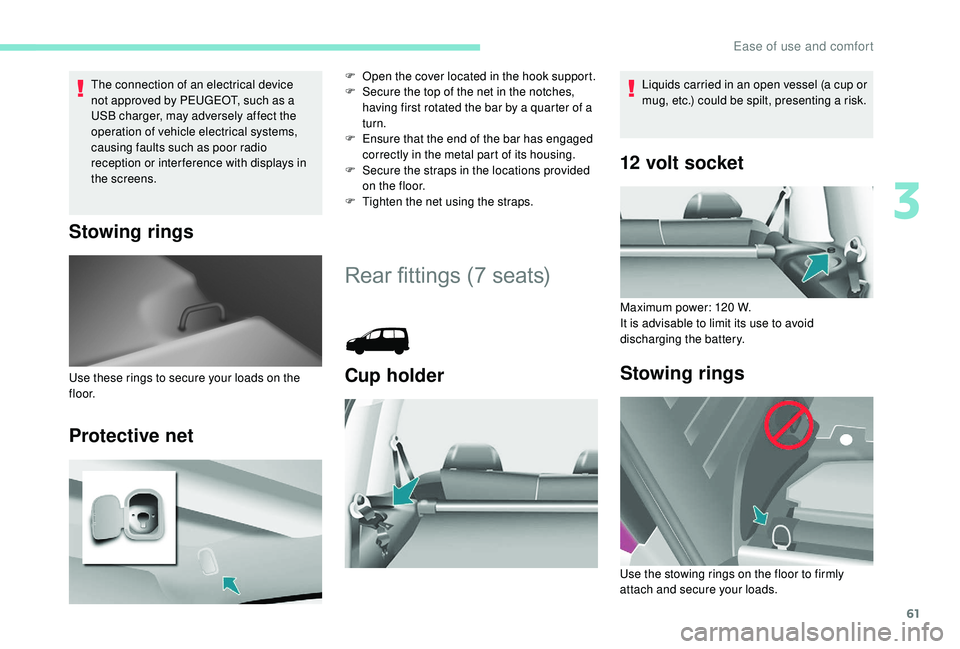
Stowing rings
Protective net
F Open the cover located in the hook support.
F S ecure the top of the net in the notches,
having first rotated the bar by a quarter of a
turn.
F
E
nsure that the end of the bar has engaged
correctly in the metal part of its housing.
F
S
ecure the straps in the locations provided
on the floor.
F
T
ighten the net using the straps.
Rear fittings (7 seats)
Cup holderUse these rings to secure your loads on the
f l o o r.
12 volt socket
Maximum power: 120 W.
I t is advisable to limit its use to avoid
discharging the battery.
Stowing rings
Liquids carried in an open vessel (a cup or
mug, etc.) could be spilt, presenting a risk.
Use the stowing rings on the floor to firmly
attach and secure your loads.
3
Ease of use and comfort
Page 67 of 216
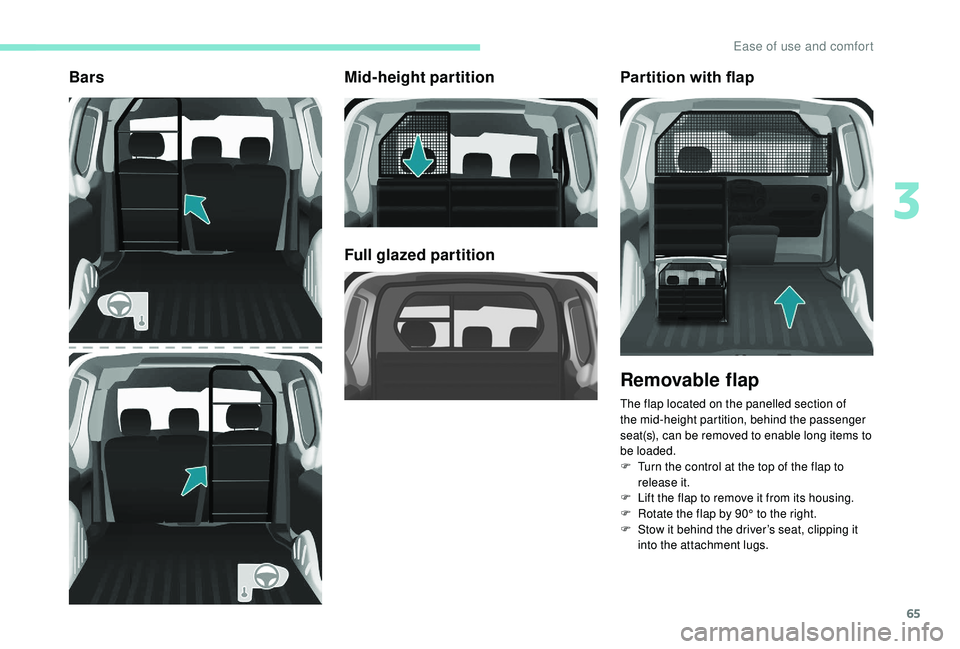
65
BarsMid-height partition
Full glazed partitionPartition with flap
Removable flap
The flap located on the panelled section of
the mid-height partition, behind the passenger
seat(s), can be removed to enable long items to
be loaded.
F
T
urn the control at the top of the flap to
release it.
F
L
ift the flap to remove it from its housing.
F
R
otate the flap by 90° to the right.
F
S
tow it behind the driver’s seat, clipping it
into the attachment lugs.
3
Ease of use and comfort
Page 106 of 216

104
In some cases of particularly demanding use
(when towing the maximum load on a steep
gradient in high temperatures), the engine
power is automatically limited. In such a case,
the air conditioning is automatically switched
off to increase the available engine power.F
I
f this warning lamp and the
STOP warning lamp come on,
stop the vehicle and switch off
the engine as soon as possible.
New vehicle
Do not pull a trailer before having driven at
least 620
miles (1,000 kilometres).
Braking
Towing a trailer increases the braking distance.
To avoid overheating of the brakes, the use of
engine braking is recommended.
Ty r e s
F Check the tyre pressures of the towing vehicle and of the trailer, observing the
recommended pressures.
Lighting
F Check the electrical lighting and signalling on the trailer and the headlamp beam height
of your vehicle. For more information on adjusting
the Headlamp beam
, refer to the
corresponding section.
The rear parking sensors will be
deactivated automatically to avoid the
audible signal if a genuine PEUGEOT
towbar is used.
Starting and stopping
Running and accessories position.
To unlock the steering, turn the steering wheel
gently while turning the key, without forcing. In
this position, certain accessories can be used. Starting position.
The starter is operated. the engine turns over,
release the key.
STOP position
: anti-theft.
The ignition is off. Turn the steering wheel until
the steering column locks. Remove the key.
If this warning lamp comes on, a door
or the bonnet is not closed correctly.
Please check!Diesel engines
If the temperature is high enough,
the warning lamp comes on for
less than a second, you can start
without waiting.
In cold weather, wait for this warning lamp to go
off then operate the starter (starting position)
until the engine starts.
When switching off the ignition, let the
engine run for a few seconds to allow the
turbocharger (Diesel engine) to return to
idle.
Do not press the accelerator when
switching off the ignition.
There is no need to engage a gear after
parking the vehicle.
Driving
Page 126 of 216

124
The system will be deactivated
automatically if a trailer is being towed or if
a bicycle carrier is fitted (vehicle fitted with
a towbar or bicycle carrier recommended
by PEUGEOT).
The parking sensor system cannot in
any circumstances replace the need for
vigilance on the part of the driver.
Reversing camera
The image is displayed in the touch screen.
The reversing camera function may be
supplemented with parking sensors.The reversing camera cannot, in any
circumstances, replace the need for
vigilance on the part of the driver. The representation with overlaid lines helps
with the manoeuvre.
They are represented as lines marked "on the
ground" and do not indicate the position of tall
obstacles (for example: other vehicles, etc.)
relative to the vehicle.
Some distortion of the image is normal.
Blue lines represent the general direction of the
vehicle (the distance between them represents
the width of your vehicle without the door
m i r r o r s).
The red line represents a distance of about
30
cm beyond the edge of your vehicle's rear
b u m p e r.
The green lines represent distances of about 1
and 2
metres beyond the edge of your vehicle's
rear bumper.
The turquoise blue cur ves represent the
maximum turning circle.
Opening the tailgate will cause the display
to disappear.
High pressure washing
When washing your vehicle, do not direct
the lance from less than 30
cm from the
lens of the camera.
Clean the reversing camera regularly
using a soft, dry cloth.
It is advisable to deactivate the system if
your vehicle is fitted with a rear ladder or if
you are transporting a load longer than the
length of the vehicle.
The reversing camera is activated automatically
when reverse gear is engaged.
Driving