2020 PEUGEOT PARTNER TEPEE heating
[x] Cancel search: heatingPage 4 of 216

2
.
.
Instrument panel 7
W arning and indicator lamps 8
I
ndic ators
18
Lighting dimmer
2
2
Trip computer
2
2
Date and time setting
2
3
Instruments and controls
4
K
ey
25
Remote control
2
5
Front doors
2
8
Sliding side door(s)
2
8
Operation in the event of a battery failure
2
9
Tailgate
29
Side-hinged rear doors
3
0
Rear roof flap
3
2
Central locking
3
3
Alarm
34
Rear windows
3
5
Electric windows
3
5Steering wheel adjustment
3
7
Mirrors
37
Surveillance mirror
3
8
Front seats
3
8
Individual passenger seat
4
0
Multi-Flex bench seat
4
0
Rear bench seat
4
2
Rear seats (5 seats) 4 3
Rear seats (7 seats) 4 6
Crew cab
5
0
Seat modularity and configurations
5
2
Front fittings
5
4
Seating area fittings
5
5
Zenith
56
Fragrance diffuser
5
7
Courtesy lamps
5
9
Rear fittings (5 seats)
6
0
Rear fittings (7 seats)
6
1
Load space layout
6
4
Heating/Manual air conditioning
6
6
Dual-zone automatic air conditioning
6
7
Recommendations for ventilation
and air conditioning
6
9
Demisting and defrosting
7
0Lighting control stalk
7
1
Automatic illumination of headlamps
7
2
LED daytime running lamps
7
2
Guide-me-home lighting
7
2
Cornering lighting
7
3
Direction indicators
7
3
Headlamp beam
7
3
Wiper control stalk 7 3
General safety recommendations
7
6
Hazard warning lamps
7
7
Horn
77
Emergency or assistance call
7
7
Anti-lock braking system (ABS/EBFD)
7
9
Emergency braking assistance (EBA)
7
9
Anti-slip regulation (ASR) and electronic
stability control (ESC)
7
9
Grip control
8
0
Seat belts
8
2
Airbags
85
Child seats
8
9
Deactivating the passenger's front airbag
9
0
Reactivating the passenger's front airbag
9
1
Recommended child seats
9
4
Locations for child seats secured using
a seat belt
9
5
ISOFIX mountings and child seats
9
8
Instructions for child seats
1
01
Child lock
1
02
Over view
Instruments
Access Ease of use and comfort
Safety
Lighting and visibility
Eco-driving
Contents
Page 6 of 216

4
Instruments and controls1.Lighting and direction indicator control
stalk.
2. Instrument panel with display.
3. Wiper/screenwash/trip computer control
stalk.
4. Ignition.
5. Audio system controls.
6. Driver's front airbag/horn.
7. Steering wheel height and reach
adjustment.
8. Cruise control/speed limiter controls.
9. Control panel: parking sensors, headlamp
beam adjustment, ESC, Stop & Start,
alarm (depending on country of sale).
10. Bonnet release.
11. Electric door mirror adjustment controls.
12 . Front window controls.
13. Switch panel: hazard warning lamps,
central locking, child lock (depending on
ve r s i o n).
14 . Cigarette lighter.
15. Heating/ventilation controls.
16. Electronic gearbox or Grip control
control.
17. Touch screen.
18. USB port (with electronic gearbox).
19. USB port (with manual gearbox).
Over view
Page 19 of 216

17
Diesel pre-heaterFixed. The climatic conditions mean that
pre-heating is necessary. Wait until the indicator lamp goes off before starting
the engine.
Water in Diesel
fuel filter Fixed, accompanied
by a message in the
screen. The Diesel filter contains water. Have the filter drained immediately by a PEUGEOT
dealer or a qualified workshop.
For more information on the Checks and in particular
on draining the water from the Diesel filter, refer to the
corresponding section.
Depending on country of sale.
Service spanner Fixed. A ser vice will soon be due. Refer to the list of checks in the Warranty and
Maintenance Record.
Have the vehicle ser viced by a PEUGEOT dealer or a
qualified workshop.
Time Flashing. Setting the time. Use the left-hand button of the instrument panel.
For more information on Date and time setting , refer
to the corresponding section.
Warning/indicator lamp in
the display screen
State
Indicates Action/Observation
1
Instruments
Page 41 of 216

39
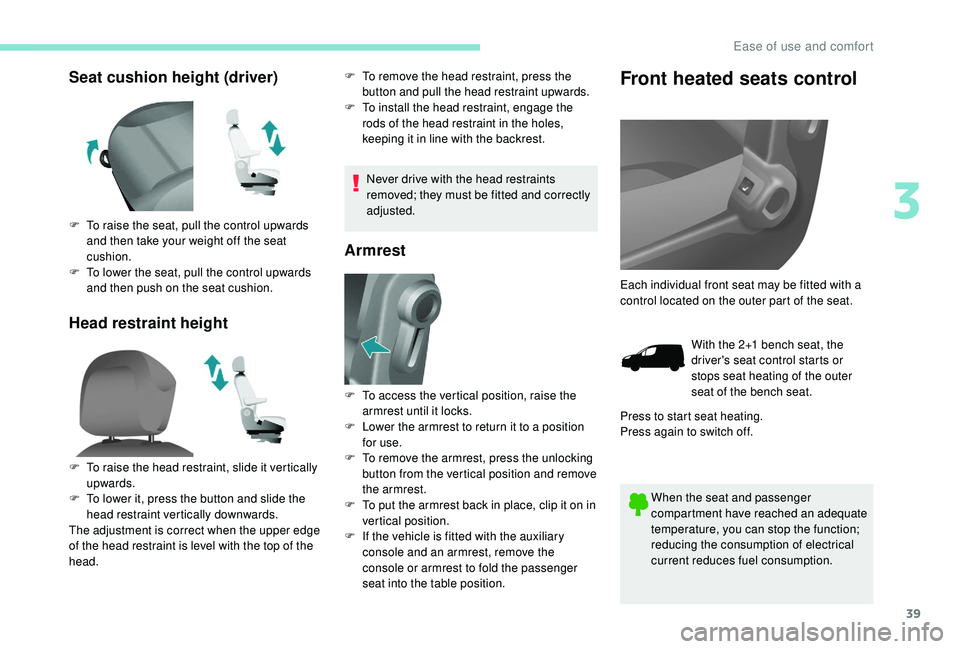
Seat cushion height (driver)
Head restraint heightF To remove the head restraint, press the button and pull the head restraint upwards.
F
T
o install the head restraint, engage the
rods of the head restraint in the holes,
keeping it in line with the backrest.
Never drive with the head restraints
removed; they must be fitted and correctly
adjusted.
Armrest
Front heated seats control
When the seat and passenger
compartment have reached an adequate
temperature, you can stop the function;
reducing the consumption of electrical
current reduces fuel consumption.
F
T
o raise the seat, pull the control upwards
and then take your weight off the seat
cushion.
F
T
o lower the seat, pull the control upwards
and then push on the seat cushion.
F
T
o raise the head restraint, slide it vertically
upwards.
F
T
o lower it, press the button and slide the
head restraint vertically downwards.
The adjustment is correct when the upper edge
of the head restraint is level with the top of the
head. F
T
o access the vertical position, raise the
armrest until it locks.
F
L
ower the armrest to return it to a position
for use.
F
T
o remove the armrest, press the unlocking
button from the vertical position and remove
the armrest.
F
T
o put the armrest back in place, clip it on in
vertical position.
F
I
f the vehicle is fitted with the auxiliary
console and an armrest, remove the
console or armrest to fold the passenger
seat into the table position. Each individual front seat may be fitted with a
control located on the outer part of the seat.
With the 2+1 bench seat, the
driver's seat control starts or
stops seat heating of the outer
seat of the bench seat.
Press to start seat heating.
Press again to switch off.
3
Ease of use and comfort
Page 42 of 216

40
Individual passenger seat Multi-Flex bench seat
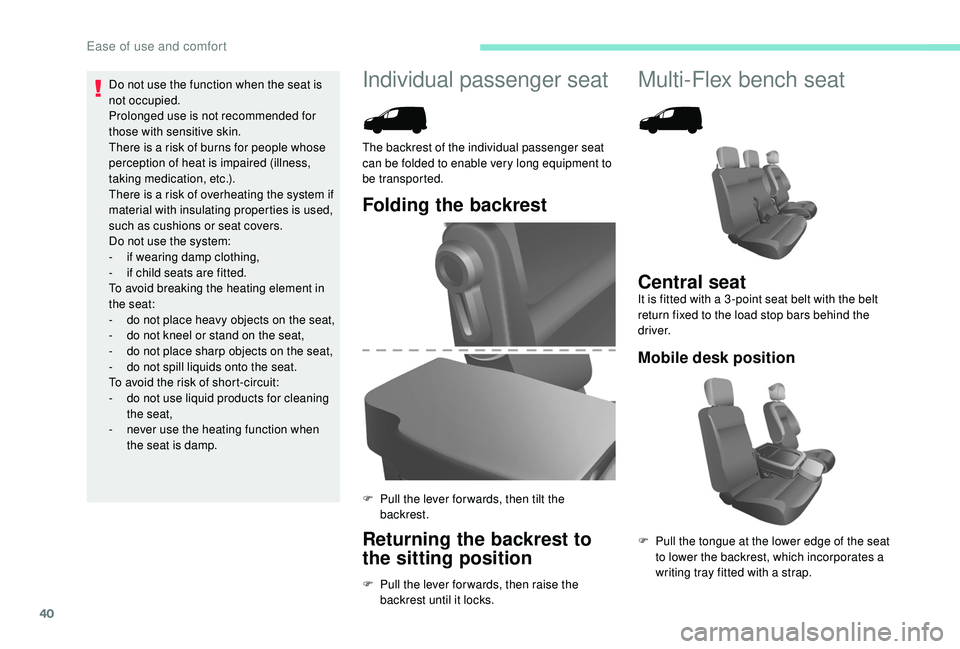
Folding the backrest
Returning the backrest to
the sitting position
F Pull the lever for wards, then raise the backrest until it locks.
The backrest of the individual passenger seat
can be folded to enable very long equipment to
be transported.
F
P
ull the lever for wards, then tilt the
backrest.
Central seatIt is fitted with a 3 -point seat belt with the belt
return fixed to the load stop bars behind the
driver.
Mobile desk position
F Pull the tongue at the lower edge of the seat to lower the backrest, which incorporates a
writing tray fitted with a strap.
Do not use the function when the seat is
not occupied.
Prolonged use is not recommended for
those with sensitive skin.
There is a risk of burns for people whose
perception of heat is impaired (illness,
taking medication, etc.).
There is a risk of overheating the system if
material with insulating properties is used,
such as cushions or seat covers.
Do not use the system:
-
i
f wearing damp clothing,
-
i
f child seats are fitted.
To avoid breaking the heating element in
the seat:
-
d
o not place heavy objects on the seat,
-
d
o not kneel or stand on the seat,
-
d
o not place sharp objects on the seat,
-
d
o not spill liquids onto the seat.
To avoid the risk of short-circuit:
-
d
o not use liquid products for cleaning
the seat,
-
n
ever use the heating function when
the seat is damp.
Ease of use and comfort
Page 68 of 216

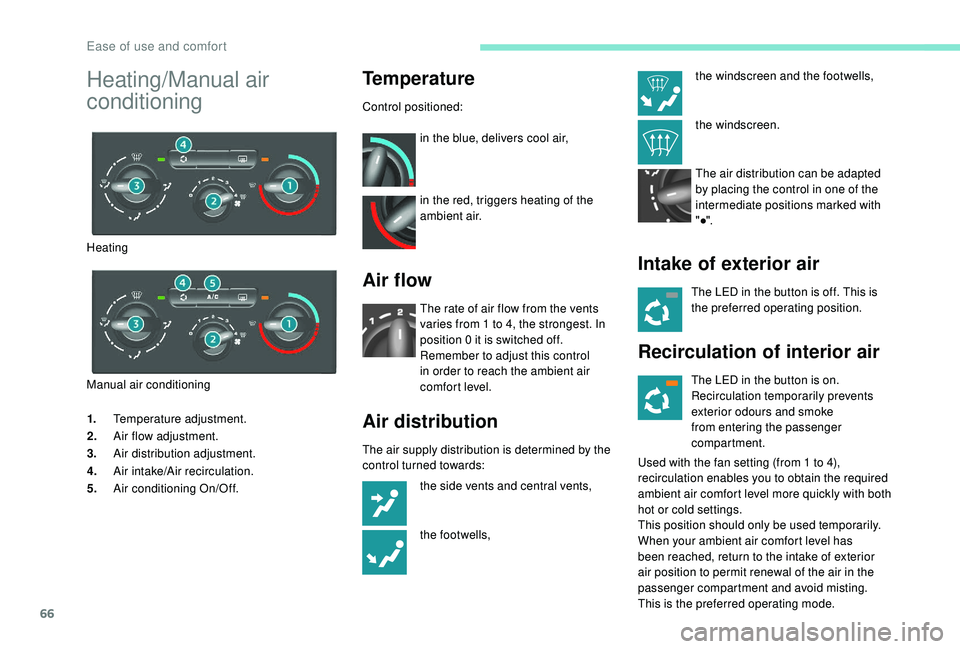
66
1.Temperature adjustment.
2. Air flow adjustment.
3. Air distribution adjustment.
4. Air intake/Air recirculation.
5. Air conditioning On/Off.
Temperature
Control positioned:
in the blue, delivers cool air,
in the red, triggers heating of the
ambient air.
Air flow
The rate of air flow from the vents
varies from 1 to 4, the strongest. In
position 0 it is switched off.
Remember to adjust this control
in order to reach the ambient air
comfort level.
Air distribution
The air supply distribution is determined by the
control turned towards: the side vents and central vents,
the footwells,
Intake of exterior air
The LED in the button is off. This is
the preferred operating position.
Recirculation of interior air
The LED in the button is on.
Recirculation temporarily prevents
exterior odours and smoke
from entering the passenger
compartment.
Used with the fan setting (from 1 to 4),
recirculation enables you to obtain the required
ambient air comfort level more quickly with both
hot or cold settings.
This position should only be used temporarily.
When your ambient air comfort level has
been reached, return to the intake of exterior
air position to permit renewal of the air in the
passenger compartment and avoid misting.
This is the preferred operating mode.
Heating/Manual air
conditioning
Heating
Manual air conditioning the windscreen and the footwells,
the windscreen.
The air distribution can be adapted
by placing the control in one of the
intermediate positions marked with
"●".
Ease of use and comfort
Page 69 of 216

67
Air conditioning A/C
The air conditioning only works with the engine
running.Pressing the button switches the air
conditioning on; the LED comes on.
Pressing the button again switches
the function off; the LED goes off.
The air conditioning cannot operate when the
air flow is set to 0.
Dual-zone automatic air
conditioning
1. AUTO comfort programme.
2. Temperature adjustment on driver/
passenger side.
3. Air distribution adjustment.
4. Air flow adjustment.
5. Air intake/Air recirculation.
6. Air conditioning On/Off. For maximum cooling or heating of the
passenger compartment, it is possible to
exceed the value 15 by turning till LO is
displayed or the value 27 by turning till HI
is displayed.
On entering the vehicle, the interior
temperature may be much colder (or
warmer) than the comfort temperature.
There is no need to alter the value
displayed in order to reach the required
level of comfort quickly. The system will
use its maximum power in order to reach
the required level of comfort.
Automatic operation
AUTO comfort programme
Driver or passenger comfort
value
The value shown on the display is a level of
comfort, not a temperature in degrees Celsius
or Fahrenheit.
This is the normal operating mode for the air
conditioning system. F
P
ress this button. The AUTO
symbol appears. When the engine is cold, the air flow will only
reach its optimum level gradually to prevent too
much cold air being distributed.
For your convenience the settings are stored
between two starts of your vehicle.
The automatic function will no longer be
maintained if you change a setting manually
(AUTO disappears).
Depending on the selected level of comfort, the
system controls the distribution, flow and intake of
air to ensure comfort and sufficient recirculation
of air in the passenger compartment. No further
adjustments are required.
F Rotate this control to the left
or to the right to decrease
or increase the value. A
setting of around 21 provides
optimum comfort. Nonetheless,
depending on your needs, a
setting between 18 and 24 is
typical.
Do not obstruct the sunshine sensor on
the dashboard.
3
Ease of use and comfort
Page 71 of 216

69
Recommendations for ventilation and air conditioning
In order for these systems to be fully effective,
follow the operation and maintenance
guidelines below:
F
T
o ensure that the air is distributed evenly,
keep the external air intake grilles at the
base of the windscreen, the nozzles, the
vents, the air outlets and the air extractor
in the boot free from obstructions.
F
D
o not cover the sunshine sensor,
located on the dashboard; this is used for
regulation of the automatic air conditioning
system.
F
O
perate the air conditioning system for
at least 5 to 10
minutes once or twice a
month to keep it in per fect working order.
F
E
nsure that the passenger compartment
filter is in good condition and have the
filter elements replaced regularly. We
recommend the use of a combined
passenger compartment filter. Thanks to
its special active additive, it contributes
to the purification of the air breathed by
the occupants and the cleanliness of the
passenger compartment (reduction of
allergic symptoms, bad odours and greasy
deposits). If after an extended stop in sunshine, the
interior temperature is very high, first air
the passenger compartment for a few
moments.
Put the air flow control at a setting high
enough to quickly change the air in the
passenger compartment.
The condensation created by the air
conditioning results in a discharge of water
under the vehicle which is per fectly normal.
Depending on version and country
of sale, the air conditioning system
contains fluorinated greenhouse gas
R13 4A
.
Gas capacity: 0.450
kg (+/- 0.025 kg),
GWP index 1,430 t (equivalent CO
2:
0.6 4 4 t).
F
T
o ensure correct operation of the
air conditioning system, you are also
advised to have it checked regularly
as recommended in the Warranty and
Maintenance Record.
F
I
f the system does not produce cold air,
switch it off and contact a PEUGEOT
dealer or a qualified workshop.
When towing the maximum load on a steep
gradient in high temperatures, switching off
the air conditioning increases the available
engine power and so improves the towing
ability.
To avoid the windows misting up and
deterioration in the quality of the air:
-
d
o not drive for too long with the
ventilation switched off.
-
d
o not keep air recirculation set for an
extended period.
Stop & Star t
The heating and air conditioning systems
only work when the engine is running.
Temporarily deactivate the Stop &
Start system to maintain a comfortable
temperature in the passenger
compartment.
For more information on Stop & Star t,
refer to the corresponding section.
3
Ease of use and comfort