2020 PEUGEOT PARTNER TEPEE tow
[x] Cancel search: towPage 107 of 216

105
Electronic engine
immobiliser
All of the keys contain an electronic immobiliser
device.
This device locks the engine supply system.
It is activated automatically when the key is
removed from the ignition.
When the ignition switch is turned on, a
dialogue is set up between the key and the
electronic immobiliser.
The metal part of the key must be correctly
unfolded to ensure a good connection.
In case of lost keys
See a PEUGEOT dealer with the vehicle
registration certificate and your ID.
A PEUGEOT dealer can retrieve the key
code and the transponder code to order the
replacement key.
When you leave the vehicle, check that the
lamps are off and do not leave valuables
visible.
As a safety precaution (with children on
board), remove the key from the ignition when
leaving the vehicle, even for a short time.
Parking brake
Application
F Pull the parking brake lever up to immobilise your vehicle.
F
C
heck that the parking brake is applied
firmly before leaving the vehicle.
When parking on a slope, turn your
wheels towards the kerb and pull the
parking brake lever up.
There is no advantage in engaging a gear
after parking the vehicle, particularly if the
vehicle is loaded. Apply the parking brake only when the
vehicle is stationary
.
In the exceptional case of use of the
parking brake when the vehicle is moving,
apply the brake by pulling gently to avoid
locking the rear wheels (risk of skidding).
Release
F Pull the lever up slightly and press the button to release the parking brake lever.
When the vehicle is being driven, this
warning lamp coming on indicates
that the parking brake is still on or
has not been fully released.
Manual gearbox
To change gear easily, always press the clutch
pedal fully.
To prevent the mat from becoming caught
under the pedal:
-
e
nsure that the mat is positioned and
secured to the floor correctly,
-
n
ever fit one mat on top of another.
When driving, avoid leaving your hand on the
gear knob as the force exerted, even if slight,
may wear the internal components of the
gearbox over time.
6
Driving
Page 124 of 216

122
With monochrome screen C
F Press the MENU button for access to the
main menu.
F
Sel
ect "Personalisation-Configuration ".
F
Sel
ect "Define the vehicle parameters ".
F
Sel
ect "Driving assistance ".
F
Sel
ect "Automatic emergency braking :
OFF " or " Automatic emergency braking :
ON ".
F
P
ress the " 7" or " 8" button to tick or
untick the box and respectively activate or
deactivate the system.
F
P
ress the " 5" or " 6" button, then the OK
button to select the " OK" box and confirm or
the Back button to cancel.
With the touch screen
F Press the " MENU" button.
F Sel ect the " Driving" menu.
F
I
n the secondary page, select " Vehicle
parameters ".
F
Sel
ect the " Driving assistance " tab.
F
T
ick or untick the " Automatic emergency
braking " box to activate or deactivate the
system.
F
Confirm.
Operating faults
Sensor fault
The operation of the laser sensor may suffer
inter ference from accumulations of dirt or
misting of the windscreen. In this case you are
warned by the display of a message.
Use windscreen demisting and regularly clean
the area of the windscreen in front of the
sensor. Do not stick or other wise attach any object
on the windscreen in front of the sensor.
System fault
In the event of a malfunction of the system, you
are warned by an audible signal and the display
of the message " Automatic braking system
fault ".
Have the system checked by a PEUGEOT
dealer or a qualified workshop.
In the event of an impact to the
windscreen at the sensor, deactivate the
system and contact a PEUGEOT dealer
or a qualified workshop
to have your
windscreen replaced. Do not attempt to remove, adjust or test
the sensor.
Only a PEUGEOT dealer or a qualified
workshop is able to work on the system.
When towing a trailer or when the vehicle
is being towed, the system must be
deactivated.
Parking sensors
The audible (front and rear) and/or visual (rear)
parking sensor system consists of proximity
sensors installed in the bumpers.
They detect any obstacle which enters the
field of vision (person, vehicle, tree, fence,
etc.) behind or in front of the vehicle during the
manoeuvre.
Driving
Page 126 of 216

124
The system will be deactivated
automatically if a trailer is being towed or if
a bicycle carrier is fitted (vehicle fitted with
a towbar or bicycle carrier recommended
by PEUGEOT).
The parking sensor system cannot in
any circumstances replace the need for
vigilance on the part of the driver.
Reversing camera
The image is displayed in the touch screen.
The reversing camera function may be
supplemented with parking sensors.The reversing camera cannot, in any
circumstances, replace the need for
vigilance on the part of the driver. The representation with overlaid lines helps
with the manoeuvre.
They are represented as lines marked "on the
ground" and do not indicate the position of tall
obstacles (for example: other vehicles, etc.)
relative to the vehicle.
Some distortion of the image is normal.
Blue lines represent the general direction of the
vehicle (the distance between them represents
the width of your vehicle without the door
m i r r o r s).
The red line represents a distance of about
30
cm beyond the edge of your vehicle's rear
b u m p e r.
The green lines represent distances of about 1
and 2
metres beyond the edge of your vehicle's
rear bumper.
The turquoise blue cur ves represent the
maximum turning circle.
Opening the tailgate will cause the display
to disappear.
High pressure washing
When washing your vehicle, do not direct
the lance from less than 30
cm from the
lens of the camera.
Clean the reversing camera regularly
using a soft, dry cloth.
It is advisable to deactivate the system if
your vehicle is fitted with a rear ladder or if
you are transporting a load longer than the
length of the vehicle.
The reversing camera is activated automatically
when reverse gear is engaged.
Driving
Page 132 of 216

130
Removable snow shield
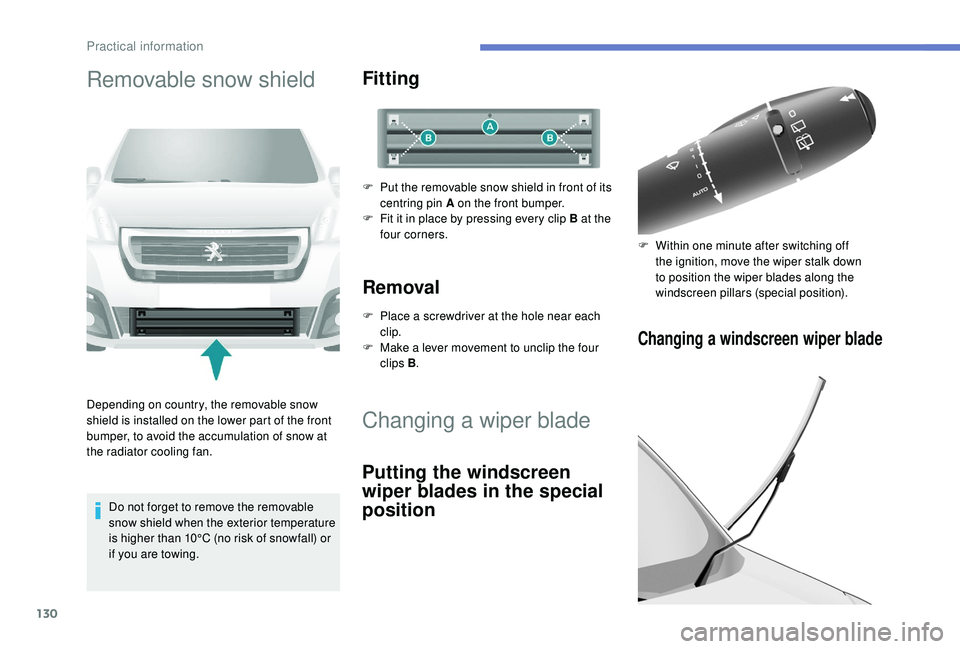
Depending on country, the removable snow
shield is installed on the lower part of the front
bumper, to avoid the accumulation of snow at
the radiator cooling fan.Do not forget to remove the removable
snow shield when the exterior temperature
is higher than 10°C (no risk of snowfall) or
if you are towing.
Fitting
F Put the removable snow shield in front of its centring pin A on the front bumper.
F
F
it it in place by pressing every clip B at the
four corners.
Removal
F Place a screwdriver at the hole near each clip.
F
M
ake a lever movement to unclip the four
clips B .
Changing a wiper blade
Putting the windscreen
wiper blades in the special
position
Changing a windscreen wiper blade
F Within one minute after switching off
the ignition, move the wiper stalk down
to position the wiper blades along the
windscreen pillars (special position).
Practical information
Page 133 of 216

131
To return the wiper blades to their normal
position, switch on the ignition and operate the
wiper stalk again.
Changing the rear wiper blade
F Raise the wiper arm.
F U nclip the wiper blade and remove it.
F
I
nstall the new blade.
F
F
old the arm down.
F
L
ift the arm, then unclip the blade and
remove it.
F
I
nstall the new blade and fold the arm down.Towing device
Load distribution
F D istribute the load in the trailer so that
the heaviest items are as close as
possible to the axle, and the nose weight
approaches the maximum permitted without
exceeding
it.
Air density decreases with altitude, thus
reducing engine performance. The maximum
load which can be towed must be reduced by
10% per 1,000
metres of altitude.
Use towing devices and their original
harnesses approved by PEUGEOT. It
is recommended that the installation be
per formed by a PEUGEOT dealer or a
qualified workshop.
If the towing device is not fitted by
a PEUGEOT dealer, it must still be
fitted in accordance with the vehicle
manufacturer's instructions.
Certain driving assistance or manoeuvring
assistance functions are automatically
deactivated if an approved towbar is used. Obser ve the maximum authorised towable
weight, indicated on your vehicle's
registration certificate, the manufacturer's
label and in the Technical data
section of
this guide.
Complying with the maximum
authorised nose weight (towball)
also includes the use of accessories
(bicycle carriers, tow boxes, etc.).
Obser ve the legislation in force in the
country in which you are driving.
Towbar with a swan neck towball,
lockable and quickly detachable
Presentation
This swan neck towbar, delivered assembled,
can be removed and fitted quickly and easily.
No tools are needed.
7
Practical information
Page 134 of 216

132
Instructions for fitting and before
each use
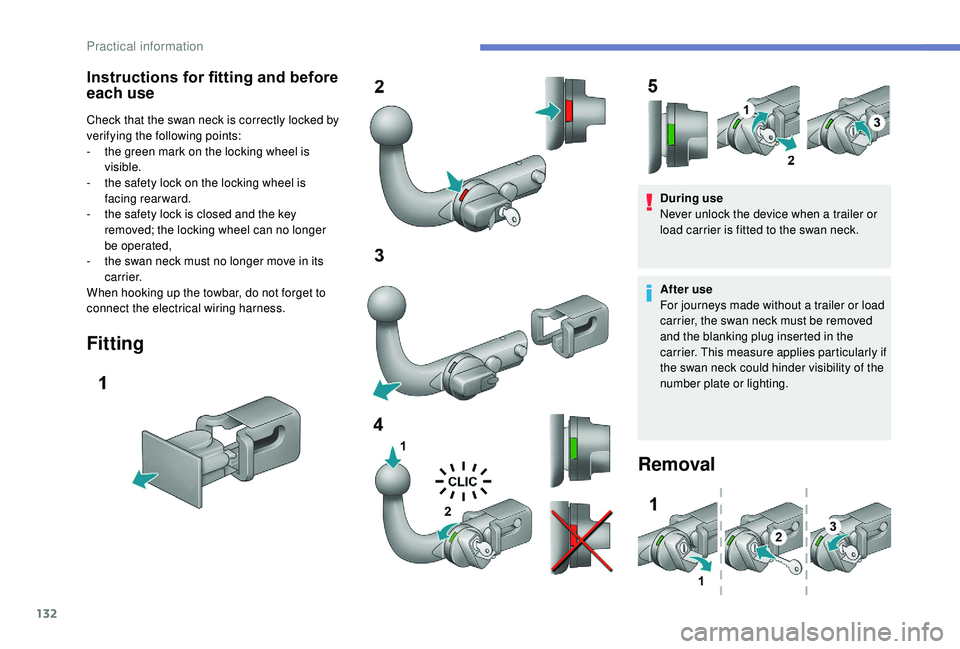
Check that the swan neck is correctly locked by
verifying the following points:
-
t
he green mark on the locking wheel is
visible.
-
t
he safety lock on the locking wheel is
facing rearward.
-
t
he safety lock is closed and the key
removed; the locking wheel can no longer
be operated,
-
t
he swan neck must no longer move in its
c a r r i e r.
When hooking up the towbar, do not forget to
connect the electrical wiring harness.
Fitting
During use
Never unlock the device when a trailer or
load carrier is fitted to the swan neck.
After use
For journeys made without a trailer or load
carrier, the swan neck must be removed
and the blanking plug inserted in the
carrier. This measure applies particularly if
the swan neck could hinder visibility of the
number plate or lighting.
Removal
Practical information
Page 136 of 216

134
F Open the protective covers.
F U nscrew the 4 screws using the spanner
and remove them.
F
T
urn the bars by 90°, positioning the hollow
parts towards the front.
F
R
efit the 4 screws and tighten them using
the spanner.
F
C
lose the protective covers.
Maximum weights on bars
F Only use the strap passages A to secure the load correctly. In all cases, the load must rest on the non-slip
bands provided for this purpose, and must not
touch the roof or the glazing on the roof.
-
T
ransverse bars on longitudinal bars: 75 kg
(these bars are not compatible with the
Zenith).
-
R
oof rack: 120 kg.
-
T
ransverse bars on roof: 100 kg.
-
T
ransverse bars on longitudinal bars: 75
kg.
Other accessories
These accessories and parts, having been
tested and approved for reliability and safety,
are all adapted to your vehicle. A wide range of
genuine parts is available.
Another range of accessories is also available
which is centred around comfort, leisure and
maintenance:
Anti-intrusion alarm, glass engraving, first aid
kit, safety vest, front and rear parking sensors,
hazard warning triangle, alloy wheel anti-theft
bolts, etc.
Seat covers compatible with airbags for front
seat, bench seat, rubber mats, carpet mats,
snow chains, blinds, tailgate bicycle carrier, etc.
To avoid any jamming under the pedals:
-
e
nsure that the mat and its fixings are
positioned correctly,
-
n
ever fit one mat on top of another.
Recommendations for
loading the roof
This procedure requires the use of the spanner
supplied with the tools for changing a wheel.For more information on Changing a
wheel , refer to the corresponding section.
Audio systems, hands-free kit, speakers, CD
changer, navigation, USB Box, Video Kit, etc.
With a wide range of audio and telematic
equipment offered on the market, the technical
constraints associated with the installation of
devices from these product families require
Practical information
Page 137 of 216

135
taking into account the device specifics and
their compatibility with the capacities of the
standard equipment of your vehicle. Please
check this with a PEUGEOT dealer in advance.
The spare parts department publishes a
catalogue of accessories offering various
equipment and fittings, such as:
Load stops (all types).
Loading roller.
Towbar, towing harness: trailer towbar, which
must be installed by a PEUGEOT dealer.
Partition walls and dividing grilles, smooth
wood interior protection with non-slip floor.
Protective grilles.
Professional equipment
range
Bonnet
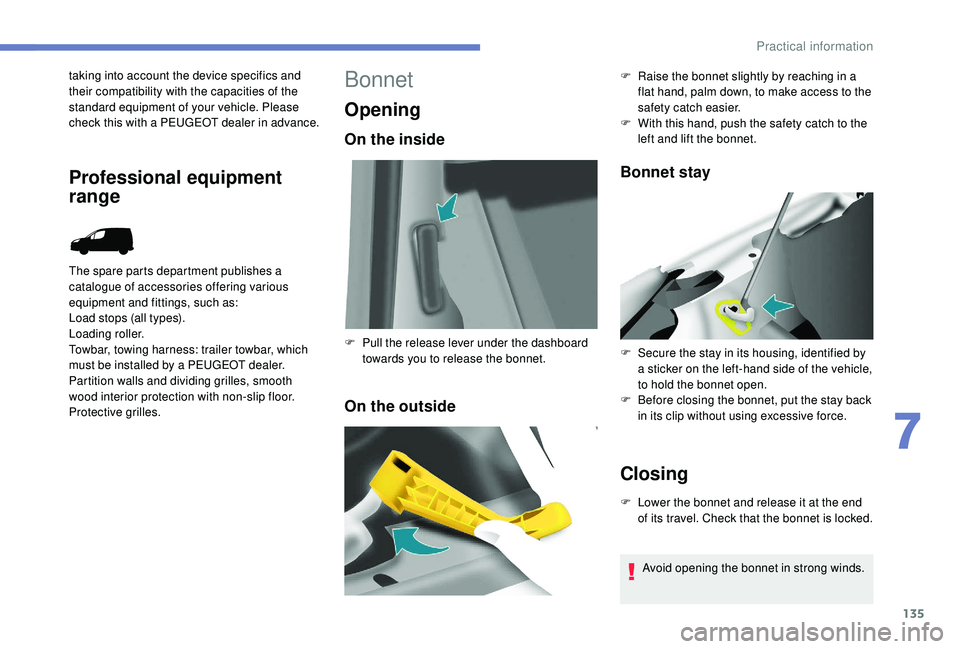
Opening
On the inside
On the outsideBonnet stay
Closing
F Lower the bonnet and release it at the end
of its travel. Check that the bonnet is locked.
F
P
ull the release lever under the dashboard
towards you to release the bonnet. F
R
aise the bonnet slightly by reaching in a
flat hand, palm down, to make access to the
safety catch easier.
F
W
ith this hand, push the safety catch to the
left and lift the bonnet.
F
S
ecure the stay in its housing, identified by
a sticker on the left-hand side of the vehicle,
to hold the bonnet open.
F
B
efore closing the bonnet, put the stay back
in its clip without using excessive force.
Avoid opening the bonnet in strong winds.
7
Practical information