2020 PEUGEOT PARTNER TEPEE lock
[x] Cancel search: lockPage 103 of 216
101
Instructions for child seats
The incorrect installation of a child seat in a
vehicle compromises the child's protection in
the event of an accident.
Ensure that there is no seat belt or seat belt
buckle under the child seat, as this could
destabilise it.
Remember to fasten the seat belts or the
child seat harnesses keeping the slack
relative to the child's body to a minimum,
even for short journeys.
When installing a child seat using the seat
belt, ensure that the seat belt is tightened
correctly on the child seat and that it secures
the child seat firmly on the seat of your
vehicle. If your passenger seat is adjustable,
move it for wards if necessary.
At the rear, always leave sufficient space
between the front seat and:
-
a r
ear ward facing child seat,
-
t
he feet of a child seated in a for ward
facing child seat.
To do this, move the front seat for wards
and, if necessary, move its backrest into the
upright position. When a child seat is installed in row 3, place
the backrests of the outer seats and the
centre seat of row 2 in the table position, or
remove these row 2 seats so that the child
seat or the child's legs do not touch the row
2 seats.
For optimal installation of the "forward facing"
child seat, check that its backrest is as close
as possible to the backrest of the vehicle
seat, if possible in contact with it.
The head restraint must be removed before
installing a child seat with a backrest on a
passenger seat.
Ensure that the head restraint is stored or
attached securely to prevent it from being
thrown around the vehicle in the event of
sharp braking.
Refit the head restraint once the child seat
has been removed.
Installing a booster (height adjuster)
The chest part of the seat belt must be
positioned on the child's shoulder without
touching the neck.
Ensure that the lap part of the seat belt
passes correctly over the child's thighs.
PEUGEOT recommends using a booster seat
with a backrest, equipped with a belt guide at
shoulder level.
As a safety precaution, do not leave:
-
a c
hild or children alone and unattended in
a vehicle,
-
a c
hild or an animal in a vehicle which
is exposed to the sun, with the windows
closed,
-
t
he keys within reach of children inside the
vehicle.
To prevent accidental opening of the doors,
use the "Child lock" system.
Take care not to open the rear windows by
more than one third.
To protect young children from the rays of the
sun, fit side blinds on the rear windows.
Children in front
The legislation on carrying children on the
front passenger seat is specific to each
country. Refer to the legislation in force in
your country.
Deactivate the passenger’s front airbag when
a rear ward facing child seat is installed on
the front passenger seat. Otherwise, the child
may be seriously injured or killed if the airbag
is deployed.
5
Safety
Page 104 of 216
102
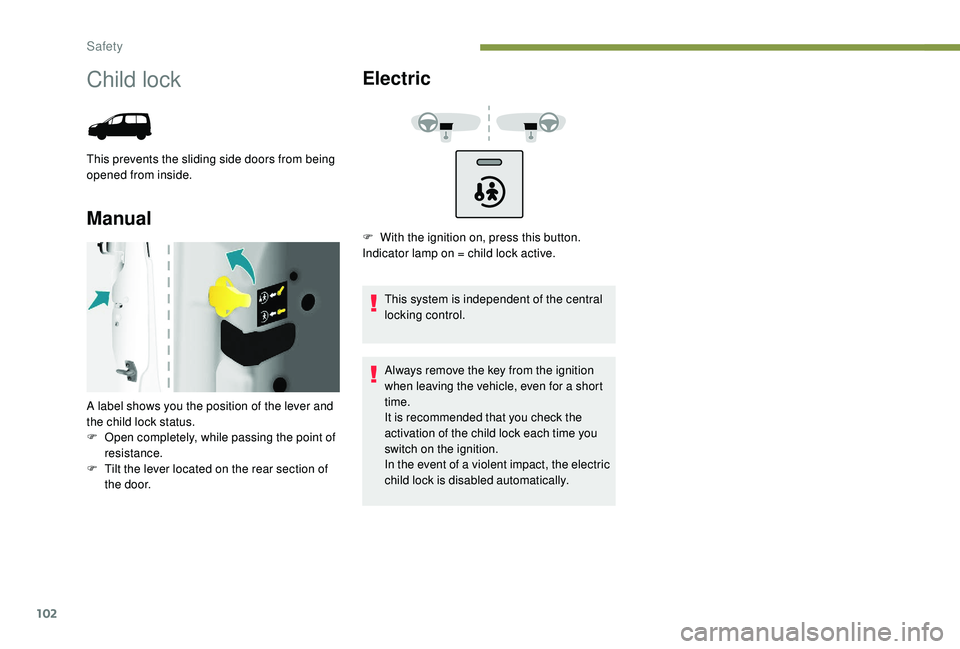
Child lock
This prevents the sliding side doors from being
opened from inside.
ManualElectric
This system is independent of the central
locking control.
Always remove the key from the ignition
when leaving the vehicle, even for a short
time.
It is recommended that you check the
activation of the child lock each time you
switch on the ignition.
In the event of a violent impact, the electric
child lock is disabled automatically.
A label shows you the position of the lever and
the child lock status.
F
O
pen completely, while passing the point of
resistance.
F
T
ilt the lever located on the rear section of
the door. F
W
ith the ignition on, press this button.
Indicator lamp on = child lock active.
Safety
Page 106 of 216

104
In some cases of particularly demanding use
(when towing the maximum load on a steep
gradient in high temperatures), the engine
power is automatically limited. In such a case,
the air conditioning is automatically switched
off to increase the available engine power.F
I
f this warning lamp and the
STOP warning lamp come on,
stop the vehicle and switch off
the engine as soon as possible.
New vehicle
Do not pull a trailer before having driven at
least 620
miles (1,000 kilometres).
Braking
Towing a trailer increases the braking distance.
To avoid overheating of the brakes, the use of
engine braking is recommended.
Ty r e s
F Check the tyre pressures of the towing vehicle and of the trailer, observing the
recommended pressures.
Lighting
F Check the electrical lighting and signalling on the trailer and the headlamp beam height
of your vehicle. For more information on adjusting
the Headlamp beam
, refer to the
corresponding section.
The rear parking sensors will be
deactivated automatically to avoid the
audible signal if a genuine PEUGEOT
towbar is used.
Starting and stopping
Running and accessories position.
To unlock the steering, turn the steering wheel
gently while turning the key, without forcing. In
this position, certain accessories can be used. Starting position.
The starter is operated. the engine turns over,
release the key.
STOP position
: anti-theft.
The ignition is off. Turn the steering wheel until
the steering column locks. Remove the key.
If this warning lamp comes on, a door
or the bonnet is not closed correctly.
Please check!Diesel engines
If the temperature is high enough,
the warning lamp comes on for
less than a second, you can start
without waiting.
In cold weather, wait for this warning lamp to go
off then operate the starter (starting position)
until the engine starts.
When switching off the ignition, let the
engine run for a few seconds to allow the
turbocharger (Diesel engine) to return to
idle.
Do not press the accelerator when
switching off the ignition.
There is no need to engage a gear after
parking the vehicle.
Driving
Page 107 of 216

105
Electronic engine
immobiliser
All of the keys contain an electronic immobiliser
device.
This device locks the engine supply system.
It is activated automatically when the key is
removed from the ignition.
When the ignition switch is turned on, a
dialogue is set up between the key and the
electronic immobiliser.
The metal part of the key must be correctly
unfolded to ensure a good connection.
In case of lost keys
See a PEUGEOT dealer with the vehicle
registration certificate and your ID.
A PEUGEOT dealer can retrieve the key
code and the transponder code to order the
replacement key.
When you leave the vehicle, check that the
lamps are off and do not leave valuables
visible.
As a safety precaution (with children on
board), remove the key from the ignition when
leaving the vehicle, even for a short time.
Parking brake
Application
F Pull the parking brake lever up to immobilise your vehicle.
F
C
heck that the parking brake is applied
firmly before leaving the vehicle.
When parking on a slope, turn your
wheels towards the kerb and pull the
parking brake lever up.
There is no advantage in engaging a gear
after parking the vehicle, particularly if the
vehicle is loaded. Apply the parking brake only when the
vehicle is stationary
.
In the exceptional case of use of the
parking brake when the vehicle is moving,
apply the brake by pulling gently to avoid
locking the rear wheels (risk of skidding).
Release
F Pull the lever up slightly and press the button to release the parking brake lever.
When the vehicle is being driven, this
warning lamp coming on indicates
that the parking brake is still on or
has not been fully released.
Manual gearbox
To change gear easily, always press the clutch
pedal fully.
To prevent the mat from becoming caught
under the pedal:
-
e
nsure that the mat is positioned and
secured to the floor correctly,
-
n
ever fit one mat on top of another.
When driving, avoid leaving your hand on the
gear knob as the force exerted, even if slight,
may wear the internal components of the
gearbox over time.
6
Driving
Page 128 of 216
126
Fuel
Low fuel level
When the low fuel level is reached
this warning lamp comes on.
When it first comes on, around 8
litres remain
in the tank, according to your driving style and
your engine.
You must refuel as soon as possible to avoid
running out.
Never continue to drive until you run out of fuel,
as this could damage the emission control and
injection systems.
Filling
The fuel tank must be filled with the engine
off. When filling the fuel tank, do not continue after
the 3
rd cut-off of the nozzle. This could cause
malfunctions.
The capacity of the tank is approximately
60
litres (53 litres for BlueHDi Diesel versions).
F
A
fter filling the fuel tank, lock the cap and
close the flap.
When refilling, a mechanical
system prevents opening of
the left side door. Ensure
that nobody attempts to slide
open this door while the fuel
flap is open.
After closing the flap, the
sliding side door can become
blocked. Push the door to
close it and then open it.
When refilling, ensure that
nobody attempts to open the
sliding side door while the
fuel filler flap is open.
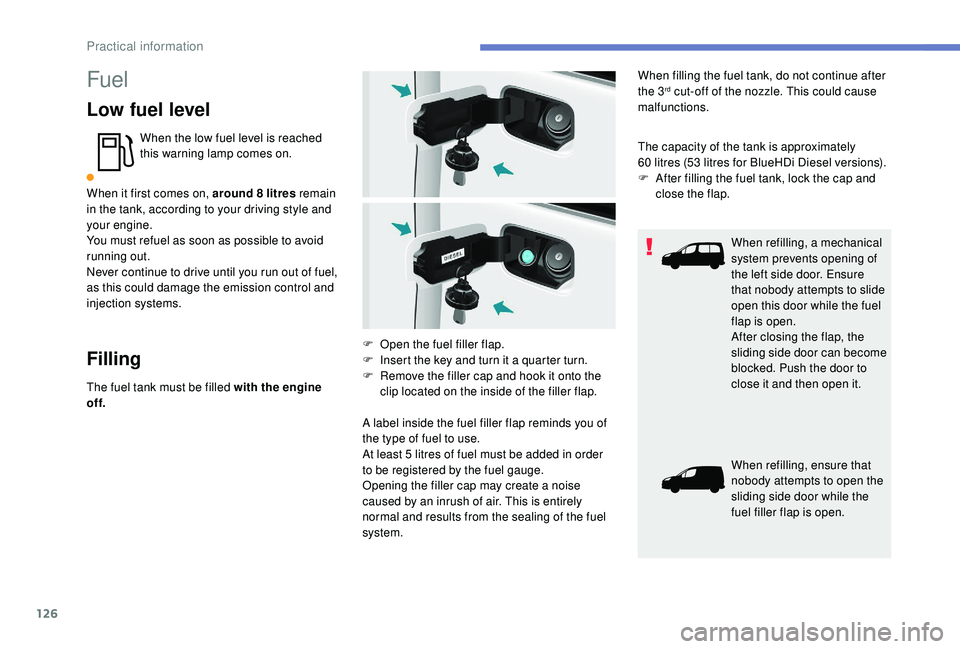
F
O
pen the fuel filler flap.
F
I
nsert the key and turn it a quarter turn.
F
R
emove the filler cap and hook it onto the
clip located on the inside of the filler flap.
A label inside the fuel filler flap reminds you of
the type of fuel to use.
At least 5
litres of fuel must be added in order
to be registered by the fuel gauge.
Opening the filler cap may create a noise
caused by an inrush of air. This is entirely
normal and results from the sealing of the fuel
system.
Practical information
Page 133 of 216

131
To return the wiper blades to their normal
position, switch on the ignition and operate the
wiper stalk again.
Changing the rear wiper blade
F Raise the wiper arm.
F U nclip the wiper blade and remove it.
F
I
nstall the new blade.
F
F
old the arm down.
F
L
ift the arm, then unclip the blade and
remove it.
F
I
nstall the new blade and fold the arm down.Towing device
Load distribution
F D istribute the load in the trailer so that
the heaviest items are as close as
possible to the axle, and the nose weight
approaches the maximum permitted without
exceeding
it.
Air density decreases with altitude, thus
reducing engine performance. The maximum
load which can be towed must be reduced by
10% per 1,000
metres of altitude.
Use towing devices and their original
harnesses approved by PEUGEOT. It
is recommended that the installation be
per formed by a PEUGEOT dealer or a
qualified workshop.
If the towing device is not fitted by
a PEUGEOT dealer, it must still be
fitted in accordance with the vehicle
manufacturer's instructions.
Certain driving assistance or manoeuvring
assistance functions are automatically
deactivated if an approved towbar is used. Obser ve the maximum authorised towable
weight, indicated on your vehicle's
registration certificate, the manufacturer's
label and in the Technical data
section of
this guide.
Complying with the maximum
authorised nose weight (towball)
also includes the use of accessories
(bicycle carriers, tow boxes, etc.).
Obser ve the legislation in force in the
country in which you are driving.
Towbar with a swan neck towball,
lockable and quickly detachable
Presentation
This swan neck towbar, delivered assembled,
can be removed and fitted quickly and easily.
No tools are needed.
7
Practical information
Page 134 of 216
132
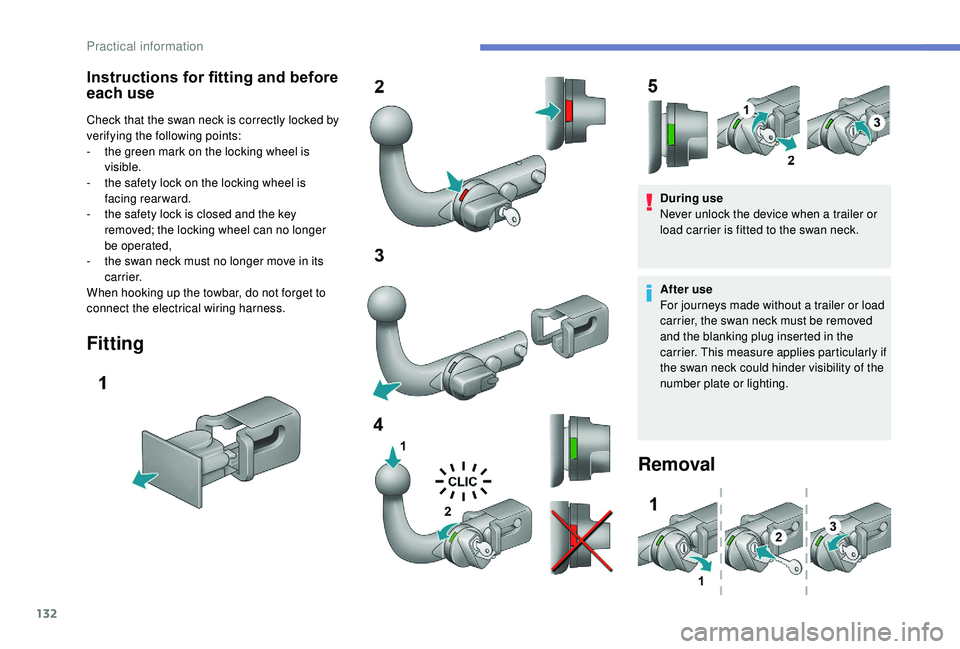
Instructions for fitting and before
each use
Check that the swan neck is correctly locked by
verifying the following points:
-
t
he green mark on the locking wheel is
visible.
-
t
he safety lock on the locking wheel is
facing rearward.
-
t
he safety lock is closed and the key
removed; the locking wheel can no longer
be operated,
-
t
he swan neck must no longer move in its
c a r r i e r.
When hooking up the towbar, do not forget to
connect the electrical wiring harness.
Fitting
During use
Never unlock the device when a trailer or
load carrier is fitted to the swan neck.
After use
For journeys made without a trailer or load
carrier, the swan neck must be removed
and the blanking plug inserted in the
carrier. This measure applies particularly if
the swan neck could hinder visibility of the
number plate or lighting.
Removal
Practical information
Page 137 of 216
135
taking into account the device specifics and
their compatibility with the capacities of the
standard equipment of your vehicle. Please
check this with a PEUGEOT dealer in advance.
The spare parts department publishes a
catalogue of accessories offering various
equipment and fittings, such as:
Load stops (all types).
Loading roller.
Towbar, towing harness: trailer towbar, which
must be installed by a PEUGEOT dealer.
Partition walls and dividing grilles, smooth
wood interior protection with non-slip floor.
Protective grilles.
Professional equipment
range
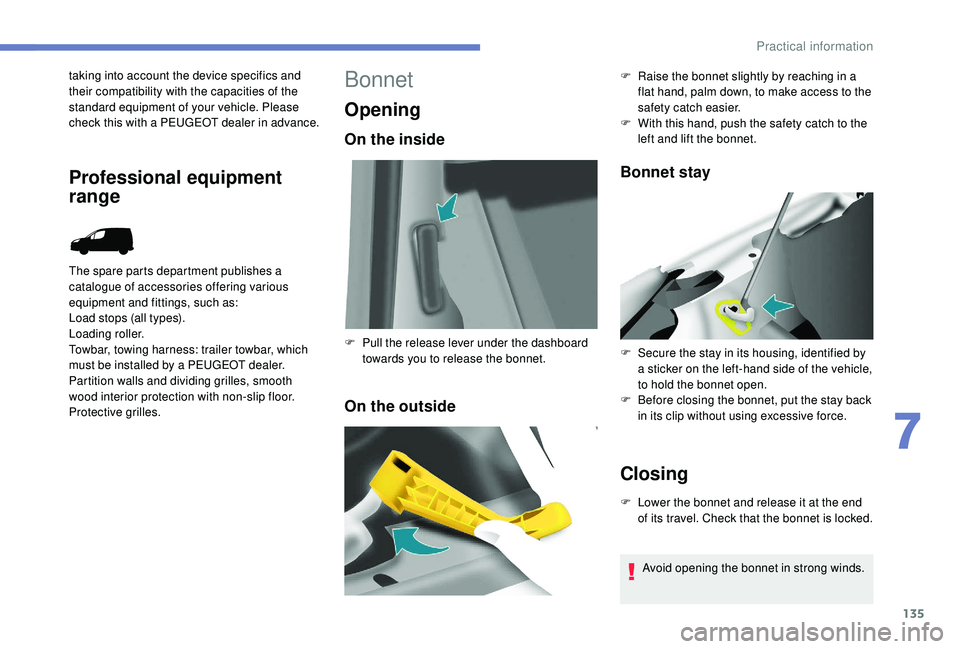
Bonnet
Opening
On the inside
On the outsideBonnet stay
Closing
F Lower the bonnet and release it at the end
of its travel. Check that the bonnet is locked.
F
P
ull the release lever under the dashboard
towards you to release the bonnet. F
R
aise the bonnet slightly by reaching in a
flat hand, palm down, to make access to the
safety catch easier.
F
W
ith this hand, push the safety catch to the
left and lift the bonnet.
F
S
ecure the stay in its housing, identified by
a sticker on the left-hand side of the vehicle,
to hold the bonnet open.
F
B
efore closing the bonnet, put the stay back
in its clip without using excessive force.
Avoid opening the bonnet in strong winds.
7
Practical information