Page 6 of 216
4
Instruments and controls1.Lighting and direction indicator control
stalk.
2. Instrument panel with display.
3. Wiper/screenwash/trip computer control
stalk.
4. Ignition.
5. Audio system controls.
6. Driver's front airbag/horn.
7. Steering wheel height and reach
adjustment.
8. Cruise control/speed limiter controls.
9. Control panel: parking sensors, headlamp
beam adjustment, ESC, Stop & Start,
alarm (depending on country of sale).
10. Bonnet release.
11. Electric door mirror adjustment controls.
12 . Front window controls.
13. Switch panel: hazard warning lamps,
central locking, child lock (depending on
ve r s i o n).
14 . Cigarette lighter.
15. Heating/ventilation controls.
16. Electronic gearbox or Grip control
control.
17. Touch screen.
18. USB port (with electronic gearbox).
19. USB port (with manual gearbox).
Over view
Page 39 of 216
37
Steering wheel adjustment
F While at a standstill, unlock the steering wheel by pulling the control.
F
A
djust the height and reach of the steering
wheel, then lock it by pushing down on the
control.
Mirrors
Adjusting the manual door
mirrors Adjusting the electric door
mirrors
F Move the control to the right or to the left to
select the corresponding mirror.
F
M
ove the control in any of the four directions
to adjust.
F
R
eturn the control to the central position.
Electric folding/unfolding
The mirrors can be folded or unfolded
electrically from the inside, with the vehicle
parked and the ignition on:
F
P
lace the control in the central position.
F
T
urn the control downwards.
F
M
ove the adjustment lever in any of the four
directions to adjust it.
When the vehicle is parked, the door mirrors
can be folded in manually.
They do not have automatic defrosting.
3
Ease of use and comfort
Page 41 of 216

39
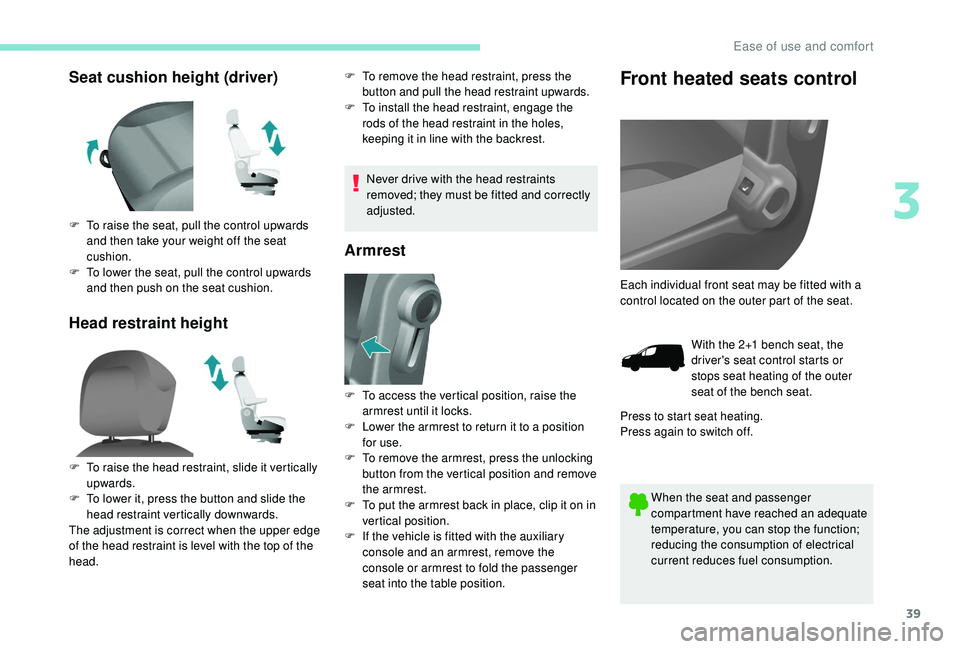
Seat cushion height (driver)
Head restraint heightF To remove the head restraint, press the button and pull the head restraint upwards.
F
T
o install the head restraint, engage the
rods of the head restraint in the holes,
keeping it in line with the backrest.
Never drive with the head restraints
removed; they must be fitted and correctly
adjusted.
Armrest
Front heated seats control
When the seat and passenger
compartment have reached an adequate
temperature, you can stop the function;
reducing the consumption of electrical
current reduces fuel consumption.
F
T
o raise the seat, pull the control upwards
and then take your weight off the seat
cushion.
F
T
o lower the seat, pull the control upwards
and then push on the seat cushion.
F
T
o raise the head restraint, slide it vertically
upwards.
F
T
o lower it, press the button and slide the
head restraint vertically downwards.
The adjustment is correct when the upper edge
of the head restraint is level with the top of the
head. F
T
o access the vertical position, raise the
armrest until it locks.
F
L
ower the armrest to return it to a position
for use.
F
T
o remove the armrest, press the unlocking
button from the vertical position and remove
the armrest.
F
T
o put the armrest back in place, clip it on in
vertical position.
F
I
f the vehicle is fitted with the auxiliary
console and an armrest, remove the
console or armrest to fold the passenger
seat into the table position. Each individual front seat may be fitted with a
control located on the outer part of the seat.
With the 2+1 bench seat, the
driver's seat control starts or
stops seat heating of the outer
seat of the bench seat.
Press to start seat heating.
Press again to switch off.
3
Ease of use and comfort
Page 85 of 216
83
Height adjustment
The row 3 seat belts which are not in use can
be stored to clear the load space and to make
use of the load space cover easier.
Hook the snap hook into the location provided
for this purpose on the rear pillar trim.
F
S
queeze the control with the return and
slide the assembly on the driver's seat side
and on the individual passenger seat side.
Unfastening
F Press the red button on the buckle.
Seat belt(s) not fastened
warning lamp
When the vehicle is started, this
warning lamp comes on if a user at the
front has not fastened their seat belt.
The front passenger's seat
cushion may be fitted with a
presence detector, in which case
you should not place any heavy
items on this seat, as this could
trigger the alert.
Fastening
F Pull the strap then insert the tongue in the buckle.
F
C
heck that the seat belt is fastened
correctly by pulling the strap.
The height of the seat belt for the
centre seat of the front bench seat
cannot be adjusted.
5
Safety
Page 96 of 216

94
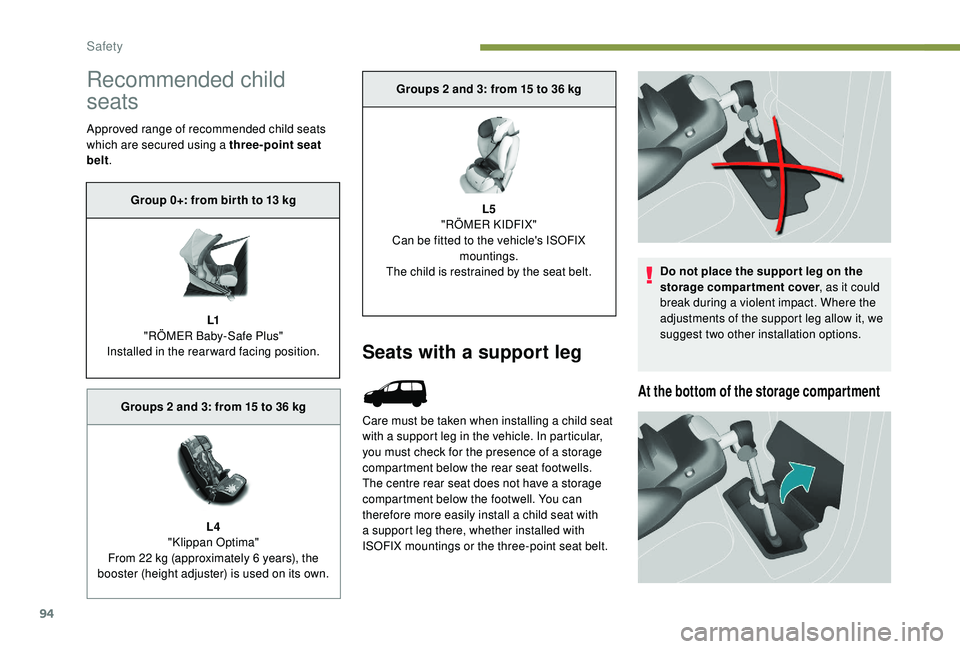
Recommended child
seats
Approved range of recommended child seats
which are secured using a three-point seat
belt.
Seats with a support leg
Care must be taken when installing a child seat
with a support leg in the vehicle. In particular,
you must check for the presence of a storage
compartment below the rear seat footwells.
The centre rear seat does not have a storage
compartment below the footwell. You can
therefore more easily install a child seat with
a support leg there, whether installed with
ISOFIX mountings or the three-point seat belt. Do not place the suppor t leg on the
storage compartment cover
, as it could
break during a violent impact. Where the
adjustments of the support leg allow it, we
suggest two other installation options.
At the bottom of the storage compartment
Group 0+: from bir th to 13 kg
L1
"
RÖMER Baby-Safe Plus"
Installed in the rearward facing position.
Groups 2 and 3: from 15 to 36
kg
L4
"Klippan Optima"
From 22
kg (approximately 6 years), the
booster (height adjuster) is used on its own. Groups 2 and 3: from 15 to 36
kg
L5
"RÖMER KIDFIX"
Can be fitted to the vehicle's ISOFIX mountings.
The child is restrained by the seat belt.
Safety