Page 152 of 216

150
Open the bonnet. To access the bulbs, reach
behind the headlamp unit.
Carry out the operations in reverse order to
refit each bulb and check that the bonnet is
closed securely.Halogen bulbs must be changed with the
headlamps off. Wait a few minutes (risk
of serious burns). Do not touch the bulb
directly with your fingers, use a lint-free
cloth.
It is normal for condensation to form inside
the headlamps. Regular use of the vehicle
eliminates this misting.
The bulbs must be changed with the
ignition off or the battery disconnected.
Wait approximately three minutes after
changing the bulb before reconnecting the
battery.
Check that the lamps are working properly
after each operation.
High-pressure jet wash
When using this type of washer on
stubborn dirt, do not persist on the
headlamps, the lamps and their edges to
avoid damaging their coating and seals.
Front lampsDipped beam headlamps/Main
beam headlamps
Ty p e C , H4 – 55W
F R emove the centre cover by pulling on the
flexible rubber tab.
F
D
isconnect the electrical connector.
F
R
elease the retaining tab.
F
C
hange the bulb taking care to align the
metal part with the grooves on the lamp.
F
R
eposition the retaining tab.
F
E
nsure that the cover is refitted correctly all
around to ensure correct sealing.
Sidelamps
Ty p e A , W5W – 5W
F
R
emove the cover by pulling on the flexible
rubber tab.
F
R
emove the pressure-mounted bulb holder
by pulling the connector.
F
C
hange the bulb.
F
E
nsure that the cover is refitted correctly all
around to ensure correct sealing.
Direction indicators
Ty p e B , PY21W – 21W (amber)
F
R
emove the cover by pulling on the flexible
rubber tab.
F
T
urn the bulb holder a quarter turn
anticlockwise.
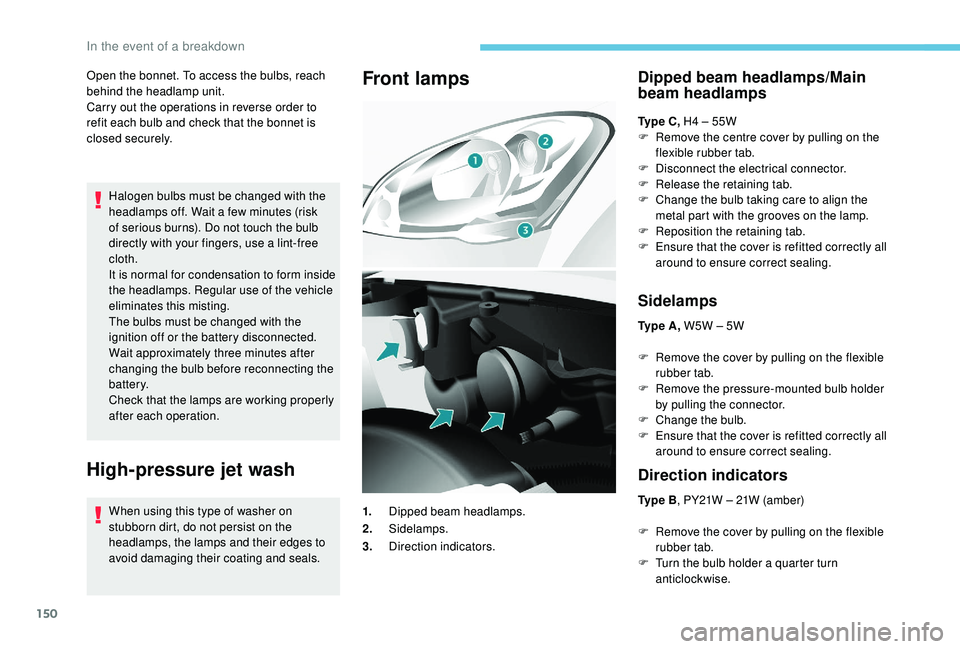
1.
Dipped beam headlamps.
2. Sidelamps.
3. Direction indicators.
In the event of a breakdown
Page 153 of 216
151
Foglamps
Ty p e C , H1 – 55W
F
R
emove the three clips and the bolt
securing the mudflap, located under the
b u m p e r.
F
M
ove the mudflap upwards.
F
D
isconnect the bulb holder connector by
pressing the tab at the top.
F
R
emove the bulb by pressing lightly on it,
then turning it anti-clockwise.
F
C
hange the bulb.
F
E
nsure that the cover is refitted correctly all
around to ensure correct sealing.
Side repeater
Ty p e A , W Y5W – 5W (amber)
F
R
emove the bulb holder by squeezing the
two clips (top and bottom) using a thumb
and forefinger.
F
C
hange the module (bulb holder and bulb).
F
F
ollow these steps in reverse order to refit
the module and the mudflap. F
P
ush the repeater towards the rear and
disengage it by pulling it forwards.
F
C
ontact a PEUGEOT dealer to obtain a new
repeater, which is a sealed component.
F
T
o fit it, engage the repeater towards the
rear and then bring it towards the front.
8
In the event of a breakdown
Page 154 of 216

152
Rear lamps
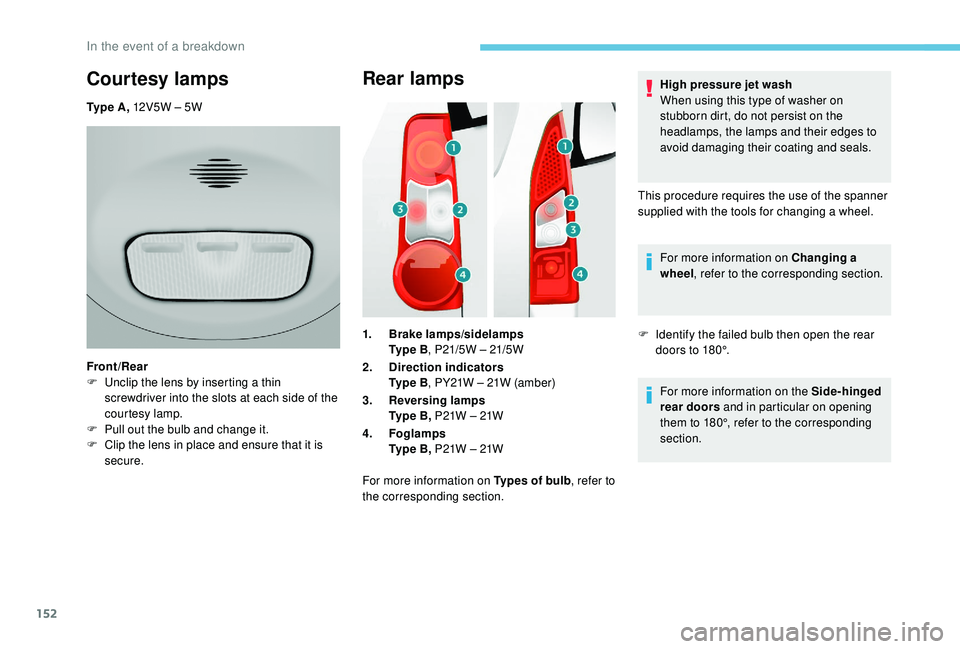
1.Brake lamps/sidelamps
Ty p e B , P21/5W – 21/5W
2. Direction indicators
Ty p e B , PY21W – 21W (amber)
3. Reversing lamps
Ty p e B , P21W – 21W
4. Foglamps
Ty p e B , P21W – 21W
For more information on Types of bulb , refer to
the corresponding section. High pressure jet wash
When using this type of washer on
stubborn dirt, do not persist on the
headlamps, the lamps and their edges to
avoid damaging their coating and seals.
This procedure requires the use of the spanner
supplied with the tools for changing a wheel. For more information on Changing a
wheel , refer to the corresponding section.
F I dentify the failed bulb then open the rear
doors to 180°.
For more information on the Side-hinged
rear doors and in particular on opening
them to 180°, refer to the corresponding
section.
Courtesy lamps
Ty p e A , 12V5W – 5W
Front/Rear
F
U
nclip the lens by inserting a thin
screwdriver into the slots at each side of the
courtesy lamp.
F
P
ull out the bulb and change it.
F
C
lip the lens in place and ensure that it is
secure.
In the event of a breakdown