2020 MERCEDES-BENZ SPRINTER reset
[x] Cancel search: resetPage 132 of 416

Electronic le
vel control starts automatically if the
ignition is switched on. Operation is only possible
af te rth e parking brake has been applied.
Elect ronic le vel control per form s a self-check reg‐
ularly when it is activated and while in use. Indi‐
cator lamp 7onthere mo tecontrol lights up for
about one second when you swit chon the igni‐
tion.
There is a malfunction if indicator lamp 7
beha ves in thefo llowing ways:
R The indicator lamp does not light up when you
switch on the ignition.
or
R The indicator lamp then lights up again or
fl ashes.
In addition, a warning tone is emitted from the
re mo tecontrol for appro ximately 30 seconds.
The fault that has been de tected can be shown
using the indicator lamps (signaling of fault
codes). #
Park theve hicle, leaving the ignition switched
on. #
Apply the parking brake. #
Toraise or lo wer the vehicle le vel:press
and hold button 4or5 until theve hicle
le ve lre aches therequ ired height.
The indicator lamp in button 4or5 flashes
as long as theve hicle le vel is being changed.
When theve hicle le vel has been set, the indi‐
cator lamp in button 4or5 lights up. #
Tolowe r automatical ly:brie fly press but ton
5 .
Electronic le vel control automatically lo wers
th eve hicle tothe next lo wer position:
R From the highest position todriving le vel
R From driving le velto the lo west position
The indicator lamp in button 5flashes as
long as theve hicle le vel is being changed. When
theve hicle le vel has been set, the indi‐
cator lamp in button 5lights up.
% By pressing button
4during the mo vement,
th e original position will be reset. #
Toraise automaticall y:briefly press button
4.
Elect ronic le vel control automatically raises
th eve hicle tothe next higher position:
R From the lo west position todriving le vel
R From driving le velto the highest position
The indicator lamp in button 4flashes as
long as theve hicle le vel is being changed.
When theve hicle le vel has been set, the indi‐
cator lamp in button 4lights up.
% By pressing button
5during the mo vement,
th e original position will be reset. #
Toraise or lo wer automatical lyto driving
le ve l (center position): press and hold but‐
to n6.
Electronic le vel control automatically raises or
lo we rstheve hicle todriving le vel. #
Tosave the set vehicle le vel:set the
re qu ired vehicle le vel. #
Press and hold button 1or2 until you hear
a to ne.
The vehicle le vel set has been sa ved on cor re‐
sponding button 1or2. #
Tocall up the sa vedve hicle le vel:briefly
press button 1or2.
Electronic le vel control automatically raises or
lo we rstheve hicle tothe sa ved driving le vel.
The indicator lamp in button 1or2 flashes
as long as theve hicle le vel is being changed.
When theve hicle le vel has been set, the indi‐
cator lamp in button 1or2 lights up.
% Service mode may only be activated or deac‐
tivated at a
qualified specialist workshop by
trained pe rsonnel. In service mode, the air
suspension sy stem is deactivated for mainte‐
nance or fault de tection. #
Toactivate service mode: press button3.
Service mode is active and the indicator lamp
in button 3lights up continuousl y. #
Todeactivate service mode: press button
3.
Service mode is deactivated and the indicator
lamp in button 3goes out. 13 0
Driving and pa rking
Page 133 of 416

#
Toswitch on automaticall y:drive at over
6.2 mph (10 km/h) or release the parking
brake.
Elect ronic le vel control controls theve hicle
le ve l automaticall y.
Using the but ton in the control panel #
Park theve hicle, leaving the ignition switched
on. #
Apply the parking brake. #
Toraise or lo wer the vehicle le vel:press
and hold button 1or2 until theve hicle
le ve lre aches therequ ired height. #
Tolowe r automatical ly:brie fly press the
lo we r section of switch 2.
Electronic le vel control automatically lo wers
th eve hicle tothe next lo wer position:
R From the highest position todriving le vel
R From driving le velto the lo west position
% By pressing button
1during the mo vement,
th e original position will be reset. #
Toraise automaticall y:briefly press the
lo we r section of switch 1.
Electronic le vel control automatically raises
th eve hicle tothe next higher position:
R From the lo west position todriving le vel
R From driving le velto the highest position
% By pressing button
2during the mo vement,
th e original position will be reset. #
Toswitch on automaticall y:drive at over
6.2 mph (10 km/h) or release the parking
brake.
Elect ronic le vel control controls theve hicle
le ve l automaticall y. Using
the but ton in there ar comp artment #
Park theve hicle, leaving the ignition switched
on. #
Apply the parking brake. #
Toraise or lo wer the vehicle le vel:press
and hold button 1or2 until theve hicle
le ve lre aches therequ ired height. #
Tolowe r automatical ly:brie fly press the
lo we r section of switch 2.
Electronic le vel control automatically lo wers
th eve hicle tothe next lo wer position:
R From the highest position todriving le vel
R From driving le velto the lo west position
% By pressing button
1during the mo vement,
th e original position will be reset. #
Toraise automaticall y:briefly press the
lo we r section of switch 1.
Electronic le vel control automatically raises
th eve hicle tothe next higher position:
R From the lo west position todriving le vel
R From driving le velto the highest position
% By pressing button
2during the mo vement,
th e original position will be reset. #
Toswitch on automaticall y:drive at over
6.2 mph (10 km/h) or release the parking
brake.
Elect ronic le vel control controls theve hicle
le ve l automaticall y. Driving and pa
rking 131
Page 170 of 416

not a sy
stem for automatically keeping tothe
lane. You are responsible forth e dis tance tothe
ve hicle in front, forve hicle speed, braking in good
time and forst ay ing in your lane. If a lane-cor
recting brake application from Active
Lane Keeping Assist occurs, display 1appears
in the multifunction displa y.
Sy stem limits
No lane-cor recting brake application from Active
Lane Keeping Assist occurs in thefo llowing situa‐
tions:
R You clearly and actively steer, brake or accel‐
erate.
R You swit chon the turn signal.
R A driving saf ety sy stem inter venes, su chas
ESP ®
or Active Brake Assi st.
R You ha veadop ted a sporty driving style with
high cornering speeds or high rates of accel‐
eration.
R ESP ®
has been switched off.
R When driving with a trailer, the electrical con‐
nection tothe trailer has been cor rectly
es tab lished.
R If a loss of tire pressure or a faulty tire has
been de tected and displa yed.
The sy stem may be impaired or may not function
in thefo llowing situations:
R There is poor visibilit y,e.g. due toinsuf ficient
illumination of thero ad, highly variable shade
conditions, or due torain, sno w,fog or heavy
spr ay.
R Glare from oncoming traf fic, direct sunlight or
re flections.
R There is dirt on the windshield in the vicinity
of the multifunction camera or the camera is
fo gged up, damaged or obscured.
R No or se veral unclear lane markings are pres‐
ent for one lane, e.g. in a construction area.
R The lane markings are worn, dark or co vered. R
The dis tance totheve hicle in front is too
small, and therefore the lane markings cann ot
be de tected.
R The lane markings change quickl y,e.g. lanes
branch off, cross one ano ther or mer ge.
R The roadw ayisvery nar row and winding.
Ac tivating/deactivating Lane Keeping Assist
or Active Lane Keeping Assist
Multimedia sy stem:
4 © 5
Settings 5
Assistance #
Select Lane Keeping Assist orAct. Lane
Keep Asst. On.
Ac tivating or deactivating the warning #
Select Lane Keeping Assist orAct. Lane
Keep Asst. On. #
Select Warning. Wo
rkmode ADR (working speed control)
Fu
nction of ADR (working speed control)
When activated, ADR automatically increases the
engine speed toa preset speed or a speed you
ha ve set.
% Af
ter a cold start, the idle speed of the
engine is increased automaticall y.Ifth e pre‐
set working speed is lo werth an the
inc reased idle speed, thewo rking speed is
only reached once the engine has comple ted
th ewa rm-up phase.
It is only possible toactivate ADR with the
ve hicle stationary and the parking brake
applied.
On vehicles with automatic transmission, the
selector le ver must be in position 005D. 16 8
Driving and pa rking
Page 181 of 416

Calling up
the Assistance graphic display On-board computer:
4 Assistance #
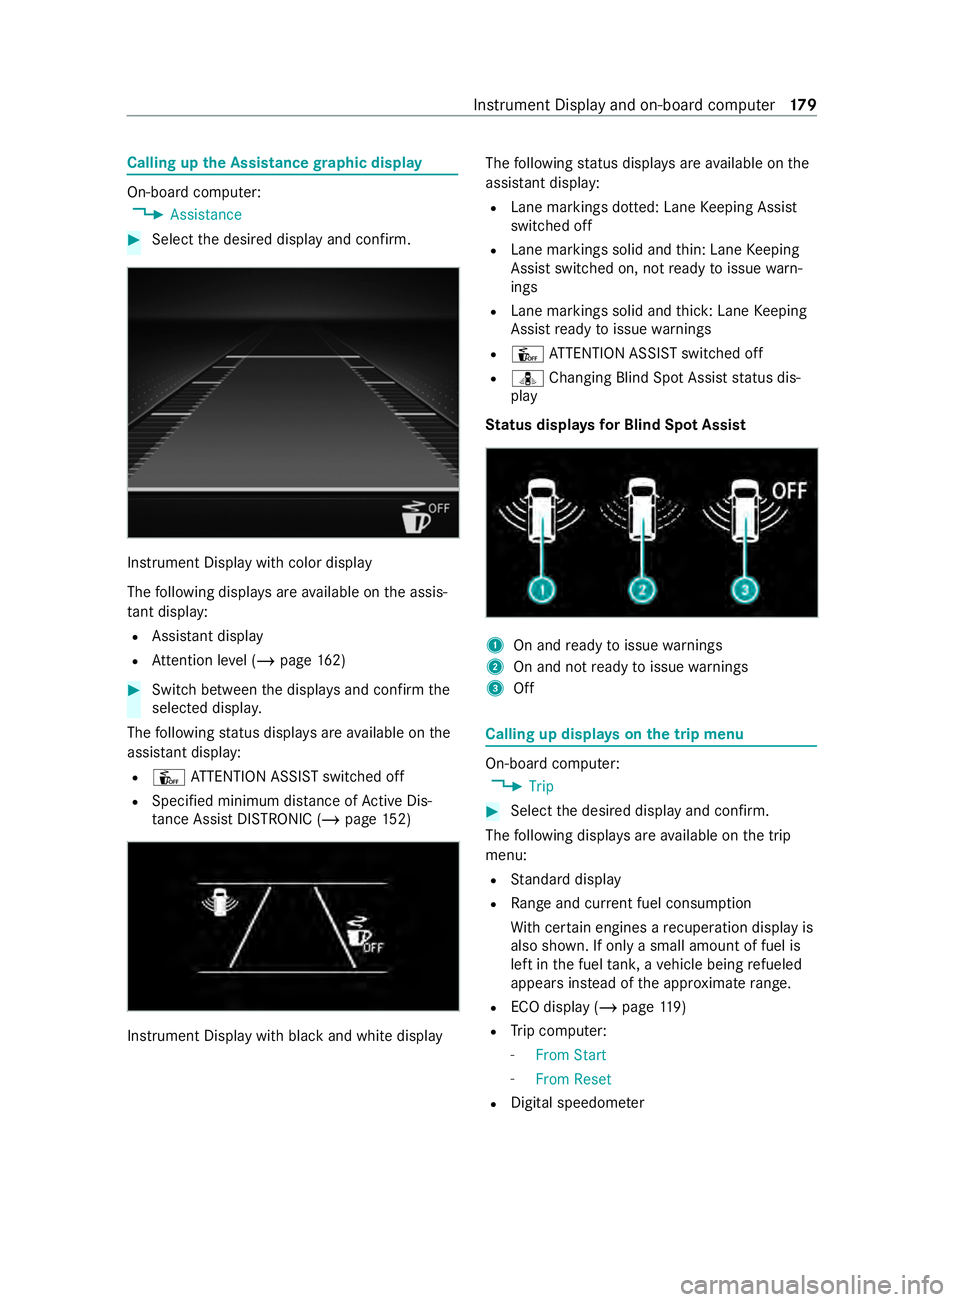
Select the desired display and confirm. Instrument Display with color display
The
following displa ysare available on the assis‐
ta nt displ ay:
R Assi stant display
R Attention le vel (/ page 162) #
Switch between the displa ysand con firm the
selected displa y.
The following status displa ysare available on the
assis tant displ ay:
R Û ATTENTION ASSIST switched off
R Specified minimum dis tance of Active Dis‐
ta nce Assi stDISTRONIC (/ page 152) Instrument Displ
aywith black and white display The
following status displa ysare available on the
assis tant displ ay:
R Lane markings dotted: Lane Keeping Assist
switched off
R Lane markings solid and thin: Lane Keeping
Assist switched on, not ready toissue warn‐
ings
R Lane markings solid and thick: Lane Keeping
Assist ready toissue warnings
R Û ATTENTION ASSIST switched off
R ¸ Changing Blind Spot Assist status dis‐
play
St atus displa ysfor Blind Spot Assi st 1
On and ready toissue warnings
2 On and not ready toissue warnings
3 Off Calling up displa
yson the trip menu On-board computer:
4 Trip #
Select the desired display and confirm.
The following displa ysare available on the trip
menu:
R Standard display
R Range and cur rent fuel consu mption
Wi th cer tain engines a recuperation display is
also shown. If only a small amount of fuel is
left in the fuel tank, a vehicle being refueled
appears ins tead of the appr oximate range.
R ECO displ ay (/page 119)
R Trip computer:
- From Start
- From Reset
R Digital speedom eter Instrument Display and on-board computer
17 9
Page 182 of 416

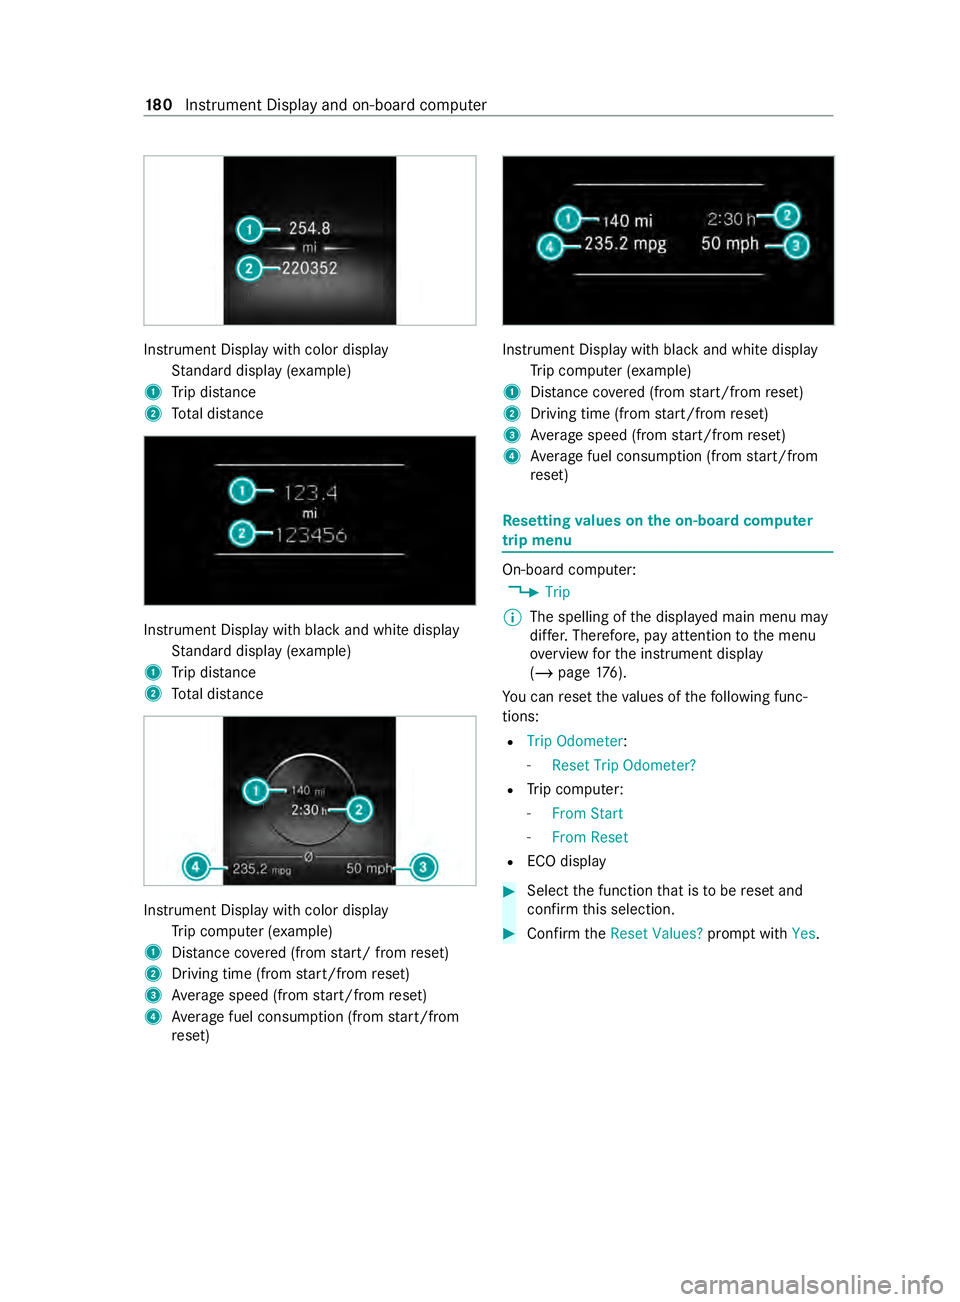
Instrument Display with color display
Standard display (e xamp le)
1 Trip dis tance
2 Total dis tance Instrument Display wi
thblack and white display
St andard display (e xamp le)
1 Trip dis tance
2 Total dis tance Instrument Display wi
thcolor display
Tr ip computer (e xamp le)
1 Distance co vered (from start/ from reset)
2 Driving time (from start/from reset)
3 Average speed (from start/from reset)
4 Average fuel consum ption (from start/from
re set) Instrument Display with black and white display
Trip computer (e xamp le)
1 Distance co vered (from start/from reset)
2 Driving time (from start/from reset)
3 Average speed (from start/from reset)
4 Average fuel consum ption (from start/from
re set) Re
setting values on the on-boa rdcompu ter
trip menu On-board computer:
4 Trip
% The spelling of
the displa yed main menu may
dif fer. Therefore, pay attention tothe menu
ove rview forth e instrument display
(/ page 176).
Yo u can reset theva lues of thefo llowing func‐
tions:
R Trip Odometer :
- Reset Trip Odometer?
R Trip computer:
- From Start
- From Reset
R ECO display #
Select the function that is tobe reset and
confirm this selection. #
Confirm theReset Values? promptwith Yes. 18 0
Instrument Display and on-board computer
Page 205 of 416

#
Select Save.
or #
Toadopt factory settings: selectSavesave
directly.
% Fu
rther information on setting a user profile
(/ page 203). #
Activate Blu etoo th®
and select Connect
Phone, toconnect a mobile phone wi th the
user profile (/ page243).
Yo u can also set up a user profile without regis‐
te ring a mobile phone. #
Select Finished.
The user profile is sa ved.
Selecting profile options
Multimedia sy stem:
4 © 5
f Profiles #
Select 0062for a profile. #
Toedit a profile: selectEdit Profile. #
Select an avatar. #
Chan gethe name, if necessar y.#
Select Save. #
Toconfigure suggestions: selectSugges-
tion Settings (/page 204). #
Toreset favo rite s: select Reset Favorite to
Factory Settings. #
Select Yes. #
Toreset a profile: selectReset Profile to
Factory Settings. #
Select Yes. #
Todel ete a profile: selectDelete Profile . #
Select Yes.
% The guest profile cannot be dele
ted.
Selecting a profile
Multimedia sy stem:
4 © 5
f Profiles #
Select a profile. #
Press the0076 button toconfirm the mes‐
sage.
The profile is loaded and activated.
% Alternatively,
the profile can already be selec‐
te d when theve hicle is entered
(/ page 203). Showing
the profile selection when entering
Requ irements:
R Atleast one profile has been created.
Multimedia sy stem:
4 © 5
f Profiles #
Select General Settings. #
Activate Show Profile Selection When Getting
In.
When theve hicle is star ted, the media display
sho ws th e active profile. Suggestions
Suggestions
overview
The vehicle can learn the habits of the driver.
Based on the habits that ha vebeen learned by
th e sy stem, the most likely navigation destina‐
tions, music tra cks, radio stations or con tacts are
of fere d under SUGGESTIONS.
Suggestions are shown when thefo llowing
re qu irements are fulfilled:
R A profile has been created (/ page 202).
No suggestions are available in theGuest pro‐
fi le.
R A profile has been selec ted.
R You ha veaccep ted data recording.
R From the beginning of usage, the multimedia
sy stem must analyze the user habits. When
suf ficient da tais collec tedth en the sugges‐
tions are available.
If th ere qu irements mentioned are not fulfilled, a
pr ev iew with a description of the function
appears in theSUGGESTIONS menu.
Yo u can con figure the data recording
(/ page 204) or del ete unsuitable suggestions
(/ page 204)in order toimpr ove suggestions.
Calling up suggestions
Requ irements:
R An individual user profile has been created
and is selected (/ page 203).
% The guest profile is active when
the multime‐
dia sy stem is firs tst ar ted. #
Tap on © inthe media displa y.
The home screen is shown. #
Swipe up until theSUGGESTIONS menu is
shown. #
Select a navigation destination, a music tra ck,
a ra dio station or a con tact. MBUX multimedia sy
stem 203
Page 206 of 416

%
If
ro ute guidance is already active, you can
st art a suggestion as a new route guidance or
set an intermediate destination forth eex ist‐
ing route.
Configuring suggestions
Multimedia sy stem:
4 © 5
f Profiles #
Select Zfor a profile. #
Select Suggestion Settings. #
Toswitch suggestions display on/off:
switch Allow Destination Suggestions, Allow
Music Suggestions andAllow Contact Sug-
gestions on or off.
If an option is switched on, suggestions for
navigation de stinations, music trac ks,ra dio
st ations or con tacts are shown.
If th e option is switched off, no suggestions
are shown. #
Todeactivate the learn function for one
da y:activate 24h Learning Deact..
Fo r24 hours no new actions will be trained
and no data recorded forth e active profile.
Suggestions will continue tobe shown. The
re maining time is shown next to24h Learn-
ing Deact..
Before the time runs out, a messa geis shown
th at the multimedia sy stem will continue the
learn function shortl y.
Example: if the option is switched on and a
ro ute toa new destination has been calcula‐
te d, this destination would not be take n into
account forth e learn function. #
Toreset the suggestion his tory :select
Reset Suggestion History .
% This process cannot be
reve rsed. #
Select Yes.
Re naming suggestions
Only navigation destinations can be renamed. #
Tap on the© symbol in the media displa y.
The home screen is shown. #
Swipe up until theSUGGESTIONS menu is
shown. #
Highlight a navigation destination and press
until theOPTIONS menu is shown. #
Select Rename . #
Ente rth e name. #
Toconfirm the entr y:select Yes. Deleting a suggestion #
Tap on © inthe media displa y.
The home screen is shown. #
Swipe up until theSUGGESTIONS menu is
shown. #
Highlight a suggestion and press until the
OPTIONS menu is shown. #
Select Delete.
Deleting suggestions in the applications
Yo u can dele tesuggestions in the pr evious desti‐
nations, in thera dio station list and in the con‐
ta cts. #
Select 0064for a suggestion. #
Select No Longer Suggest. #
Todel eteth e suggestion from the cur rent
lis t:select Not Now.
The suggestion will be shown again at a later
time in the list. #
Todel ete a suggestion permanent ly:select
Never. #
Select Yes.
The suggestion will not be shown again in
future. All suggestions are reset. #
Tocancel the function: selectCancel. Favo
rites Overview of
favo rites
Favo rite s of feryo uqu ick access tofrequently
used applications. It is possible tocrea te20
fa vo rite s in tota l.
Yo u can select favo rite s from categories or you
add favo rite s directly from an application.
Calling up favo rites
In the media display #
Tap on ©.
The home screen is shown. #
Swipe up until FAVORITESis shown.
Using thest eering wheel #
Press thef rocker switch on thesteering
wheel down.
Ad ding favo rites
Selecting favo rite s from categories #
Tap on © inthe media displa y.
The home screen is shown. #
Swipe up until FAVORITESis shown. 204
MBUX multimedia sy stem
Page 216 of 416

Changing
the PIN #
Select Change Settings. #
Enterth e cur rent PIN. #
Select Change PIN. #
Set a new PIN.
Ac tivating PIN pr otection for data export #
Select Change Settings. #
Confirm wi th the PIN. #
Select Protect Data Export. #
Activate or deacti vate the function.
Un blocking the PIN #
Consult an authorized Mercedes-Benz Center
and ha vethe PIN pr otection reset. Software update
Information on software updates
A software update
consists of thre esteps:
R Downloading or copying of the data requ ired
fo r ins tallation
R Installation of the update
R Activation of the update byrestarting the sys‐
tem
The multimedia sy stem pr ovides a message when
an update is available.
Depending on the source, you can per form vari‐
ous updates:
Software update Source of
the
update Up
date type
Interne tN avigation map, sys‐
te m updates, Digital
Operator's Manual
External storage
medium, e.g. USB
fl ash drive Na
vigation maps Ad
vantages of updating software
Software updates ensure your vehicle's tech nol‐
ogy is al ways up-to-date.
In order tocons tantly impr ovethequ ality of our
services you will receive futu reupdates foryo ur
multimedia sy stem, the Mercedes PRO connect
services and your vehicle's communication mod‐
ule. These will con veniently be sent to you via the
mobile phone connection in your vehicle and, in many cases, ins
talled automaticall y.Yo u can
monitor thest atus of your updates at any time via
th e Mercedes PRO por tal and find information
about po tential inno vations.
Yo ur advantages at a glance:
R Con veniently receive software upda tes via the
mobile phone network
R The long-term quality and availability of
Mercedes PRO connect is guaranteed
R Keep your multimedia sy stem and communi‐
cation module up-to-date
Fu rther information about software updates can
be found at https://www.mercedes.pro
Pe rforming a software upda te
Re quirements:
R For online updates: an Internet connection
is es tablished (/ page 254).
R For automatic online updates: your vehicle
has a permanently ins talled communication
module.
Multimedia sy stem:
4 Settings 5
System 5
Software Update
Au tomatically #
Activate Automatic Online Update .
The upda tes will be downloaded and ins talled
automaticall y.
The cur rent status of the updates is dis‐
pla yed.
Manually #
Deactivate Automatic Online Update. #
Select an update from the list and start the
update.
Ac tivating the so ftwa reupdate #
Restart the sy stem.
The modifications from the software update
will be active.
Important sy stem upda tes
Impor tant sy stem updates may be necessary for
th e security of your multimedia sy stem's data.
Please ins tallth ese updates, or else the security
of your multimedia sy stem cann otbe ensured.
% If automatic software updates are activated,
th e sy stem updates will be downloaded auto‐
matically (/ page214). 214
MBUX multimedia sy stem