Page 193 of 228

For safety reasons, the App cannot be
accessed when the phone is paired
with the radio.
Personal details (e-mail and password)
are required to access theUconnect™
LIVEradio services, therefore your
personal account is protected and can
only be accessed by the real user.
Connected services that can be
accessed on the vehicle
TheUconnect™ LIVEservices
available in the radio menu may change
depending on the market.
Theeco:Drive™and my:Car
applications were developed to improve
the customer's driving experience,
therefore they are available in all
markets where theUconnect™ LIVE
services can be accessed.
For further information visit the
www.driveuconnect.eu website.
If the navigation system is installed in
the radio, accessing theUconnect™
LIVEservices enables use of the
TomTom LIVE services. Further
information about the LIVE functions is
available in the dedicated chapter.eco:Drive™
Theeco:Drive™application allows you
to display your driving behaviour in
real time, in order to help you reach a
more efficient driving style as far as
consumption and emissions are
concerned.
In addition, the data can be saved on a
USB flash drive, and the data analysis
can be made on your personal
computer thanks to theeco:Drive™
desktop application, available on
www.fiat.it or www.driveuconnect.eu.
Driving style is evaluated by means
of four indices which monitor the
following parameters:
Acceleration
Deceleration
Transmission
Speed
eco:Drive™ display
Press theeco:Drive™button to
interact with the function.
A screen will be displayed on the radio,
showing the 4 indices described above.
These indices are grey until the system
has enough data to evaluate the driving
style.Once sufficient data are available, the
indices will have 5 colours depending
on the evaluation: dark green (very
good), light green, yellow, orange and
red (very bad).
"Current trip index" refers to the entire
value calculated in real time based
on the average of the described
indices.
It represents eco-friendliness of the
driving style: from 0 (low) to 100 (high).
In the event of extended inactivity the
display will show the average of the
indices up to that moment (“Average
index”) then the indices will be coloured
again in real time as soon as the car is
restarted.
To check the data average for the
previous trip (the “trip” starts when the
ignition key is turned to the MAR
position and stops when it is turned to
STOP), select the “Previous Route”
button.
The details of the previous trip can also
be displayed by pressing the "Details"
button to show trip duration (time
and mileage) and average speed.
191
Page 194 of 228

Recording and transferring trip data
The trip data can be stored in the
system memory and transferred using a
suitably configured USB memory stick
or byUconnect™ LIVEApp. This
allows you to display the history of the
collected data, showing the complete
analysis of the trip data and of your
driving style.
Further information is available at
www.driveuconnect.eu.
WARNING Do not remove the USB
memory stick nor unpair the
smartphone and theUconnect™ LIVE
App before the system has
downloaded the data, otherwise it
could be lost.
During the transfer of data to the
devices, messages may appear on the
radio display to guide the user correctly
through the operation; follow these
instructions. These messages are only
displayed with the ignition key at STOP
and when a delay in the system
switching off is set. The data are
automatically transferred to the devices
when the engine is switched off.
Transferred data will be deleted from
the system memory in this manner. You
can choose to store the trip data or
not, by pressing the "Settings" button
and by setting the storage activation
and the USB or Cloud transfer mode.NOTES When the USB memory stick is
full, the warning messages are shown
on the radio display.
When theeco:Drive™data are not
transferred to USB memory stick for a
long time, the internal memory of the
Uconnect™ LIVEsystem may be
exhausted. Follow the instructions given
by the messages on the radio display.
my:Car
my:Car allows you to keep the
condition of your car always under
control.
my:Car can detect malfunction in real
time and inform the user about the
expiry of the servicing interval. Press
the "my:Car" button to interact with the
application.
The display will show a screen with the
"care:Index" section, which provides
all the detailed information about the
status of the car. Press the "Active
warnings" button (if present) to show
the details of the vehicle's faults which
caused a warning light to switch on.
The status of the car can be viewed on
both the website
www.driveuconnect.eu and using the
Uconnect™ LIVEapp.Settings
Press the
button on the front panel
to display the main “Settings” menu.
NOTE The menu items displayed vary
according to the versions.
The menu includes the following items:
Display;
Units;
Voice commands;
Clock & Date;
Lights (where provided);
Doors & Locks;
Engine Off Options;
Audio;
Phone /Bluetooth®;
Setup SiriusXM (where provided);
Radio Setup;
Restore settings;
Clear Personal Data.
Navigation (Uconnect™
5" Nav LIVE only)
Planning a route
IMPORTANT In the interest of safety
and to reduce distractions while you are
driving, you should always plan a route
before you start driving.
Press the “Nav” button to show the
navigation map on the display.
To plan a route, do the following:
192
MULTIMEDIA
Page 195 of 228

tap the screen to open the Main
menu;
tap "Navigate to" or "Drive to";
tap “Address”. You can change the
country or state setting by tapping
the flag before you select a city;
enter the town or city name, or the
postcode. Towns with similar names
are shown in the list while you type;
enter the street name. Streets with
similar names are shown in the list while
you type. When the correct street
name appears in the list, tap the name
to select the destination;
enter the house number, then tap
“Done”;
if in the Advanced settings menu the
“Show location preview” option is
active, your position is shown on the
map. Tap “Select” to continue or tap
“Back” to enter another address;
when the new route is shown, tap
“Done”. For more information about the
route, tap on “Details”. To change
your route, for example, to travel via a
particular location or to select a new
destination, tap “Change route”;
You are guided to your destination,
using spoken instructions and
on-screen directions.NOTE: The navigation system volume
can only be adjusted during navigation
when the system provides voice
indications.
Updating the map
Two modes for downloading a map
update are available:
Most recent maps guarantee: if a
new map is available for your system
within 90 days of initial use, you can
download it once free of charge.
Map update: you can purchase a
new version of the map installed on the
system.
To check availability or purchase a map,
make sure that you have prepared a
USB device and installed TomTom
HOME on your computer.
Preparing a USB device
To update the map, use a USB device
that meets the following requirements.
Ideally, the USB device should be
empty.
The USB device must have at least
8 GB of memory free.
The USB device must use a FAT-32
file system.
The USB device must not be
blocked and must allow files to be
saved.NOTE: the use of a memory stick is
recommended, while the use of mass
storage devices, such as mobile
phones or multimedia players, is not
recommended.
To prepare a USB device, proceed as
follows:
Select “Navigation updates” in the
“Settings” menu. You are asked
whether you wish to prepare a USB
device for downloading updates.
Select Yes.
Insert the USB device.
NOTE If the system continues to ask
you to insert the USB device, check
that the device meets the requirements
indicated previously, then retry.
The system starts to prepare the USB
device.
When the USB device is ready, the
following message is displayed.
Remove the USB device and connect it
to the computer. The new map can
now be downloaded to the USB
device.
TomTom HOME installation
To install TomTom HOME and create a
MyTomTom account, proceed as
follows:
193
Page 196 of 228

Download and install the TomTom
HOME application on the computer. On
the computer, access tomtom.com/
getstarted. Select “Download TomTom
HOME”, then follow the instructions
provided.
Connect the USB device prepared
with the computer. TomTom HOME
is started automatically.
Select “Enter” in the top right corner
of TomTom HOME.
Select “Create account” and enter
the required details to create a
MyTomTom account. A MyTomTom
account is required to receive map
updates.
After creating the account, you will be
asked if you want to connect the
Uconnect™system to your account.
The prepared USB device represents
yourUconnect™system.
Select “Connect device” and then
select “Close”.
A map can now be downloaded to the
USB device.
Downloading a map
Connect the USB device to the
computer.
If a map update is available for the
system, this update is included in the
list of updates available.NOTE If the most recent map is already
installed on the system, the update is
not proposed.
Select the map that you wish to
download, then select “Update and
install”.
The map is downloaded and copied to
your USB device.
Select “Done” when the process is
complete.
NOTE Don’t disconnect the USB device
from the computer while map
downloading and copying is in
progress.
The map can now be installed on the
system.
Installing the map
After downloading a map to your USB
device, it can be installed on your
system.
IMPORTANT The map update MUST
be made with the vehicle engine
running and may require more than 30
minutes.
IMPORTANT Do not disconnect the
USB device during the map installation
process, otherwise installation will be
interrupted.
Insert the USB device containing the
new map in theUconnect™system.
The system detects a new map on
the USB device.
Select “Start”.Keep the device inserted. Before
updating the map, the system indicates
that this process may take several
minutes. Select “OK”.
NOTE Do not remove the USB device
and do not disconnect the system’s
power supply before the update is
complete. The system cannot be used
until the update is completed correctly.
If the update is interrupted, the system
update is started again.
Once the map has been updated, the
following message is displayed.
Click on “Close”.
The new map is now available on the
system.
Troubleshooting
The following problems may occur
during the update:
The map on the USB device is not
valid. In this case, download the map to
the USB device again, using TomTom
HOME. It may be necessary to prepare
the USB device again.
The version of the map on the USB
device is the same as or is a previous
version of the one already on the
system. In this case, download the map
to the USB device again, using
TomTom HOME. It may be necessary to
prepare the USB device again.
194
MULTIMEDIA
Page 197 of 228

Voice commands
NOTE For languages not supported by
the system, voice controls are not
available. To use the voice commands,
press the
button on the steering
wheel (”Voice” button) and say out loud
the command you want to activate.
Global
The following voice commands can be
given after pressing the
button on
the steering wheel:
Help
Cancel
Repeat
Voice Prompts
Phone
The following voice commands can be
given after pressing the
button on
the steering wheel and saying "Go
to telephone":
Call
Dial
Re-dial
Call back
Recent calls
Calls made
Missed calls
Calls received
PhoneBook
Search
Show SMS
Radio
The following voice commands can be
given after pressing the
button on
the steering wheel:
Tune to XXX FM
Tune to XXX AM
Tune to Radio XXX
Tune to DAB channel
Media
The following voice commands can be
given after pressing the
button on
the steering wheel:
Play song...
Play album…
Play artist…
Play genre…
Play playlist…
Play podcast…
Play audiobook…
Select the source
View
Navigation (Uconnect™ 5" Nav LIVE
only)
The following voice commands can be
given after pressing the
button on
the steering wheel:
Drive Home
2D view
3D vision
Clear route
Add Favourite
Repeat instruction
195
Page 198 of 228
Uconnect™ 7 HD LIVE/ NAV LIVE.
Controls on front panel
145F0S0623
196
MULTIMEDIA
Page 199 of 228
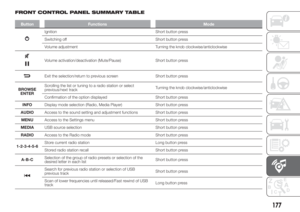
Front control panel summary table
Button Functions Mode
Ignition Short button press
Switching off Short button press
Volume adjustment Left/right rotation of knob
Volume activation/deactivation (Mute/Pause) Short button press
Display on/off Short button press
BACKExit the selection/return to previous screen Short button press
SCROLL TUNE
Scrolling the list or tuning to a radio station
Media source track change
Radio station change if in tuner modeLeft/right rotation of knob
Confirmation of the option displayed
Display the list of stations if in Radio mode
Scroll the contents of the sources if in Media mode
Open the browsing list if in Radio or Media modeShort button press
197
Page 200 of 228
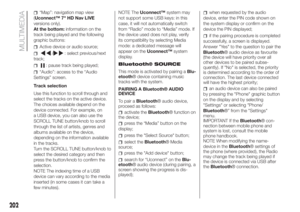
Summary table of display buttons
Button Functions Mode
Radio Access to the Radio mode Press button
Media
Source selection: USB,
Bluetooth®Press button
Phone Phone data display Press button
Uconnect™Access the additional functions (e.g. Compass display,Uconnect™
LIVE
services)Press button
Nav
(*)Access to the navigation function Press button
Settings Access the settings menu Press button
Trip Access to the Trip menu Press button
(*)Uconnect™ 7" HD Nav LIVEversions only
198
MULTIMEDIA