Page 73 of 196
 71
Driving
6This system (also called HHC - Hill Hold
Control), integrated with the dynamic stability
control system, is activated in the following
conditions:
– the vehicle must be stationary, e")
71
Driving
6This system (also called HHC - Hill Hold
Control), integrated with the dynamic stability
control system, is activated in the following
conditions:
– the vehicle must be stationary, engine running,
foot on the brake,
– the gradient of the road must be steeper than
5%,
– uphill, the gearbox must be in neutral or in a
gear other than reverse,
– downhill, reverse gear must be engaged.
The hill start assist system is a driving
aid. It is not an automatic vehicle parking
function or an automatic parking brake.
Operation
With the brake pedal and clutch pedal pressed,
from the time you release the brake pedal,
without using the parking brake, you have
approximately 2 seconds to move off before the
vehicle starts to roll back.
During the moving off phase, the function is
deactivated automatically, gradually releasing
the braking pressure. During this phase, you
may hear the typical mechanical brake release
noise, signalling the imminent movement of the
vehicle.
Do not leave the vehicle while it is being
held temporarily by hill start assist.
If you need to get out of the vehicle with
the engine running, apply the parking brake
manually then ensure that the parking brake
indicator lamp is on.
Hill start assist is deactivated in the following
situations:
– when the clutch pedal is released,
– when the parking brake is applied,
– when the engine is switched off,
– if the engine stalls.
Malfunction
If a malfunction of the system occurs, this
warning lamp lights up, accompanied by
an audible signal and confirmed by a message
on the display. Have the system checked by a
CITROËN dealer or a qualified workshop.
Tyre under-inflation detection
System which automatically checks the
pressures of the tyres while driving.
The system continuously monitors the pressures
of the four tyres, as soon as the vehicle is
moving.
A pressure sensor is located in the valve of each
tyre (except the spare wheel).
The system triggers an alert as soon as it
detects a drop in the inflation pressure of one or
more tyres.
The under-inflation detection system does not replace the need for vigilance
on the part of the driver.
This system does not avoid the need to
regularly check the tyre pressures (including
the spare wheel) as well as before a long
journey.
Driving with under-inflated tyres, particularly
in adverse conditions (heavy load, high
speed, long journey):
– worsens road-holding,
– lengthens braking distances,
– causes premature wear of the tyres,
– increases fuel consumption.
Page 74 of 196
 72
Driving
The inflation pressures defined for the vehicle can be found on the tyre pressure
label.
Tyre pressures should be checked when the
tyres are \"cold\" (vehicle stopped for 1 hour or")
72
Driving
The inflation pressures defined for the vehicle can be found on the tyre pressure
label.
Tyre pressures should be checked when the
tyres are "cold" (vehicle stopped for 1 hour or
after a journey of less than 6 miles (10 km) at
moderate speeds). Otherwise, add 0.3 bar to
the pressures shown on the label.
For more information on Identification
markings, including the tyre pressure label,
refer to the corresponding section.
The tyre pressure measurement unit can be configured with the MODE button: in
the "Tyre pressure measurement” menu, select
"psi/bar/kPa".
For more information on Vehicle configuration
(MODE), refer to the corresponding section.
Under-inflation alert
This is signalled by the fixed illumination of this warning lamp, accompanied by an
audible signal and, depending on equipment, the
display of a message.
In the event of an anomaly noted on just one of
the tyres, depending on equipment, the symbol
or the message displayed identifies it.
► Reduce speed immediately, avoid excessive
steering movements and avoid sudden braking.
► Stop the vehicle as soon as it is safe to do
so.
The loss of pressure detected does not always cause visible bulging of the tyre.
Do not rely on just a visual check.
► Using a compressor, such as the one in
the temporary puncture repair kit, check the
pressures of the four tyres when cold.
► If it is not possible to make this check
immediately, drive carefully at reduced speed.
► In the event of a puncture, use the
temporary puncture repair kit or the spare wheel
(depending on equipment).
The alert is kept active until the tyre/tyres concerned is/are reinflated, repaired or
replaced.
Malfunction
The flashing and then fixed illumination of this warning lamp, accompanied by the
illumination of the service warning lamp, and
depending on equipment, the display of a
message, indicates a fault with the system.
In this case, the tyre pressures are no longer
monitored.
This alert is also displayed if at least one wheel is not equipped with a sensor.
Contact a CITROËN dealer or a qualified
workshop to have the system checked or,
following a puncture, to have the original wheel,
equipped with a sensor, refitted.
Pneumatic suspension
If the vehicle is equipped with pneumatic
suspension, it is possible to change the height
of the rear sill, in order to facilitate loading or
unloading.
There is a normal sill level, as well as 3 higher
levels (from +1 to +3) and 3 lower levels (from
-1 to -3). Each level reached is displayed on the
instrument panel display screen.
Loading sill height manual
correction
Adjusting the platform sill up or down
► A quick press on one of the controls selects
the upper or lower level. Each press (diode lit)
increases or decreases by one level.
A long press on one of the controls selects the
maximum corresponding level (-3 or +3).
Returning to the normal sill height
► Press the same number of times in the
opposite direction of the displayed position.
Deactivation/Reactivation
► Press and hold both controls simultaneously
to deactivate/reactivate the system.
Deactivation is confirmed by the lighting of the
control LEDs.
Beyond a speed of 3 mph (5 km/h), the
system reactivates automatically.
Loading sill height
automatic correction
Beyond a speed of 12 mph (20 km/h), the
system automatically restores the rear sill height
to its normal level.
Page 75 of 196
 73
Driving
6Loading sill height manual
correction
Adjusting the platform sill up or down
► A quick press on one of the controls selects
the upper or lower level. Each press (diode lit)
increases")
73
Driving
6Loading sill height manual
correction
Adjusting the platform sill up or down
► A quick press on one of the controls selects
the upper or lower level. Each press (diode lit)
increases or decreases by one level.
A long press on one of the controls selects the
maximum corresponding level (-3 or +3).
Returning to the normal sill height
► Press the same number of times in the
opposite direction of the displayed position.
Deactivation/Reactivation
► Press and hold both controls simultaneously
to deactivate/reactivate the system.
Deactivation is confirmed by the lighting of the
control LEDs.
Beyond a speed of 3 mph (5 km/h), the
system reactivates automatically.
Loading sill height
automatic correction
Beyond a speed of 12 mph (20 km/h), the
system automatically restores the rear sill height
to its normal level.
Malfunction
If a fault occurs with the system, this
warning lamp comes on.
Have the system checked by a CITROËN dealer
or a qualified workshop.
Driving with the suspension set too high
or too low poses risk of damaging
components under the body.
The height may be adjusted automatically to
take account of changes in temperature or
loading.
You must avoid using this control in the
following circumstances:
– when working underneath the vehicle,
– when changing a wheel,
– when the vehicle is being transported by
lorry, train, ferry, boat, etc.
To avoid damaging the vehicle or injuring
anyone, check that there is nothing or no
person that might be close to or come into
contact with the vehicle, before raising or
lowering the suspension.
Driving and manoeuvring
aids - General
recommendations
Driving and manoeuvring aids cannot, in
any circumstances, replace the need for
vigilance on the part of the driver.
The driver must comply with the Highway
Code, must remain in control of the vehicle in
all circumstances and must be able to retake
control of it at all times. The driver must adapt
the speed to climactic conditions, traffic and
the state of the road.
It is the driver's responsibility to constantly
check the traffic, to assess the relative
distances and speeds of other vehicles and to
anticipate their movements before indicating
and changing lane.
The systems cannot exceed the limits of the
laws of physics.
Driving aids
You should hold the steering wheel
with both hands, always use the interior and
exterior rear view mirrors, always keep the
feet close to the pedals and take a break
every two hours.
Manoeuvring aids
The driver must always check the
surroundings of the vehicle before and during
Page 76 of 196
 74
Driving
the whole manoeuvre, in particular using the
mirrors.
Radar
The operation of the radar as well as the
associated functions may be impaired through
the accumulation of dirt (mud, frost, e")
74
Driving
the whole manoeuvre, in particular using the
mirrors.
Radar
The operation of the radar as well as the
associated functions may be impaired through
the accumulation of dirt (mud, frost, etc.), in
certain difficult weather conditions (very heavy
rain, snow) or if the bumper is damaged.
If the front bumper is to be repainted, contact
a CITROËN dealer or a qualified workshop;
certain types of paint could interfere with the
operation of the radar.
Driving aids camera
This camera and its associated functions
may be impaired or not work if the windscreen
area in front of the camera is dirty, misty,
frosty, covered with snow, damaged or
masked by a sticker.
In humid and cold weather, demist the
windscreen regularly.
Poor visibility (inadequate street lighting,
heavy rain, thick fog, snowfall), dazzle
(headlamps of an oncoming vehicle, low sun,
reflections on a damp road, leaving a tunnel,
alternating shade and light) can also impair
detection performance.
In the event of a windscreen replacement,
contact a CITROËN dealer or a qualified
workshop to recalibrate the camera;
otherwise, the operation of the associated
driving aids may be disrupted.
Other cameras
The images from the camera(s)
displayed on the touch screen or on the
instrument panel may be distorted by the
relief.
In the presence of areas in shade, or in
conditions of bright sunlight or inadequate
lighting, the image may be darkened and with
lower contrast.
Obstacles may appear further away than they
actually are.
Sensors
The operation of the sensors as well as
the associated functions may be disturbed
by sound interference such as that emitted
by noisy vehicles and machinery (e.g. lorries,
pneumatic drills), by the accumulation of
snow or dead leaves on the road or in the
event of damaged bumpers and mirrors.
When reverse gear is engaged, an audible
signal (long beep) indicates that the sensors
may be dirty.
A front or rear impact to the vehicle can
upset the sensors’ settings, which is not
always detected by the system: distance
measurements may be distorted.
The sensors do not systematically detect
obstacles that are too low (pavements, studs)
or too thin (trees, posts, wire fences).
Certain obstacles located in the sensors’ blind
spots may not be detected or may no longer
be detected during the manoeuvre.
Certain materials (fabrics) absorb sound
waves: pedestrians may not be detected.
Maintenance
Clean the bumpers and door mirrors and
the field of vision of the cameras regularly.
When washing your vehicle at high pressure,
direct the spray from at least 30 cm away
from the radar, sensors and cameras.
Mats
The use of mats not approved by
CITROËN may interfere with the operation of
the speed limiter or cruise control.
To avoid any risk of jamming the pedals:
► ensure that the mat is secured correctly,
► never fit one mat on top of another.
Units of speed
Ensure that the units of speed displayed
on the instrument panel (mph or km/h) are
those for the country you are driving in.
If this is not the case, when the vehicle is
stationary, set the display to the required
units of speed so that it complies with what is
authorised locally.
In case of doubt, contact a CITROËN dealer
or a qualified workshop.
Speed Limit recognition
and recommendation
Refer to the General recommendations on the
use of driving and manoeuvring aids .
Using the camera located at the top of the
windscreen, this system detects the following
types of signs and displays the corresponding
information on the instrument panel:
– the maximum authorised speed,
– no overtaking,
– the end of the previous limitations /
restrictions.
Page 77 of 196
 75
Driving
6In case of doubt, contact a CITROËN dealer
or a qualified workshop.
Speed Limit recognition
and recommendation
Refer to the General recommendations on the
use of driving and manoeuvrin")
75
Driving
6In case of doubt, contact a CITROËN dealer
or a qualified workshop.
Speed Limit recognition
and recommendation
Refer to the General recommendations on the
use of driving and manoeuvring aids .
Using the camera located at the top of the
windscreen, this system detects the following
types of signs and displays the corresponding
information on the instrument panel:
– the maximum authorised speed,
– no overtaking,
– the end of the previous limitations /
restrictions.
The system detects signs on the left-hand side
and right-hand side, high and low, as well as
overlapping signs.
The system only detects circular signs.
The units for the speed limit (mph or km/h) depend on the country you are
driving in.
This should be taken into account so that you
observe the speed limit.
For the system to operate correctly when
you change country, the units for speed in
the instrument panel must be those for the
country you are driving in.
The automatic reading of road signs is a driving aid system and does not always
display speed limits correctly.
The speed limit signs present on the road
always take priority over the display by the
system.
It is possible for the system to not display the
speed limit if it does not detect a speed limit
sign within a preset period.
The system is designed to detect signs that
conform to the Vienna Convention on road
signs.
When replacing the bulbs of the headlamps,
it is highly recommended that you fit genuine
replacement parts.
Using other bulbs could reduce system
performance.
Principles
Using the camera, located at the top of the
windscreen, this system detects and reads the
speed limit indications, overtaking prohibitions
and signs indicating the end of implementation of
the signs previously mentioned.
The sign is read by the camera and is displayed
in the instrument panel when it is passed (when
the vehicle is level with it).
Display on the touch
screen tablet then on the
instrument panel
The display of signs takes place as per the
following two phases:
– All new road signs recognised are displayed
on the touch screen tablet as a pop-up for 40
seconds.
– These signs are then displayed on the
instrument panel.
The system can display two road signs (speed
limit and no overtaking/end of no overtaking)
Page 78 of 196
 76
Driving
simultaneously in the two dedicated areas of the
instrument panel.
If an additional road sign is detected, such
as a reduced speed limit for wet road sign, it
is displayed in an empty wi")
76
Driving
simultaneously in the two dedicated areas of the
instrument panel.
If an additional road sign is detected, such
as a reduced speed limit for wet road sign, it
is displayed in an empty window below the
corresponding sign.
Additional signs are filtered as follows:
– Signs for snow or ice only appear if the
outside temperature is below 3°C.
– Signs for snow, rain or fog are only displayed
if the wipers are activated while the outside
temperature is below 3°C.
– Signs concerning heavy goods vehicles are
not displayed if they concern a vehicle weighing
less than 4 tonnes.
– Signs concerning farm equipment are not
displayed.
Signs such as no overtaking go out after about
40 seconds on the instrument panel.
Activation/Deactivation
This function can be set using the MODE button: in the “Traffic Sign” menu, select
“ON” or “OFF”.
For more information on Vehicle
configuration (MODE) , refer to the
corresponding section.
Operating limits
The system does not take account of reduced
speed limits, especially those imposed in the
following cases:
– Poor weather (rain, snow).
– Atmospheric pollution.
– Towing.
– Driving with a space-saver type spare wheel
or snow chains fitted.
– Driving with a non-standard suspension kit.
– Tyre repaired using the temporary puncture
repair kit.
– Young drivers.
The system may not display the speed limit if it
does not detect a speed limit sign within a preset
period and in the following situations:
– Road signs that are obstructed, non-standard,
damaged or bent.
– Obsolete or incorrect maps.
– Road incline causing the sign to be out of the
camera field of vision (on a slope, for example).
– Change in the vehicle load that causes the
camera to tilt significantly (system operation may
temporarily be suspended to enable camera
self-calibration).
Speed limiter
Refer to the General recommendations on the
use of driving and manoeuvring aids .
System which prevents the vehicle
from exceeding the speed
programmed by the driver. The speed is selected when the vehicle is
stationary with the engine running or while
driving with at least 2
nd gear engaged.
The minimum speed to be programmed is 19
mph (30 km/h).
The vehicle responds to the driver's foot
pressure on the accelerator until resistance is felt
in the pedal, which signifies that the vehicle has
reached the programmed speed.
However, depressing the pedal beyond this point
of resistance to the floor allows you to exceed
the programmed speed. To resume use of the
speed limiter, gradually release the pressure
on the accelerator pedal and return below the
programmed speed.
1. Selection of the speed limiter function
2. Activation / deactivation of the function
3. Programming a speed
The selection status of the function and the
programmed speed are visible in the instrument
panel display screen.
Selecting the function
► Turn ring 1 all the way down. The speed
limiter is selected, but is not yet active.
The display indicates OFF and the last
programmed speed.
Programming a speed
A speed can be programmed without activating
the speed limiter but with the engine running.
To memorise a speed higher than the previous
one:
► Move the control upwards (+).
A short press increases the setting by 1 mph
(km/h).
Pressing and holding increases the setting in
steps of 5 mph (km/h).
To memorise a speed lower than the previous
one:
► Move the control downwards (-).
A short press decreases the setting by 1 mph
(km/h).
Pressing and holding decreases the setting in
steps of 5 mph (km/h).
Activation/Deactivation
► Press button 2 to activate the speed limiter.
Page 79 of 196
 77
Driving
6Selecting the function
► Turn ring 1 all the way down. The speed
limiter is selected, but is not yet active.
The display indicates OFF and the last
programmed speed.
Programming")
77
Driving
6Selecting the function
► Turn ring 1 all the way down. The speed
limiter is selected, but is not yet active.
The display indicates OFF and the last
programmed speed.
Programming a speed
A speed can be programmed without activating
the speed limiter but with the engine running.
To memorise a speed higher than the previous
one:
► Move the control upwards (+).
A short press increases the setting by 1 mph
(km/h).
Pressing and holding increases the setting in
steps of 5 mph (km/h).
To memorise a speed lower than the previous
one:
► Move the control downwards (-).
A short press decreases the setting by 1 mph
(km/h).
Pressing and holding decreases the setting in
steps of 5 mph (km/h).
Activation/Deactivation
► Press button 2 to activate the speed limiter.
OFF disappears from the display and a message
appears confirming activation.
Pressing again deactivates it, OFF is displayed
again and a message appears confirming
deactivation.
Exceeding the programmed
speed
► Press firmly on the accelerator pedal, going
beyond the point of resistance, to exceed the
programmed limit speed.
The speed limiter is deactivated temporarily and
the programmed speed flashes.
To return to the speed limiter function, reduce
your speed below the programmed speed.
On a steep descent or in the event of
sharp acceleration, the speed limiter will
not be able to prevent the vehicle from
exceeding the programmed speed.
Switching the function off
► Place the ring in the central position O or
switch the ignition off to stop the system.
The last programmed speed remains in the
memory.
Malfunction
The programmed speed is cleared, then
replaced by dashes.
Have the system checked by a CITROËN dealer
or a qualified workshop.
Fixed speed limiter
If your vehicle is equipped with it, the speed of
your vehicle can be limited in a fixed way to 56
mph (90 km/h) or 62 mph (100 km/h).
A label located in the passenger compartment
indicates this maximum speed.
The fixed speed limiter is not a cruise control
type function. It cannot be activated or
deactivated by the driver during the trip.
Page 80 of 196
 78
Driving
The maximum speed is set according to the regulations in force in the country of
sale.
This maximum speed cannot be changed by
the driver.
If you wish to modify this maximum speed,
conta")
78
Driving
The maximum speed is set according to the regulations in force in the country of
sale.
This maximum speed cannot be changed by
the driver.
If you wish to modify this maximum speed,
contact a CITROËN dealer.
Cruise control - particular
recommendations
For the safety of everyone, only use the
cruise control where the driving
conditions allow running at a constant speed
and keeping an adequate safety distance.
Remain vigilant when the cruise control
is activated. If you hold one of the speed
setting modification buttons down, a very
rapid change in the speed of your vehicle may
occur.
When descending a steep hill , the cruise
control system cannot prevent the vehicle
from exceeding the set speed. Brake if
necessary to control the speed of your
vehicle.
On steep climbs or when towing, the set
speed may not be reached or maintained.
Exceeding the programmed speed
setting
The speed setting can be exceeded
temporarily by pressing the accelerator
pedal (the programmed speed flashes).
To return to the speed setting, release
the accelerator pedal (when this speed is
reached again, the display of the speed stops
flashing).
Operating limits
Never use the system in the following
situations:
– In an urban area with the risk of
pedestrians crossing the road.
– In heavy traffic.
– On winding or steep roads.
– On slippery or flooded roads.
– In poor weather conditions.
– Driving on a speed circuit.
– Driving on a rolling road.
– When using snow chains, non-slip covers
or studded tyres.
Cruise control
Refer to the General recommendations on the
use of driving and manoeuvring aids and to
Cruise control - particular recommendations.
System which automatically maintains the
speed of the vehicle at the cruise setting programmed by the driver, without using the
accelerator pedal.
To be programmed or activated, the speed of the
vehicle must be above 19 mph (30 km/h), with at
least 2
nd gear engaged.
1. Selection of the cruise control function
2. Activation/deactivation of the function
3. Programming a speed
This cruise control function is shown by an
indicator lamp located in the rev counter and
messages in the instrument panel display
screen.
Function selected (green)/deactivated
(grey)
Selecting the function
► Turn ring 1 all the way up. The cruise control
function is selected, but is not yet active and no
speed is programmed.
The indicator lamp lights up on the instrument panel.
First activation/
Programming a speed
► Bring the vehicle up to the desired speed by
pressing the accelerator.
► Move the control upwards (+) or downwards
(-) to memorise it. A message appears in the
instrument panel display to confirm activation.
The memorised speed is visible in the instrument
panel display.
The vehicle will maintain this speed setting.
Deactivation (off)
► Press button 2.
or
► Depress the brake or clutch pedal.
A message appears in the instrument panel
display to confirm deactivation.
Reactivation
► Following deactivation of the cruise control,
press button 2. A message appears in the
instrument panel display to confirm reactivation.
Your vehicle will return to the last programmed
speed.
You can also repeat the "first activation"
procedure.
Changing the programmed
speed
There are two methods for memorising a speed
higher than the previous one:
 1
1 2
2 3
3 4
4 5
5 6
6 7
7 8
8 9
9 10
10 11
11 12
12 13
13 14
14 15
15 16
16 17
17 18
18 19
19 20
20 21
21 22
22 23
23 24
24 25
25 26
26 27
27 28
28 29
29 30
30 31
31 32
32 33
33 34
34 35
35 36
36 37
37 38
38 39
39 40
40 41
41 42
42 43
43 44
44 45
45 46
46 47
47 48
48 49
49 50
50 51
51 52
52 53
53 54
54 55
55 56
56 57
57 58
58 59
59 60
60 61
61 62
62 63
63 64
64 65
65 66
66 67
67 68
68 69
69 70
70 71
71 72
72 73
73 74
74 75
75 76
76 77
77 78
78 79
79 80
80 81
81 82
82 83
83 84
84 85
85 86
86 87
87 88
88 89
89 90
90 91
91 92
92 93
93 94
94 95
95 96
96 97
97 98
98 99
99 100
100 101
101 102
102 103
103 104
104 105
105 106
106 107
107 108
108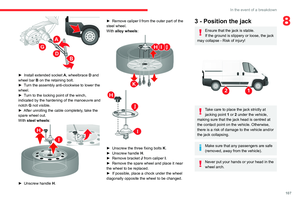 109
109 110
110 111
111 112
112 113
113 114
114 115
115 116
116 117
117 118
118 119
119 120
120 121
121 122
122 123
123 124
124 125
125 126
126 127
127 128
128 129
129 130
130 131
131 132
132 133
133 134
134 135
135 136
136 137
137 138
138 139
139 140
140 141
141 142
142 143
143 144
144 145
145 146
146 147
147 148
148 149
149 150
150 151
151 152
152 153
153 154
154 155
155 156
156 157
157 158
158 159
159 160
160 161
161 162
162 163
163 164
164 165
165 166
166 167
167 168
168 169
169 170
170 171
171 172
172 173
173 174
174 175
175 176
176 177
177 178
178 179
179 180
180 181
181 182
182 183
183 184
184 185
185 186
186 187
187 188
188 189
189 190
190 191
191 192
192 193
193 194
194 195
195