Page 161 of 196
 159
Touch screen audio and telematics system
12ENTER
Confirm an option displayed on the screen by
pressing.
Steering mounted controls
Activate / deactivate the pause function of USB/iPod and Bluetoo")
159
Touch screen audio and telematics system
12ENTER
Confirm an option displayed on the screen by
pressing.
Steering mounted controls
Activate / deactivate the pause function of USB/iPod and Bluetooth® sources.
Activate / deactivate the mute function of the
radio.
Activate / deactivate the microphone during a
telephone conversation.
Toggle up or down: increase or decrease volume for voice announcements, and
music sources, hands-free, and text message
reader.
Activate voice recognition. Pause a voice message to start a new
voice command.
Pause voice recognition.
Accept an incoming call. Accept a second incoming call and put
the active call on hold.
Activate voice recognition for the telephone
function.
Pause a voice message to give another voice
command.
Pause voice recognition.
Radio, toggle up or down: select next /
previous station.
Radio, toggle up or down continuously: scan up /
down frequencies until you release the button. Media, toggle up or down: select next / previous
track.
Media, toggle up or down continuously: fast
forward / rewind ntil you release the button.
Refuse an incoming call.
End the call in progress.
Menus
Radio
Select from the different radio sources.
Activate, deactivate and adjust certain
function settings.
Telephone
Connect a mobile phone via Bluetooth®.
Media
Select from the different music sources.
Activate, deactivate and adjust certain
function settings.
Page 162 of 196
 160
Touch screen audio and telematics system
Vehicle information
Access the exterior temperature, the clock, the compass and the trip computer.
Navigation
Enter navigation settings and choose a")
160
Touch screen audio and telematics system
Vehicle information
Access the exterior temperature, the clock, the compass and the trip computer.
Navigation
Enter navigation settings and choose a
destination.
Settings
Activate, deactivate and configure certain system and vehicle function settings.
Radio
Press "RADIO" to display the radio
menus:
Briefly press on the 9 or : buttons to perform an automatic search.
Press and hold down the buttons to perform a
quick search.
Press Memor.
Press and hold this button to memorise the
station being listened to.
The station being listened to is highlighted.
Press the "All" button to display all saved radio
stations in the selected frequency band.
Browse
– List of stations .
– Press to select a station.
– Refresh the list according to the reception.
– Press on the 5 or 6 buttons to scroll through
the radio stations found. –
Skip directly to the desired letter in the list.
AM/DAB
– Choose the band .
– Choose the waveband.
Adjustment
– Direct adjustment.
– The virtual keyboard on the screen allows you
to enter a single number corresponding to the
station.
– The "plus" or "minus" graphic buttons allow
precise adjustment of the frequency.
Information
– Information .
– Display information about the radio station
being listened to.
Audio
– Equalizer.
– Adjust the bass, medium and treble.
– Balance/Fade.
– Adjust the balance of the front and rear
speakers, left and right.
– Press the button in the centre of the arrows to
balance the settings.
– Volume/Speed.
– Select the desired parameter; the option is
highlighted.
– Loudness.
– Optimise the quality of low volume audio.
– Automatic radio.
– Set the radio when starting up or recover the
active state when the ignition key was last turned
to STOP.
– Radio switch-off delay .
– Set the parameter.
– AUX vol. setting .
– Set the parameters.
DAB (Digital Audio
Broadcasting) radio
Terrestrial Digital Radio
Digital radio
Digital radio provides higher quality
reception and also the graphical display
of current information on the radio station
being listened to.
The various "multiplexes/ensembles" offer
a choice of radio stations organised in
alphabetical order.
Press “RADIO” successively to display
the "DAB Radio".
Select the "Navigate" tab.
Select a list from the filters
offered: "All", "Types",
"Ensembles", then select a radio station.
Press the "Update" button to update the
list of "DAB Radio" stations received.
Page 163 of 196
 161
Touch screen audio and telematics system
12– Set the parameter.
– AUX vol. setting .
– Set the parameters.
DAB (Digital Audio
Broadcasting) radio
Terrestrial Digital Radio
Digital radio
D")
161
Touch screen audio and telematics system
12– Set the parameter.
– AUX vol. setting .
– Set the parameters.
DAB (Digital Audio
Broadcasting) radio
Terrestrial Digital Radio
Digital radio
Digital radio provides higher quality
reception and also the graphical display
of current information on the radio station
being listened to.
The various "multiplexes/ensembles" offer
a choice of radio stations organised in
alphabetical order.
Press “RADIO” successively to display
the "DAB Radio".
Select the "Navigate" tab.
Select a list from the filters
offered: "All", "Types",
"Ensembles", then select a radio station.
Press the "Update" button to update the
list of "DAB Radio" stations received.
DAB/FM station tracking
"DAB" does not cover 100% of the
territory.
When the digital radio signal is poor, the
"AF" (alternative frequency) option enables
you to continue listening to the same
station by automatically switching to the
corresponding "FM" analogue station (if there
is one).
When the system switches to analogue
station, there is a delay of a few seconds
with sometimes a change in volume.
When the digital signal quality is restored, the
system automatically changes back to "DAB".
If the "DAB" station is not available, the
sound cuts out when the digital signal
quality becomes poor and the "AF"
alternative frequency is crossed out.
Media
Press "MEDIA" to display the media
menus:
Briefly press on the 9 or : buttons to play the previous/next track.
Press and hold the buttons to fast-forward or
rewind the selected track.
Browse –
Browse by: Currently playing, Artists,
Albums, Types, Songs, Playlists,
Audiobooks, Podcasts.
– Browse and select the songs contained in the
active device.
– The selection possibilities depend on the
device connected or the type of CD inserted.
Source
– CD, AUX, USB.
– Select the desired audio source from those
available or insert a device intended for this
purpose; the system starts to play the sources
automatically.
– Bluetooth
®.
– Save a Bluetooth® audio device.
Information
– Information .
– View the information about the track being
listened to.
Random
Press the button to play the songs on the CD,
USB, iPod or Bluetooth
® in random order.
Repeat
Press the button to activate this function.
Audio
– Equalizer.
– Adjust the bass, medium and treble.
– Balance/Fade.
– Adjust the balance of the front and rear
speakers, left and right.
– Press the button in the centre of the arrows to
balance the settings.
– Volume/Speed.
Page 164 of 196
 162
Touch screen audio and telematics system
– Select the desired parameter; the option is
highlighted.
– Loudness.
– Optimise the quality of low volume audio.
– Automatic radio.
– Set")
162
Touch screen audio and telematics system
– Select the desired parameter; the option is
highlighted.
– Loudness.
– Optimise the quality of low volume audio.
– Automatic radio.
– Set the radio when starting up or recover the
active state when the ignition key was last turned
to STOP.
– Radio switch-off delay .
– Set the parameter.
– AUX vol. setting .
– Set the parameters.
USB socket
Insert the USB memory stick or connect
the device to the USB socket in the
central storage space , provided for transferring
data to the system, using a suitable cable (not
supplied).
To protect the system, do not use a USB hub.
The system builds playlists (in temporary
memory); this operation can take from a
few seconds to several minutes at the first
connection.
Reduce the number of non-music files and the
number of folders to reduce the waiting time.
The playlists are updated every time the ignition
is switched off or a USB memory stick is
connected. The lists are memorised: if they are
not modified, the subsequent loading time will
be shorter.
USB socket
Located on the central console, this
socket is used only to power and
recharge the connected portable device.
Auxiliary socket (AUX)
Connect a portable device (MP3 player,
etc.) to the auxiliary jack socket using an
audio cable (not supplied).
First adjust the volume on your portable device
(to a high level). Then adjust the volume on your
audio system.
Controls are managed via the portable device.
The functions of the device connected to the
“AUX” socket are managed directly by this
device: it is therefore not possible to change the
track/folder/playlist or manipulate the playback
start/end/pause using the controls on the control
panel or the steering wheel.
Do not leave the cable of your portable device
connected to the “AUX” socket when not in use,
to avoid possible noise from the speakers.
Selecting the source
Press on "MEDIA".
Select the "Source" tab to show the
rolling display of audio sources.
Select the source.
Use the play settings on the screen.
Press the "Rand." button and/or the
"Repeat" button to activate them, press again to
deactivate them.
Information and advice
The audio system will only play audio files with
".wav", ".wma" and ".mp3" file extensions, at bit
rates between 32 Kbps and 320 Kbps.
For audio files with ".aac", ".m4a", ".m4b" and
".mp4" file extensions, the supported sampling
rates are 8 - 96 kHz.
".m3u" and ".wpl" types are also supported.
The system does not manage devices with a
capacity greater than 64 GB.
It is advisable to restrict file names to 20
characters, without using special characters (e.g.
" " ? . ; ù) so as to avoid any reading or display
problems.
The system supports USB mass storage devices, BlackBerry® devices or Apple®
players via the USB sockets. The adapter
cable is not supplied.
Devices are managed using the audio system
controls.
Other devices, not recognised by the system
during connection, must be connected to
the auxiliary socket using a Jack cable (not
supplied).
Only use USB memory sticks formatted to FAT
32 (File Allocation Table).
To protect the system, do not use a USB hub.
The system does not support the simultaneous connection of two identical
devices (two memory sticks or two
Apple
® players) but it is possible to connect
one memory stick and one Apple® player at
the same time.
It is recommended that you use genuine
Apple® USB cables to guarantee correct
operation.
Bluetooth® Streaming
Streaming allows music files on the telephone to
be played via the vehicle's speakers.
Active the Bluetooth
® function on the device.Press "MEDIA".
If there is a media source active, press
the "Source" button.
Select the "Bluetooth®" media source
then press the "Add device” button.
If no device has yet been paired with the system,
a special page is displayed on the screen.
Select "Yes" to start the pairing procedure, and
then search for the name of the system on the
device.
Select the name of the system on the device
and, when requested by the audio system,
enter the PIN code displayed on the screen of
Page 165 of 196
 163
Touch screen audio and telematics system
12To protect the system, do not use a USB hub.
The system does not support the simultaneous connection of two identical
devices (two memory sticks or two")
163
Touch screen audio and telematics system
12To protect the system, do not use a USB hub.
The system does not support the simultaneous connection of two identical
devices (two memory sticks or two
Apple
® players) but it is possible to connect
one memory stick and one Apple® player at
the same time.
It is recommended that you use genuine
Apple® USB cables to guarantee correct
operation.
Bluetooth® Streaming
Streaming allows music files on the telephone to
be played via the vehicle's speakers.
Active the Bluetooth
® function on the device.Press "MEDIA".
If there is a media source active, press
the "Source" button.
Select the "Bluetooth®" media source
then press the "Add device” button.
If no device has yet been paired with the system,
a special page is displayed on the screen.
Select "Yes" to start the pairing procedure, and
then search for the name of the system on the
device.
Select the name of the system on the device
and, when requested by the audio system,
enter the PIN code displayed on the screen of
the system or confirm the PIN displayed on the
device.
During pairing, a screen page is displayed
showing the progress of the operation.
If the pairing procedure fails, we recommend
deactivating and then reactivating the Bluetooth
®
function on your device.
Once the pairing procedure is complete, a
screen page appears:
– if you reply "Yes" to the question, the
Bluetooth
® audio device will be saved as
favourite (the device will have priority over other
devices paired later).
– if you reply "No", the priority will be determined
by the order of connection. The last device
connected has the highest priority.
Some Bluetooth® devices do not allow
you to scroll through the tracks and
information on the telephone using all of the
categories present in the system.
Connecting Apple® players
Connect the Apple® player to the USB
socket using a suitable cable (not
supplied).
Play starts automatically.
Control is via the audio system.
The classifications available are those of the portable device connected (artists/
albums/types/tracks/playlists/audio books/
podcasts).
The default classification is sorting by artist.
To change the classification used, return to
the first level of the menu and then select the
desired classification (playlists for example)
and confirm to browse the tree to the desired
track.
The audio system software version may not be compatible with the generation of
your Apple
® player.
Navigation
Press "N AV " and then at the centre or
bottom of the screen to display the
settings and navigation menus:
Go to...
Select "Go to" to set the destination in several
ways and not just by entering the address.
Display the map
Display the route map for an overview using the
map's navigator.
Plan a route
Use the navigation system to plan a route in
advance by selecting the starting point and the
destination.
Services
Use traffic information to minimise the impact of
traffic delays on your route.
Settings
Page 166 of 196
 164
Touch screen audio and telematics system
Change the appearance and behaviour of the
navigation system.
Most system settings can be accessed by
touching \"Settings\" in the main menu.
Help")
164
Touch screen audio and telematics system
Change the appearance and behaviour of the
navigation system.
Most system settings can be accessed by
touching "Settings" in the main menu.
Help
Access information about assistance services
and other specialised services.
Finish
Validate the settings.
Limitation
Speed limitation (if known).
To see the difference between the desired arrival
time and the estimated arrival time.
Switch between a 3D map and a 2D map.
Go to..., Display the map, Plan a route,
Services, Settings, Help, Finish.
When the navigation system starts for the first
time, the "Driving mode" as well as detailed
information on the current position is displayed.
Touch the centre of the screen to open the main
menu.
Details
The route summary provides an overview of the
route, the remaining distance to the destination
and an estimate of the remaining travel time.
With the RDS-TMC data, the route summary
also shows the traffic information concerning
delays along the route.
Modify route
The navigation system helps you to get to your
destination as quickly as possible by displaying a
faster alternative route when it is available.
FinishValidate the settings.
Instructions
Navigation instructions for the next part of the
trip and the distance to the next instruction. If the
second instruction is less than 150 metres from
the first one, it is immediately displayed instead
of the distance.
Touch this part of the status bar to repeat the last
voice instruction.
Updating maps
To get a map update, you can proceed as follows:
– Map refresh guarantee: if a new map
becomes available within 90 days of the first
use of the system, you can download it once
for free.
– Map update: you can buy a new version of
your system’s map.
To install a map update on your system, perform
the following four steps:
– Prepare a USB device.
– Install TomTom HOME and create a
MyTomTom account.
– Download the map.
– Install the new map.
Use a USB device instead of a mass
storage device (telephone or media
player).
To protect the system, do not use a USB hub.
Prepare a USB device
The preparation of the USB device
must be done with the engine running
and the vehicle stationary.
In order to update the map, you must have
a USB device that meets the following
requirements:
– The USB device must be empty.
– The USB device has 16 GB of available
space.
– Use only USB devices in FAT32 format (File
Allocation Table).
– Do not lock the USB device and check that
files can be saved on it.
To prepare the USB device, proceed as follows:
► Make sure that the map you want to update is
active on your navigation system.
If the navigation system has multiple maps and
you want to update a map that is not currently
active, start by activating it.
► Select “Change map” in the “Settings” menu
of the navigation application.
► Select “Navigation updates” from the
“Settings” menu.
► You must indicate whether you want to
prepare a USB device to download updates.
► Select "Ye s ".
Page 167 of 196
 165
Touch screen audio and telematics system
12► Insert the USB device into the USB socket
located in the central storage space dedicated
to data transfer.
The system starts preparing the USB devi")
165
Touch screen audio and telematics system
12► Insert the USB device into the USB socket
located in the central storage space dedicated
to data transfer.
The system starts preparing the USB device.
– If the system continues to ask you to
insert a USB device, make sure that your
USB device meets the above conditions, and
then try again.
– If you connect multiple USB devices, the
system prompts you to remove devices
so that only the device to be prepared is
connected.
– If there is not enough space on the USB
device, you are prompted to use another USB
device.
– If you connect a USB device that contains
files, the system warns you that files on the
USB device may be deleted.
When the USB device is ready, the message
below appears:
"Navigation updates"
The preparation of the USB device is
finished.
You can now safely remove the USB device.
► Remove the USB device; you can now
download the new map to your USB device.
Install TomTom HOME
To install "TomTom HOME" and create a
"MyTomTom" account, perform the following
steps:
► Download and install the TomTom HOME
app on your computer through this link:
tomtom.com/getstarted
► Select and download TomTom HOME, then
follow the on-screen instructions.
Use a secure Wi-Fi network rather than
3G/4G to download the application on
your computer.
► Connect the USB device to your computer;
"TomTom HOME" starts automatically.
► Select "Log in " in the upper right corner of
"TomTom HOME".
► Select "Register" and enter your information
to create a "MyTomTom" account.
To receive map updates, you must have a "MyTomTom" account.
Once the account is created, you must indicate
whether you want to link your system to your
account. The prepared USB device represents
your system.
► Select “Link device”, then “Close”.
You are now ready to download a map to your
USB device.
Download a map
Connect your USB device to your computer.
Select a map to download
– To check if you can download a map for free
with the map refresh guarantee, select " Tools"
and then "Map refresh guarantee " in "TomTom
HOME".
– To purchase a map update, select " Buy
maps" in "TomTom HOME".
– If you have already purchased an update,
select "Update my device" in "TomTom HOME".
Download a map
If a map update is available for your system, it is
listed as an available update.
If your system already has the most
recent map, no updates are available.
► Select the map to download, then select
"Update and install "; the map will be
downloaded and installed on your USB device.
► Select “Done” once the process is finished.
Install the map
The new map must be downloaded
with the engine running and the
vehicle stationary.
Once you have downloaded a map to your USB
device, you can install it on your system.
► Insert the USB device containing the new
map into the USB socket located in the central
storage space dedicated to data transfer to the
system.
The system detects the presence of a new
map on the USB device. It may also contain
an update of the navigation software if it is
necessary for the new map.
► You must indicate whether you want to
update the system.
► Select "Start".
Page 168 of 196
 166
Touch screen audio and telematics system
If the USB device contains new software,
the system starts by updating the navigation
software. Once the software is updated, the
system must restart.
�")
166
Touch screen audio and telematics system
If the USB device contains new software,
the system starts by updating the navigation
software. Once the software is updated, the
system must restart.
► Select "OK".
Before the system starts updating the map,
it warns you that a minimum of 30 minutes is
required to install the map.
Do not remove the USB device or turn off
the system until the update is complete.
You cannot use the system until the update is
complete. If the update is interrupted, restart
the system update.
Once the map is updated, the message below
appears:
"Updates completed"
You can now safely remove the USB device.
► Click on “Close”.
The new map is now available on the system.
Troubleshooting
During an update, the following issues may
occur:
– The map on the USB device is invalid. If this is
the case, download the map to the USB device
again using "TomTom HOME".
You may need to prepare the USB device again.
– The version of the map on the USB device is
the same as the version on the system, or older.
If this is the case, download the map to the USB
device again using "TomTom HOME".
You may need to prepare the USB device again.
Telephone
Press "PHONE" to display the telephone
menus:
– Mobile phone .
– Display and call the contacts in the mobile
phone directory.
– Press on the 5 or 6 buttons to scroll through
the contacts.
– Skip directly to the desired letter in the list.
Recent calls
– All calls, In, Out, Missed .
– Display and call recent call log contacts.
The system memory contains predefined text
messages, which can be sent to reply to a
received message or as a new message.
Upon receipt of a text message (depending on
the telephone version), the system also relays
the message in question to you.
Settings
– Connected tels. Add device, Connected
audio.
– Combine up to 10 telephones/audio devices to
make it easier and faster to access and connect.
Dial the telephone number using the on-screen
virtual keypad.
Transf.
– Transf..
– Transfer calls from the system to the mobile
phone and vice versa.
– Mute.
– Disable the system microphone's audio for
private conversations.
Pairing a Bluetooth®
telephone
For safety reasons and because it
requires sustained attention by the driver,
the pairing of a Bluetooth
® mobile phone with
the hands-free kit of your audio system must
be done with the vehicle stationary.
Activate the telephone's Bluetooth function
and ensure that it is "visible to all" (telephone
configuration).
Press on "PHONE".
If no mobile phone has yet been paired
with the system, a special page is displayed on
the screen.
Select "Yes" to start the pairing procedure, and
then search for the name of the system on the
mobile phone (on the other hand, by selecting
"No", the main screen page of the Telephone is
displayed).
Select the name of the system and, depending
on the telephone, using the telephone keypad,
enter the PIN displayed on the screen of the
 1
1 2
2 3
3 4
4 5
5 6
6 7
7 8
8 9
9 10
10 11
11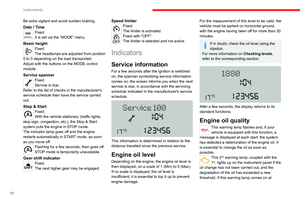 12
12 13
13 14
14 15
15 16
16 17
17 18
18 19
19 20
20 21
21 22
22 23
23 24
24 25
25 26
26 27
27 28
28 29
29 30
30 31
31 32
32 33
33 34
34 35
35 36
36 37
37 38
38 39
39 40
40 41
41 42
42 43
43 44
44 45
45 46
46 47
47 48
48 49
49 50
50 51
51 52
52 53
53 54
54 55
55 56
56 57
57 58
58 59
59 60
60 61
61 62
62 63
63 64
64 65
65 66
66 67
67 68
68 69
69 70
70 71
71 72
72 73
73 74
74 75
75 76
76 77
77 78
78 79
79 80
80 81
81 82
82 83
83 84
84 85
85 86
86 87
87 88
88 89
89 90
90 91
91 92
92 93
93 94
94 95
95 96
96 97
97 98
98 99
99 100
100 101
101 102
102 103
103 104
104 105
105 106
106 107
107 108
108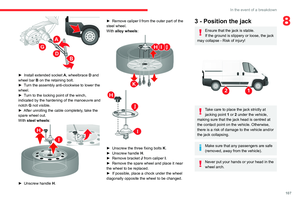 109
109 110
110 111
111 112
112 113
113 114
114 115
115 116
116 117
117 118
118 119
119 120
120 121
121 122
122 123
123 124
124 125
125 126
126 127
127 128
128 129
129 130
130 131
131 132
132 133
133 134
134 135
135 136
136 137
137 138
138 139
139 140
140 141
141 142
142 143
143 144
144 145
145 146
146 147
147 148
148 149
149 150
150 151
151 152
152 153
153 154
154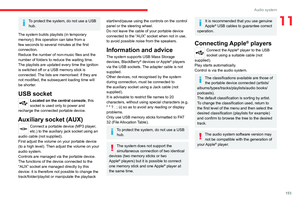 155
155 156
156 157
157 158
158 159
159 160
160 161
161 162
162 163
163 164
164 165
165 166
166 167
167 168
168 169
169 170
170 171
171 172
172 173
173 174
174 175
175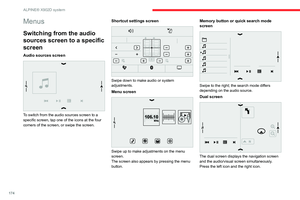 176
176 177
177 178
178 179
179 180
180 181
181 182
182 183
183 184
184 185
185 186
186 187
187 188
188 189
189 190
190 191
191 192
192 193
193 194
194 195
195