Page 81 of 156
 79
REFUELLING THE CAR
The car features the “Fast Fuel” system,
which prevents refuelling with incorrect
fuels (e.g. diesel for a petrol engine).
Stop the engine before refuelling.
Only refuel with")
79
REFUELLING THE CAR
The car features the “Fast Fuel” system,
which prevents refuelling with incorrect
fuels (e.g. diesel for a petrol engine).
Stop the engine before refuelling.
Only refuel with unleaded petrol with
octane rating (RON) not less than 95, in
compliance with the European
specification EN228. In particular, the
engine of Alfa 4C has been designed to
comply with all emission limits while
simultaneously guaranteeing minimal
consumption and maximum performance,
using premium-quality unleaded petrol
with octane rating (RON) 98 or higher.
In order to prevent damage to the
catalytic converter never introduce even
the smallest amount of leaded petrol,
even in the event of an emergency.
IMPORTANT An inefficient catalytic
converter leads to harmful exhaust
emissions, thus contributing to air
pollution.
FILLING THE TANK
To ensure that you fill the tank
completely, top up twice after the first
click of the fuel supply gun. Further top-
ups could cause faults in the fuel feeding
system.
REFUELLING PROCEDURE
The car features a “Fast Fuel” device,
integrated with the opening for the fuel
tank: it opens and recloses automatically
when the fuel supply gun is
inserted/removed.
The “Fast Fuel” device is provided with an
inhibitor which prevents refuelling with
incorrect fuel.
The refuelling procedure described below
is illustrated on the label
fig. 51 located inside the fuel flap.
The label also indicates the fuel type
(UNLEADED FUEL=petrol).
Procedure
❒ open flap 1 fig. 52, pulling it outwards;
❒ introduce the dispenser in the filler
and refuel;
❒ after refuelling, before removing the
dispenser, wait for at least 10 seconds in
order for the fuel to flow inside the tank;
❒ then remove the dispenser from the
filler and close flap 1.
The flap is provided with a dust boot 2
which prevents the introduction of dirt
and dust into the end of the filling when
the flap is closed.
82) 83) 84)
51A0L0045
Page 82 of 156
 STARTING AND DRIVING
80
Emergency refuelling
If there is no fuel in the vehicle or the
supply circuit is completely empty,
proceed as follows to reintroduce fuel to
the tank:
❒ take the dedicated f")
STARTING AND DRIVING
80
Emergency refuelling
If there is no fuel in the vehicle or the
supply circuit is completely empty,
proceed as follows to reintroduce fuel to
the tank:
❒ take the dedicated funnel fig. 53 from
the tool kit located in the boot;
❒ open the flap 1 fig. 52 by pulling it
outwards;
❒ insert funnel C in the filler as
illustrated in fig. 53 and refuel;
❒ after refuelling, remove the funnel and
close the flap;
❒ finally, put the funnel back in its case
and put this back in the boot.
52A0L0046
IMPORTANT If the filler compartment is
washed with a high pressure jet, keep it at
a distance of at least 20 cm.
Fuel - Vehicle compatibility
identification Graphic symbol for
informing consumers in accordance
with EN16942
The symbols shown below facilitated
recognising the correct fuel type to be
used on your car.
Before refuelling, check the symbols
inside the fuel filler flap (where provided)
and compare them with the symbol on
the fuel pump (where provided).
53A0L0151
82)Do not apply any object/cap to the
end of the filler which is not provided for
the vehicle. The use of non-compliant
objects/caps could cause a pressure
increase inside the tank, resulting in
dangerous situations.
83) Do not bring naked flames or lit
cigarettes near to the fuel tank opening:
risk of fire. Keep your face away from the
fuel filler to prevent breathing in harmful
vapours.
84)Do not use a mobile phone near the
refuelling pump: risk of fire.
IMPORTANT
E5: Unleaded petrol containing up to
2.7% (m/m) oxygen and with maximum
5.0% (V/V) ethanol compliant with
EN228
E10: Unleaded petrol containing up to
3.7% (m/m) oxygen and with maximum
10.0% (V/V) ethanol compliant with
EN228
Page 83 of 156
 IN AN EMERGENCY
HAZARD LIGHTS ...................................................................................................... 82
WHEN NEEDING TO CHANGE A BULB .................................")
IN AN EMERGENCY
HAZARD LIGHTS ...................................................................................................... 82
WHEN NEEDING TO CHANGE A BULB ........................................................ 82
REPLACING AN EXTERNAL BULB .................................................................. 84
REPLACING FUSES ................................................................................................ 87
IF A TYRE IS PUNCTURED................................................................................... 90
“FIX&GO AUTOMATIC” KIT ................................................................................. 94
EMERGENCY STARTING ..................................................................................... 97
FUEL CUT-OFF SYSTEM ...................................................................................... 98
TOWING THE VEHICLE . ........................................................................................ 99
A punctured tyre or a burnt-out bulb?
At times, a problem may interfere with our journey.
The pages on emergencies can help you to deal with critical
situations independently and with calm.
In an emergency we recommend you call the freephone number
found in the Warranty Booklet. It is also possible
to call the national or international
universal freephone number to search
for the nearest dedicated Alfa Romeo Dealership.
Page 84 of 156
 IN AN EMERGENCY
82
HAZARD WARNING LIGHTS
OPERATION
Press switch 1 fig. 54 to turn the lights
on/off.
Warning lights Ÿand Δon the panel are
lit up when the hazard warning lights are
on.
85)
54A0L002")
IN AN EMERGENCY
82
HAZARD WARNING LIGHTS
OPERATION
Press switch 1 fig. 54 to turn the lights
on/off.
Warning lights Ÿand Δon the panel are
lit up when the hazard warning lights are
on.
85)
54A0L0023
REPLACING A BULB
86) 87) 88)
9)
GENERAL INSTRUCTIONS
❒ Check that the corresponding
contacts are not oxidised and that the
corresponding fuse is intact before
changing the bulb. For the location of
fuses, refer to the paragraph “If a fuse
blows” in this chapter.
❒ replace blown bulbs with others of the
same type and power;
❒ after replacing a headlight bulb,
always check its alignment.
IMPORTANT When the weather is cold or
damp or after heavy rain or after
washing, the surface of headlights or rear
lights may steam up and/or form drops of
condensation on the inside. This is a
natural phenomenon due to the
difference in temperature and humidity
between the inside and the outside of the
glass which does not indicate a fault and
does not compromise the normal
operation of lighting devices. The mist
disappears quickly turning the lights on,
starting from the centre of the diffuser,
extending progressively towards the
edges.
85)The use of hazard warning lights is
governed by the Highway Code of the
country you are driving in: comply with
legal requirements.
IMPORTANT
86)Modifications or repairs to the
electric system that are not carried out
properly or do not take the system
technical specifications into account can
cause malfunctions leading to the risk of
fire.
87) Halogen bulbs contain pressurised
gas, in the case of breakage they may
burst causing glass fragments to be
projected outwards.
88) Due to the high supply voltage, gas
discharge bulbs (Bi-Xenon) should only be
replaced by specialised personnel: danger
of death! Contact a dedicated Alfa Romeo
Dealership.
IMPORTANT
9)Halogen bulbs must be handled by
holding the metallic part only. Touching
the transparent part of the bulb with your
fingers may reduce the intensity of the
emitted light and even reduce the lifespan
of the bulb. In the event of accidental
contact, wipe the bulb with a cloth
moistened with alcohol and let the
bulb dry.
WARNING
Page 85 of 156
83
BulbsPowerType
Front side lights/Daytime running lights (DRL) LED –
Rear position LED –
Dipped beam headlights / Main beam headlights (versions with Bi-Halogen headlights)
H7 55W
(where provided)
Dipped beam headlights / Main beam headlights (versions with Bi-Xenon headlights)
D1S 35W
(where provided)
Dipped beam headlights / Main beam headlights (versions with LED headlights)
LED –
(where provided)
Front direction indicators PY21W 21W
Rear direction indicators PY21W 21W
Side direction indicators WY5W 5W
Brake LED –
3rd brake LED –
Number plate W5W 5W
Rear fog light W16W 16W
Reversing light W16W 16W
Ceiling light C10W 10W
Boot ceiling light W5W 5W
Page 86 of 156
 REPLACING AN
EXTERIOR BULB
FRONT LIGHT CLUSTERS
These contain the bulbs for the side
lights/daytime running lights (DRL),
dipped beam headlights, main beam
headlights and direction indicators.
The b")
REPLACING AN
EXTERIOR BULB
FRONT LIGHT CLUSTERS
These contain the bulbs for the side
lights/daytime running lights (DRL),
dipped beam headlights, main beam
headlights and direction indicators.
The bulbs are arranged as follows
in fig. 55:
1 Side lights/daytime running lights
2 Dipped/main beam headlights
3 Direction indicators.
55A0L0091
To replace the bulbs for the dipped and
main beam headlights and for the
direction indicators open the
corresponding protective flaps on the
inner wheel arch
fig. 56 that can be located by steering
the wheel completely.
1 direction indicator bulb protective
flap
2 dipped/main beam headlight bulb
protective flap.
SIDE LIGHTS/DAYTIME
RUNNING LIGHTS (DRL)
These are LEDs. For the replacement,
contact the dedicated Alfa Romeo
Dealership.
56A0L0092
DIPPED/MAIN BEAM HEADLIGHTS
To replace the bulb, proceed as follows:
❒ steer the wheel completely;
❒ open the protective flap
2 fig. 56 by rotating the fixing screw;
❒ take out the electric connector
1 fig. 57 and then rotate the bulb holder 2
clockwise and remove it;
❒ remove the bulb and replace it;
❒ refit the new bulb, making sure that it
is locked correctly, and reconnect the
connector 1;
❒ close the protective flap 2 fig. 56.
57A0L0093
IN AN EMERGENCY
84
Page 87 of 156
 85
DIRECTION INDICATORS
Front
To replace the bulb, proceed as follows:
❒ steer the wheel completely;
❒ open the protective flap 1 fig. 56 by
rotating the fixing screw;
❒ take out the electri")
85
DIRECTION INDICATORS
Front
To replace the bulb, proceed as follows:
❒ steer the wheel completely;
❒ open the protective flap 1 fig. 56 by
rotating the fixing screw;
❒ take out the electric connector
1 fig. 58 and then rotate the bulb holder 2
clockwise and remove it;
❒ remove the bulb and replace it;
❒ refit the new bulb, making sure that it
is locked correctly, and reconnect the
connector 1;
❒ close the protective flap 1 fig. 56.
58A0L0094
Side
To replace the bulb, proceed as follows:
❒ operate the lens 1 fig. 59 in the point
shown to press in the internal clip,
❒ then pull the unit outwards; turn the
bulb holder 2 anticlockwise, remove the
bulb and replace it;
❒ refit the bulb holder 2 in the lens and
turn it clockwise;
❒ refit the cluster making sure that the
internal clip clicks into position.
59A0L0095
REAR LIGHT CLUSTERS
Contain the bulbs for the direction
indicators, side lights and brake lights.
DIRECTION INDICATORS
To change the bulb, proceed as follows:
❒ remove the protective cap 1 fig. 60
(one on each side) located on the side
boot lining;
60A0L0096
Page 88 of 156
r insert a hand in the hole and remove
the second protective rubber plug
2 fig. 61;
r rotate the bulb holder and extract it;
proceed by replacing the bulb by
pressing it and rotating it anticlockwise;
❒ restore the protective caps which
were previously removed.
61A0L0134
SIDE LIGHTS/BRAKE LIGHTS
These are LEDs. For the replacement,
contact the dedicated Alfa Romeo
Dealership.
REAR FOG LIGHT/REVERSING LIGHT
89)
To replace the front fog light bulbs
1 fig. 62 or reversing light 2 proceed as
follows:
❒ rotate the bulb holder 3 fig. 63
anticlockwise, extract the bulb and
replace it.
THIRD BRAKE LIGHTS
These are LEDs. For the replacement,
contact the dedicated Alfa Romeo
Dealership.
63A0L0126
IN AN EMERGENCY
86
 1
1 2
2 3
3 4
4 5
5 6
6 7
7 8
8 9
9 10
10 11
11 12
12 13
13 14
14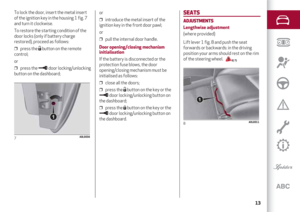 15
15 16
16 17
17 18
18 19
19 20
20 21
21 22
22 23
23 24
24 25
25 26
26 27
27 28
28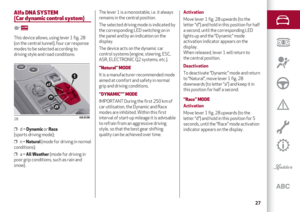 29
29 30
30 31
31 32
32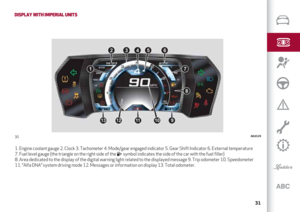 33
33 34
34 35
35 36
36 37
37 38
38 39
39 40
40 41
41 42
42 43
43 44
44 45
45 46
46 47
47 48
48 49
49 50
50 51
51 52
52 53
53 54
54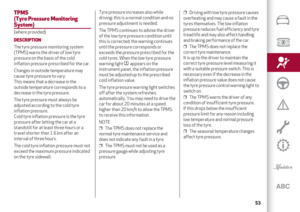 55
55 56
56 57
57 58
58 59
59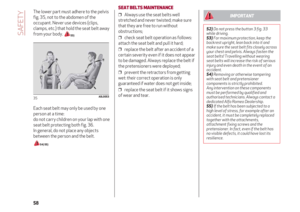 60
60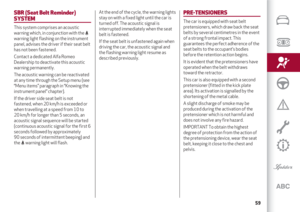 61
61 62
62 63
63 64
64 65
65 66
66 67
67 68
68 69
69 70
70 71
71 72
72 73
73 74
74 75
75 76
76 77
77 78
78 79
79 80
80 81
81 82
82 83
83 84
84 85
85 86
86 87
87 88
88 89
89 90
90 91
91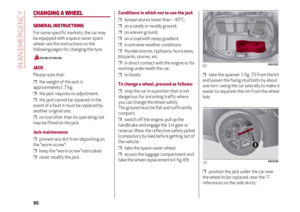 92
92 93
93 94
94 95
95 96
96 97
97 98
98 99
99 100
100 101
101 102
102 103
103 104
104 105
105 106
106 107
107 108
108 109
109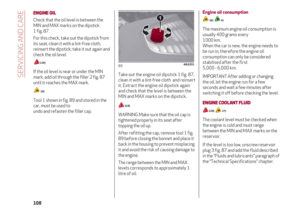 110
110 111
111 112
112 113
113 114
114 115
115 116
116 117
117 118
118 119
119 120
120 121
121 122
122 123
123 124
124 125
125 126
126 127
127 128
128 129
129 130
130 131
131 132
132 133
133 134
134 135
135 136
136 137
137 138
138 139
139 140
140 141
141 142
142 143
143 144
144 145
145 146
146 147
147 148
148 149
149 150
150 151
151 152
152 153
153 154
154 155
155 83
BulbsPowerType
Front side lights/Daytime running lights (DRL)")
 r insert a hand in the hole and remove
the second protective rubber plug
2 fig. 61;
r rotate the bulb holder and extract it;
proceed by replacing the bulb by
pressing it and rotating it a")