2019 MERCEDES-BENZ GLS SUV buttons
[x] Cancel search: buttonsPage 6 of 729
Infrared-reflective windscreen function .......
174Climate control
......................................... 175
Overview of climate contro l systems ..........1 75
Operating the climate control sy stem ......... 17 7 Driving and pa
rking ................................. 18 9
Driving ........................................................ 189
DY NA MIC SELECT switch ........................... 203
Au tomatic transmission .............................. 205
Tr ans fer case .............................................. 210
Fu nction of the 4MATIC ...............................2 11
Re fuelling .................................................... 212
Pa rking ........................................................ 218
Driving and driving sa fety sy stems .............2 28
Tr ailer hit ch................................................. 311
Bicycle rack ................................................ 316
Ve hicle towing instructions ........................ .318 Instrument Display and on-board
compu ter................................................... 319
Instrument display overview ...................... .319 Overview of
the buttons on thesteering
wheel ..........................................................3 20
Operating the on-board computer .............. 320
Ad justing the design of the instrument
display ........................................................ 322
Showing display conte nt onthe instru‐
ment clus ter ............................................... 322
Overview of displa yson the multifunc‐
tion display .................................................3 24
Ad justing the instrument lighting ................3 24
Menus and submenus ................................ 325
Head-up Display ......................................... 332 LINGU
ATRO NIC ........................................ 333
No tes on operating saf ety .......................... 333
Ope ration ................................................... 333
Using LINGU ATRO NIC ef fectively ............... 336
Essential voice commands ........................ .337 MBUX multimedia sy
stem ...................... 352
Overview and operation .............................. 352
Sy stem settings .......................................... 388
Fit & Healt hy............................................... 399
Na vigation .................................................. 405 Te
lephone .................................................. .450
Online and Internet functions ..................... 487
Media ........................................................ .496
Ra dio .......................................................... 504
TV ............................................................... 507
Sound ......................................................... 51 5
MBUX rear tablet ........................................ 519
Re ar Seat En tertainment Sy stem ................5 21 Maintenance and care
.............................531
ASS YST PLUS service inter val display ........ .531
Engine compartment .................................. 532
Cleaning and care ....................................... 538 Breakdown assistance
............................549
Emergency ................................................. .549
Flat tyre ...................................................... 550
Battery (vehicle) ......................................... 557
To w- starting or towing away ....................... 562
Electrical fuses ........................................... 567 Contents
3
Page 22 of 729
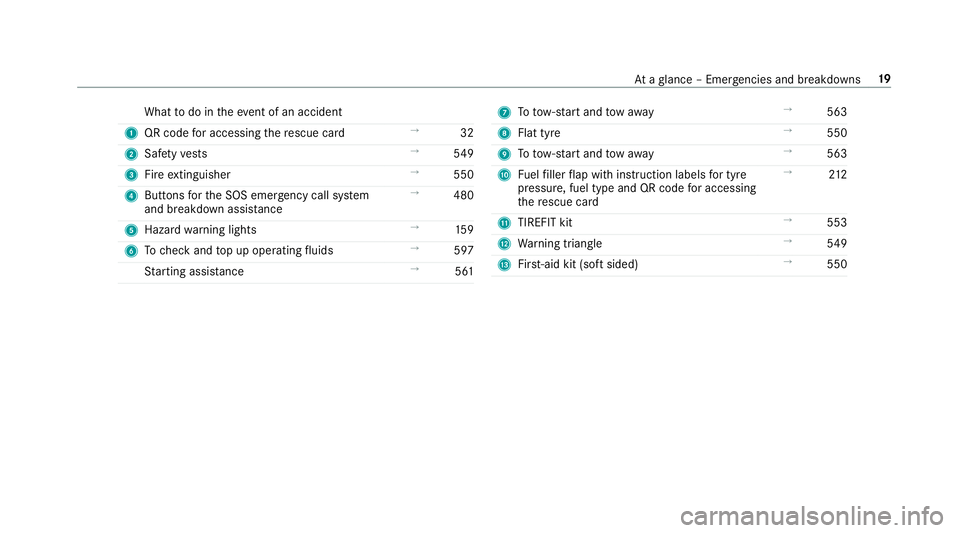
What
todo in theeve nt of an accident
1 QR code for accessing there scue card →
32
2 Safetyve sts →
549
3 Fire extinguisher →
550
4 Buttons forth e SOS emer gency call sy stem
and breakdown assis tance →
480
5 Haza rdwa rning lights →
15 9
6 Tocheck and top up operating fluids →
597
St arting assis tance →
561 7
Totow- start and tow aw ay →
563
8 Flat tyre →
550
9 Totow- start and tow aw ay →
563
A Fuelfiller flap with instruction labels for tyre
pressu re, fuel type and QR code for accessing
th ere scue card →
212
B TIREFIT kit →
553
C Warning triangle →
549
D First-aid kit (so ftsided) →
550 At
aglance – Emer gencies and breakdowns 19
Page 84 of 729
R
With indicator lamp 1off: via the switch
on the cor responding rear door or driv‐
er's door. Note
s on pets in theve hicle &
WARNING Risk of accident and inju ry
due toanimals left unsecured or unat‐
te nded in theve hicle
If yo u lea veanimals in theve hicle unatten‐
ded or unsecured, they could possib lypress
down buttons or switches.
Thereby an animal may: R activate vehicle equipment and become
trapped, forex ample
R swit chsystems on or off and endanger
ot her road users
Uns ecured animals may be throw n around in
th eve hicle in theeve nt of an accident or
sudden steering and braking manoeuvres
and injure vehicle occupants in the process. #
Never lea veanimals in theve hicle unat‐
te nded. #
Alw ays cor rectly secu reanimals while
driving, e.g. using a suitable animal car‐
ri er. Occupant saf
ety81
Page 87 of 729
#
Toswitch between settings: pressthe
Ü andß buttons simul taneously for
appr oximately six seconds until the battery
ch eck lamp flashes twice.
If th e unlocking function forth e driver's door
and fuel filler flap has been selec ted:
R pressing theÜ button a second time cen‐
trally unloc kstheve hicle
R Vehicles with KEYLESS-GO: ifyo uto uch
th e inner sur face of the door handle on the
driver's door, only the driver's door and fuel
fi ller flap are unlo cked. Deactivating
theke y functions If
yo u do not use theve hicle or a keyfo r an
ex tended pe riod of time, you can reduce the
energy consum ption of there spective key.Todo
so, deactivate theke y functions. #
Todeactivate: presstheß button on the
ke y twice in quick succession.
The battery check lamp of theke yflashes
twice brief lyand lights up once. #
Toactivate: press any button on thekey. %
When theve hicle is star ted with theke y in
th estow age compartment of the cent recon‐
sole, theke y functions are automatical ly
activated (/ page192). Re
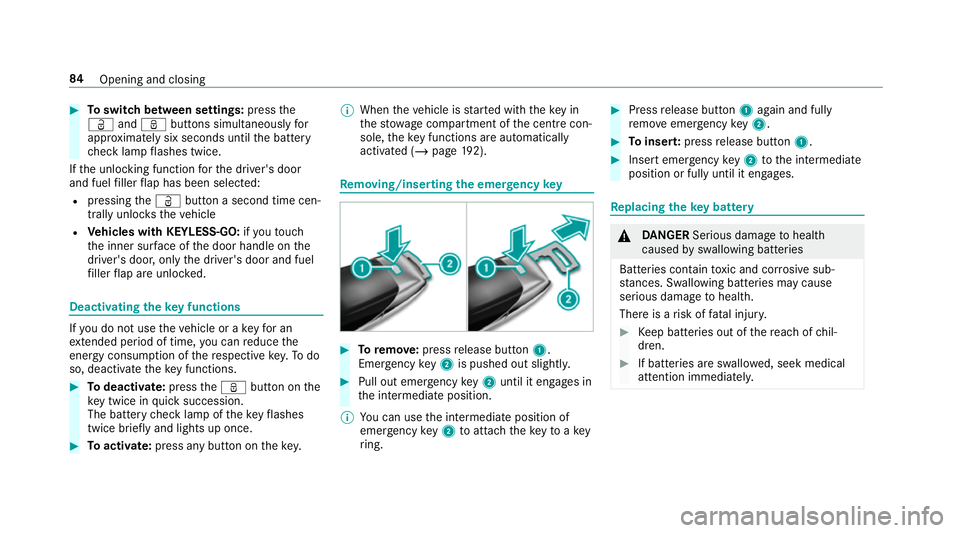
moving/inserting the eme rgency key #
Toremo ve:press release button 1.
Emer gency key2 is pushed out slight ly. #
Pull out emer gency key2 until it en gage s in
th e intermediate position.
% You can use the intermediate position of
emer gency key2 toattach theke yto akey
ri ng. #
Press release button 1again and fully
re mo veemer gency key2. #
Toinser t:press release button 1. #
Insert emer gency key2 tothe intermediate
position or fully until it engages. Re
placing the key battery &
DANG ER Serious damage tohealth
caused byswallowing batteries
Batteries contain toxic and cor rosive sub‐
st ances. Swallowing bat teries may cause
serious damage tohealth.
There is a risk of fata l injur y. #
Keep batteries out of there ach of chil‐
dren. #
If batteries are swallo wed, seek medical
attention immediately. 84
Opening and closing
Page 100 of 729
Ro
ller sunblinds Extending or
retracting the roller sunblinds
on there ar side windo ws &
WARNING Risk of entrapment when
ex tending or retracting thero ller sun‐
blind
Body parts could become ent rapped in the
sweep of thero ller sunblind when it is being
ex tended or retracted. #
Makesure that no body parts are in the
sweep of thero ller sunblind when it is
being extended or retracted. #
If someone becomes trapped, brie fly
press the button again.
The opening or closing process is
brief lystopped. The roller sun blind
th en returns toits starting position. *
NO
TEDama gecaused byobjects #
Make sure that thero ller sunblind can
mo vefreely. The
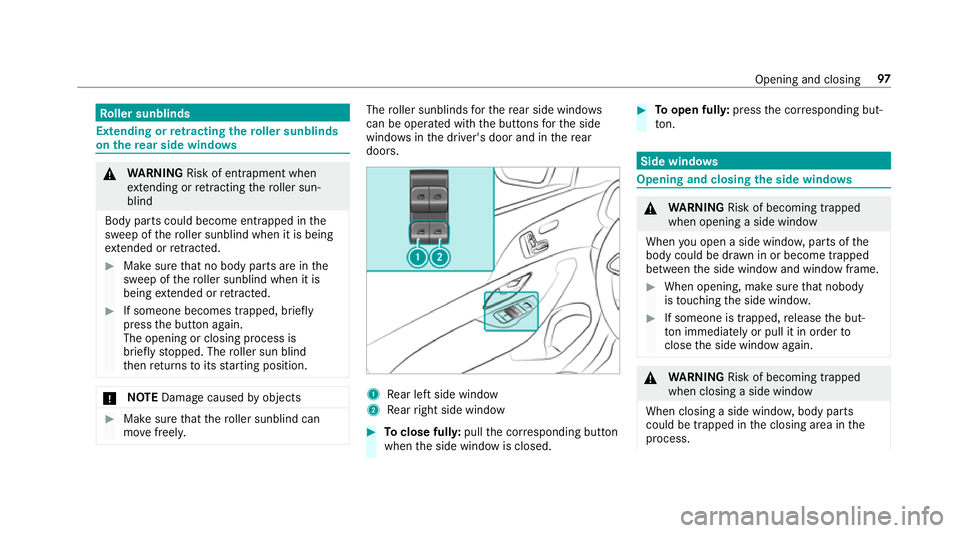
roller sunblinds forth ere ar side wind ows
can be ope rated with the buttons forth e side
windo wsinthe driver's door and in there ar
doors. 1
Rear left side wind ow
2 Rear right side window #
Toclose full y:pull the cor responding button
when the side window is closed. #
Toopen ful ly:press the cor responding but‐
to n. Side windo
ws Opening and closing
the side windo ws &
WARNING Risk of becoming trapped
when opening a side window
When you open a side wind ow, parts of the
body could be dr awn in or become trapped
between the side window and window frame. #
When opening, make sure that nobody
is touching the side windo w. #
If someone is trapped, release the but‐
to n immedia tely or pull it in order to
close the side window again. &
WARNING Risk of becoming trapped
when closing a side window
When closing a side windo w,body parts
could be trapped in the closing area in the
process. Opening and closing
97
Page 101 of 729
#
When closing, make sure that no body
parts are in the closing area. #
If someone is trapped, release the but‐
to n immedia tely or press the button in
order toreopen the side windo w. &
WARNING Risk of becoming trapped
when children opera tethe side windo ws
Children could become trapped if they oper‐
ate the side windo ws, particularly when unat‐
te nded. #
Activate theove rride feature forthe
re ar side wind ows. #
When leaving theve hicle, alw aysta ke
th eke y with you and lock theve hicle. #
Never lea vechildren unat tended in the
ve hicle. Re
quirements:
R The po wer supply or the ignition is switched
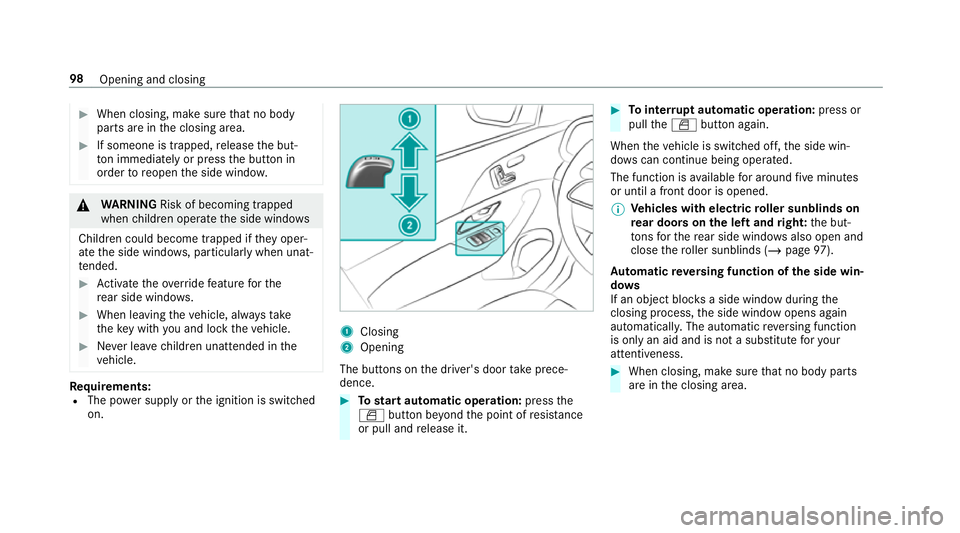
on. 1
Closing
2 Opening
The buttons on the driver's door take prece‐
dence. #
Tostart automatic operation: pressthe
W button be yond the point of resis tance
or pull and release it. #
Tointer rupt automatic operation: press or
pull theW button again.
When theve hicle is switched off, the side win‐
do ws can continue being ope rated.
The function is available for around five minutes
or until a front door is opened.
% Ve
hicles with electric roller sunblinds on
re ar doors on the left and right: the but‐
to ns forth ere ar side wind owsalso open and
close thero ller sunblinds (/ page97).
Au tomatic reve rsing function of the side win‐
do ws
If an object bloc ksa side wind owduring the
closing process, the side window opens again
automaticall y.The automatic reve rsing function
is only an aid and is not a substitute foryo ur
attentiveness. #
When closing, make sure that no body parts
are in the closing area. 98
Opening and closing
Page 116 of 729
Seats
Ad
justing the front seat &
WARNING Risk of becoming trapped if
th e seats are adjus tedby children
Children could become trapped if they adjust
th e seats, particularly when unattended. #
When leaving theve hicle, alw aysta ke
th eke y with you and lock theve hicle.
This also applies tothe digital vehicle
ke y if the "Digital Vehicle Key" function
is activated via Mercedes me connect. #
Never lea vechildren unat tended in the
ve hicle. The seats can be adjus
ted when the ignition is
switched off. &
WARNING Risk of becoming trapped
when adjusting the seats
When you adjust a seat, you or other vehicle
occupants could become trapped, e.g. on the
seat guide rail. #
When adjusting a seat, make sure that
no one has any body parts in the sweep
of the seat. Obser
vethe saf ety no tes on "Airbags" and "Chil‐
dren in theve hicle". &
WARNING Risk of inju rythro ugh adjust‐
ing vehicle settings while theve hicle is in
motion
Yo u could lose cont rol of theve hicle in the
fo llowing situations:
R ifyo u adjust the driver's seat, the head
re stra ints, thesteering wheel or the mir‐
ro r while theve hicle is in motion
R ifyo ufast enyour seat belt while theve hi‐
cle is in motion #
Before starting the engine: adjust the
driver's seat, the head restra ints, the
st eering wheel or the mir ror and fasten
yo ur seat belt. &
WARNING Risk of becoming trapped if
th e seat height is adjus ted carelessly
If yo u adjust the seat height carelessly, you
or other vehicle occupants could be trapped
and thereby injured.
Children in particular could acciden tally
press the electrical seat adjustment buttons
and become trapped. #
While moving the seats, make sure that
hands or other body parts do not get
under the le ver assembly of the seat
adjustment sy stem. &
WARNING Risk of inju rydue tohead
re stra ints which are not fitted or are
adjus ted inco rrectly
If head restra ints are not fitted or are adjus‐
te d incor rectl y,they cannot pr ovide pr otec‐
tion as intended.
There is an increased risk of injury in the
head and neck area, e.g. in theeve nt of an
accident or when braking. Seats and
stowing 11 3
Page 118 of 729
Ad
justing the front passen ger seat electri‐
cally from the driver's seat Re
quirement:
R The po wer supp lyhas been switched on
(/ page 189). Yo
u can call up thefo llowing functions forthe
front passenger sea t:
R seat adjustment R
seat heating
R seat ventilation
R memory function #
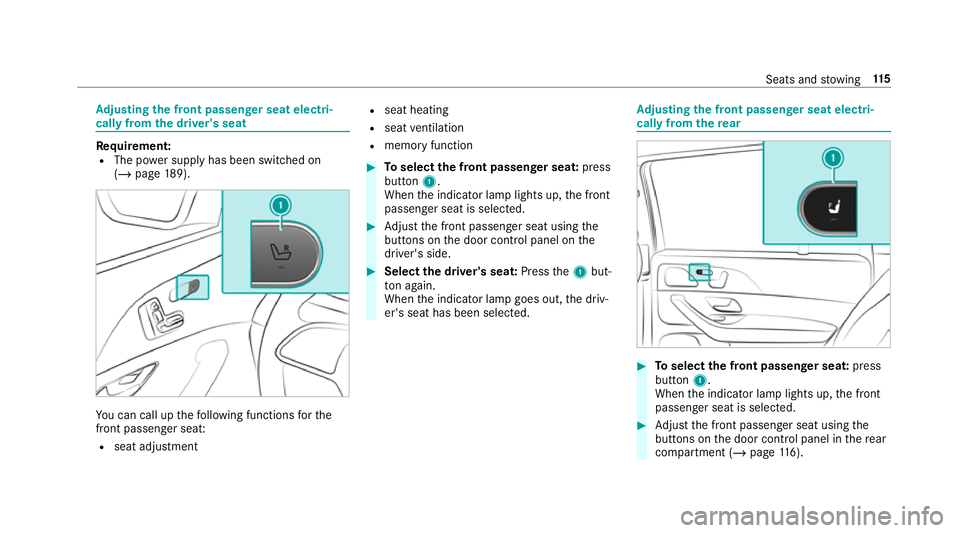
Toselect the front passenger seat: press
button 1.
When the indicator lamp lights up, the front
passenger seat is selected. #
Adjust the front passenger seat using the
buttons on the door control panel on the
driver's side. #
Select the driver's seat: Pressthe1 but‐
to n again.
When the indicator lamp goes out, the driv‐
er's seat has been selected. Ad
justing the front passen ger seat electri‐
cally from the rear #
Toselect the front passenger seat: press
button 1.
When the indicator lamp lights up, the front
passenger seat is selected. #
Adjust the front passenger seat using the
buttons on the door control panel in there ar
compartment (/ page116). Seats and
stowing 11 5