2019 MERCEDES-BENZ GLS SUV glove box
[x] Cancel search: glove boxPage 137 of 729
#
Alw ays be particular lycareful when in
th e vicinity of theta ilpipe and tailpipe
trims and supervise children very
closely when in this area. #
Before any con tact, allow the car parts
to cool down. The driving
characteristics of your vehicle are
dependent on the distribution of the load within
th eve hicle. You should bear thefo llowing in
mind when loading theve hicle:
R neverex ceed the permissible gross mass or
th e permissible axle loads forth eve hicle
(including occupants).
Information can be found on theve hicle iden‐
tification plate (/ page 595).
R the load must not pr otru de abo vethe upper
edge of the seat backrests.
R always use the partition net when transport‐
ing objects in the load compartment.
R always place the load behind unoccupied
seats if possible. R
secure the load using the tie-down eyes and
distribute the load evenl y. St
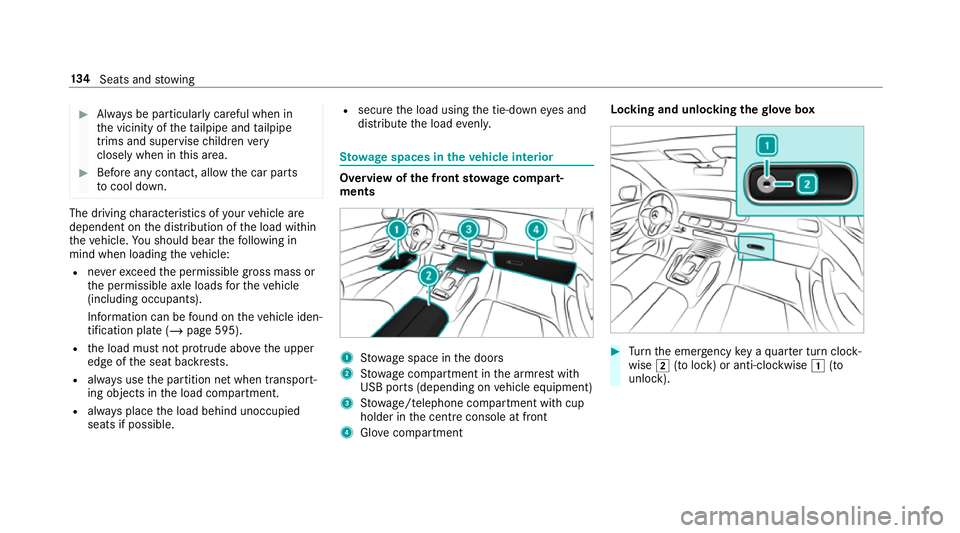
ow age spaces in theve hicle interior Overview of
the front stowage compa rt‐
ments 1
Stow age space in the doors
2 Stow age compartment in the armrest with
USB ports (depending on vehicle equipment)
3 Stow age/telephone compartment with cup
holder in the cent reconsole at front
4 Glove compa rtment Locking and unlo
cking thegl ove box #
Turn the emer gency key a quarter turn clock‐
wise 2(to lock) or anti-clockwise 1(to
unlock). 134
Seats and stowing
Page 183 of 729
When
there sidual heat of the engine is activated
in there ar compartment, you can heat or venti‐
la te there ar compartment for appro ximately
30 minutes. #
Press the 5 button (/ page176). Ac
tivating/deactivating ionisation The ionisation impr
oves thequ ality of theve hi‐
cle's interior air. The ionisation of the interior air
is odourless. #
Call up the climate control menu
(/ page 177). #
Select Air quality. #
Select IONISATION .
Depending on the pr evious status, the func‐
tion is activated or deactivated. Fr
ag rance sy stem Setting
the frag rance sy stem
Re quirements:
R Automatic clima tecontrol is acti vated. R
The glove box is closed.
The fragrance sy stem distributes a pleasant fra‐
grance thro ughout theve hicle interior from a fla‐
con located in theglov e box. #
Call up the climate control menu
(/ page 177). #
Select Air quality. #
Select AIR FRESHENER .
The fragrance sy stem begins at the highest
intensit y. #
Keep pressing until the desired intensity is
re ached.
% The intensity le vels can be selec ted in the
fo llowing order: Strong - Medium - Weak -
Off Inserting or
removing the flacon ofthe fra‐
gr ance sy stem &
WARNING Risk of inju ryfrom liquid per‐
fume
If ch ildren open theflacon, they could drink
th e liquid perfume or it could come into con‐
ta ct wi th theireyes. #
Do not lea vechildren unat tended in the
ve hicle. #
Consult a doctor immediately if liquid
perfume has been drunk. #
If liquid perfume comes into contact
with your eyes or skin, rinse your eyes
with clean water. #
If sym ptoms continue, consult a doctor. 18 0
Climate cont rol
Page 191 of 729
Air
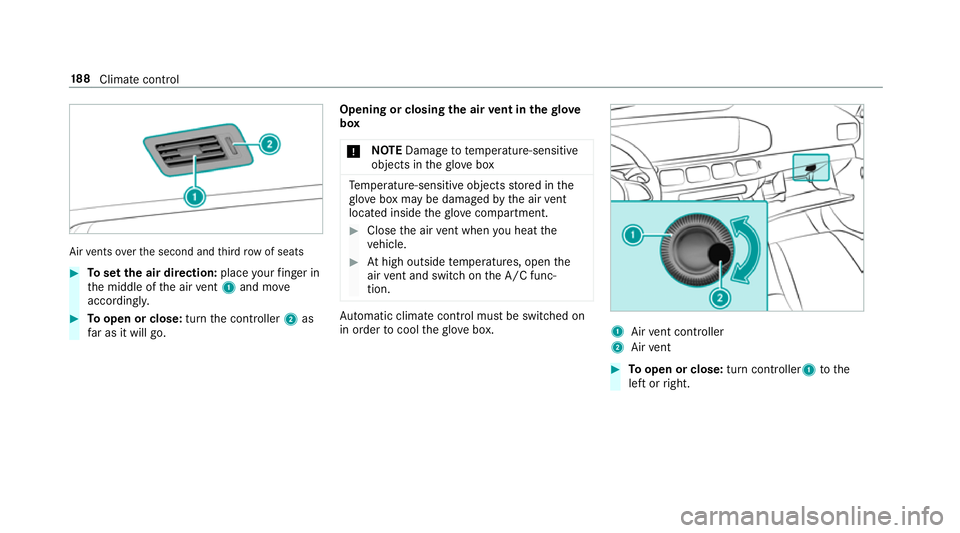
vents overth e second and third row of seats #
Toset the air direction: placeyour finger in
th e middle of the air vent 1 and mo ve
accordin gly. #
Toopen or close: turnthe controller 2as
fa r as it will go. Opening or closing
the air vent in thegl ove
box
* NO
TEDama geto te mperature-sensitive
objects in theglove box Te
mp erature-sensitive objects stored in the
gl ove box may be damaged bythe air vent
located inside theglove compa rtment. #
Close the air vent when you heat the
ve hicle. #
Athigh outside temp eratures, open the
air vent and switch on the A/C func‐
tion. Au
tomatic clima tecontrol must be switched on
in order tocool theglove box. 1
Airvent controller
2 Airvent #
Toopen or close: turn controller1 tothe
left or right. 18 8
Climate cont rol
Page 461 of 729
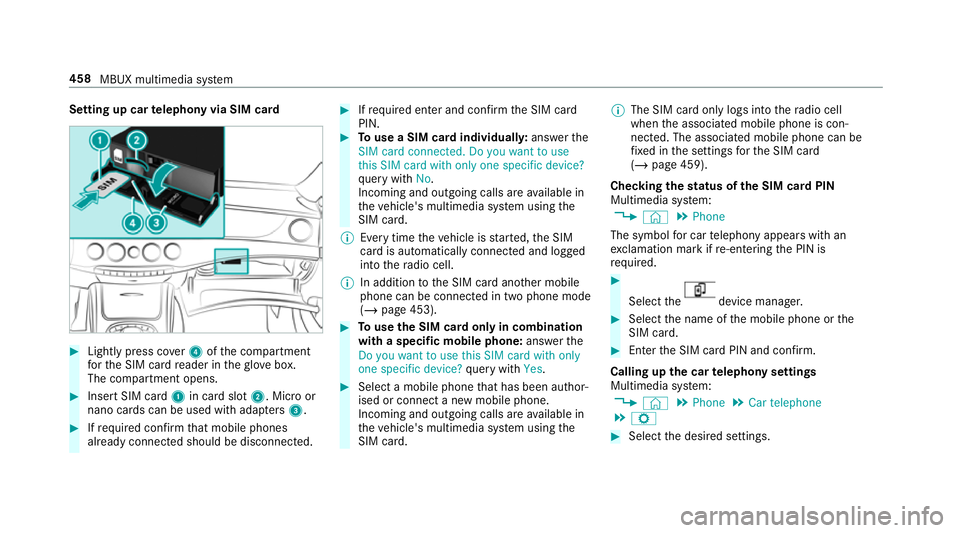
Setting up car
telephony via SIM card #
Light lypress co ver4 ofthe compartment
fo rth e SIM card reader in theglove box.
The compartment opens. #
Insert SIM card 1in card slot 2. Micro or
nano cards can be used with adap ters 3 . #
Ifre qu ired con firm that mobile phones
already connec ted should be disconnec ted. #
Ifre qu ired enter and con firm the SIM card
PIN. #
Touse a SIM card individuall y:ans werthe
SIM card connected. Do you want to use
this SIM card with only one specific device?
qu ery with No.
Incoming and outgoing calls are available in
th eve hicle's multimedia sy stem using the
SIM card.
% Every time theve hicle is star ted, the SIM
card is automatically connected and logged
into thera dio cell.
% In addition tothe SIM card ano ther mobile
phone can be connected in two phone mode
(/ page 453). #
Touse the SIM card only in combination
with a specific mobile phone: answerthe
Do you want to use this SIM card with only
one specific device? query with Yes. #
Select a mobile phone that has been author‐
ised or connect a new mobile phone.
Incoming and outgoing calls are available in
th eve hicle's multimedia sy stem using the
SIM card. %
The SIM card only logs into thera dio cell
when the associated mobile phone is con‐
nected. The associated mobile phone can be
fi xe d in the settings forth e SIM card
(/ page 459).
Checking thest atus of the SIM card PIN
Multimedia sy stem:
4 © 5
Phone
The symbol for car telephony appears with an
ex clamation mark if re-entering the PIN is
requ ired. #
Select the device manager.
#
Select the name of the mobile phone or the
SIM card. #
Enter the SIM card PIN and confi rm.
Calling up the car telephony settings
Multimedia sy stem:
4 © 5
Phone 5
Car telephone
5 Z #
Select the desired settings. 458
MBUX multimedia sy stem
Page 518 of 729
#
Make sure that the CI+ module is not
subject tohigh temp eratures forex ten‐
ded pe riods of time.
If th e CI+ module is damaged, no
encryp tedch annels can be recei ved. A CI+ module (Common Inter
face Module),
whi chis not included in the scope of deliver y,is
used todecrypt HD programmes according to
th e CI+ standard.
In some countries, an additional smart card is
re qu ired, which is inse rted into the CI+ module
(see the manufacturer's operating manual).
The CI+ module is connected in the CI+ box in
th eglove compa rtment. #
Toinsert the Smart Card in the CI+ mod‐
ule: ifre qu ired (countr y-dependent), insert
th e Smart Card into the CI+ module slot.
Encryp ted HD programmes can be recei ved
according tothe CI+ standard.
% If a CI+ module is connec ted, Card status
reminder is switched on (/ page515)and
th e ignition is switched off, theCI+ card inserted
message appears in the media dis‐
pla y.
Calling up the CI+ module menu
Multimedia sy stem:
4 © 5
Media 5
TV 5
Z
5 General 5
CI+ module #
Tocall up the CI+ menu: selectOpen menu.
The subsc ript ion number can be shown in
th e menu, forex ample. The con tent of the
menu depends on the manufacturer of the CI
+ module.
% You need the subscription menu toextend
th e subscription, forex ample.
Fu rther information can be found in the man‐
ufacturer's operating instructions. #
Toshow theve rsion number: selectDis-
play version . #
Torestart the CI+ module: if playback is
ex periencing inter fere nce you can try and
re solve the problem using Restart CI+. #
Toswitch there minder of a connec ted CI
+ module on or off: selectZ. #
Select General settings. #
Switch theCard status reminder option on or
off. #
Toreset theTV tuner: selectReset TV. Sound
To
ne settings Information about
the sound sy stem
The sound sy stem has a total output of 125 W
and is equipped with se ven speakers. It is availa‐
ble for all functions in thera dio and media
modes.
Calling up the sound menu
Multimedia sy stem:
4 © 5
Media 5
Z 5
Sound
The following functions are available:
R Equaliser
R Balance and Fader
R Volume #
Select a function. MBUX multimedia sy
stem 515
Page 718 of 729
St
arting the engine
see Vehicle
St arting-o ffaid
see Hill Start Assist
St ation
Deleting ............................................... 506
Direct frequency entry ........................ 506
Fr equency fix ....................................... 507
Moving ................................................ 506
Sea rching ............................................ 506
Setting .................................................5 06
St oring ................................................ 506
St ation list
Calling up ............................................ 506
St ation presets
Modifying ............................................ 506
St ation tracking
Setting ................................................. 507
St ationary heater/ventilation
Displ ays (remo tecontrol) .................... 184
Problems (remo tecontrol) ................... 186
Re placing the battery (remo tecon‐
trol) ..................................................... 185
Setting (multimedia sy stem) ................1 83Setting (remo
tecontrol) ...................... 183
Switching on/off (control panel) ......... 182
ST EER CONT ROL
Fu nction/no tes ................................... 235
Ste ering wheel ........................................ 320
Ad justing (electrically) ......................... 12 9
Ad justing (manually) ............................ 12 8
Buttons ................................................ 320
St eering wheel heater .......................... 12 9
Ste ering wheel gearshift paddles .......... 207
Ste ering wheel heater
Swit ching on/off ................................ .129
St ow age areas
see Loading
see Stow age compartment
St ow age comp artment........................... 13 4
Armrest ............................................... 13 4
Centre armrest, rear ............................ 13 5
Centre console .................................... 13 4
Door ................................................... .134
Glove box .............................................1 34
Re ar seat backrest .............................. 13 5
Spectacles compa rtment .................... 13 5St
ow age comp artments
see Loading
see Stow age compartment
St ow age space underneath the load
compa rtment floor .................................. 14 6
Suggestions ............................................. 371
Calling up ............................................ .371
Con figuring .......................................... 371
Del eting .............................................. .372
Overview ..............................................3 71
Re naming ............................................ 372
Sulphur content ...................................... 599
Sun visor Operating ............................................. 173
Sur round lighting
Switching on/off ................................. 16 3
Sur round View
see 360° Camera
Suspension Free driving mode (ACTIVE BODY
CO NTROL) ........................................... 274
Individual wheel control (ACTIVE
BO DY CONTROL) .................................2 75 Index
715