2019 MERCEDES-BENZ GLS SUV run flat
[x] Cancel search: run flatPage 554 of 729
Ty
res without run-flat characteristics: #
Do not drive on with a flat tyre. #
Chan getheflat tyre immediately with
an emer gency spa rewheel or spare
wheel. Alternativel y,consult a qualified
specialist workshop.
Ty res with run-flat characteristics: #
Obse rveth e information and warning
no tes on MOExtended tyres (run-flat
tyres). In
theeve nt of a flat tyre, thefo llowing options
are available depending on your vehicle's equip‐
ment:
R Vehicles with MOExtended tyres: it is pos‐
sible tocontinue the journey for a short
period of time. Make sure you obse rvethe
no tes on MOExtended tyres (run-flat tyres)
(/ page 551).
R Vehicles with a TIREFIT kit: you can repair
th e tyre so that it is possible tocontinue the
jou rney for a short period of time. Todo this,
use the TIREFIT kit (/ page 553). R
Vehicles with Mercedes me connect: you
can make a call for breakdown assi stance via
th eov erhead control panel in the case of a
breakdown (/ page477).
R Allvehicles: change the wheel
(/ page 584).
% The emer gency spa rewheel is only available
in cer tain countries. Note
s on MOExtended tyres (run-flat tyres) &
WARNING Risk of accident when driving
in eme rgency mode
When driving in emer gency mode, the han‐
dling characteristics are impaired. e.g. when
cornering, when accelerating stronglyand
when braking. #
Do not exceed the permissible maxi‐
mum speed. #
Avoid any abrupt steering and driving
maneuvers as well as driving over
obs tacles (curbs, pot holes, off-road). This applies, in pa
rticular, toa loaded
ve hicle. #
Stop driving in the emer gency mode if
yo u notice:
R banging noise
R vehicle vibration
R smoke which smells like rubber
R continuous ESP ®
inter vention
R crac ksin tire side walls #
After driving in emergency mode ha ve
th erims checkedby aqu alified special‐
ist workshop with rega rd totheir fur ther
use. #
The defective tire must be replaced in
eve rycase. Wi
th MOExtended tyres (run-flat tyres), you can
continue todrive your vehicle even if there is a
tot al loss of pressure in one or more tyres. How‐
eve r,th e tyre af fected must not show any clearly
visible damage. Breakdown assis
tance 551
Page 556 of 729
The tyre inflation compressor is mainte‐
nance-free. If
there is a malfunction, please
conta ct aqualified specialist workshop. Using
the TIREFIT kit Re
quirements:
R Tyre sealant bottle
R TIREFIT sticker
R Tyre inflation compressor
R Gloves (depending on theve hicle equipment)
TIREFIT kit storage location: (/ page 552)
Yo u can use TIREFIT tyre sealant toseal per fora‐
tion dama geof up to4 mm, particular lythose in
th e tyre conta ct surface. You can use TIREFIT in
outside temp eratures down to-20 °C. &
WARNING Risk of accident when using
tyre sealant
In thefo llowing situations in particular, the
tyre sealant is unable toprov ide suf ficient breakdown assis
tance, as it is unable toseal
th e tyre properly:
R there are cuts or punctures in the tyre
lar gerth an those pr eviously mentioned.
R the wheel rim is dama ged.
R you ha vedriven at very low tyre pres‐
sures or on a flat tyre. #
Do not drive on. #
Consult a qualified specialist workshop. &
WARNING Risk of inju ryand poisoning
from tyre sealant
Ty re sealant is hazardous tohealth and cau‐
ses ir rita tion. Do not allow it tocome into
contact wi thyour skin, eyes or clo thing, and
do not swallow it. Do not inhale any vapours.
Ke ep the tyre sealant away from children.
Obser vethefo llowing if you come into con‐
ta ct wi th the tyre sealant: #
Rinse off the tyre sealant from your skin
using water immediatel y. #
If tyre sealant gets into your eyes, thor‐
oughly rinse them using clean water
immediatel y. #
If tyre sealant has been swallowe d,
th oroughly rinse out your mouth imme‐
diately and drink plenty of water.Do not
induce vomiting and seek medical
attention immediately. #
Change out of clo thing which has come
into con tact wi thtyre sealant immedi‐
ately. #
If an alle rgic reaction occurs, seek med‐
ical attention immediatel y. *
NO
TEOverheating due tothe tyre infla‐
tion compressor running too long #
Do not runth e tyre inflation compres‐
sor for longer than ten minu tes without
inter ruption. Comply with
the manufacturer's saf ety no tes on
th est icke r on the tyre inflation compressor. Breakdown assis
tance 553
Page 558 of 729
Do not swit
choff the ty reinflation compres‐
sor during this phase! #
Let the tyre inflation compressor runfo r a
maximum of ten minu tes.
The tyre should then ha veattained a tyre
pressure of at least 200 kPa (2.0 bar/
29 psi).
If tyre sealant leaks out, make sure you clean the
af fected area as quickly as possible. It is prefera‐
ble touse clear water.
If yo uge t tyre sealant on your clo thing, ha veit
cleaned as soon as possible with per chloroe thy‐
lene.
If, af terte n minutes, a tyre pressure of
200 kPa (2.0 bar/29 psi) has not been ach‐
ie ve d: #
Switch off the tyre inflation compressor. #
Unscr ew thefilling hose from theva lve of the
defective tyre.
Please no tethat tyre sealant may leak out when
unscr ewing thefilling hose. #
Drive forw ards or reve rseve ry slowly for
appr oximately 10m. #
Pump up the tyre again.
Af ter a maximum of ten minu testh e tyre
pressure must be at least 200 kPa (2.0 bar/
29 psi). &
WARNING Risk of accident due tothe
specified tyre pressure not being ach‐
ie ved
If th e specified tyre pressure is not achie ved
af te rth e specified time, the tyre is too badly
damaged. The tyre sealant cannot repair the
tyre in this ins tance.
Dama ged tyres and a tyre pressure that is
to o low can significantly impair braking and
handling characteristics. #
Do not drive on. #
Consult a qualified specialist workshop. If, af
terte n minutes, a tyre pressure of
200 kPa (2.0 bar/29 psi) has been achie ved: #
Switch off the tyre inflation compressor. #
Unscr ew thefilling hose from theva lve of the
defective tyre. &
WARNING Risk of accident from driving
wi th sealed tyres
A tyre temp orarily sealed with tyre sealant
impairs driving characteristics and is not
suitable for higher speeds. #
Adapt your driving style according lyand
drive carefull y. #
Do not exceed the maximum speed
limit with a tyre that has been repaired
using tyre sealant. #
Obser vethe maximum permissible speed for
a tyre sealed with tyre sealant 80 km/h. #
Affix th e upper section of the TIREFIT sticker
to the instrument clus ter in a location where
it will be easi lyseen bythe driver.
* NO
TEStaining from leaking tyre sealant Af
ter use, excess tyre sealant may leak out
from thefilling hose. Breakdown assis
tance 555
Page 582 of 729
or tyres,
the tyre pressure loss warning sy stem
has tobe restar ted (/ page579).
The tyre pressu reloss warning sy stem does not
re place the need toregularly check the tyre
pressures.
Sy stem limitations
The sy stem may be impaired or may not function
particular lyin thefo llowing situations:
R incor rectly set tyre pressure
R sudden pressure loss caused, forex ample,
by afo re ign object penetrating the tyre
R steady pressure loss in se veral tyres
The sy stem has a restricted or del ayed function
particularly in thefo llowing situations:
R poor ground cond itions, e.g. snow or gr avel
R driving with snow chains
R when adopting a very sporty driving style
with high cornering speeds or sudden accel‐
eration
R driving with a very heavy or lar getrailer
R driving wi tha high load Be sure
toalso obse rveth efo llowing fur ther
re lated subjects:
R Notes on tyre pressure (/ page571)
R Displ aymessa ges about the tyres
(/ page
64 9)
Re starting the ty repressure loss warning
sy stem
Re quirements:
R The recommended tyre pressure is cor rectly
set forth ere spective operating status on
each of thefo ur wheels (/ page571).
Re start the tyre pressure loss warning sy stem in
th efo llowing situations:
R The tyre pressure has changed.
R The wheels or tyres ha vebeen changed or
newly fitted. On-boa
rdcompu ter:
4 Service 5
Tyres #
Swipe down wards on Touch Control on the
left-hand side of thesteering wheel.
The Run Flat Indicator activeRestart message
is shown in the multifunction displa y.
Re start the tyre pressure loss warning sy stem in
th efo llowing situations:
R The tyre pressure has changed.
R The wheels or tyres ha vebeen changed or
newly fitted. #
Tobegin restart, press Touch Control on the
left-hand side of thesteering wheel.
The Tyre pressure now OK? message is
shown in the multifunction displa y. #
Select Yes. #
Toconfirm restart, press Touch Control on
th e left-hand side of thesteering wheel.
The Run Flat Indicator restarted message is
shown in the multifunction displa y. Wheels and tyres
57 9
Page 583 of 729
Af
teryo u ha vedriven for a few minutes, the
tyre pressu reloss warning sy stem monitors
th e set tyre pressures of all the tyres.
Be sure toalso obse rveth efo llowing fur ther
re lated subjects:
R Notes on tyre pressure (/ page571) Wheel
change Note
s on selecting, fitting and replacing
tyres Yo
u can ask for information rega rding permit ted
wheel/tyre combinations at a Mercedes-Benz
Service Cent re. &
WARNING Risk of accident due toincor‐
re ct dimensions of wheels and tyres
If wheels and tyres of the wrong size are
used, the wheel brakes or wheel suspension
components may become damaged. #
Alw aysre place wheels and tyres with
th ose that fulfil the specifications of the
original part. When
replacing wheels, make sure tofit the
cor rect:
R Designation
R Type
When replacing tyres, make sure tofit the
cor rect:
R Designation
R Manufactu rer
R Type &
WARNING Risk of inju rythro ugh exceed‐
ing the specified tyre load-bearing capa‐
city or the permissible speed rating
Exceeding the specified tyre load-bearing
capacity or the permissible speed rating may
lead totyre dama geand tothe tyres bur st‐
ing. #
Therefore, only use tyre types and sizes
appr ovedfo ryo ur vehicle model. #
Obser vethe tyre load-bearing capacity
ra ting and speed rating requ iredfor
yo ur vehicle. *
NO
TEVehicle and tyre damage thro ugh
tyre types and sizes that ha venot been
appr oved Fo
r saf etyre asons, on lyuse tyres, wheels
and accessories which ha vebeen specially
appr ovedby Mercedes-Benz foryo ur vehicle.
These tyres are specially adap tedto the con‐
trol sy stems, such as ABS, ESP ®
and
4MATIC, and mar ked as follo ws:
R MO = Mercedes-Benz Original
R MOE = Mercedes-Benz Original Extended
(run-flat tyres only for cer tain wheels)
R MO1 = Mercedes-Benz Original (only cer‐
tain AMG tyres)
Cer tain characteristics, such as handling,
ve hicle noise emissions, fuel consum ption,
et c. may otherwise be adversely af fected.
Fu rthermore, other tyre sizes could result in 580
Wheels and tyres
Page 585 of 729
#
Switch on the ESP ®
and adapt your
driving style accordingly. #
Use M+S tyres at outside temp eratures
of less than 50 °F. Obse
rveth efo llowing when selecting, fitting and
re placing tyres:
R Countr y-specific requirements for tyre
appro valth at define a specific tyre type for
yo ur vehicle.
Fu rthermore, the use of cer tain tyre types in
cer tain regions and areas of operation can
be highly beneficial.
R Only use tyres and wheels of the same type
(summer tyres, winter tyres, MOEx tended
tyres) and the same make.
R Only fit wheels of the same size on one axle
(left and right).
It is only permissible tofit a di fferent wheel
size in theeve nt of a flat tyre in order to
drive tothe specialist workshop.
R Only fit tyres of the cor rect size onto the
wheels. R
Do not make any modifications tothe brake
sy stem, the wheels or the tyres.
The use of shims or brake dust shields is not
permitted and may in validate theve hicle's
ge neral operating pe rmit.
R Vehicles with a tyre pressure monitoring
sy stem: allfitted wheels mu stbe equipped
with functioning sensors forth e tyre pres‐
sure monitoring sy stem.
R Attemp eratures below 7 °C, use winter tyres
or all-season tyres mar ked M+S for all
wheels.
Wi nter tyres bearing thei snowflake
symbol in addition tothe M+S marking pro‐
vide the best possible grip in wintry road
conditions.
R For M+S tyres, only use tyres with the same
tread.
R Obser vethe maximum permissible speed for
th e M+S tyres fitted.
If th is is below theve hicle's maximum speed,
th is must be indicated byan appropriate
label in the driver's field of vision. R
Run in new tyres at moderate speeds forthe
fi rs t10 0 km.
R Replace the tyres af ter six years at the latest,
re ga rdless of wear.
R When replacing with tyres that do not
fe ature run-flat characteristics: vehicles
with MOExtended tyres are not equipped
with a TIREFIT kit at thefa ctor y.Equip the
ve hicle with a TIREFIT kit af terre placing with
tyres that do not feature run-flat characteris‐
tics, e.g. winter tyres.
% You can permanently limit the maximum
ve hicle speed for driving with winter tyres
(/ page 245).
Fo r more information on wheels and tyres, con‐
ta ct a qualified specialist workshop.
Be sure toalso obse rveth efo llowing fur ther
re lated subjects:
R Notes on tyre pressure (/ page571)
R Tyre pressure table (/ page572)
R Notes on the emer gency spa rewheel
(/ page 588) 582
Wheels and tyres
Page 594 of 729
#
Obser vethe information on mounting tyres
(/ page 580). #
Open the load compartment. #
Detach the securing stra ps. #
Unhook there taining spring hooks of the
securing stra ps from the brac kets. #
Remo vethe emer gency spa rewheel bag
to ge ther with the collapsible spare wheel. #
Open the emer gency spa rewheel bag and
re mo vethe collapsible spare wheel. Inflating
the collapsible spa rewheel Re
quirements:
R Mount the collapsible spare wheel as descri‐
bed. (/ page 587)
R Remo vethe tyre inflation compressor from
th estow agewell under the boot floor.
(/ page 552) *
NO
TEDama getothe collapsible spare
wheel when lo wering theve hicle Lo
we ring theve hicle without pr eviously
inflating the collapsible spare wheel can
damage its rim. #
Inflate the collapsible spare wheel using
th e tyre inflation compressor before
lo we ring theve hicle. *
NO
TEOverheating due tothe tyre infla‐
tion compressor running too long #
Do not runth e tyre inflation compres‐
sor for longer than ten minu tes without
inter ruption. #
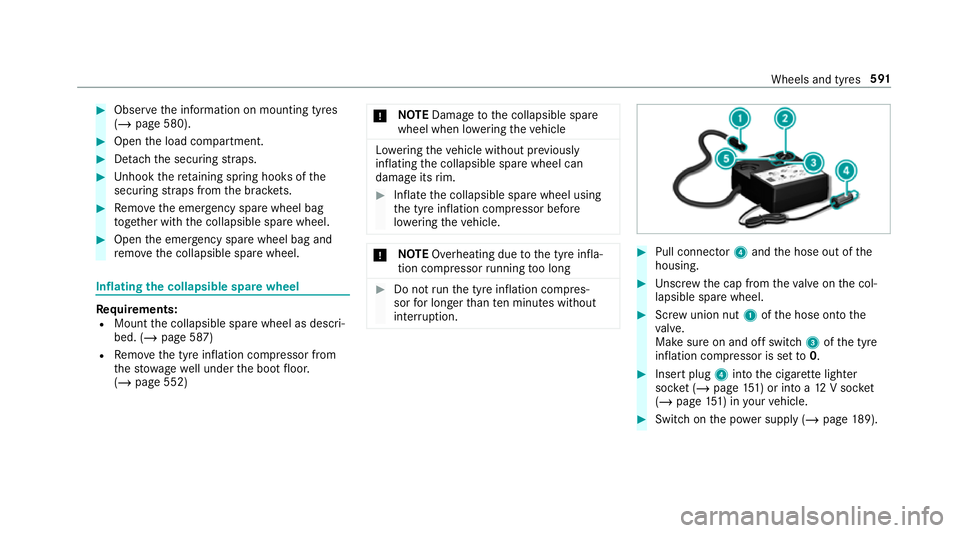
Pull connec tor4 and the hose out of the
housing. #
Unscr ew the cap from theva lve on the col‐
lapsible spare wheel. #
Screw union nut 1ofthe hose onto the
va lve.
Make sure on and off switch 3ofthe tyre
inflation compressor is set to0. #
Insert plug 4into the cigar ette lighter
soc ket (/ page 151) or in toa12 V soc ket
( / page 151) in your vehicle. #
Switch on the po wer supp ly (/ page 189). Wheels and
tyres591
Page 654 of 729
Display messages
Possible causes/consequences and M
MSolutions
h Tyre press. monitor inoper-
ative *T
he tyre pressure monitoring sy stem is faulty. &
WARNING Thereis a risk of an accident if the tyre pressure monitoring sy stem is malfunctioning
If th e tyre pressure monitoring sy stem is malfunctioning, it is not able toissue a warning if there is pressure
loss in one or more of the tyres.
Ty res with insuf ficient tyre pressure ma y,forex ample, af fect theve hicle's handling characteristics, steering and
braking. ‑ #
Have the tyre pressure monitoring sy stem checked at a qualified specialist workshop. #
Consult a qualified specialist workshop.
Check tyre pressures then
restart Run Flat Indicator *T
he tyre pressure loss warning sy stem generated a displ aymessa geand has not been restar ted since. #
When the tyre pressure is cor rect, restart the tyre pressure loss warning sy stem (/ page578).
h
Tyre press. mo nitor inoper-
ative No wheel sensors *T
he wheels fitted do not ha vesuitable tyre pressure sensors. The tyre pressure monitoring sy stem is deactivated. #
Fit wheels with suitable tyre pressure sensors. Display messages and
warning/indicator lamps 651