2019 MERCEDES-BENZ GLS SUV roof rack
[x] Cancel search: roof rackPage 25 of 729
Pr
otection of the environment
+ ENVIRONMENTAL
NOTEEnvironmental
dama gedue tooperating conditions and
personal driving style The pollutant emission of
your vehicle is
directly related tothewa yyo u operate your
ve hicle.
Help toprotect the environment byoperating
yo ur vehicle in an environmentally responsi‐
ble manner. Please obser vethefo llowing rec‐
ommendations on ope rating conditions and
pe rsonal driving style.
Operating conditions: #
Make sure that the tyre pressure is cor‐
re ct. #
Do not car ryany unnecessary weight
(e.g. roof luggage rack s once you no
lon ger need them). #
Adhere tothe service inter vals.
A regularly serviced vehicle will contri b‐
ute toenvironmen tal pr otection. #
Alw ays ha vemaintenance workcar ried
out at a qualified specialist workshop.
Pe rsonal driving style: #
Do not depress the accelera tor pedal
when starting the engine. #
Do not warm upthe engine while the
ve hicle is stationar y. #
Drive carefully and maintain a suitable
di st ance from theve hicle in front. #
Avoid frequent, sudden acceleration
and braking. #
Change gear in good time and use each
ge ar on lyup toÔ of its maximum
engine speed. #
Switch off the engine in stationary traf‐
fi c, e.g. byusing the ECO start/ stop
function. #
Drive fuel-ef ficiently. Obser vethe ECO
display for a fuel-ef ficient driving style. +
ENVIRONMEN
TALNO TEEnvironmental
pollution caused byirre sponsible dis‐
posal of the high-voltage battery A high-voltage battery conta
ins materials
which are harmful tothe environment. #
Dispose of faulty high-voltage bat teries
at a qualified specialist workshop. Ta
ke -back of end-of-life vehicles
EU countries onl y:
Mercedes-Benz will take back your end-of-life
ve hicle for environment-friendly disposal in
accordance with the European Union(EU) End-
of-Life Vehicles Directive.
A network of vehicle take -ba ckpoints and dis‐
mantlers has been es tablished foryo uto return
yo ur vehicle. You can lea veit at any of these
points free of charge . This makes an impor tant
contribution toclosing there cycling circle and
conse rving resources.
Fo r fur ther information about there cycling and
disposal of end-of-li fevehicles, and theta ke- 22
General no tes
Page 107 of 729
#
Press the button in any direction during
th e automatic opening/closing process.
The opening/closing process is stop‐
ped. &
WARNING Risk of entrapment if the slid‐
ing sunroof is operated bychildren
Children operating the sliding sunroof could
get caught in the moving parts, particularly if
unattended. #
Never lea vechildren unat tended in the
ve hicle. #
When leaving theve hicle, alw aysta ke
th eke y with you and lock theve hicle. &
WARNING Risk of entrapment while
opening and closing thero ller sunblinds
When opening or closing, make sure that no
body parts become trapped between the
ro ller sunblind and frame or sliding sunroof. #
When opening or closing, make sure
that no body parts are in the sweep of
th ero ller sunblind. #
Release the switch immediately if
somebody becomes trapped.
or #
Press the switch in any direction during
th e automatic opening/closing process.
The opening/closing process is stop‐
ped. *
NO
TEMalfunction caused bysnow and
ice Snow and ice may lead
toa malfunction of
th e sliding sunroof. #
Only open the sliding sunroof if it is free
of snow and ice. *
NO
TEDama gecaused byprotru ding
objects Objects
that pr otru de from the sliding sun‐
ro of may damage the sealing strips. #
Do not allow anything toprotru de from
th e sliding sunroof. *
NO
TEImpo rtant points toremember
when a roof rack isfitted When a
roof rack isfitted, raising or opening
th e sliding sunroof may be limited. #
Check whe ther the sliding sunroof can
be raised or opened when a roof rack is
fi tted. #
If in doubt, do not raise or open the
sliding sunroof. 104
Opening and closing
Page 108 of 729
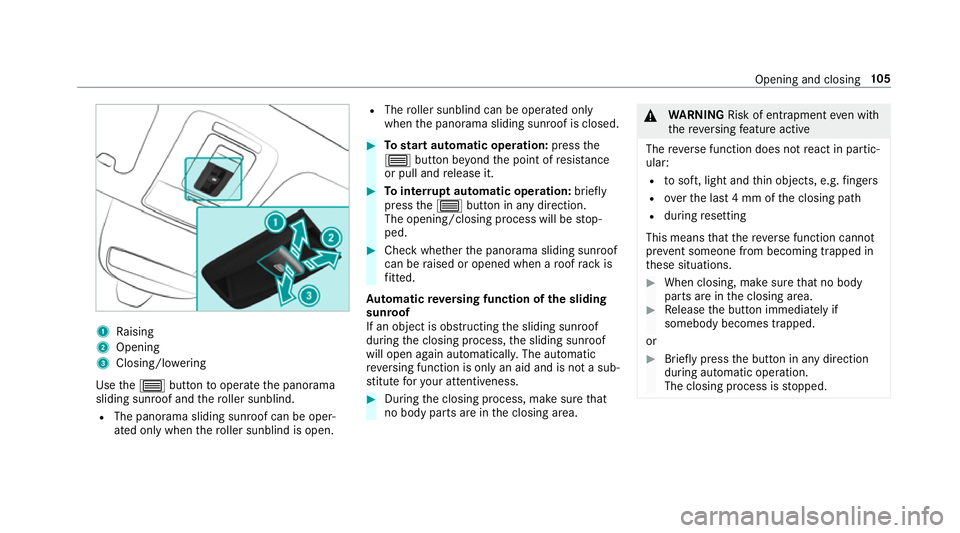
1
Raising
2 Opening
3 Closing/lo wering
Use the3 button tooperate the panorama
sliding sunroof and thero ller sunblind.
R The panorama sliding sunroof can be oper‐
ated only when thero ller sunblind is open. R
The roller sunblind can be operate d only
when the panorama sliding sunroof is closed. #
Tostart automatic operation: pressthe
3 button be yond the point of resis tance
or pull and release it. #
Tointer rupt automatic operation: briefly
press the3 button in any direction.
The opening/closing process will be stop‐
ped. #
Check whe ther the panorama sliding sunroof
can be raised or opened when a roof rack is
fi tted.
Au tomatic reve rsing function of the sliding
sunroof
If an object is obstructing the sliding sunroof
during the closing process, the sliding sunroof
will open again automaticall y.The automatic
re ve rsing function is only an aid and is not a sub‐
st itute foryo ur attentiveness. #
During the closing process, make sure that
no body parts are in the closing area. &
WARNING Risk of entrapment even wi th
th ere ve rsing feature active
The reve rse function does not react in partic‐
ular:
R tosoft, light and thin objects, e.g. fingers
R overth e last 4 mm of the closing path
R during resetting
This means that there ve rse function cann ot
pr eve nt someone from becoming trapped in
th ese situations. #
When closing, make sure that no body
parts are in the closing area. #
Release the button immediately if
somebody becomes trapped.
or #
Brief lypress the button in any direction
during automatic operation.
The closing process is stopped. Opening and closing
105
Page 150 of 729
Locking and unlocking
the load compa rt‐
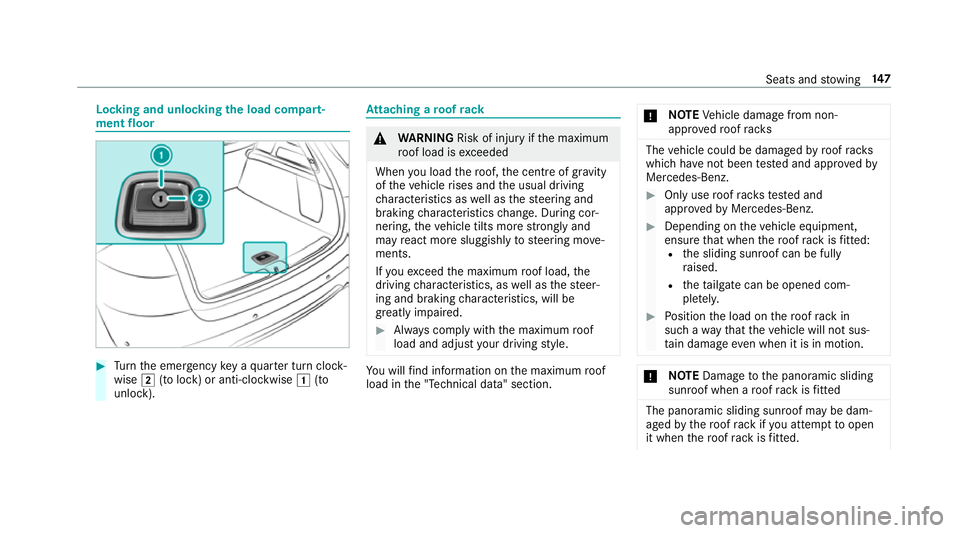
ment floor #
Turn the emer gency key a quarter turn clock‐
wise 2(to lock) or anti-clockwise 1(to
unlock). At
taching a roof rack &
WARNING Risk of inju ryifth e maximum
ro of load is exceeded
When you load thero of, the cent reof gr avity
of theve hicle rises and the usual driving
ch aracteristics as well as thesteering and
braking characteristics change. During cor‐
nering, theve hicle tilts more strongly and
may react more sluggishly tosteering mo ve‐
ments.
If yo uexc eed the maximum roof load, the
driving characteristics, as well as thesteer‐
ing and braking characteristics, will be
great lyimpaired. #
Alw ays comply with the maximum roof
load and adjust your driving style. Yo
u will find information on the maximum roof
load in the "Technical data" section. *
NO
TEVehicle damage from non-
appr ovedro of racks The
vehicle could be damaged byroof racks
which ha venot been tested and appr ovedby
Mercedes-Benz. #
Only use roof rack ste sted and
appr ovedby Mercedes-Benz. #
Depending on theve hicle equipment,
ensure that when thero of rack isfitted:
R the sliding sunroof can be fully
ra ised.
R theta ilgate can be opened com‐
ple tely. #
Position the load on thero of rack in
such a wayth at theve hicle will not sus‐
ta in damage even when it is in motion. *
NO
TEDama getothe panoramic sliding
sunroof when a roof rack isfitted The panoramic sliding sunroof may be dam‐
aged
bythero of rack ifyo u attem pttoopen
it when thero of rack isfitted. Seats and
stowing 147
Page 151 of 729
#
Do not open the panoramic sliding sun‐
ro of if a roof rack isfitted.
In order toallow ventilation of theve hicle
interior, you can raise the panoramic sliding
sunroof. #
Secure thero of rack tothero of railing. #
Obser vethe manufacturer's ins tallation
instructions. Cup holders
Using
the cup holder &
WARNING ‑ Risk of accident or inju ry
when using the cup holder while the
ve hicle is in motion
The cup holder cannot hold a container
secure while theve hicle is in motion.
If yo u use a cup holder while theve hicle is in
motion, the conta iner may be flung around
and liquids could be spilled. The vehicle
occupants may come into contact with the liquid and if it is hot,
they could be scalded.
Yo u could be distracted from traf fic condi‐
tions and you may lose cont rol of theve hicle. #
Only use the cup holder when theve hi‐
cle is stationar y. #
Only use the cup holder for containers
of theright size. #
Alw ays close the conta iner, particularly
if th e liquid is hot. Depending on
theve hicle's equipment, thefo l‐
lowing cupholders are available:
R inthe front stowage compartment of the
centre console
R inthere ar passenger compartment centre
console
R inthe armrests of there ar seats Ve
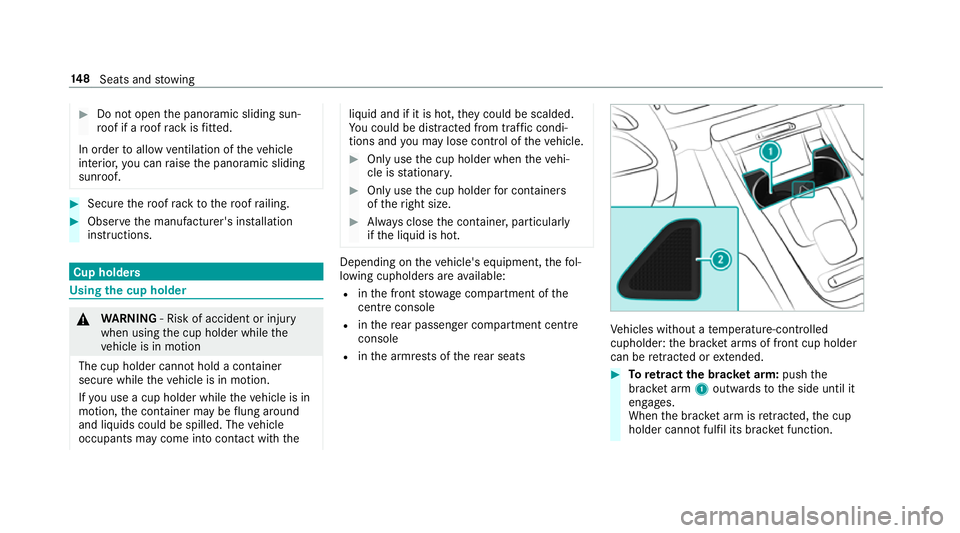
hicles without a temp erature-contro lled
cupholder: the brac ket arms of front cup holder
can be retracted or extended. #
Toretract the brac ket arm: pushthe
brac ket arm 1outwards tothe side until it
engages.
When the brac ket arm is retracted, the cup
holder cann otfulfil its brac ket function. 14 8
Seats and stowing
Page 712 of 729
Fu
nction ................................................. 51
PRE-SAFE ®
PLUS (anticipatory occu‐
pant pr otection plus) ................................ .51
Fu nction ................................................. 51
Re versing measures .............................. .51
Pr ev entative occupant pr otection sys‐
tem
see PRE-SAFE ®
(anticipatory occu‐
pant pr otection)
Pr ev ious destinations
Selecting .............................................. 41 0
Profile .......................................................3 65
Creating a new profile ......................... 366
Maximum number of profiles .............. 365
No tes .................................................. 365
Overview ............................................. 365
Selecting a profile ................................ 367
Selecting profile options ......................3 67
Showing the profile selection when
entering ............................................... 368
Synchronising ...................................... 368
Prog ramme in form ation
TV channel .......................................... .511 Prog
rams
see DYNA MIC SELECT
Pr otection against collision ...................298
Pr otection of the environment
No tes ..................................................... 22
Ta ke -ba ckof end-of-life vehicles ............ 22 Q
Qibla ......................................................... 444
QR code Rescue card .......................................... 32
Qualified specialist workshop .................. 31 R
Ra dar senso rs
Fo il co vering ........................................ 228
Ra dio
Ac tivating/deactivating radio text ....... 507
Ac tivating/deactivating traf fic
announcements .................................. .507
Calling up a slide show ........................ 506
Calling up thest ation list .................... .506
Deleting channels ................................ 506 Direct frequency ent
ry........................ 506
Displaying information ......................... 507
Displaying radio text ............................ 507
Editing station presets ........................ .506
Fr equency fix ....................................... 507
Menu (on-boa rdcompu ter) .................. 329
Moving stations .................................. .506
Overview ............................................. 505
Sear ching forst ations ........................ .506
Setting a channel ................................ 506
Setting station tracking ...................... .507
Setting the frequency band ................. 506
Setting the tra ffic information
service volume inc rease ...................... 507
St oring radio stations .......................... 506
Swit ching on ...................................... .504
Vo ice commands (LINGU ATRO NIC) .....3 43
Ra dio stations
Dialling (on-boa rdcompu ter) ............... 329
Ra in closing function
Sliding sunroof .................................... 106
Ra in-closing feature
Side wind ows........................................ 99 Index
709
Page 714 of 729
Re
mo tecont rol (stationa ryheater/
ve ntilation)
Displa ys............................................... 184
Problems ............................................. 186
Re placing the battery .......................... 185
Setting ................................................. 183
Re mo teOnline
Cooling or heating theve hicle inte‐
ri or .......................................................1 92
Re scue card ............................................... 32
Re ser ve
Fu el ..................................................... 601
Re set function (multimedia sy stem) .....3 99
Re sidual heat ...........................................1 79
Re ar compartment .............................. 17 9
Re storing (factory settings)
see Reset function (multimedia sy stem)
Re stra int sy stem ...................................... .36
Basic instructions forch ildren .............. .52
Fu nction in an accident ......................... 37
Fu nctionality .......................................... 37
Malfunction ...........................................37
Pr otection ..............................................36 Re
duced pr otection ...............................36
Self-test ................................................. 37
Wa rning lamp ........................................ 37
Re versege ar
Inserting .............................................. 206
Re versing camera .................................. .286
Care .................................................... 545
Fu nction .............................................. 286
Opening the camera co ver (360°
Camera) ............................................. .293
Setting favo urites (360° Camera) ...... .293
Switching auto matic operation
on/off (360° Camera) ......................... 293
Rims (Care) ............................................. .545
RO AD SUR FACE SCAN
Multifunction camera .......................... .274
Ro llaw ay protection
see HOLD function
Ro ller sunblind
Pa noramic roof .................................... 102
Side windo ws(elect ric) .......................... 97
Ro of lining (care) .................................... .547
Ro of load .................................................. 606 Ro
of load display
In fo rm ation .......................................... 203
Ro ofrack
At tach ing ............................................ .147
Loading ................................................ 147
Ro ute ................................................ .415, 421
Ac cepting a de tour recommendation
af te r a prom pt...................................... 417
Ac tivating a commuter route .............. .421
Alternati veroute (quic k-access) .......... 427
Calculating .......................................... .415
Displ aying destination information ...... .419
Displ aying thero ute list ...................... .420
Editing a stored route .......................... 423
Ex tern al .............................................. .431
Planning ..............................................4 20
Re cording a route ................................ 423
Saving a recorded route ...................... 423
Selecting a type .................................. .416
Selecting an al tern ative route .............. 421
Selecting notifications ........................ .418
Selecting options ................................. 417
Showing a stored route on the map ....4 22
St arting a sa vedro ute ........................ .423 Index
711