2019 MERCEDES-BENZ GLS SUV battery
[x] Cancel search: batteryPage 6 of 729
Infrared-reflective windscreen function .......
174Climate control
......................................... 175
Overview of climate contro l systems ..........1 75
Operating the climate control sy stem ......... 17 7 Driving and pa
rking ................................. 18 9
Driving ........................................................ 189
DY NA MIC SELECT switch ........................... 203
Au tomatic transmission .............................. 205
Tr ans fer case .............................................. 210
Fu nction of the 4MATIC ...............................2 11
Re fuelling .................................................... 212
Pa rking ........................................................ 218
Driving and driving sa fety sy stems .............2 28
Tr ailer hit ch................................................. 311
Bicycle rack ................................................ 316
Ve hicle towing instructions ........................ .318 Instrument Display and on-board
compu ter................................................... 319
Instrument display overview ...................... .319 Overview of
the buttons on thesteering
wheel ..........................................................3 20
Operating the on-board computer .............. 320
Ad justing the design of the instrument
display ........................................................ 322
Showing display conte nt onthe instru‐
ment clus ter ............................................... 322
Overview of displa yson the multifunc‐
tion display .................................................3 24
Ad justing the instrument lighting ................3 24
Menus and submenus ................................ 325
Head-up Display ......................................... 332 LINGU
ATRO NIC ........................................ 333
No tes on operating saf ety .......................... 333
Ope ration ................................................... 333
Using LINGU ATRO NIC ef fectively ............... 336
Essential voice commands ........................ .337 MBUX multimedia sy
stem ...................... 352
Overview and operation .............................. 352
Sy stem settings .......................................... 388
Fit & Healt hy............................................... 399
Na vigation .................................................. 405 Te
lephone .................................................. .450
Online and Internet functions ..................... 487
Media ........................................................ .496
Ra dio .......................................................... 504
TV ............................................................... 507
Sound ......................................................... 51 5
MBUX rear tablet ........................................ 519
Re ar Seat En tertainment Sy stem ................5 21 Maintenance and care
.............................531
ASS YST PLUS service inter val display ........ .531
Engine compartment .................................. 532
Cleaning and care ....................................... 538 Breakdown assistance
............................549
Emergency ................................................. .549
Flat tyre ...................................................... 550
Battery (vehicle) ......................................... 557
To w- starting or towing away ....................... 562
Electrical fuses ........................................... 567 Contents
3
Page 25 of 729
Pr
otection of the environment
+ ENVIRONMENTAL
NOTEEnvironmental
dama gedue tooperating conditions and
personal driving style The pollutant emission of
your vehicle is
directly related tothewa yyo u operate your
ve hicle.
Help toprotect the environment byoperating
yo ur vehicle in an environmentally responsi‐
ble manner. Please obser vethefo llowing rec‐
ommendations on ope rating conditions and
pe rsonal driving style.
Operating conditions: #
Make sure that the tyre pressure is cor‐
re ct. #
Do not car ryany unnecessary weight
(e.g. roof luggage rack s once you no
lon ger need them). #
Adhere tothe service inter vals.
A regularly serviced vehicle will contri b‐
ute toenvironmen tal pr otection. #
Alw ays ha vemaintenance workcar ried
out at a qualified specialist workshop.
Pe rsonal driving style: #
Do not depress the accelera tor pedal
when starting the engine. #
Do not warm upthe engine while the
ve hicle is stationar y. #
Drive carefully and maintain a suitable
di st ance from theve hicle in front. #
Avoid frequent, sudden acceleration
and braking. #
Change gear in good time and use each
ge ar on lyup toÔ of its maximum
engine speed. #
Switch off the engine in stationary traf‐
fi c, e.g. byusing the ECO start/ stop
function. #
Drive fuel-ef ficiently. Obser vethe ECO
display for a fuel-ef ficient driving style. +
ENVIRONMEN
TALNO TEEnvironmental
pollution caused byirre sponsible dis‐
posal of the high-voltage battery A high-voltage battery conta
ins materials
which are harmful tothe environment. #
Dispose of faulty high-voltage bat teries
at a qualified specialist workshop. Ta
ke -back of end-of-life vehicles
EU countries onl y:
Mercedes-Benz will take back your end-of-life
ve hicle for environment-friendly disposal in
accordance with the European Union(EU) End-
of-Life Vehicles Directive.
A network of vehicle take -ba ckpoints and dis‐
mantlers has been es tablished foryo uto return
yo ur vehicle. You can lea veit at any of these
points free of charge . This makes an impor tant
contribution toclosing there cycling circle and
conse rving resources.
Fo r fur ther information about there cycling and
disposal of end-of-li fevehicles, and theta ke- 22
General no tes
Page 34 of 729
#
Alw aysfit th efloor mats securely and
as prescribed in order toensure that
th ere is alw ays suf ficient room forthe
pedals. #
Do not use loose floor mats and do not
place floor mats on top of one ano ther. *
NO
TEBattery discharging from using
devices connected tothe diagnostics
connection Using devices at
the diagnostics connection
drains the batter y. #
Check thech arge leve l of the batter y. #
Ifth ech arge leve l is lo w,charge the
batter y,e.g. bydriving a considerable
dis tance. Connecting equipment
tothe diagnostics con‐
nection can lead toemissions monitoring infor‐
mation being reset, forex ample. This may lead
to theve hicle failing tomeet therequ irements of
th e next emissions inspection during the main
inspection. Qualified specialist
workshop
A qu alified specialist workshop has the neces‐
sary special skills, tools and qualifications to
cor rectly car ryout any necessary workon your
ve hicle. This particularly applies tosaf ety-re le‐
va nt wo rks.
Alw ays ha vethefo llowing workcar ried out on
yo ur vehicle at a qualified specialist workshop:
R safety-re leva nt wo rks
R service and maintenance work
R repair work
R modifications as well as ins tallations and
con versions
R workon electronic components
R vehicles with 48 V on-board electrical
sy stem (EQ boost tech nology): workon
high voltage components of the 48 V on-
board electrical sy stem
Mercedes‑Benz recommends a Mercedes‑Benz
service centre. Ve
hicle registration
Mercedes-Benz may ask its service centres to
car ryout tech nical inspections on cer tain vehi‐
cles. The quality or saf ety of theve hicle is
impr oved as a result of the inspection.
Mercedes-Benz can only inform you about vehi‐
cle checks if Mercedes-Benz has your registra‐
tion data.
It is possible that your vehicle has not yet been
re gis tere d in your name in thefo llowing cases:
R ifyo ur vehicle was not pur chased at an
authorised specialist dealer.
R ifyo ur vehicle has not yet been examined at
a Mercedes-Benz service centre.
It is advisable toregis teryo ur vehicle with a
Mercedes-Benz service centre.
Inform Mercedes-Benz as soon as possible
about any change in address or vehicle owner‐
ship. You can do this at a Mercedes-Benz service
centre, forex ample. Gene
ral no tes 31
Page 36 of 729
te
ch nical information about theve hicle's operat‐
ing state, component loads, main tenance
re qu irements and tech nical events or faults.
In general, this information documents thest ate
of a component part, a module, a sy stem or the
sur roundings such as:
R operating status of sy stem components (e.g.
fi ll le vels, battery status, tyre pressure)
R status messages concerning theve hicle or
its individual components (e.g. number of
wheel revo lutions/speed, longitudinal accel‐
eration, lateral acceleration, display of fas‐
te ned seat belts)
R malfunctions or faults in impor tant sy stem
components (e.g. lights, brakes)
R information on events leading tovehicle
damage
R system reactions in special driving situations
(e.g. airbag deployment, inter vention of sta‐
bility control sy stems)
R ambient conditions (e.g. temp erature, rain
sensor) In addition
toprov iding the actual control unit
function, this data assists the manufacturer in
de tecting and rectifying faults and optimising
ve hicle functions. The majority of this data is
te mp orary and is only processed in theve hicle
itself. Only a small portion of the data is stored
in theeve nt or fault memor y.
When your vehicle is serviced, tech nical da ta
from theve hicle can be read out byservice net‐
wo rkemplo yees (e.g. workshops, manufactur‐
ers) or third parties (e.g. breakdown services).
Services include repair services, maintenance
processes, warranty claims and quality assur‐
ance measures, forex ample. The read out is per‐
fo rm ed via the legally prescribed port forthe
diagnostics connection in theve hicle. The
re spective service network locations or third
parties collect, process and use the data. They
document tech nical statuses of theve hicle,
assist in finding faults and impr oving quality and
are transmitted tothe manufacturer, if neces‐
sar y.Fu rthermore, the manufacturer is subject
to product liability. Forth is, the manufacturer
requ irestech nical da tafrom vehicles. Fa
ult memories in theve hicle can be reset by a
service outlet as part of repair or maintenance
wo rk.
Depending on the selected equipment, you can
import data into theve hicle's comfort and info‐
ta inment functions yourself.
This includes, forex ample:
R multimedia data such as music, films or pho‐
to sfo r playback in an integrated multimedia
sy stem
R address book data for use in connection with
an integrated hands-free sy stem or an inte‐
grated navigation sy stem
R entered navigation destinations
R data about the use of Internet services
This data can be sa ved locally in theve hicle or it
is located on a device which you ha veconnected
to theve hicle (e.g. smartphone, USB flash drive
or MP3 pla yer). If this data is stored in theve hi‐
cle, you can dele teit at any time. This data is
sent tothird parties only at your requ est, partic‐
ular lywhen you use online services in accord‐
ance with the settings that you ha veselected. General no
tes33
Page 85 of 729
Key
Overview of
key functions &
WARNING Risk of accident and inju ry
due tochildren left unat tended in the
ve hicle
If ch ildren are left unat tended in theve hicle,
th ey could:
R Open doo rs,th ereby endangering other
persons or road users.
R Get out and be stru ck byoncoming traf‐
fi c.
R Ope rate ve hicle equipment and become
trapped, forex ample.
In addition, thech ildren could also set the
ve hicle in motion, forex ample by:
R Releasing the parking brake.
R Changing the transmission position.
R Starting theve hicle. #
Never lea vechildren unat tended in the
ve hicle. #
When leaving theve hicle, alw aysta ke
th eke y with you and lock theve hicle. #
Keep theve hicle key out of reach of
ch ildren. This also applies
tothe Digital Vehicle Key if the
"Digital Vehicle Key" function is activated via
Mercedes me connect.
* NO
TEDama getotheke y caused by
magnetic fields #
Keep theke yaw ay from strong mag‐
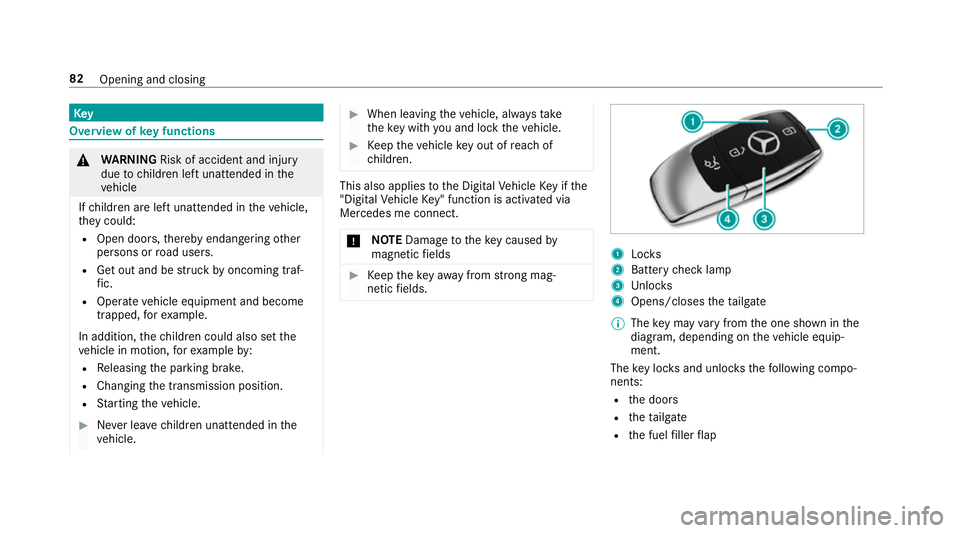
netic fields. 1
Locks
2 Battery check lamp
3 Unloc ks
4 Opens/closes theta ilgate
% The key may vary from the one shown in the
diagram, depending on theve hicle equip‐
ment.
The key loc ksand unlo cksth efo llowing compo‐
nents:
R the doors
R theta ilgate
R the fuel filler flap 82
Opening and closing
Page 86 of 729
If
yo u do not open theve hicle within appr ox‐
imately 40 seconds af ter unlocking:
R theve hicle is loc ked again
R anti- theft pr otection is reactivated
Do not keep theke yto ge ther with electronic
devices or me tal objects. This can af fect the
ke y's functionalit y.
Do not keep theke y in thete mp erature-contro l‐
led cup holder. Otherwise, theke y will not be
re liably de tected.
% If battery check lamp 2does not light up
af te r pressing theÜ orß button, the
battery has been dischar ged.
Changing theke y bat tery ( / page 84). Ac
tivating/deactivating the acoustic lo cking
ve rification signal Multimedia sy
stem:
4 © 5
Settings 5
Vehicle #
Activate or deacti vate Acoustic lock .
% Please no
te: The selected setting
forth e acoustic locking
ve rification signal must comply wi th there le‐
va nt national road and traf fic re gulations. In
some countri es, including German y,using
th e acoustic locking verification signal is for‐
bidden bytraf fic la ws(in accordance with
§16 Para. 1 and §30 Para. 1 of the German
national road traf fic re gulations). The driver
of theve hicle must comply with these regu‐
lations. In countri es wherethe use of this
function is forbidden, this function is not
activated in theve hicle and must not be acti‐
va ted. Ac
tivating/deactivating the panic alarm Re
quirements:
R The ignition is switched off.
% The panic alarm function is only available in
cer tain countries. #
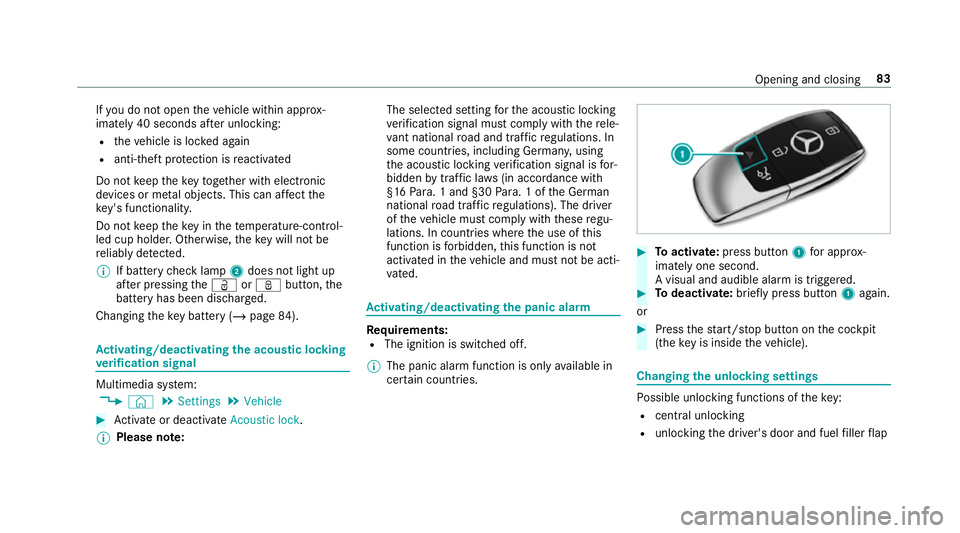
Toactivate: press button 1for appro x‐
ima tely one second.
A visual and audible alarm is triggered. #
Todeactivate: briefly press but ton1 again.
or #
Press thest art/ stop button on the cockpit
(the key is inside theve hicle). Changing
the unlocking settings Po
ssible unlocking functions of theke y:
R cent ral unlocking
R unlocking the driver's door and fuel filler flap Opening and closing
83
Page 87 of 729
#
Toswitch between settings: pressthe
Ü andß buttons simul taneously for
appr oximately six seconds until the battery
ch eck lamp flashes twice.
If th e unlocking function forth e driver's door
and fuel filler flap has been selec ted:
R pressing theÜ button a second time cen‐
trally unloc kstheve hicle
R Vehicles with KEYLESS-GO: ifyo uto uch
th e inner sur face of the door handle on the
driver's door, only the driver's door and fuel
fi ller flap are unlo cked. Deactivating
theke y functions If
yo u do not use theve hicle or a keyfo r an
ex tended pe riod of time, you can reduce the
energy consum ption of there spective key.Todo
so, deactivate theke y functions. #
Todeactivate: presstheß button on the
ke y twice in quick succession.
The battery check lamp of theke yflashes
twice brief lyand lights up once. #
Toactivate: press any button on thekey. %
When theve hicle is star ted with theke y in
th estow age compartment of the cent recon‐
sole, theke y functions are automatical ly
activated (/ page192). Re
moving/inserting the eme rgency key #
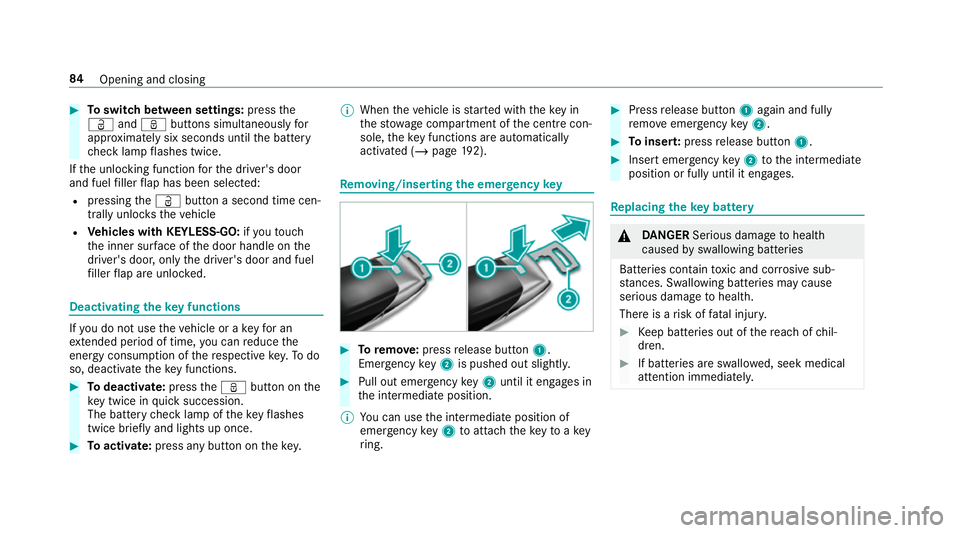
Toremo ve:press release button 1.
Emer gency key2 is pushed out slight ly. #
Pull out emer gency key2 until it en gage s in
th e intermediate position.
% You can use the intermediate position of
emer gency key2 toattach theke yto akey
ri ng. #
Press release button 1again and fully
re mo veemer gency key2. #
Toinser t:press release button 1. #
Insert emer gency key2 tothe intermediate
position or fully until it engages. Re
placing the key battery &
DANG ER Serious damage tohealth
caused byswallowing batteries
Batteries contain toxic and cor rosive sub‐
st ances. Swallowing bat teries may cause
serious damage tohealth.
There is a risk of fata l injur y. #
Keep batteries out of there ach of chil‐
dren. #
If batteries are swallo wed, seek medical
attention immediately. 84
Opening and closing
Page 88 of 729
+
ENVIRONMENTAL
NOTEEnvironmental
dama gedue toimproper disposal of bat‐
te ries Batteries conta
in pollutants. It is
illegal todispose of them with the household
ru bbish. #
Dispose of batteries in an
environmen tally responsible manner.
Ta ke dischar ged batteries toaqu alified specialist
workshop or toa collection
point for used batteries. Re
quirements:
R Yourequ ire a CR 2032 3 V cell batter y.
Mercedes-Benz recommends that you ha vethe
battery replaced at a qualified specialist work‐
shop. #
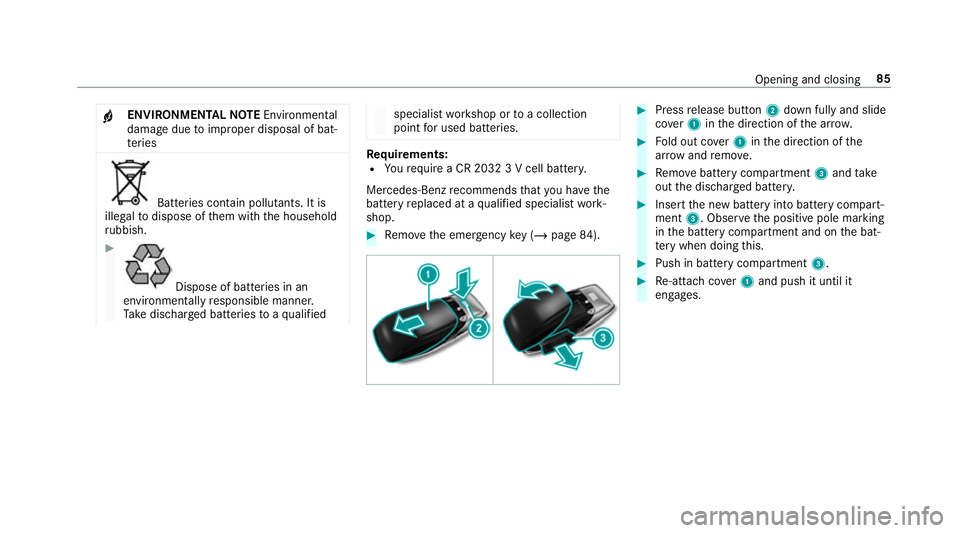
Remo vethe emer gency key ( / page 84). #
Press release button 2down fully and slide
co ver1 inthe direction of the ar row. #
Fold out co ver1 inthe direction of the
ar row and remo ve. #
Remo vebattery compartment 3and take
out the dischar ged batter y. #
Insert the new battery into battery compart‐
ment 3. Obser vethe positive pole marking
in the battery compartment and on the bat‐
te ry when doing this. #
Push in battery compartment 3. #
Re-attach co ver1 and push it until it
engages. Opening and closing
85