2019 MERCEDES-BENZ AMG GT ROADSTER oil change
[x] Cancel search: oil changePage 15 of 298
From inside (central locking but-
ton) .................................................. 72
see KEYLESS-GO
Locking centrally
see Central locking
Locking the vehicle
Trunk lid separately ......................... 76
Low-beam headlamps
Display messag e............................ 186
Switching on/of f.............................. 97
Lubricant additives
see Additives (engine oil) M
M button ............................................. 121
M+S tires ............................................ 265
Malfunction message
see Display messages
Manual drive program
Activating ....................................... 122
Changing gear ............................... 123
Deactivating ................................... 123
General notes ................................ 122
Manual mode
Activating ....................................... 123
Deactivating ................................... 124
General notes ................................ 123
Matte finish (cleaning instruc-
tions) .................................................. 244
mbrace
Call priority .................................... 226
Display message ............................ 180
Downloading destinations
(COMAND) ..................................... 226
Downloading routes ....................... 229
Emergency call .............................. 223
General notes ................................ 222
Geo fencing ................................... 229
Info call button .............................. 225
Locating a stolen vehicle ............... 228
Remote fault diagnosi s.................. 228
Remote vehicle locking .................. 227
Roadside assistance button ........... 224
Search & Send ............................... 226
Self-test ......................................... 223
Speed alert .................................... 229
System .......................................... 223 Triggering the vehicle alarm ........... 229
Vehicle remote unlocking .............. 227
Mechanical key
Function/note s................................ 68
General notes .................................. 68
Inserting .......................................... 68
Locking vehicle ................................ 73
Removing ......................................... 68
Unlocking the driver's doo r.............. 73
Media Interface
see Digital Operator's Manual
Memory card (audio) ......................... 165
Memory function
Seats, steering wheel, exterior
mirrors ............................................. 94
Mercedes me connect
Change of vehicle ............................ 32
Data protection ................................ 32
Display message ............................ 180
Website ............................................ 31
Mercedes-Benz Intelligent Drive
Active Distance Assist
DISTRONIC .................................... 136
Message memory (on-board com-
puter) .................................................. 174
Messages
see Display messages
see Warning and indicator lamps
Mirror turn signal
Cleaning ......................................... 246
Mirrors
see Exterior mirrors
see Rear-view mirror
see Vanity mirror
Mobile phone
Connecting (device manager) ........ 215
Frequencies ................................... 287
Installation ..................................... 287
Menu (on-board computer) ............ 166
Transmission output (maximum) .... 287
Model type
see Vehicle identification plate
Modifying the programming
(SmartKey) ........................................... 68
Mounting wheels
Lowering the vehicle ...................... 285
Mounting a new wheel ................... 284
Preparing the vehicle ..................... 282 Index
13
Page 21 of 298
Information .................................... 287
Tires/wheels .................................2
85
Vehicle data ................................... 293
Telephone
Accepting a call (multifunction
steering wheel) .............................. 167
Authorizing a mobile phone (con-
necting) ......................................... 216
Connecting a mobile phone
(device manager) ........................... 215
Display message ............................ 197
Introduction ................................... 166
Menu (on-board computer) ............ 166
Number from the phone book ....... .167
Redialing ........................................ 167
Rejecting/ending a call ................. 167
see also Digital Operator's Man-
ual ................................................. .209
Temperature
Coolant (display in the instrumentcluster) .......................................... 159
Engine oil (on-board computer) ...... 170
Outside temperature ..................... .159
Setting (climate control) ................ 105
Transmission oil (on-board com-
puter) ............................................. 170
Timing (RACETIMER) ......................... 172
Tire pressure
Calling up (on-board computer) ..... 269
Checking manually ........................ 268
Display message ............................ 192
Maximum ....................................... 268
Not reached (TIREFIT) .................... 253
Notes ............................................. 267
Reached (TIREFIT) .......................... 253
Recommended ............................... 266
Tire pressure monitor
Checking the tire pressure elec-
tronically ........................................ 270
Function/notes ............................ .269
General notes ................................ 269
Important safety notes .................. 269
Restarting ...................................... 271
Warning lamp ................................. 207
Warning message .......................... 270
Tire-change tool kit ........................... 250
TIREFIT kit
Important safety notes .................. 251 Storage location ............................ 250
Tire pressure not reached .............. 253
Tire pressure reached .................... 253
Using ............................................. 251
Tires
Aspect ratio (definition) ................. 280
Average weight of the vehicle
occupants (definition) .................... 279
Bar (definition) ............................... 279
Changing a wheel .......................... 281
Characteristics .............................. 279
Checking ........................................ 264
Curb weight (definition) ................. 280
Definition of terms ......................... 279
Direction of rotation ..................... .281
Display message ............................ 192
Distribution of the vehicle occu-
pants (definition) ............................ 281
DOT (Department of Transporta-
tion) (definition) ............................ .279
DOT, Tire Identification Number
(TIN) ............................................... 278
GAWR (Gross Axle Weight Rating)
(definition) ..................................... 279
GVW (Gross Vehicle Weight) (def-
inition) .......................................... .280
GVWR (Gross Vehicle Weight Rat-
ing) (definition) .............................. 280
Important safety notes .................. 263
Increased vehicle weight due to
optional equipment (definition) ...... 279
Information on driving .................... 263
Kilopascal (kPa) (definition) ........... 280
Labeling (overview )........................ 276
Load bearing index (definition) ...... 281
Load index ..................................... 278
Load index (definition) ................... 280
Maximum load on a tire (defini-
tion) ............................................... 280
Maximum loaded vehicle weight
(definition) ..................................... 280
Maximum permissible tire pres-
sure (definition) ............................. 280
Maximum tire load ......................... 278
Maximum tire load (definition) ....... 280
Notes on sport tire s....................... 263
Optional equipment weight (defi-
nition) ............................................ 281 Index
19
Page 76 of 298
tem will be triggered. Switch off the alarm
(Y page 64). Trunk
Important safety notes
G
DANGER
Combustion engines emit poisonous exhaust
gases such as carbon monoxide. Exhaust
gases can enter the vehicle interior if the
trunk lid is open while the engine is running,
especially if the vehicle is in motion. There is a risk of poisoning.
Always switch off the engine before opening
the trunk lid. Never drive with the trunk lid
open. G
WARNING
If objects, luggage or loads are not secured or not secured sufficiently, they could slip, tip
over or be flung around and thereby hit vehicle
occupants. There is a risk of injury, particu-
larly in the event of sudden braking or a sud-
den change in direction.
Always store objects so that they cannot be
flung around. Secure objects, luggage or
loads against slipping or tipping before the
journey.
! The trunk lid swings upwards when opened.
Therefore, make sure that there is sufficient
clearance above the trunk lid.
The opening dimensions of the trunk lid can be
found in the "Vehicle data" section
(Y page 293).
If the rear spoiler has been extended manually,
the height when opened is higher by this
amount. If in doubt, retract the rear spoiler again manually before opening the trunk lid
(Y page 229).
Do not leave the SmartKey in the trunk. You
could otherwise lock yourself out.
You should preferably place luggage or loads in the trunk. Observe the loading guidelines
(Y page 218). Opening/closing from outside
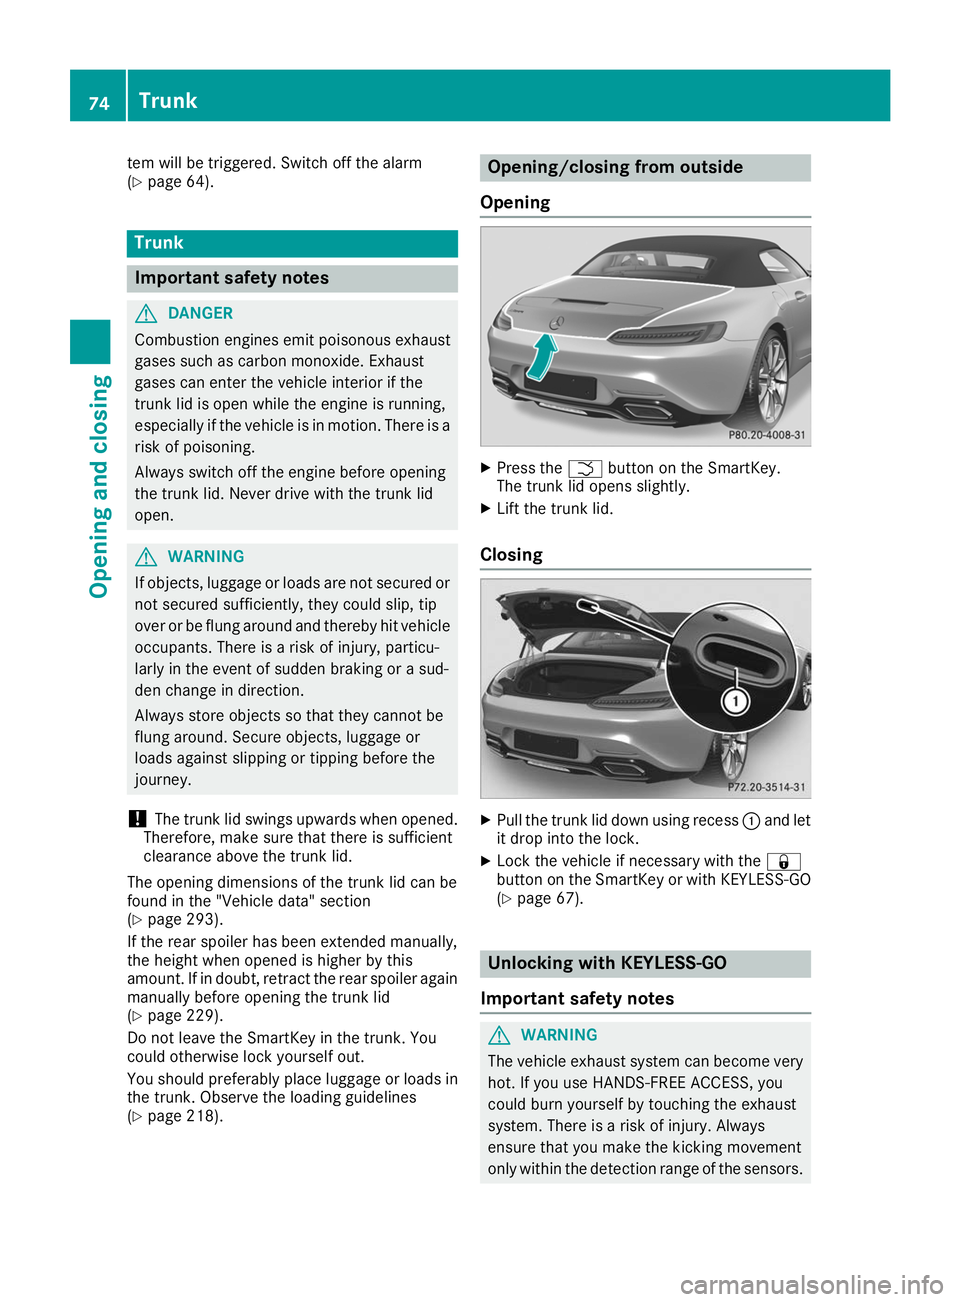
Opening X
Press the 0054button on the SmartKey.
The trunk lid opens slightly.
X Lift the trunk lid.
Closing X
Pull the trunk lid down using recess 0043and let
it drop into the lock.
X Lock the vehicle if necessary with the 0037
button on the SmartKey or with KEYLESS-GO
(Y page 67). Unlocking with KEYLESS-GO
Important safety notes G
WARNING
The vehicle exhaust system can become very
hot. If you use HANDS-FREE ACCESS, you
could burn yourself by touching the exhaust
system. There is a risk of injury. Always
ensure that you make the kicking movement
only within the detection range of the sensors. 74
TrunkOpening and closing
Page 197 of 298
Display messages
Possible causes/consequences and
0050
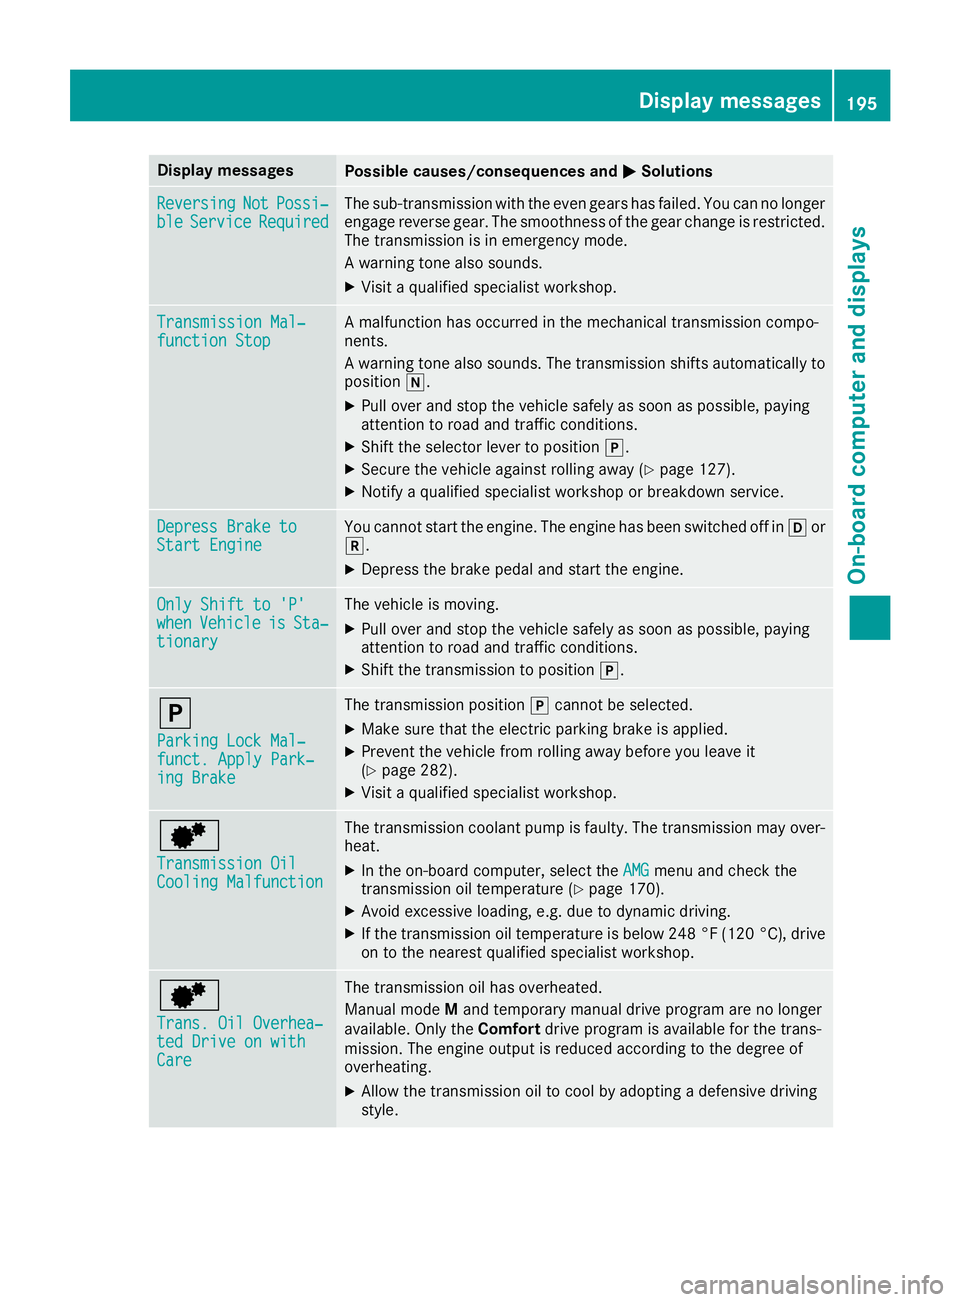
0050Solutions Reversing
Reversing
Not
NotPossi‐
Possi‐
ble
ble Service
Service Required
Required The sub-transmission with the even gears has failed. You can no longer
engage reverse gear. The smoothness of the gear change is restricted.
The transmission is in emergency mode.
A warning tone also sounds.
X Visit a qualified specialist workshop. Transmission Mal‐ Transmission Mal‐
function Stop function Stop A malfunction has occurred in the mechanical transmission compo-
nents.
A warning tone also sounds. The transmission shifts automatically to position 005C.
X Pull over and stop the vehicle safely as soon as possible, paying
attention to road and traffic conditions.
X Shift the selector lever to position 005D.
X Secure the vehicle against rolling away (Y page 127).
X Notify a qualified specialist workshop or breakdown service. Depress Brake to Depress Brake to
Start Engine Start Engine You cannot start the engine. The engine has been switched off in
005Bor
005E.
X Depress the brake pedal and start the engine. Only Shift to 'P'
Only Shift to 'P'
when when
Vehicle
Vehicle is
isSta‐
Sta‐
tionary
tionary The vehicle is moving.
X
Pull over and stop the vehicle safely as soon as possible, paying
attention to road and traffic conditions.
X Shift the transmission to position 005D.005D
Parking Lock Mal‐ Parking Lock Mal‐
funct. Apply Park‐ funct. Apply Park‐
ing Brake ing Brake The transmission position
005Dcannot be selected.
X Make sure that the electric parking brake is applied.
X Prevent the vehicle from rolling away before you leave it
(Y page 282).
X Visit a qualified specialist workshop. 0080
Transmission Oil Transmission Oil
Cooling Malfunction Cooling Malfunction The transmission coolant pump is faulty. The transmission may over-
heat.
X In the on-board computer, select the AMG
AMGmenu and check the
transmission oil temperature (Y page 170).
X Avoid excessive loading, e.g. due to dynamic driving.
X If the transmission oil temperature is below 248 °F (120 °C), drive
on to the nearest qualified specialist workshop. 0080
Trans. Oil Overhea‐ Trans. Oil Overhea‐
ted Drive on with ted Drive on with
Care Care The transmission oil has overheated.
Manual mode
Mand temporary manual drive program are no longer
available. Only the Comfortdrive program is available for the trans-
mission. The engine output is reduced according to the degree of
overheating.
X Allow the transmission oil to cool by adopting a defensive driving
style. Display
messages
195On-board computer and displays Z
Page 243 of 298
Hiding a service message
X Press the 0076or0038 button on the steering
wheel. Displaying service messages
X Switch on the ignition.
X Use 00E2 on the steering wheel to call up the
list of menus.
X Press 0063or0064 on the steering wheel to
select the Service Servicemenu and confirm with
0076.
X Press 0063or0064 on the steering wheel to
select the ASSYST PLUS
ASSYST PLUS submenu and con-
firm with 0076.
The service due date appears in the multi-
function display. Information about Service
Resetting the ASSYST PLUS service
interval display !
If the ASSYST PLUS service interval display
has been inadvertently reset, this setting can
be corrected at a qualified specialist work-
shop.
Have service work carried out as described in the Maintenance Booklet. This may otherwise
lead to increased wear and damage to the
major assemblies or the vehicle.
A qualified specialist workshop, e.g. an author-
ized Mercedes-Benz Service Center, will reset
the ASSYST PLUS service interval display after
the service work has been carried out. You can
also obtain further information on maintenance work, for example.
Special service requirements The specified maintenance interval takes only
the normal operation of the vehicle into
account. Under arduous operating conditions or
increased load on the vehicle, maintenance
work must be carried out more frequently, for
example:
R Regular city driving with frequent intermedi-
ate stops
R If the vehicle is primarily used to travel short
distances R
Use in mountainous terrain or on poor road
surfaces
R If the engine is often left idling for long periods
R In racetrack mode
Under these or similar conditions, have, for
example, the air filter, engine oil and oil filter
replaced or changed more frequently. Under
arduous operating conditions, the tires must be
checked more often. Further information can be
obtained at a qualified specialist workshop, e.g. an authorized Mercedes-Benz Service Center.
i In racetrack mode, the vehicle is subject to
higher loads, meaning that additional main-
tenance work is required. If you plan race-
track use, consult a qualified specialist work-
shop first. Mercedes-Benz recommends that
you use an authorized Mercedes-Benz Ser-
vice Center for this purpose.
Driving abroad An extensive Mercedes-Benz Service network is
also available in other countries. You can obtain further information from any authorized
Mercedes-Benz Service Center. Care
General notes
H
Environmental note
Dispose of empty packaging and cleaning
cloths in an environmentally responsible man-
ner.
! When cleaning your car, do not use:
R dry, coarse or hard cloths
R abrasive cleaning agents
R solvents
R cleaning agents containing solvents
Do not scrub.
Do not touch the surfaces and films with hard
objects, e.g. rings or ice scrapers. Otherwise,
you may scratch or damage the surfaces and films.
! Do not park your vehicle for a long period of
time directly after cleaning, particularly after
cleaning the wheel rim with wheel cleaner.
Wheel cleaner can lead to the increased cor-
rosion of the brake discs and pads. Therefore, Care
241Maintenance and care Z
Page 249 of 298
Cleaning the exhaust pipe
G
WARNING
The exhaust tail pipe and tail pipe trim can
become very hot. If you come into contact
with these parts of the vehicle, you could burn
yourself. There is a risk of injury.
Always be particularly careful around the
exhaust tail pipe and the tail pipe trim. Allow
these components to cool down before touch-
ing them.
! Do not clean the exhaust pipe with acid-
based cleaning agents, such as bathroom
cleaner or wheel cleaner.
! Vehicles with black exhaust pipes: black
chromed screens should not be polished with
a chrome polish. They will otherwise lose their black shine. For optimal care, the screens
should be rubbed with a lightly oiled cloth
after every car wash. Commercially available
engine and care oils are suitable for this.
For heavier soiling, you can apply a fine paint- work polish with a microfiber cloth. Remove
the excess polish residue after polishing.
X Clean the exhaust pipe with a chrome care
product tested and approved by Mercedes-
Benz.
Impurities combined with the effects of road grit
and corrosive environmental factors may cause flash rust to form on the surface. You can
restore the original shine of the exhaust pipe by
cleaning it regularly, especially in winter and
after washing. Interior care
Cleaning the display !
For cleaning, do not use any of the following:
R alcohol-based thinner or gasoline
R abrasive cleaning agents
R commercially-available household cleaning
agents
These may damage the display surface. Do
not put pressure on the display surface when
cleaning. This could lead to irreparable dam-
age to the display. X
Before cleaning the display, make sure that it
is switched off and has cooled down.
X Clean the display surface using a commer-
cially available microfiber cloth and TFT/LCD
display cleaner.
X Dry the display surface using a dry microfiber
cloth.
Cleaning the plastic trim G
WARNING
Care products and cleaning agents containing solvents cause surfaces in the cockpit to
become porous. As a result, plastic parts may
come loose in the event of air bag deploy-
ment. There is a risk of injury.
Do not use any care products and cleaning
agents to clean the cockpit.
! Never attach the following to plastic surfa-
ces:
R stickers
R films
R perfume oil container or similar
You could otherwise damage the plastic.
! Do not allow cosmetics, insect repellent or
sunscreen to come into contact with the plas-
tic trim. This maintains the high-quality look of the surfaces.
X Wipe the plastic trim with a damp, lint-free
cloth, e.g. a microfiber cloth.
X Heavy soiling: use care and cleaning prod-
ucts recommended and approved by
Mercedes-Benz.
The surface may change color temporarily.
Wait until the surface is dry again.
Cleaning the steering wheel and gear or selector lever X
Thoroughly wipe with a damp cloth or use
leather care agents that have been recom-
mended and approved by Mercedes-Benz.
Cleaning the trim elements !
Do not use solvent-based cleaning agents
such as tar remover, wheel cleaners, polishes
or waxes. There is otherwise a risk of damag- ing the surface. Care
247Maintenance and care Z
Page 251 of 298
Where will I find...?
Reflective safety jacket
Removing/replacing the reflective
safety jacket The reflective safety jackets are located in front
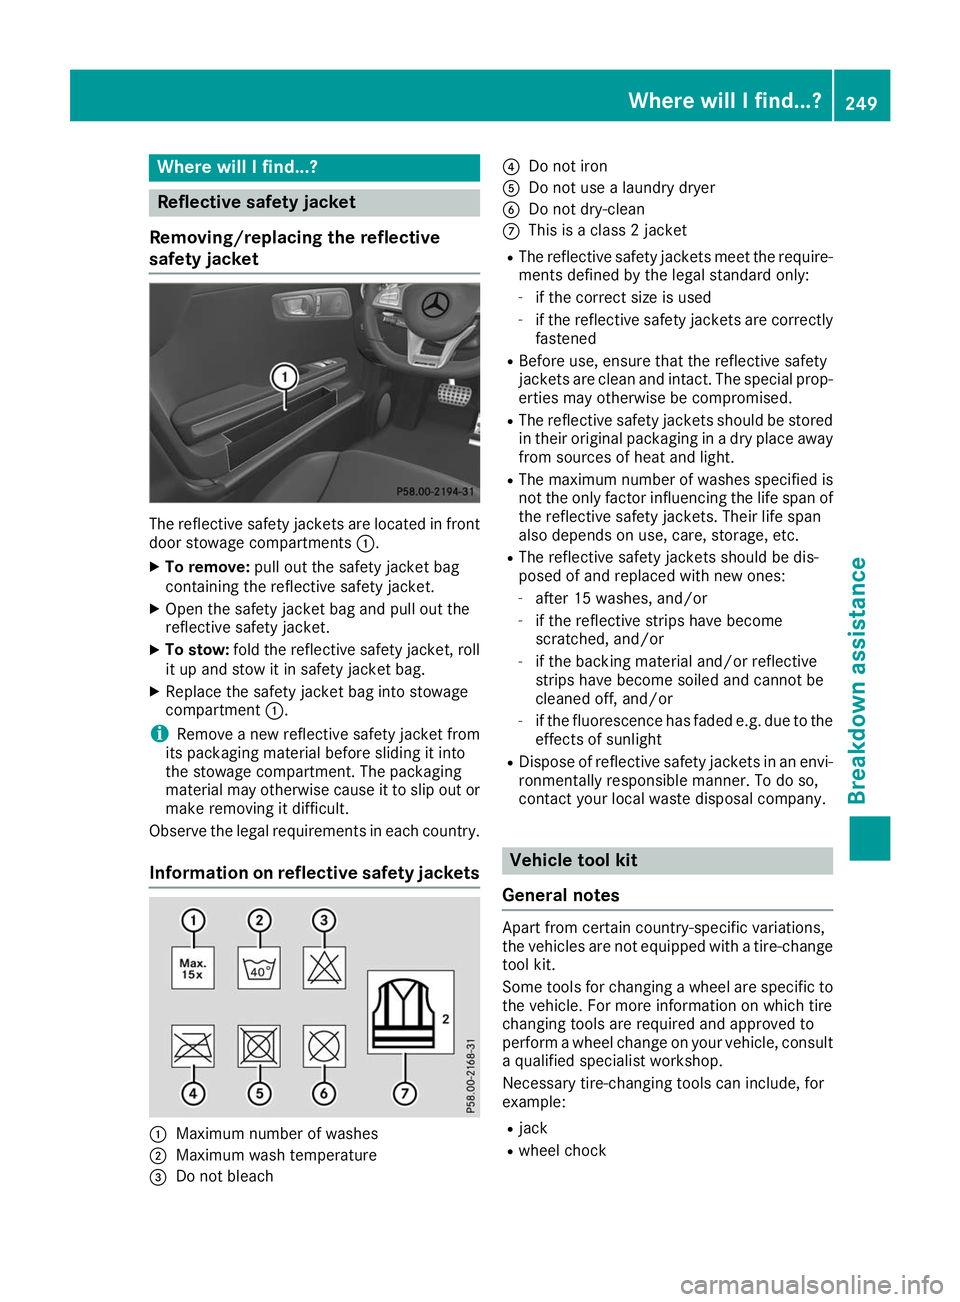
door stowage compartments 0043.
X To remove: pull out the safety jacket bag
containing the reflective safety jacket.
X Open the safety jacket bag and pull out the
reflective safety jacket.
X To stow: fold the reflective safety jacket, roll
it up and stow it in safety jacket bag.
X Replace the safety jacket bag into stowage
compartment 0043.
i Remove a new reflective safety jacket from
its packaging material before sliding it into
the stowage compartment. The packaging
material may otherwise cause it to slip out or
make removing it difficult.
Observe the legal requirements in each country.
Information on reflective safety jackets 0043
Maximum number of washes
0044 Maximum wash temperature
0087 Do not bleach 0085
Do not iron
0083 Do not use a laundry dryer
0084 Do not dry-clean
006B This is a class 2 jacket
R The reflective safety jackets meet the require-
ments defined by the legal standard only:
- if the correct size is used
- if the reflective safety jackets are correctly
fastened
R Before use, ensure that the reflective safety
jackets are clean and intact. The special prop-
erties may otherwise be compromised.
R The reflective safety jackets should be stored
in their original packaging in a dry place away
from sources of heat and light.
R The maximum number of washes specified is
not the only factor influencing the life span of
the reflective safety jackets. Their life span
also depends on use, care, storage, etc.
R The reflective safety jackets should be dis-
posed of and replaced with new ones:
- after 15 washes, and/or
- if the reflective strips have become
scratched, and/or
- if the backing material and/or reflective
strips have become soiled and cannot be
cleaned off, and/or
- if the fluorescence has faded e.g. due to the
effects of sunlight
R Dispose of reflective safety jackets in an envi-
ronmentally responsible manner. To do so,
contact your local waste disposal company. Vehicle tool kit
General notes Apart from certain country-specific variations,
the vehicles are not equipped with a tire-change
tool kit.
Some tools for changing a wheel are specific to the vehicle. For more information on which tire
changing tools are required and approved to
perform a wheel change on your vehicle, consult
a qualified specialist workshop.
Necessary tire-changing tools can include, for
example:
R jack
R wheel chock Where will I find...?
249Breakdown assistance
Page 284 of 298
An arrow on the sidewall of the tire indicates its
correct direction of rotation. Storing wheels
Store wheels that are not being used in a cool,
dry and preferably dark place. Protect the tires
from oil, grease, gasoline and diesel. Mounting a wheel
Preparing the vehicle X
Stop the vehicle on solid, non-slippery and
level ground.
X Apply the electric parking brake manually.
X Bring the front wheels into the straight-ahead
position.
X Shift the transmission to position 005D.
X Switch off the engine.
X With KEYLESS-GO start function or vehi-
cles with KEYLESS-GO:
open the driver's
door.
The vehicle electronics are now in key posi-
tion 0092. This is the same as the SmartKey
having been removed.
or X Remove the SmartKey from the ignition lock.
X If included in the vehicle equipment, remove
the tire-change tool kit from the vehicle.
X Safeguard the vehicle against rolling away.
Securing the vehicle to prevent it from
rolling away If your vehicle is equipped with a wheel chock, it
can be found in the tire-change tool kit
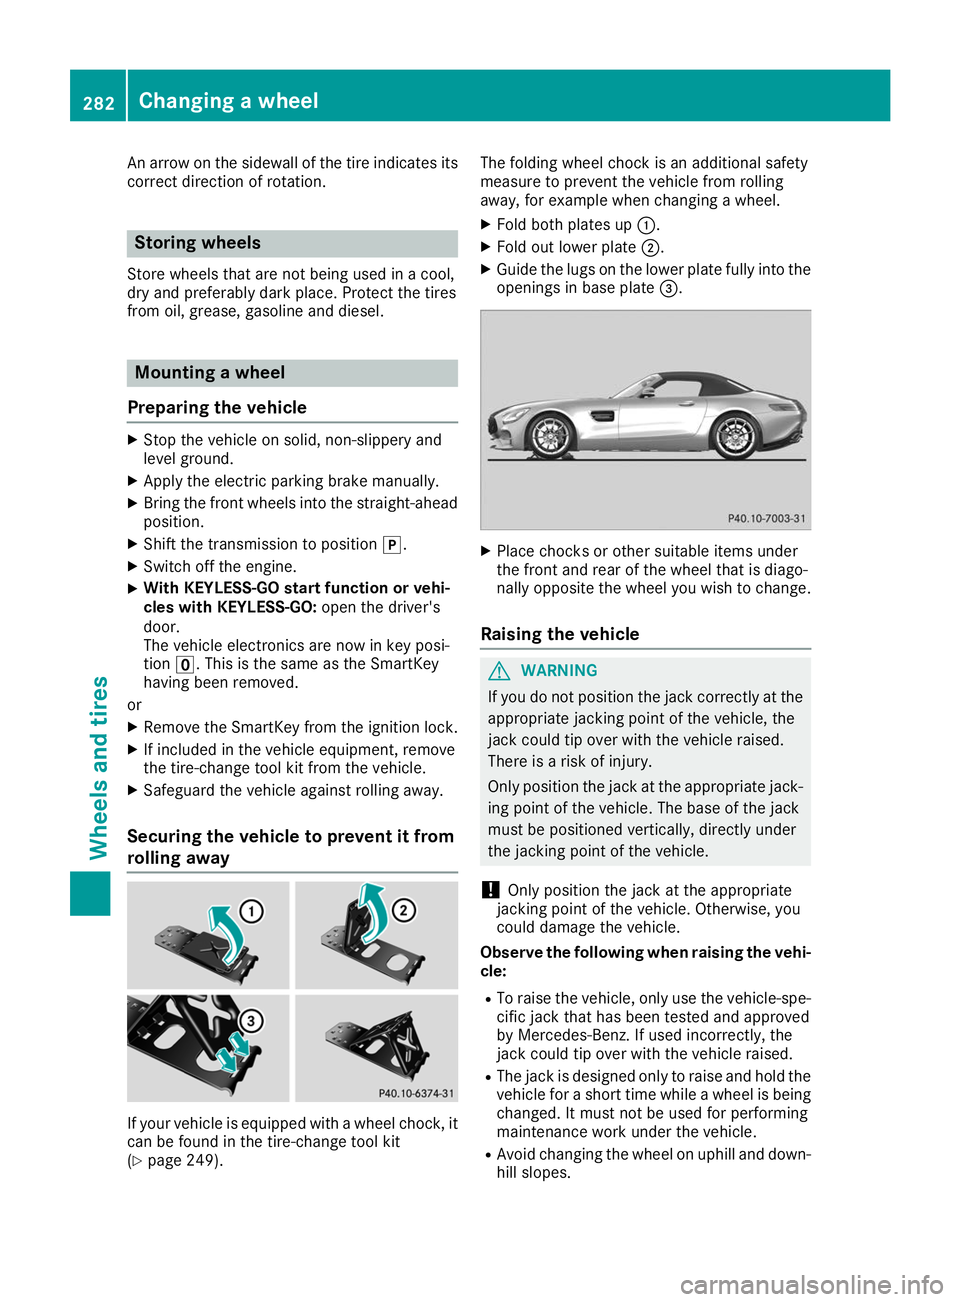
(Y page 249). The folding wheel chock is an additional safety
measure to prevent the vehicle from rolling
away, for example when changing a wheel.
X Fold both plates up 0043.
X Fold out lower plate 0044.
X Guide the lugs on the lower plate fully into the
openings in base plate 0087. X
Place chocks or other suitable items under
the front and rear of the wheel that is diago-
nally opposite the wheel you wish to change.
Raising the vehicle G
WARNING
If you do not position the jack correctly at the appropriate jacking point of the vehicle, the
jack could tip over with the vehicle raised.
There is a risk of injury.
Only position the jack at the appropriate jack-
ing point of the vehicle. The base of the jack
must be positioned vertically, directly under
the jacking point of the vehicle.
! Only position the jack at the appropriate
jacking point of the vehicle. Otherwise, you
could damage the vehicle.
Observe the following when raising the vehi- cle:
R To raise the vehicle, only use the vehicle-spe-
cific jack that has been tested and approved
by Mercedes-Benz. If used incorrectly, the
jack could tip over with the vehicle raised.
R The jack is designed only to raise and hold the
vehicle for a short time while a wheel is being
changed. It must not be used for performing
maintenance work under the vehicle.
R Avoid changing the wheel on uphill and down-
hill slopes. 282
Changing a wheelWheels and tires