2019 MERCEDES-BENZ AMG GT ROADSTER garage door opener
[x] Cancel search: garage door openerPage 13 of 298
Preparing the vehicle ..................... 250
TIREFIT kit ...................................... 251
Floormats ...........................................2 34
Frequencies
Mobile phone ................................. 287
Two-way radio ................................ 287
Front passenger seat
see Seat
Fuel
Additives ........................................ 290
Consumption statistics .................. 162
Displaying the current consump-
tion ................................................ 162
Displaying the range ..................... .162
Driving tips ................................... .131
E10 ................................................ 290
Fuel gauge ....................................... 34
Grade (gasoline) ............................ 290
Important safety notes .................. 289
Problem (malfunction) ................... 127
Refueling ........................................ 125
Tank content/reserve fuel ............. 289
Fuel filler flap
Closing .......................................... .126
General information ....................... 126
Opening ......................................... 126
Problem (malfunction) ................... 127
Fuel level
Calling up the range (on-board
computer) ...................................... 162
Fuel tank
Capacity ........................................ 289
Problem (malfunction) ................... 127
Fuses
Allocation chart ............................ .262
Before changing ............................ .261
Fuse box in the front-passenger
footwell .......................................... 261
Fuse box in the rear compartment .. 262
Important safety notes .................. 261 G
G-Meter (on-board computer) .......... 171
Garage door opener
Clearing the memory ..................... 234
General notes ................................ 231
Important safety notes .................. 231 Opening/closing the garage door .. 233
Problems when programming .......
.233
Programming (button in the rear-
view mirror) ................................... 231
Synchronizing the rolling code ....... 232
Gasoline ............................................. 290
Gear indicator (on-board com-
puter) ................................................. .170
Genuine parts ...................................... 24
Glove box .......................................... .219
Google™ Local Search
see also Digital Operator's Man-
ual ................................................. .209 H
Handling control system see ESP ®
(Electronic Stability Program)
Handwriting recognition
Switching text reader function
on/off ............................................ 212
Touchpad ....................................... 211
Hazard warning lamps ........................ 98
Head bags
Operation ......................................... 47
Head level heating (AIRSCARF) .......... 89
Head restraints
Adjusting ......................................... 86
Headlamps
Cleaning system (notes) ................ 292
Fogging up ....................................... 99
see Automatic headlamp mode
Heating
see Climate control
High beam flasher ............................... 97
High-beam headlamps
Display message ............................ 186
Switching on/off .............................. 97
Hill start assist .................................. 112
HOLD function
Activating ....................................... 145
Activation conditions ..................... 145
Deactivating ................................... 145
Display message ............................ 190
General notes ................................ 144
Home address
see also Digital Operator's Man-
ual ................................................. .209 Index
11
Page 39 of 298
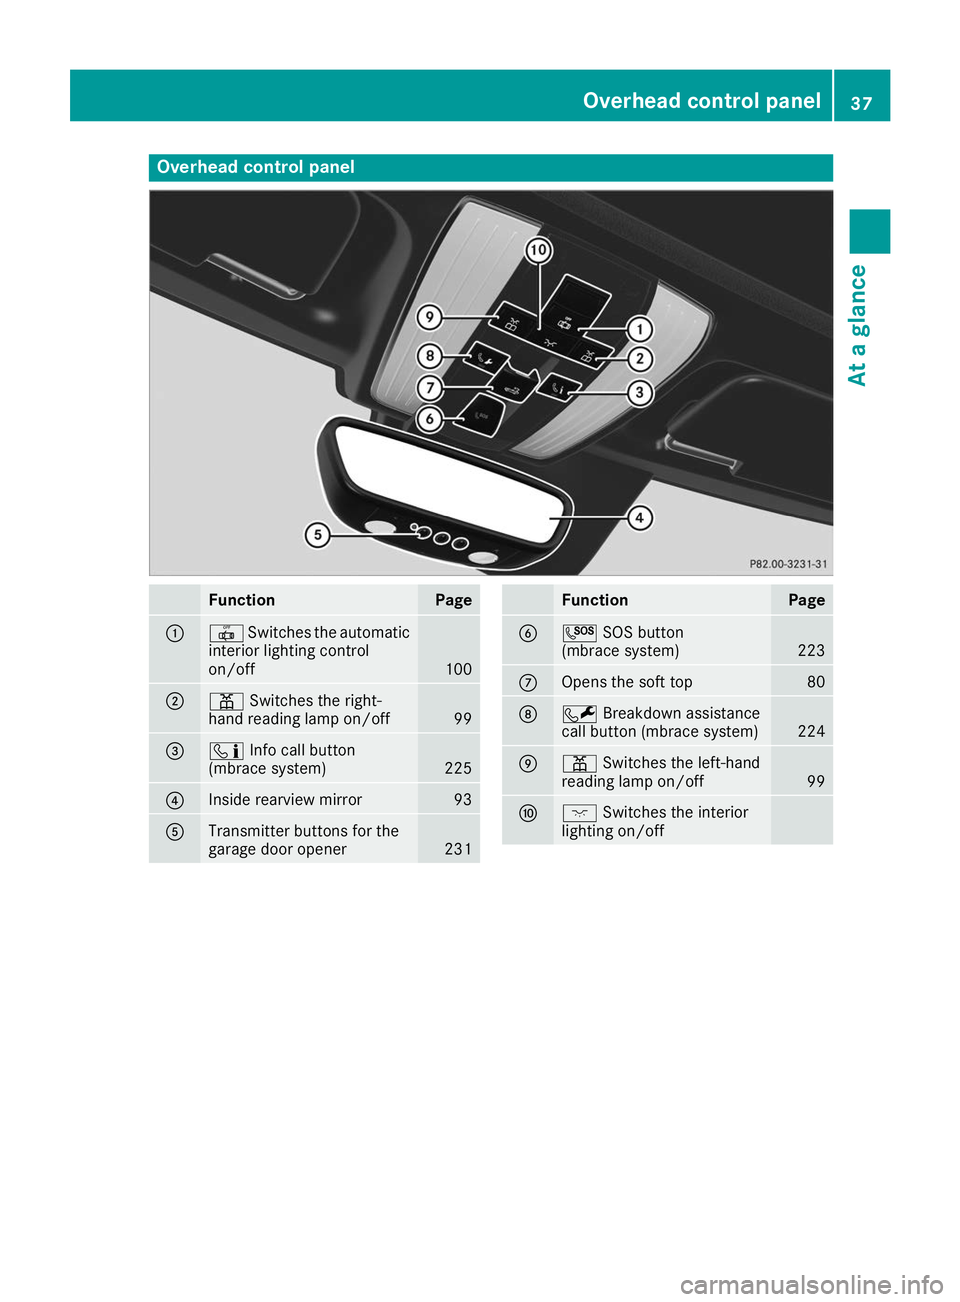
Overhead control panel
Function Page
0043
0033
Switches the automatic
interior lighting control
on/off 100
0044
003D
Switches the right-
hand reading lamp on/off 99
0087
00D9
Info call button
(mbrace system) 225
0085
Inside rearview mirror 93
0083
Transmitter buttons for the
garage door opener 231 Function Page
0084
0053
SOS button
(mbrace system) 223
006B
Opens the soft top 80
006C
0052
Breakdown assistance
call button (mbrace system) 224
006D
003D
Switches the left-hand
reading lamp on/off 99
006E
004A
Switches the interior
lighting on/off Overhead control panel
37At a glance
Page 233 of 298
Problem
Possible causes/consequences and
0050
0050Solutions The rear spoiler cannot
be retracted again after
manually extending it. You have opened the trunk lid while manually extending the rear
spoiler.
X Close the trunk lid. The rear spoiler does not
extend or retract auto-
matically. The rear spoiler's movement is blocked, e.g. by an object jammed
between the body and the rear spoiler.
X Remove the object. Garage door opener
General notes The HomeLink
®
garage door opener integrated
in the rear-view mirror allows you to operate up
to three different door and gate systems.
Use the integrated garage door opener only on
garage doors that:
R they are equipped with a safety stop and
reverse feature
R they conform to the current U.S. safety stand-
ards
When it has been programmed, the integrated
garage door opener in the rear-view mirror will
assume the function of the garage door sys-
tem's remote control. Please also read the oper-
ating instructions for the garage door system.
When programming a garage door opener, park the vehicle outside the garage. Do not leave the
engine running while programming it.
Certain garage door drives are incompatible
with the integrated garage door opener. If you
have difficulty programing the integrated garage
door opener, contact a Mercedes-Benz Service
Center.
Alternatively, you can call the following tele-
phone assistance services:
R USA: Mercedes-Benz Customer Assistance
Center at 1-800-FOR-MERCedes
R Canada: Customer Service at
1-800-387-0100
R HomeLink ®
hotline 1-800-355-3515 (free of
charge)
More information on HomeLink ®
and/or com-
patible products is also available on the Internet
at http://www.homelink.com.
Notes on the declaration of conformity
(Y page 27).
USA: FCC ID: CB2HMIHL4 Canada: IC: 279B-HMIHL4
Important safety notes G
WARNING
When you operate or program the door with
the integrated garage door opener, persons in the range of movement of the door may
become trapped or be struck by the door.
There is a risk of injury.
When using the integrated garage door
opener, always make sure that nobody is
within the range of movement of the door. G
DANGER
Combustion engines emit poisonous exhaust
gases such as carbon monoxide. Inhaling
these exhaust gases is hazardous to health
and can result in poisoning. There is a risk of
fatal injury. Therefore, never leave the engine running an enclosed space without adequate
ventilation.
Programming Programming the buttons
Pay attention to the "Important safety notes"
(Y page 231). Features
231Stowage and features Z
Page 234 of 298
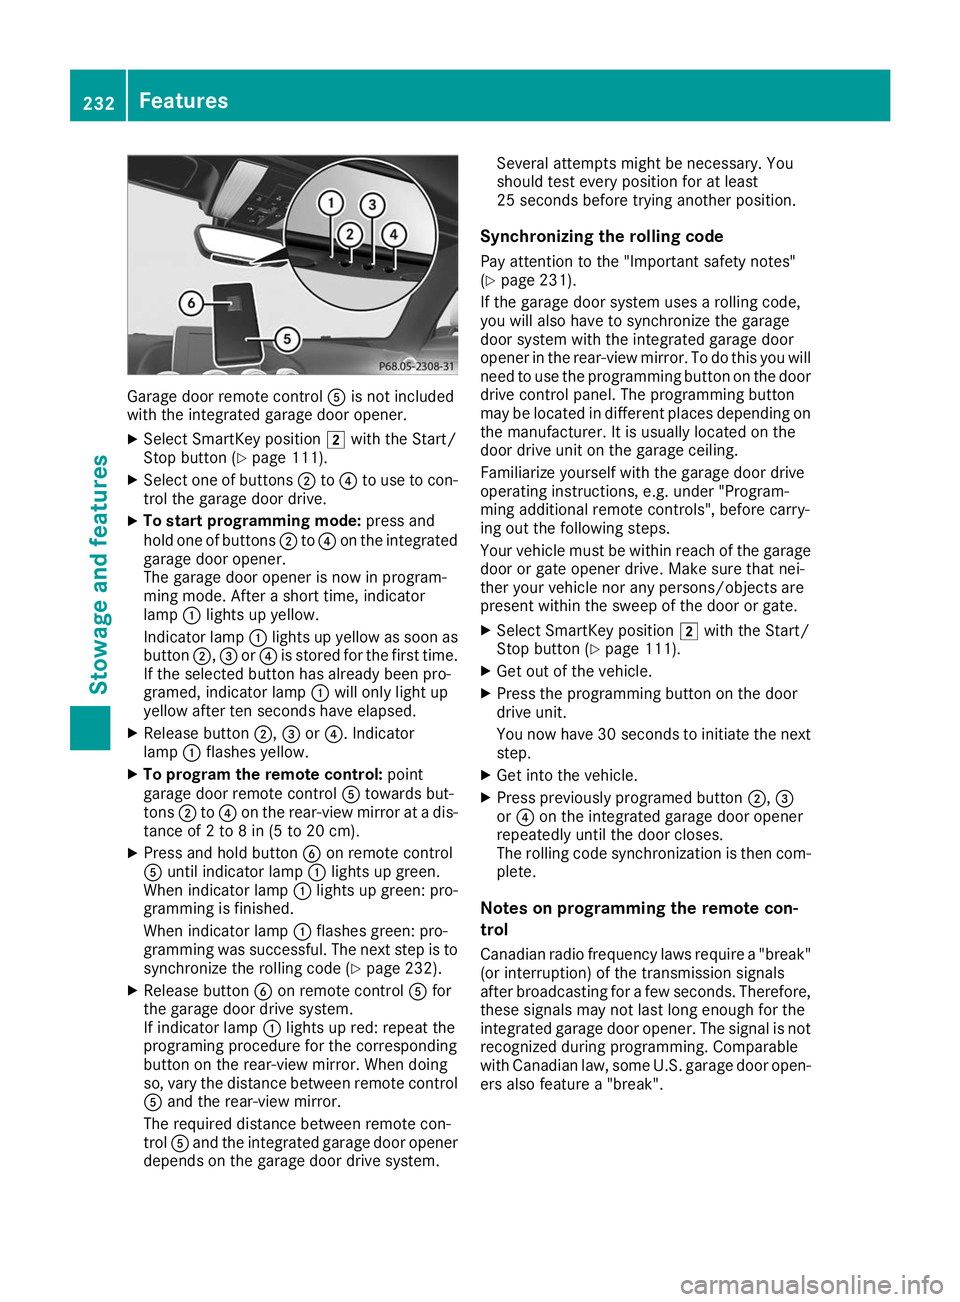
Garage door remote control
0083is not included
with the integrated garage door opener.
X Select SmartKey position 0048with the Start/
Stop button (Y page 111).
X Select one of buttons 0044to0085 to use to con-
trol the garage door drive.
X To start programming mode: press and
hold one of buttons 0044to0085 on the integrated
garage door opener.
The garage door opener is now in program-
ming mode. After a short time, indicator
lamp 0043lights up yellow.
Indicator lamp 0043lights up yellow as soon as
button 0044,0087or0085 is stored for the first time.
If the selected button has already been pro-
gramed, indicator lamp 0043will only light up
yellow after ten seconds have elapsed.
X Release button 0044,0087or0085. Indicator
lamp 0043flashes yellow.
X To program the remote control: point
garage door remote control 0083towards but-
tons 0044to0085 on the rear-view mirror at a dis-
tance of 2 to 8 in (5 to 20 cm).
X Press and hold button 0084on remote control
0083 until indicator lamp 0043lights up green.
When indicator lamp 0043lights up green: pro-
gramming is finished.
When indicator lamp 0043flashes green: pro-
gramming was successful. The next step is to
synchronize the rolling code (Y page 232).
X Release button 0084on remote control 0083for
the garage door drive system.
If indicator lamp 0043lights up red: repeat the
programing procedure for the corresponding
button on the rear-view mirror. When doing
so, vary the distance between remote control
0083 and the rear-view mirror.
The required distance between remote con-
trol 0083and the integrated garage door opener
depends on the garage door drive system. Several attempts might be necessary. You
should test every position for at least
25 seconds before trying another position.
Synchronizing the rolling code
Pay attention to the "Important safety notes"
(Y page 231).
If the garage door system uses a rolling code,
you will also have to synchronize the garage
door system with the integrated garage door
opener in the rear-view mirror. To do this you will
need to use the programming button on the door
drive control panel. The programming button
may be located in different places depending on the manufacturer. It is usually located on the
door drive unit on the garage ceiling.
Familiarize yourself with the garage door drive
operating instructions, e.g. under "Program-
ming additional remote controls", before carry-
ing out the following steps.
Your vehicle must be within reach of the garage
door or gate opener drive. Make sure that nei-
ther your vehicle nor any persons/objects are
present within the sweep of the door or gate.
X Select SmartKey position 0048with the Start/
Stop button (Y page 111).
X Get out of the vehicle.
X Press the programming button on the door
drive unit.
You now have 30 seconds to initiate the next
step.
X Get into the vehicle.
X Press previously programed button 0044,0087
or 0085 on the integrated garage door opener
repeatedly until the door closes.
The rolling code synchronization is then com- plete.
Notes on programming the remote con-
trol
Canadian radio frequency laws require a "break" (or interruption) of the transmission signals
after broadcasting for a few seconds. Therefore,
these signals may not last long enough for the
integrated garage door opener. The signal is not recognized during programming. Comparable
with Canadian law, some U.S. garage door open-
ers also feature a "break". 232
FeaturesStowage and features
Page 235 of 298
Proceed as follows:
R if you live in Canada.
R if you have difficulties programming the
garage door opener (regardless of where you
live) when following the programming steps.
X Press and hold one of buttons 0044to0085 on the
integrated garage door opener.
After a short time, indicator lamp 0043lights up
yellow.
X Release the button.
Indicator lamp 0043flashes yellow.
X Press button 0084of garage door remote con-
trol 0083for two seconds, then release it for two
seconds.
X Press button 0084again for two seconds.
X Repeat this sequence on button 0084of remote
control 0083until indicator lamp 0043lights up
green.
When indicator lamp 0043lights up green: pro-
gramming is finished.
When indicator lamp 0043flashes green: pro-
gramming was successful. The next step is to
synchronize the rolling code.
X Release button 0084of remote control 0083of the
garage door drive.
When indicator lamp 0043lights up red: repeat
the programming process for the correspond- ing button on the rear-view mirror. When
doing so, vary the distance between remote
control 0083and the rear-view mirror.
The required distance between remote con-
trol 0083and the integrated garage door opener
depends on the garage door drive system.
Several attempts might be necessary. You
should test every position for at least
25 seconds before trying another position.
Problems when programming If you are experiencing problems programming
the integrated garage door opener on the rear-
view mirror, take note of the following instruc-
tions:
R Check the transmitter frequency used by
garage door drive remote control 0083and
whether it is supported. The transmitter fre-
quency can usually be found on the back of
remote control 0083for the garage door drive.
The integrated garage door opener is com-
patible with devices that have units which operate in the frequency range of 280 to
433 MHz.
R Replace the batteries in garage door remote
control 0083. This increases the likelihood that
garage door remote control 0083will transmit a
strong and precise signal to the integrated
garage door opener.
R When programming, hold remote control 0083
at varying distances and angles from but-
tons 0044to0085 which you are programming. Try
various angles at a distance between 2and
8 inches (5to 20 cm) or at the same angle but at varying distances.
R If a further remote control 0083is available for
the same garage door drive, repeat the same
programming steps with this remote control
0083. Before performing these steps, make sure
that new batteries have been installed in
garage door drive remote control 0083.
R Note that some remote controls only transmit
for a limited amount of time (the indicator
lamp on the remote control goes out). Press
button 0084on remote control 0083again before
transmission ends.
R Align the antenna cable of the garage door
opener unit. This can improve signal recep-
tion/transmission.
Opening/closing the garage door After it has been programmed, the integrated
garage door opener performs the function of the garage door system remote control. Please also
read the operating instructions for the garage
door system.
X Select key position 0048with the Start/Stop
button (Y page 111).
X Press button 0044,0087or0085 which you pro-
grammed to operate the garage door.
Garage door system with a fixed code: indi-
cator lamp 0043lights up green.
Garage door system with a rolling code: indi-
cator lamp 0043flashes green.
The transmitter will transmit a signal as long
as the button is pressed. The transmission is
halted after a maximum of ten seconds and
indicator lamp 0043lights up yellow.
X Press button 0044,0087or0085 again if necessary. Features
233Stowage and features Z
Page 236 of 298
Clearing the memory
Make sure that you clear the memory of the
integrated garage door opener before selling the vehicle.
X Select key position 0048with the Start/Stop
button (Y page 111).
X Press and hold buttons 0044and 0085.
Indicator lamp 0043initially lights up yellow and
then green.
X Release buttons 0044and 0085.
The memory of the integrated garage door
opener in the rear-view mirror is cleared. Floormats
G
WARNING
Objects in the driver's footwell can restrict the pedal travel or obstruct a depressed pedal.
The operating and road safety of the vehicle is
jeopardized. There is a risk of an accident.
Make sure that all objects in the vehicle are
stowed correctly, and that they cannot enter
the driver's footwell. Install the floormats
securely and as specified in order to ensure
sufficient clearance for the pedals. Do not use loose floormats and do not place floormats on
top of one another. X
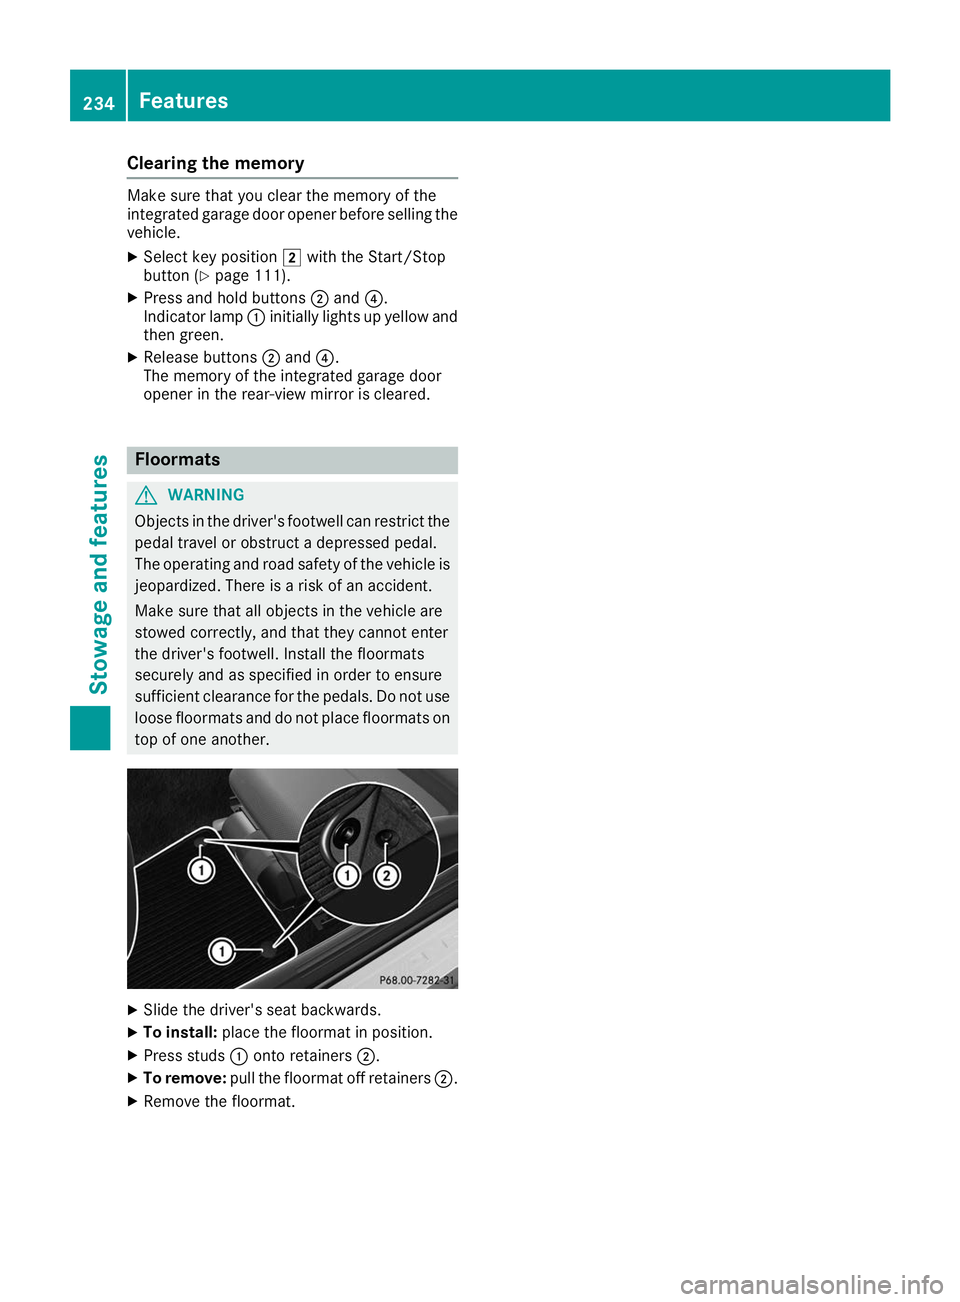
Slide the driver's seat backwards.
X To install: place the floormat in position.
X Press studs 0043onto retainers 0044.
X To remove: pull the floormat off retainers 0044.
X Remove the floormat. 234
FeaturesStowage and features