2019 MERCEDES-BENZ AMG GT ROADSTER start stop button
[x] Cancel search: start stop buttonPage 235 of 298
Proceed as follows:
R if you live in Canada.
R if you have difficulties programming the
garage door opener (regardless of where you
live) when following the programming steps.
X Press and hold one of buttons 0044to0085 on the
integrated garage door opener.
After a short time, indicator lamp 0043lights up
yellow.
X Release the button.
Indicator lamp 0043flashes yellow.
X Press button 0084of garage door remote con-
trol 0083for two seconds, then release it for two
seconds.
X Press button 0084again for two seconds.
X Repeat this sequence on button 0084of remote
control 0083until indicator lamp 0043lights up
green.
When indicator lamp 0043lights up green: pro-
gramming is finished.
When indicator lamp 0043flashes green: pro-
gramming was successful. The next step is to
synchronize the rolling code.
X Release button 0084of remote control 0083of the
garage door drive.
When indicator lamp 0043lights up red: repeat
the programming process for the correspond- ing button on the rear-view mirror. When
doing so, vary the distance between remote
control 0083and the rear-view mirror.
The required distance between remote con-
trol 0083and the integrated garage door opener
depends on the garage door drive system.
Several attempts might be necessary. You
should test every position for at least
25 seconds before trying another position.
Problems when programming If you are experiencing problems programming
the integrated garage door opener on the rear-
view mirror, take note of the following instruc-
tions:
R Check the transmitter frequency used by
garage door drive remote control 0083and
whether it is supported. The transmitter fre-
quency can usually be found on the back of
remote control 0083for the garage door drive.
The integrated garage door opener is com-
patible with devices that have units which operate in the frequency range of 280 to
433 MHz.
R Replace the batteries in garage door remote
control 0083. This increases the likelihood that
garage door remote control 0083will transmit a
strong and precise signal to the integrated
garage door opener.
R When programming, hold remote control 0083
at varying distances and angles from but-
tons 0044to0085 which you are programming. Try
various angles at a distance between 2and
8 inches (5to 20 cm) or at the same angle but at varying distances.
R If a further remote control 0083is available for
the same garage door drive, repeat the same
programming steps with this remote control
0083. Before performing these steps, make sure
that new batteries have been installed in
garage door drive remote control 0083.
R Note that some remote controls only transmit
for a limited amount of time (the indicator
lamp on the remote control goes out). Press
button 0084on remote control 0083again before
transmission ends.
R Align the antenna cable of the garage door
opener unit. This can improve signal recep-
tion/transmission.
Opening/closing the garage door After it has been programmed, the integrated
garage door opener performs the function of the garage door system remote control. Please also
read the operating instructions for the garage
door system.
X Select key position 0048with the Start/Stop
button (Y page 111).
X Press button 0044,0087or0085 which you pro-
grammed to operate the garage door.
Garage door system with a fixed code: indi-
cator lamp 0043lights up green.
Garage door system with a rolling code: indi-
cator lamp 0043flashes green.
The transmitter will transmit a signal as long
as the button is pressed. The transmission is
halted after a maximum of ten seconds and
indicator lamp 0043lights up yellow.
X Press button 0044,0087or0085 again if necessary. Features
233Stowage and features Z
Page 236 of 298
Clearing the memory
Make sure that you clear the memory of the
integrated garage door opener before selling the vehicle.
X Select key position 0048with the Start/Stop
button (Y page 111).
X Press and hold buttons 0044and 0085.
Indicator lamp 0043initially lights up yellow and
then green.
X Release buttons 0044and 0085.
The memory of the integrated garage door
opener in the rear-view mirror is cleared. Floormats
G
WARNING
Objects in the driver's footwell can restrict the pedal travel or obstruct a depressed pedal.
The operating and road safety of the vehicle is
jeopardized. There is a risk of an accident.
Make sure that all objects in the vehicle are
stowed correctly, and that they cannot enter
the driver's footwell. Install the floormats
securely and as specified in order to ensure
sufficient clearance for the pedals. Do not use loose floormats and do not place floormats on
top of one another. X
Slide the driver's seat backwards.
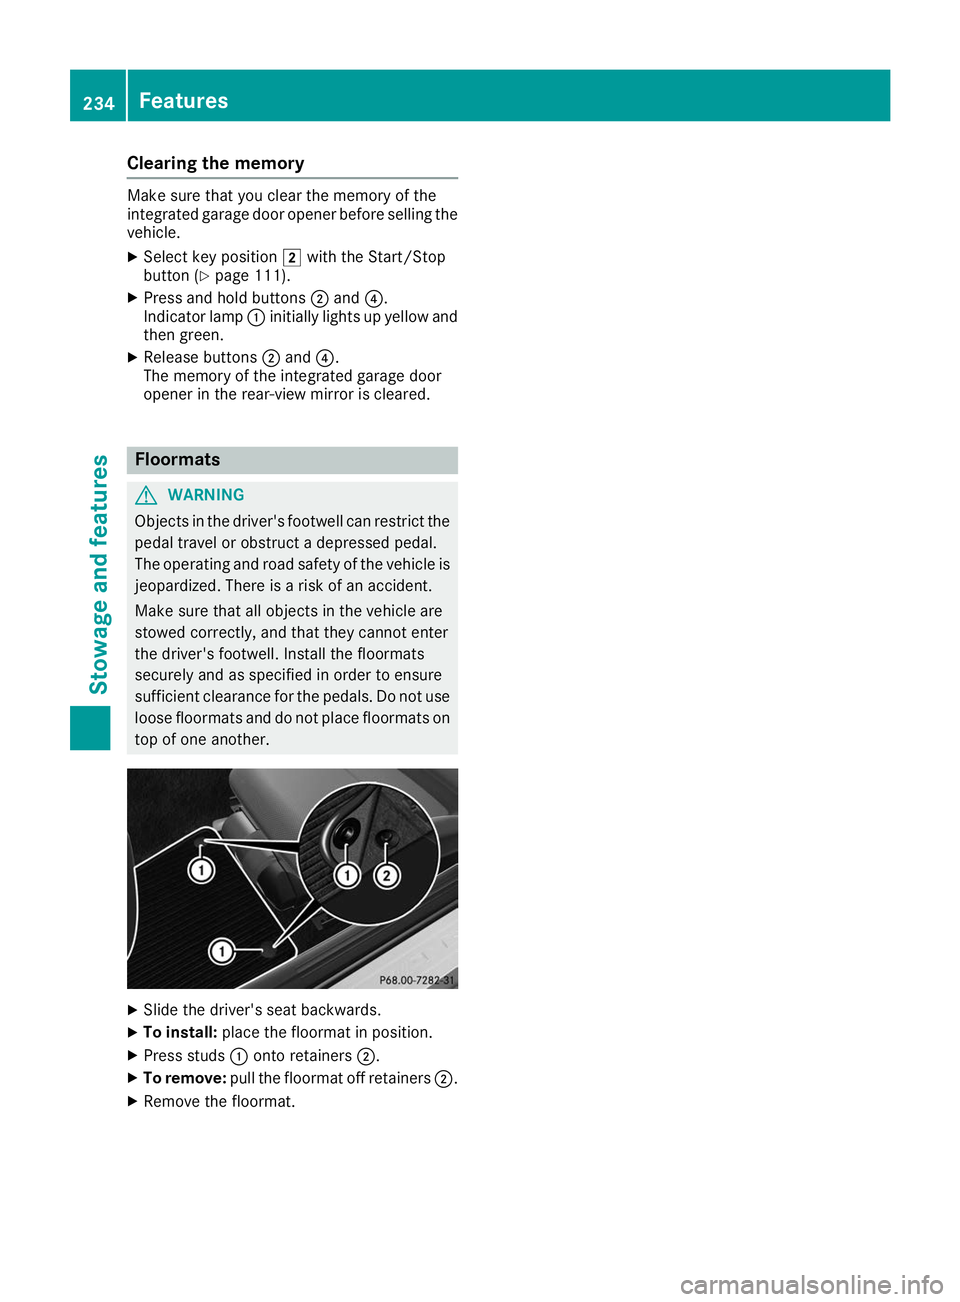
X To install: place the floormat in position.
X Press studs 0043onto retainers 0044.
X To remove: pull the floormat off retainers 0044.
X Remove the floormat. 234
FeaturesStowage and features
Page 239 of 298
X
Pull oil dipstick 0043out of the dipstick guide
tube.
X Wipe off oil dipstick 0043. X
Slowly slide oil dipstick 0043into the guide tube
to the stop, and take it out again.
If the level is between MIN mark 0087and MAX
mark 0044, the oil level is correct.
X If the oil level has dropped to MIN mark 0087or
below, add 1.1 US qt (1.0 liter) engine oil.
Checking the oil level using the on-board computer Calling up the oil level measurement
X Select key position 0048with the Start/Stop button.
X Use 00E2 on the steering wheel to call up the list of menus.
X Press the 0064or0063 button on the steering wheel to select the Service
Service menu.
X Confirm by pressing 0076on the steering wheel.
X Use 0064 or0063 to select the Engine Oil Level
Engine Oil Level submenu.
X Press 0076to confirm the selection.
The Measuring Engine Oil Level Accurate Only When Vehicle Is Level
Measuring Engine Oil Level Accurate Only When Vehicle Is Level message
appears in the multifunction display.
The measurement takes a few seconds. You will see a message in the multifunction display. The
messages are explained in the following chapter.
Engine oil level display messages Display messages
Possible causes/consequences and
0050 0050Solutions Engine Oil Level OK
Engine Oil Level OK The engine oil level is correct.
Check Engine Oil
Check Engine Oil
Level (Add 1 Liter) Level (Add 1 Liter) The engine oil level is too low.
X Add 1.1 US qt (1.0 liter) of engine oil. Reduce Engine Oil
Reduce Engine Oil
Level Level The engine oil level is too high.
X Have excess engine oil siphoned off. For Engine Oil
For Engine Oil
Level Level
Ignition
Ignition Must
Must
Be On
Be On The ignition is switched off.
X Select key position 0048with the Start/Stop button. Need More Time to
Need More Time to
Check Engine Oil Check Engine Oil
Level Level The required waiting period was not observed.
X The engine must be at regular operating temperature.
Measurements can only be taken within the first four minutes after
the engine has been switched off. Engine Oil Level
Engine Oil Level
Not Not
Measurable
Measurable with
with
Engine Running
Engine Running The engine is running; oil level measurement is not possible.
X Switch off the engine.
X Repeat the measurement. Observe the required waiting period. Engine compartment
237Maintenance and care Z
Page 241 of 298
Additional service products
Checking coolant level G
WARNING
Certain components in the engine compart-
ment, such as the engine, radiator and parts
of the exhaust system, can become very hot.
Working in the engine compartment poses a
risk of injury.
Where possible, let the engine cool down and touch only the components described in the
following. G
WARNING
Opening the hood when the engine is over-
heated or when there is a fire in the engine
compartment could expose you to hot gases
or other service products. There is a risk of
injury.
Let an overheated engine cool down before
opening the hood. If there is a fire in the
engine compartment, keep the hood closed
and contact the fire department. G
WARNING
The cooling system is pressurized, particularly when the motor is warm. If you open the cap, you could be scalded if hot coolant sprays out.
There is a risk of injury.
Let the engine cool down before you open the
cap. Wear protective gloves and protective
eyewear when opening. Open the cap slowly
to release pressure.
! Before starting your journey, make sure that
all engine covers are installed. Otherwise, the engine can be damaged, e.g. through over-
heating. Example
X Park the vehicle on a level surface.
Only check the coolant level when the vehicle
is on a level surface and the engine has cooled
down.
X Select key position 0048with the Start/Stop
button.
X Check the coolant temperature display in the
instrument cluster.
The coolant temperature must be below
158 ‡ (70 †).
X Select key position 0092with the Start/Stop
button.
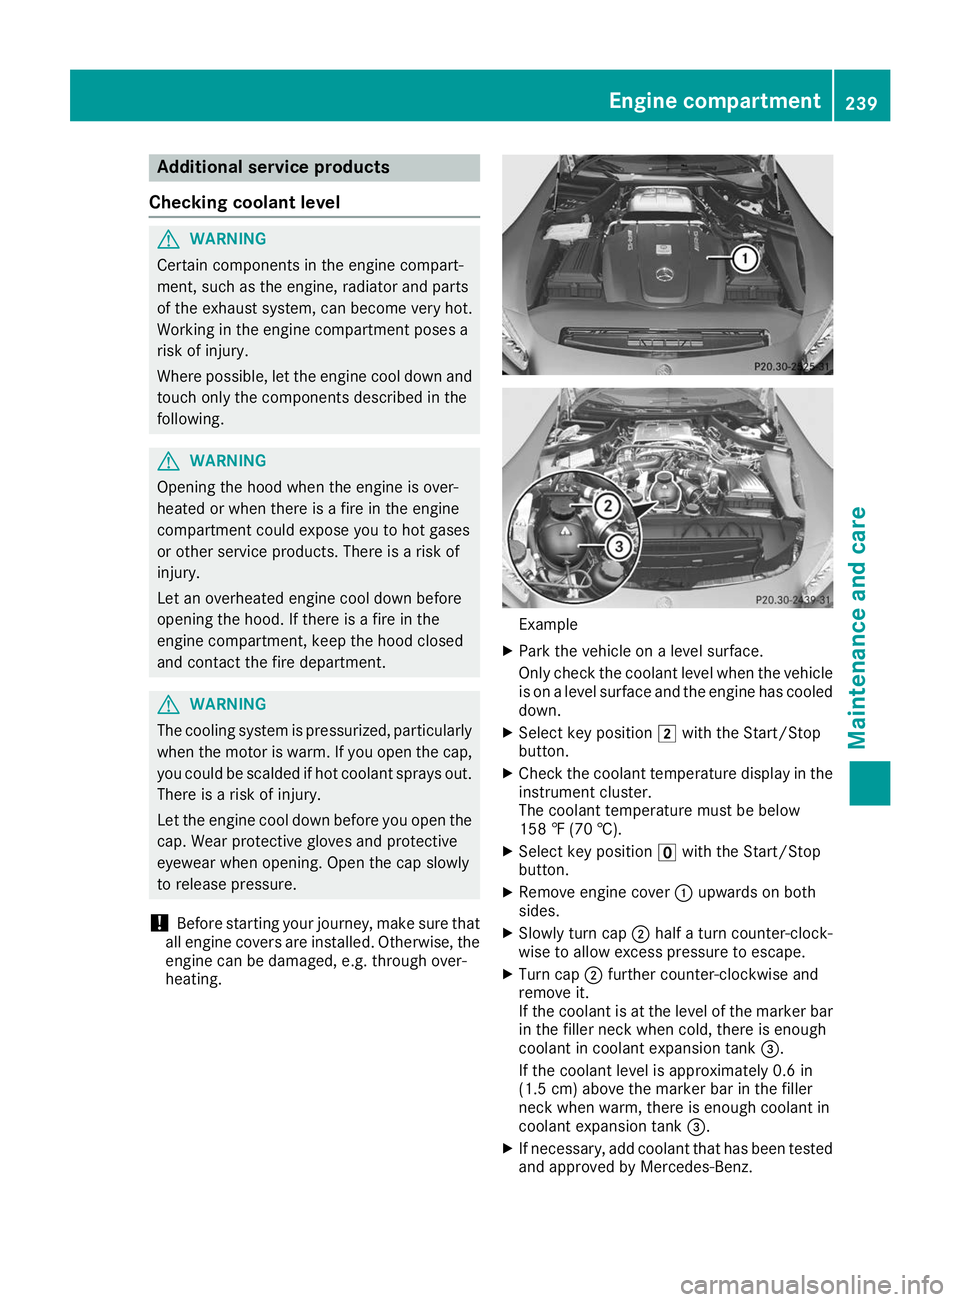
X Remove engine cover 0043upwards on both
sides.
X Slowly turn cap 0044half a turn counter-clock-
wise to allow excess pressure to escape.
X Turn cap 0044further counter-clockwise and
remove it.
If the coolant is at the level of the marker bar in the filler neck when cold, there is enough
coolant in coolant expansion tank 0087.
If the coolant level is approximately 0.6 in
(1.5 cm) above the marker bar in the filler
neck when warm, there is enough coolant in
coolant expansion tank 0087.
X If necessary, add coolant that has been tested
and approved by Mercedes-Benz. Engine compartment
239Maintenance and care Z
Page 244 of 298

drive for a few minutes after cleaning. By
heating up the brakes, the brake discs and
pads dry. The vehicle can then be parked for a
long period of time.
Regular care of your vehicle is a condition for
retaining the quality in the long term.
Use care products and cleaning agents recom-
mended and approved by Mercedes-Benz. Washing the vehicle and cleaning the
paintwork
Automatic car wash G
WARNING
Braking efficiency is reduced after washing
the vehicle. There is a risk of an accident.
After the vehicle has been washed, brake
carefully while paying attention to the traffic
conditions until full braking power is restored.
! When Active Brake Assist, Active Distance
Assist DISTRONIC or the HOLD function is
activated, the vehicle brakes automatically in
certain situations.
To avoid damage to the vehicle, deactivate
these systems in the following or similar sit-
uations:
R when towing the vehicle
R in the car wash
! Preferably use automatic car washes with
adjustable high-pressure pre-cleaning. This
corresponds with the specification for the
Cabriolet program. In car washes that use
high water pressures, there is a risk that a
small amount of water may leak into the vehi- cle.
! Make sure that the vehicle is not subse-
quently treated with hot wax.
! Never clean your vehicle in a Touchless
Automatic Car Wash as these use special
cleaning agents. These cleaning agents can
damage the paintwork or plastic parts.
If you have your vehicle cleaned in a high-
pressure automatic car wash, small amounts of water may enter the vehicle. !
If the SmartKey is within the rear detection
range of KEYLESS-GO, the following situa-
tions, for example, could lead to the uninten-
tional opening of the trunk lid:
R when using an automatic car wash
R when using a power washer
Make sure that the SmartKey is at least 10 ft
(3 m) away from the vehicle.
! Make sure that:
R the side windows are fully closed
R the blower of the ventilation/heating sys-
tem is switched off
R the windshield wiper switch is at position
003F
R the rear-view camera is deactivated
The vehicle may otherwise be damaged.
! When washing your vehicle in a tow-through
car wash, use the SmartKey instead of the
Start/Stop button.
Start the engine using the SmartKey. Set the
transmission to 005Cwith the E-SELECT selec-
tor lever. Switch the engine off again with the SmartKey by turning the SmartKey to position
0048. Make sure that you then leave the Smart-
Key in position 0048. You may otherwise dam-
age the vehicle, the transmission or the car
wash.
Check the transmission position in the instru-
ment cluster.
! Before switching off the engine, use the
E‑SELECT lever to shift the transmission to
005C. If you open the driver's or front-passenger
door, the transmission remains in this posi-
tion for up to 30 minutes if the key is in the
ignition, even if the engine is switched off. If
you do not shift the transmission to 005Cusing
the E‑SELECT lever beforehand, it shifts auto-
matically to parking position 005Dand locks the
wheels if the driver's or front-passenger door
is opened when the engine is switched off.
This may damage the vehicle, the transmis-
sion or the car wash.
You can wash the vehicle in an automatic car
wash from the very start.
If the vehicle is very dirty, pre-wash it before
cleaning it in an automatic car wash.
After using an automatic car wash, wipe off wax from the windshield and the wiper blades. This
will prevent smears and reduce wiping noises
caused by residue on the windshield. 242
CareMaintenance and care
Page 254 of 298
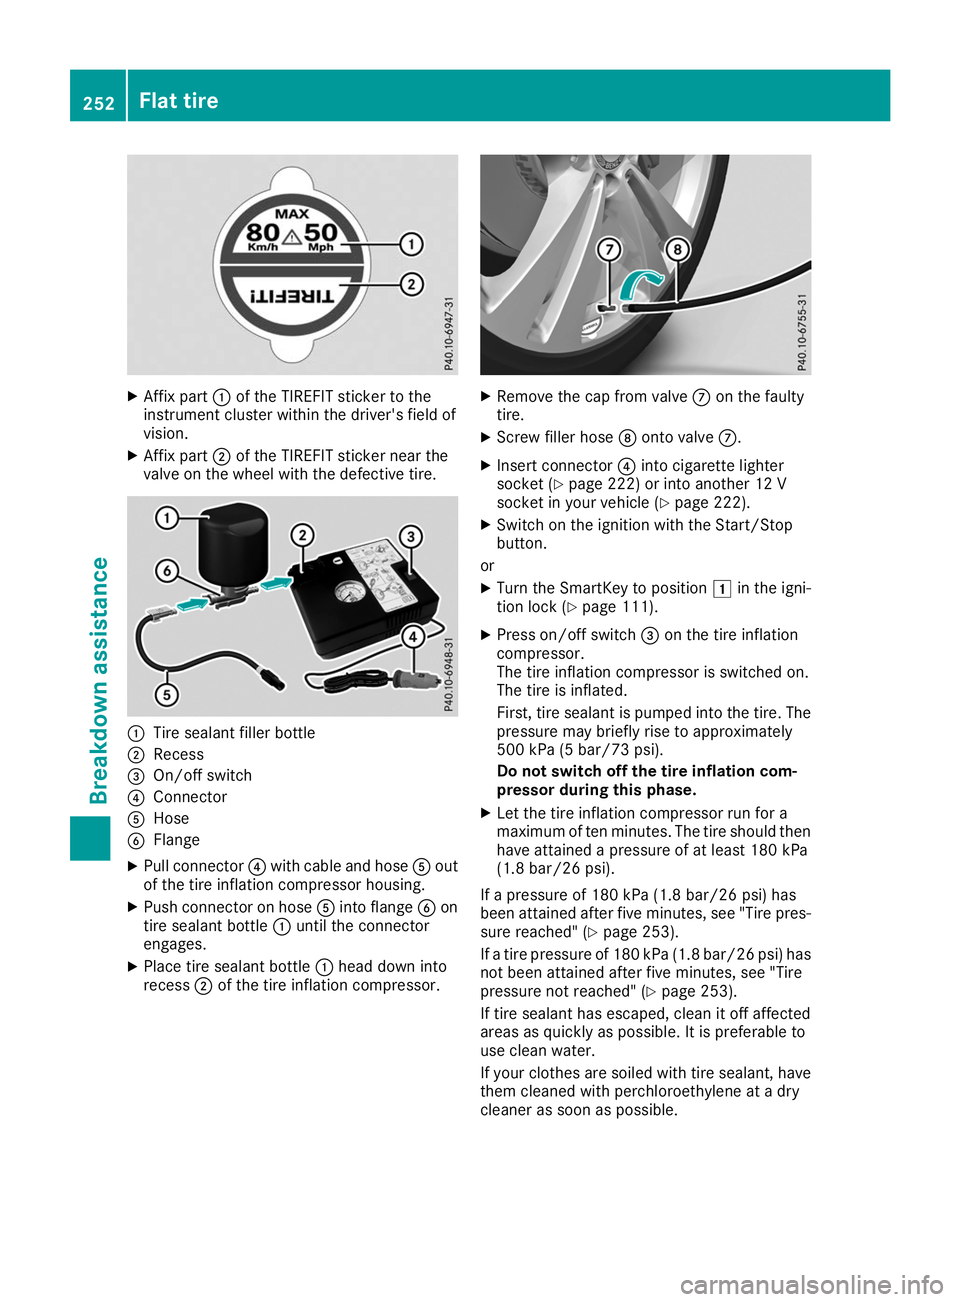
X
Affix part 0043of the TIREFIT sticker to the
instrument cluster within the driver's field of
vision.
X Affix part 0044of the TIREFIT sticker near the
valve on the wheel with the defective tire. 0043
Tire sealant filler bottle
0044 Recess
0087 On/off switch
0085 Connector
0083 Hose
0084 Flange
X Pull connector 0085with cable and hose 0083out
of the tire inflation compressor housing.
X Push connector on hose 0083into flange 0084on
tire sealant bottle 0043until the connector
engages.
X Place tire sealant bottle 0043head down into
recess 0044of the tire inflation compressor. X
Remove the cap from valve 006Bon the faulty
tire.
X Screw filler hose 006Conto valve 006B.
X Insert connector 0085into cigarette lighter
socket (Y page 222) or into another 12 V
socket in your vehicle (Y page 222).
X Switch on the ignition with the Start/Stop
button.
or X Turn the SmartKey to position 0047in the igni-
tion lock (Y page 111).
X Press on/off switch 0087on the tire inflation
compressor.
The tire inflation compressor is switched on.
The tire is inflated.
First, tire sealant is pumped into the tire. The
pressure may briefly rise to approximately
500 kPa (5 bar/73 psi).
Do not switch off the tire inflation com-
pressor during this phase.
X Let the tire inflation compressor run for a
maximum of ten minutes. The tire should then have attained a pressure of at least 180 kPa
(1.8 bar/26 psi).
If a pressure of 180 kPa (1.8 ba r/26 psi) has
been at tained after five minutes, see "Tire pres-
sure reached" (Y page 253).
If a tire pressure of 180 kPa (1.8 bar/26 psi) has not been attained after five minutes, see "Tire
pressure not reached" (Y page 253).
If tire sealant has escaped, clean it off affected
areas as quickly as possible. It is preferable to
use clean water.
If your clothes are soiled with tire sealant, have them cleaned with perchloroethylene at a dry
cleaner as soon as possible. 252
Flat tireBreakdown assistance
Page 260 of 298
X
Start the engine of your own vehicle.
X Let the engines run for several minutes.
X Before disconnecting the jumper cables, switch on an electrical consumer in your own vehicle,
e.g. the rear window heating or the lighting.
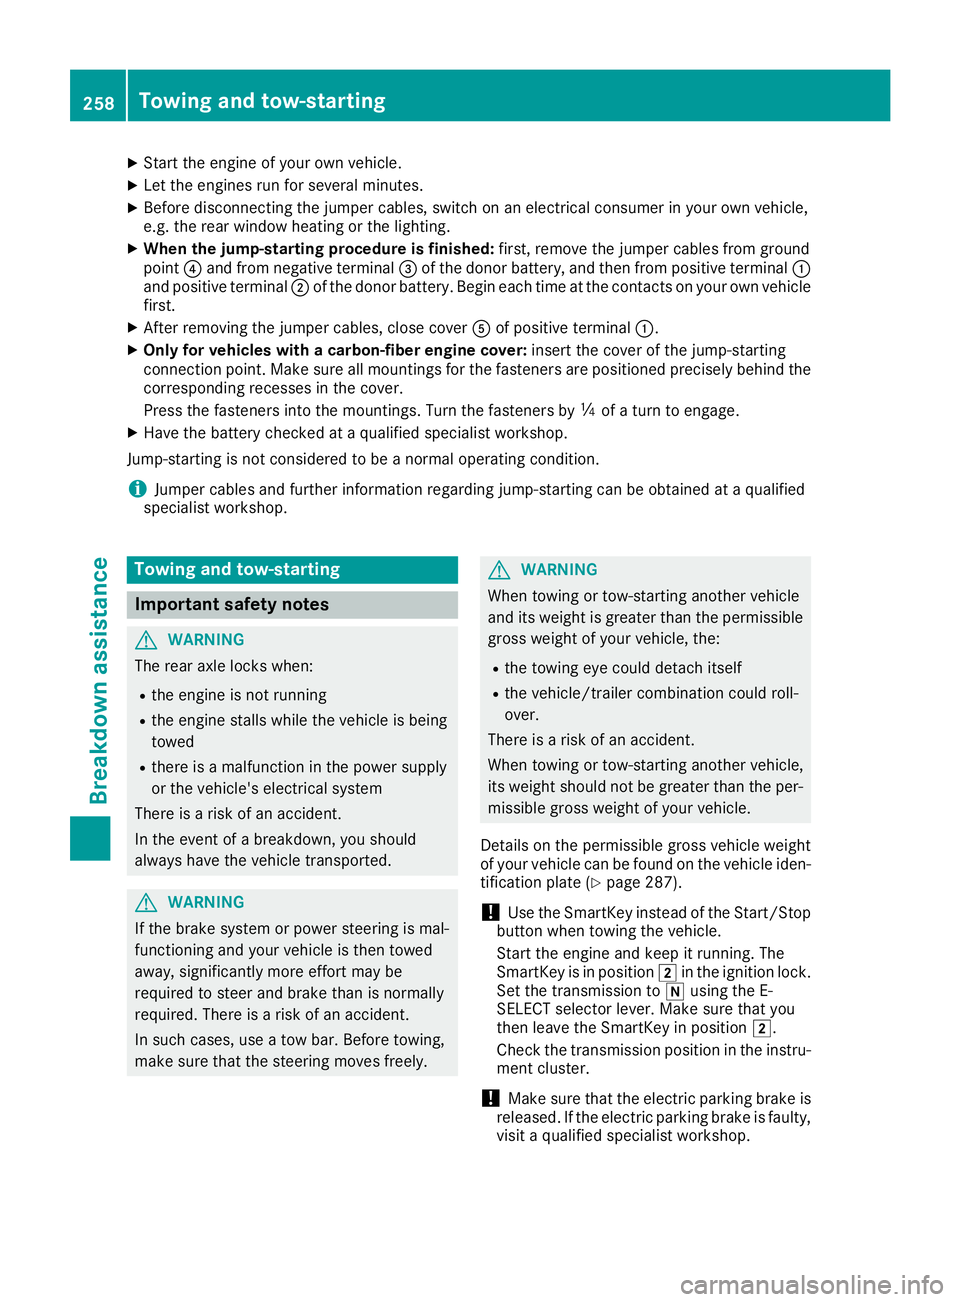
X When the jump-starting procedure is finished: first, remove the jumper cables from ground
point 0085and from negative terminal 0087of the donor battery, and then from positive terminal 0043
and positive terminal 0044of the donor battery. Begin each time at the contacts on your own vehicle
first.
X After removing the jumper cables, close cover 0083of positive terminal 0043.
X Only for vehicles with a carbon-fiber engine cover: insert the cover of the jump-starting
connection point. Make sure all mountings for the fasteners are positioned precisely behind the corresponding recesses in the cover.
Press the fasteners into the mountings. Turn the fasteners by 00C4of a turn to engage.
X Have the battery checked at a qualified specialist workshop.
Jump-starting is not considered to be a normal operating condition.
i Jumper cables and further information regarding jump-starting can be obtained at a qualified
specialist workshop. Towing and tow-starting
Important safety notes
G
WARNING
The rear axle locks when:
R the engine is not running
R the engine stalls while the vehicle is being
towed
R there is a malfunction in the power supply
or the vehicle's electrical system
There is a risk of an accident.
In the event of a breakdown, you should
always have the vehicle transported. G
WARNING
If the brake system or power steering is mal-
functioning and your vehicle is then towed
away, significantly more effort may be
required to steer and brake than is normally
required. There is a risk of an accident.
In such cases, use a tow bar. Before towing,
make sure that the steering moves freely. G
WARNING
When towing or tow-starting another vehicle
and its weight is greater than the permissible gross weight of your vehicle, the:
R the towing eye could detach itself
R the vehicle/trailer combination could roll-
over.
There is a risk of an accident.
When towing or tow-starting another vehicle,
its weight should not be greater than the per- missible gross weight of your vehicle.
Details on the permissible gross vehicle weight
of your vehicle can be found on the vehicle iden-
tification plate (Y page 287).
! Use the SmartKey instead of the Start/Stop
button when towing the vehicle.
Start the engine and keep it running. The
SmartKey is in position 0048in the ignition lock.
Set the transmission to 005Cusing the E-
SELECT selector lever. Make sure that you
then leave the SmartKey in position 0048.
Check the transmission position in the instru-
ment cluster.
! Make sure that the electric parking brake is
released. If the electric parking brake is faulty,
visit a qualified specialist workshop. 258
Towing and tow-startingBreakdown assistance
Page 261 of 298
!
Secure the tow rope or tow bar to the towing
eye only. Otherwise, the vehicle could
become damaged.
! When Active Brake Assist, Active Distance
Assist DISTRONIC or the HOLD function is
activated, the vehicle brakes automatically in
certain situations.
To avoid damage to the vehicle, deactivate
these systems in the following or similar sit-
uations:
R when towing the vehicle
R in the car wash
! Do not use the towing eyes for recovery pur-
poses as this could damage the vehicle. If in
doubt, recover the vehicle with a crane.
! When towing, pull away slowly and
smoothly. If the tractive power is too high, the
vehicles could be damaged.
! Shift the automatic transmission to position
005C and do not open the driver's or front-
passenger door when towing the vehicle
away. Otherwise, the automatic transmission may shift to position 005Dwhich can cause
damage to both vehicles.
! Do not tow with sling-type equipment. This
could damage the vehicle.
! You may tow the vehicle for a maximum dis-
tance of 30 miles (50 kilometers). A towing
speed of 30 mph (50 km/h) must not be
exceeded.
For towing distances over 30 miles
(50 kilometers), the entire vehicle must be
raised and transported.
! Observe the transmission fluid temperature
(AMG menu) in the on-board computer when
towing. The transmission oil temperature
must not exceed 250 ‡ (120 †). If this
occurs, you must stop towing immediately.
! Tow-starting the vehicle is not permitted.
The transmission may otherwise be damaged.
Also observe the following notes:
R If the engine does not start, try jump-starting
it (Y page 256). Tow-starting the vehicle is not
permitted.
R If it is not possible to jump-start the vehicle,
have it transported to the nearest qualified
specialist workshop, e.g. an authorized
Mercedes-Benz Service Center. If the vehicle can no longer be driven because of
an accident or breakdown, you have the follow- ing options:
R Transporting the vehicle.
As a rule, you should have the vehicle trans-
ported.
R Towing the vehicle with a tow rope or tow bar.
Only tow the vehicle in exceptional cases. The
engine must be running if you tow the vehicle with a tow rope or tow bar.
If the vehicle has suffered transmission damage, have it transported on a transporter or trailer.
Observe the display messages in the instrument
cluster.
The battery must be connected and charged.
Otherwise, you:
R will not be able to switch on the ignition with
the Start/Stop button
R cannot start the engine
R cannot release the electric parking brake.
R cannot shift the automatic transmission to
position 005C
Disarm the automatic locking feature before the vehicle is towed (Y page 73). You could other-
wise be locked out when pushing or towing the
vehicle. Permitted towing methods
Mercedes-Benz recommends transporting your
vehicle in the case of a breakdown, rather than
towing it away.
When towing away, use a towing rope or a tow-
ing bar with both axles on the ground. Do not use any tow bar systems. Installing/removing the towing eye
Installing the towing eye The bracket for the screw-in towing eye is
behind the radiator trim.
X Remove the towing eye from the vehicle tool
kit (Y page 249). Towing and tow-starting
259Breakdown assistance Z