2019 MERCEDES-BENZ AMG GT ROADSTER roof
[x] Cancel search: roofPage 8 of 298
B
Back button ....................................... 210
BAS (Brake Assist System) ................. 59
Basic settings
see Settings
Battery (SmartKey)
Checking .......................................... 69
Important safety notes .................... 68
Replacing ......................................... 69
Battery (vehicle)
Charging ........................................ 255
Display message ............................ 188
Important safety notes .................. 254
Jump starting ................................. 256
Replacing ....................................... 256
Belt
see Seat belts
Belt warning ......................................... 44
Blind Spot Assist
Activating/deactivating (on-
board computer) ............................ 168
Display message ............................ 190
Notes/function .............................. 155
Blower
see Climate control
Bluetooth ®
Searching for a mobile phone ........ 216
see also Digital Operator's Man-
ual .................................................. 209
Brake Assist System
see BAS (Brake Assist System)
Brake assistance
see BAS (Brake Assist System)
Brake fluid
Display message ............................ 180
Notes ............................................. 291
Brake force distribution
see EBD (electronic brake force
distribution)
Brakes
ABS .................................................. 58
AMG high-performance and
ceramic brakes .............................. 133
BAS .................................................. 59
Brake fluid (notes) ......................... 291
Braking assistance appropriate to
the situation ..................................... 61 Display message ............................ 175
EBD .................................................. 64
Hill start assist ............................... 112
Important safety notes .................. 132
Maintenance .................................. 133
Parking brake ................................ 129
Riding tips ...................................... 132
Warning lamp ................................. 200
Braking assistance appropriate to
the situation
Function/note s................................ 61
Breakdown assistance
Where will I find...? ........................ 249
see Flat tire
see Towing away
Buttons on the steering wheel ......... 160 C
Cabriolet Soft top ............................................ 80
California
Important notice for retail cus-
tomers and lessees .......................... 25
Calling up a malfunction
see Display messages
Calling up the climate control bar
Multimedia system ........................ 213
Calling up the climate control
menu
Multimedia system ........................ 213
Car
see Vehicle
Care
Car wash ........................................ 242
Carpets .......................................... 248
Display ........................................... 247
Exhaust pipe .................................. 247
Exterior lights ................................ 246
Gear or selector lever .................... 247
General notes ................................ 241
Interior ........................................... 247
Matte finish ................................... 244
Paint .............................................. 243
Plastic trim .................................... 247
Power washe r................................ 243
Rear view camera .......................... 246
Roof lining ...................................... 248 6
Index
Page 18 of 298
Radio mode
see also Digital Operator's Man-
ual .................................................. 209
Radio-wave reception/transmis-
sion in the vehicle
Declaration of conformity ................ 27
Reading lamp ....................................... 99
Rear axle steering
Function/notes ............................ .113
Rear fog lamp
Display message ............................ 186
Switching on/off .............................. 97
Rear lamps
see Lights
Rear spoiler
Display message ............................ 196
Extending/retracting ..................... 229
Problem ......................................... 230
Rear view camera
Cleaning instructions ..................... 246
Function/notes ............................ .151
Switching on/off ........................... 151
Rear window defroster
Problem (malfunction) ................... 107
Switching on/off ........................... 107
Rear-view mirror
Anti-glare (manual) .......................... 91
Dipping (automatic) ......................... 93
Recycling
see Protection of the environment
Reflective safety jacket .................... 249
Refrigerant (air-conditioning sys-
tem)
Important safety notes .................. 293
Refueling
Fuel gauge ....................................... 34
Important safety notes .................. 125
Refueling process .......................... 126
see Fuel
Remote control
Garage door opene r....................... 231
Replacing bulbs
General notes ................................ 100
Reporting safety defects .................... 28
Rescue card ......................................... 29
Reserve (fuel tank)
see Fuel Reserve fuel
Display message ............................ 189
Warning lamp ................................. 204
Restraint system
Display message ............................ 182
Introduction ..................................... 40
Warning lamp ................................. 203
Warning lamp (function) ................... 41
Reversing feature
Side windows ................................... 77
Reversing lamps (display mes-
sage) ................................................... 186
Roadside Assistance (breakdown) .... 26
Roll away protection
see HOLD function
Roof
see Soft top
Roof lining and carpets (cleaning
guidelines) ......................................... 248
Route guidance
see also Digital Operator's Man-
ual .................................................. 209 S
Safety Children in the vehicle ..................... 55
see Occupant safety
see Operating safety
Safety system
see Driving safety systems
SD card
Inserting/removing ........................ 217
SD memory card
see also Digital Operator's Man-
ual .................................................. 209
Selecting ........................................ 165
Search & Send
see also Digital Operator's Man-
ual .................................................. 209
Seat
Correct driver's seat position ........... 84
Seat belts
Adjusting the driver's and front-
passenger seat belt ......................... 44
Cleaning ......................................... 248
Correct usage .................................. 43
Fastening ......................................... 44 16
Index
Page 26 of 298
Protecting the environment
General notes
H
Environmental note
The pollutant emission of your vehicle is
directly related to the vehicle's operation.
You can make a contribution to environmental protection by operating your vehicle in an
environmentally responsible manner. To do
this, observe the following recommendations
on operating conditions and your personal
driving style.
Operating conditions:
R Make sure that the tire pressure is correct.
R Do not carry any unnecessary weight with
you (e.g. a roof rack which is no longer
required).
R Observe the service intervals. A regularly
serviced vehicle will contribute to environ-
mental protection.
R Always have maintenance work carried out
at a qualified specialist workshop.
Personal driving style:
R Do not depress the accelerator pedal when
starting the engine.
R Do not warm up the engine while station-
ary.
R Drive carefully and maintain a sufficient dis-
tance to other vehicles.
R Avoid frequent, sudden acceleration and
braking.
R Shift gears in good time and use each gear
only up to 00C3of its maximum engine speed.
R Switch off the engine in stationary traffic,
e.g. use the ECO start/stop function.
R Drive in a fuel-saving manner. Pay attention
to the ECO display for a fuel-efficient driving
style. Environmental concerns and recom-
mendations
Wherever the Operator's Manual requires you to
dispose of materials, first try to recycle or re-use them. Observe the relevant environmental rules
and regulations when disposing of materials. In
this way you will help to protect the environ-
ment. Genuine Mercedes-Benz parts
H
Environmental note
Daimler AG also supplies reconditioned major
assemblies and parts which are of the same
quality as new parts. They are covered by the
same Limited Warranty entitlements as new
parts.
! Air bags and Emergency Tensioning Devi-
ces, as well as control units and sensors for
these restraint systems, may be installed in
the following areas of your vehicle:
R doors
R door pillars
R door sills
R seats
R cockpit
R instrument cluster
R center console
Do not install accessories such as audio sys-
tems in these areas. Do not carry out repairs or welding. You could impair the operating
efficiency of the restraint systems.
Have aftermarket accessories installed at a
qualified specialist workshop.
You could jeopardize the operating safety of
your vehicle if you use parts, tires and wheels as well as accessories relevant to safety which
have not been approved by Mercedes-Benz. This could lead to malfunctions in safety-relevant
systems, e.g. the brake system. Use only genu-
ine Mercedes-Benz parts or parts of equal qual-
ity. Only use tires, wheels and accessories that
have been specifically approved for your vehi-
cle.
Genuine Mercedes-Benz parts are subject to
strict quality control. Every part has been spe-
cifically developed, manufactured or selected
for and adapted to Mercedes-Benz vehicles.
Therefore, only genuine Mercedes-Benz parts
should be used. 24
Genuine Mercedes-Benz partsIntroduction
Page 50 of 298
Occupant Classification System
(OCS)
Introduction The Occupant Classification System (OCS) cat-
egorizes the person in the front-passenger seat.
Depending on that result, the front-passenger
front air bag and front-passenger knee bag are
either enabled or deactivated.
The system does not deactivate:
R the side impact air bag
R the headbag
R the Emergency Tensioning Devices
In vehicles with the AMG Performance seat, the sidebag and the seat belt tensioner are deacti-
vated in the following situation:
R OCS has not categorized the person on the
front-passenger seat as an adult or a person
of corresponding stature and
R the seat belt buckle tongue of the seat belt is
not inserted into the front-passenger seat beltbuckle
Requirements To be classified correctly, the front passenger
must sit:
R with the seat belt fastened correctly
R in an almost upright position with their back
against the seat backrest
R with their feet resting on the floor, if possible
If the front passenger does not observe these
conditions, OCS may produce a false classifica- tion, e.g. because the front passenger:
R transfers their weight by supporting them-
selves on a vehicle armrest
R sits in such a way that their weight is raised
from the seat cushion
If you install a child restraint system on the
front-passenger seat, be sure to observe the
correct positioning of the child restraint system. Never place objects under or behind the child
restraint system, e.g. a cushion. The entire base
of the child restraint system must always rest on the seat cushion of the front-passenger seat.
The backrest of the forward-facing child
restraint system must lie as flat as possible
against the backrest of the front-passenger
seat. The child restraint system must not touch the
roof or be subjected to a load by the head
restraint. Adjust the angle of the seat backrest
and the head restraint position accordingly.
Only then can OCS be guaranteed to function
correctly. Always observe the child restraint sys-
tem manufacturer's installation and operating
instructions.
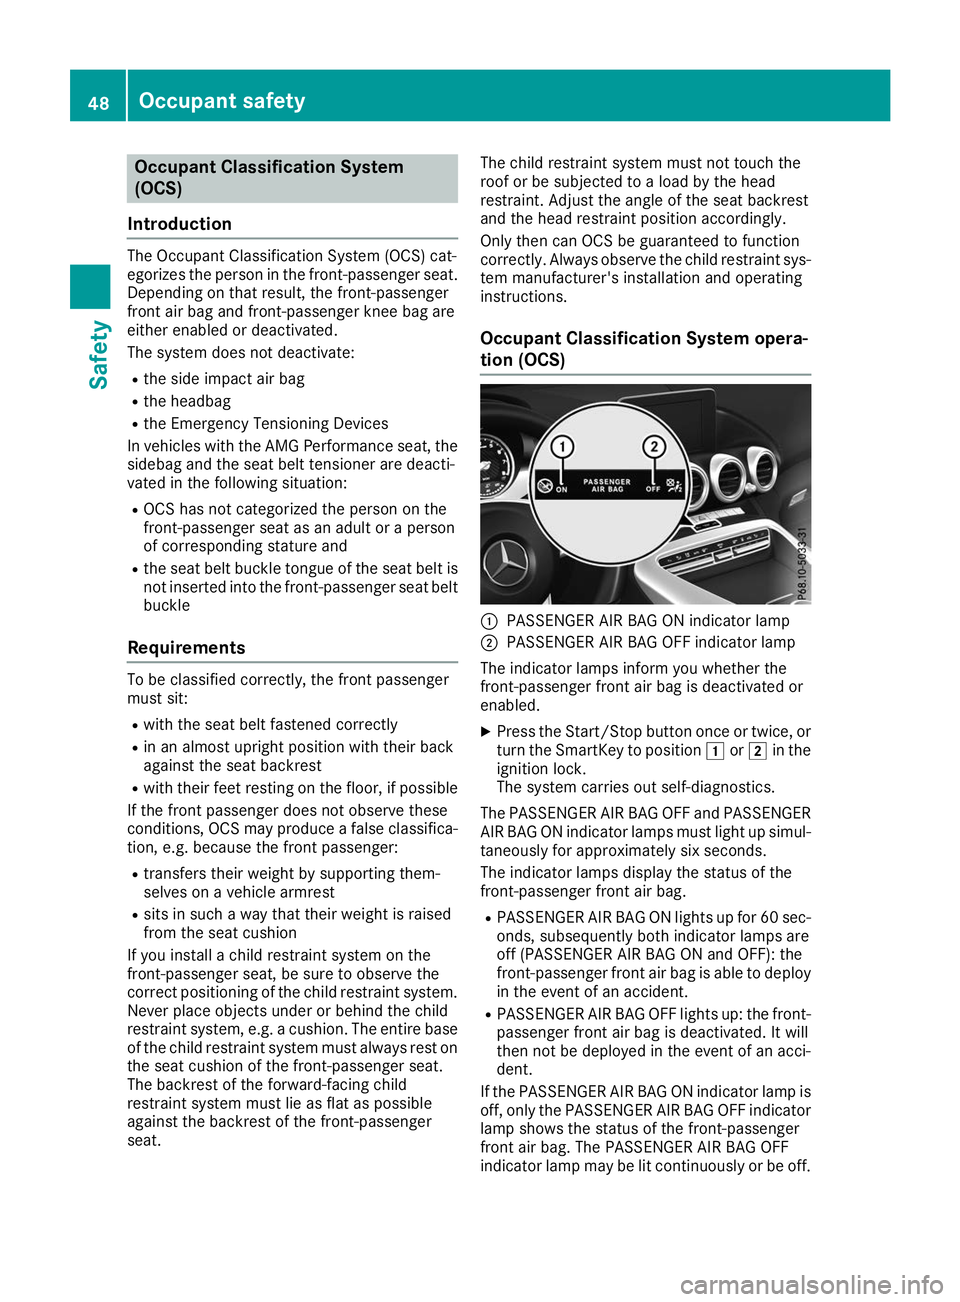
Occupant Classification System opera-
tion (OCS) 0043
PASSENGER AIR BAG ON indicator lamp
0044 PASSENGER AIR BAG OFF indicator lamp
The indicator lamps inform you whether the
front-passenger front air bag is deactivated or
enabled.
X Press the Start/Stop button once or twice, or
turn the SmartKey to position 0047or0048 in the
ignition lock.
The system carries out self-diagnostics.
The PASSENGER AIR BAG OFF and PASSENGER
AIR BAG ON indicator lamps must light up simul- taneously for approximately six seconds.
The indicator lamps display the status of the
front-passenger front air bag.
R PASSENGER AIR BAG ON lights up for 60 sec-
onds, subsequently both indicator lamps are
off (PASSENGER AIR BAG ON and OFF): the
front-passenger front air bag is able to deploy
in the event of an accident.
R PASSENGER AIR BAG OFF lights up: the front-
passenger front air bag is deactivated. It will
then not be deployed in the event of an acci-
dent.
If the PASSENGER AIR BAG ON indicator lamp is off, only the PASSENGER AIR BAG OFF indicator
lamp shows the status of the front-passenger
front air bag. The PASSENGER AIR BAG OFF
indicator lamp may be lit continuously or be off. 48
Occupant safetySafety
Page 59 of 298
as intended. The child cannot then be
restrained in the event of an accident, heavy
braking or sudden changes of direction. There is an increased risk of injury, possibly even
fatal.
Replace child restraint systems which have
been damaged or subjected to a load in an
accident as soon as possible. Have the secur-
ing systems on the child restraint system
checked at a qualified specialist workshop,
before you install a child restraint system
again.
The securing system of child restraint systems is the seat belt system.
If you install a child restraint system on the front
passenger seat, be sure to observe the instruc-
tions and safety notes on the "Occupant Clas-
sification System (OCS)" (Y page 48). There you
will also find information on disabling the front
passenger front air bag.
All child restraint systems must meet the fol-
lowing standards:
R U.S. Federal Motor Vehicle Safety Standards
213 and 225
R Canadian Motor Vehicle Safety Standards
213 and 210.2
Confirmation that the child restraint system cor- responds to the standards can be found on an
instruction label on the child restraint system.
This confirmation can also be found in the instal-
lation instructions that are included with the
child restraint system.
Observe the warning labels in the vehicle inte-
rior and on the child restraint system. Child restraint system on the front
passenger seat
General notes If you install a child restraint system on the
front-passenger seat, always observe the
instructions and safety notes on the "Occupant
Classification System (OCS)" (Y page 48).You can thus avoid the risks that could arise as
a result of:
R an incorrectly categorized person in the front-
passenger seat
R deactivating the front passenger front air bag
unintentionally
R the unsuitable positioning of the child
restraint system, e.g. too close to the dash-
board
Rearward-facing child restraint system If circumstances require you to secure a child in
a rearward-facing child restraint system on the
front-passenger seat, always make sure that the front passenger front air bag is deactivated.
Only if the PASSENGER AIR BAG OFF indicator
lamp is lit continuously (Y page 41), is the front
passenger front air bag deactivated.
Always observe the child restraint system man- ufacturer's installation and operating instruc-
tions.
Forward-facing child restraint system If you secure a child in a forward-facing child
restraint system on the front-passenger seat,
always move the front-passenger seat as far
back as possible. The entire base of the child
restraint system must always rest on the seat
cushion of the front-passenger seat. The back-
rest of the child restraint system must lie as flat
as possible against the backrest of the front-
passenger seat. The child restraint system must
not touch the roof or be subjected to a load by
the head restraint. Adjust the angle of the seat
backrest and the head restraint position accord- ingly. Always make sure that the shoulder belt
strap is correctly routed from the front-
passenger seat belt guide to the shoulder belt
guide on the child restraint system. The shoul-
der belt strap must be routed forward and down
from the front-passenger seat belt guide.
Always observe the child restraint system man-
ufacturer's installation and operating instruc-
tions. Children in the vehicle
57Safety Z
Page 82 of 298
Soft top (Roadster)
Important safety notes
G
WARNING
If you do not fully open/close the soft top, the soft-top hydraulics depressurize after a short
time. This causes the soft top to lower unex-
pectedly and may cause you or others to be
trapped. There is a risk of injury.
Always open or close the soft top completely.
! Never sit on the soft top or store heavy
objects on it. You will otherwise damage the
vehicle soft top and soft-top covers.
! When opening and closing the soft top,
make sure that:
R there is sufficient clearance above it, as the
soft top swings upwards
R there are no objects on the soft top or the
soft-top covers to the side
R the fabric is not dirty, wet or frozen
R the outside temperature is above -10 †
You could otherwise damage the soft top as
well as other parts of the vehicle.
Take the height of the vehicle into account when
opening and closing the soft top (Y page 293).
Make sure that the soft top is dry and clean
before opening or closing it. Otherwise, water or
dirt could enter the vehicle interior or trunk.
You can open or close the soft top:
R when the vehicle is stationary or
R when you do not exceed a speed of 31 mph
(50 km/h) (Max. 37 mph (60 km/h), to avoid
interrupting the closing process while slightly exceeding this speed)
If there is a strong head wind, it may not be pos- sible to close the soft top fully. In order to close
the soft top fully, reduce your speed or stop the
vehicle in accordance with the traffic condi-
tions.
For safety reasons, Mercedes-Benz recom-
mends that you only open or close the soft top
when the vehicle is stationary.
If the soft top does not open or close fully, the
soft-top hydraulics are depressurized and the
soft top is lowered: R
after approximately 7 minutes when the igni-
tion is switched on
R after about
20 seconds if the ignition is switched off Opening/closing with the soft top
switch
Important safety notes G
WARNING
When opening or closing the soft top, there is a risk that parts of the body could become
trapped by moving parts such as the roof
mechanism, the trunk lid, or the side win-
dows. There is a risk of injury.
When opening or closing the roof, make sure
that no parts of the body are in the vicinity of
moving parts. Release the switch if somebody
becomes trapped. G
WARNING
If the vehicle speed exceeds 37 mph
(60 km/h), the soft top stops during the open- ing or closing procedure. This impairs your
view to the rear. There is a risk of an accident.
Reduce your speed to below 37 mph
(60 km/h) or stop the vehicle in accordance
with the traffic conditions. Press or pull the
soft-top switch again in order to open or close the soft top fully.
Opening and closing X
Select SmartKey position 0048with the Start/
Stop button (Y page 110).
X When the vehicle is stationary, depress the
brake pedal and keep it depressed. 80
Soft top (Roadster)Opening and closing
Page 83 of 298
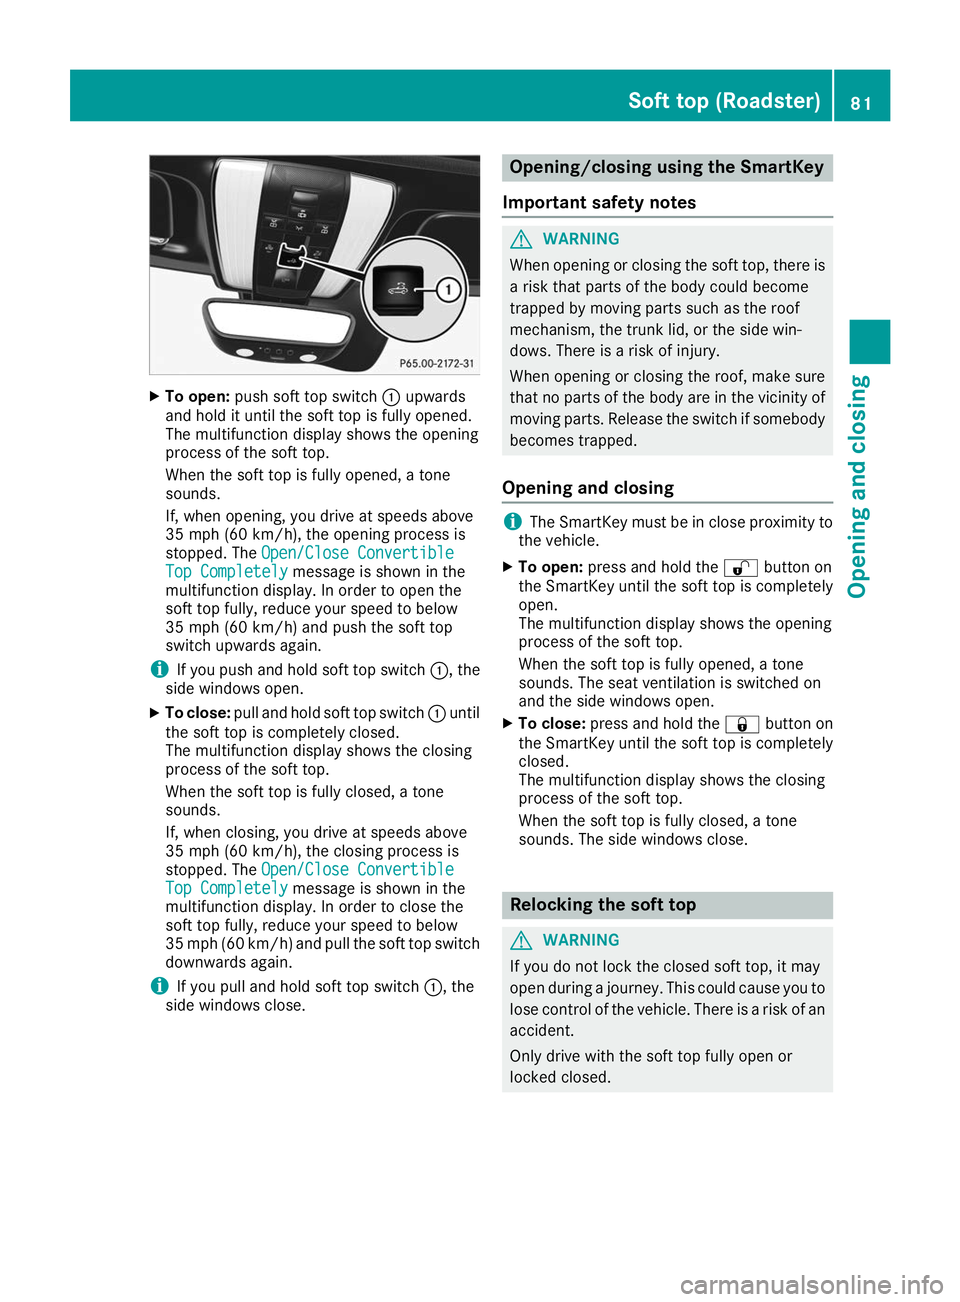
X
To open: push soft top switch 0043upwards
and hold it until the soft top is fully opened.
The multifunction display shows the opening
process of the soft top.
When the soft top is fully opened, a tone
sounds.
If, when opening, you drive at speeds above
35 mph (60 km/h), the opening process is
stopped. The Open/Close Convertible Open/Close Convertible
Top Completely
Top Completely message is shown in the
multifunction display. In order to open the
soft top fully, reduce your speed to below
35 mph (60 km/h) and push the soft top
switch upwards again.
i If you push and hold soft top switch
0043, the
side windows open.
X To close: pull and hold soft top switch 0043until
the soft top is completely closed.
The multifunction display shows the closing
process of the soft top.
When the soft top is fully closed, a tone
sounds.
If, when closing, you drive at speeds above
35 mph (60 km/h), the closing process is
stopped. The Open/Close Convertible Open/Close Convertible
Top Completely
Top Completely message is shown in the
multifunction display. In order to close the
soft top fully, reduce your speed to below
35 mph (60 km/h) and pull the soft top switch
downwards again.
i If you pull and hold soft top switch
0043, the
side windows close. Opening/closing using the SmartKey
Important safety notes G
WARNING
When opening or closing the soft top, there is a risk that parts of the body could become
trapped by moving parts such as the roof
mechanism, the trunk lid, or the side win-
dows. There is a risk of injury.
When opening or closing the roof, make sure
that no parts of the body are in the vicinity of
moving parts. Release the switch if somebody
becomes trapped.
Opening and closing i
The SmartKey must be in close proximity to
the vehicle.
X To open: press and hold the 0036button on
the SmartKey until the soft top is completely
open.
The multifunction display shows the opening
process of the soft top.
When the soft top is fully opened, a tone
sounds. The seat ventilation is switched on
and the side windows open.
X To close: press and hold the 0037button on
the SmartKey until the soft top is completely
closed.
The multifunction display shows the closing
process of the soft top.
When the soft top is fully closed, a tone
sounds. The side windows close. Relocking the soft top
G
WARNING
If you do not lock the closed soft top, it may
open during a journey. This could cause you to lose control of the vehicle. There is a risk of an
accident.
Only drive with the soft top fully open or
locked closed. Soft top (Roadster)
81Opening and closing Z
Page 136 of 298
Driving on wet roads
Hydroplaning If water has accumulated to a certain depth on
the road surface, there is a danger of hydro-
planing occurring, even if:
R you drive at low speeds
R the tires have adequate tread depth
For this reason, in the event of heavy rain or in
conditions in which hydroplaning may occur,
you must drive in the following manner:
R lower your speed
R avoid ruts
R avoid sudden steering movements
R brake carefully
Driving on flooded roads !
Do not drive through flooded areas. Check
the depth of any water before driving through
it. Drive slowly through standing water. Oth-
erwise, water could enter the vehicle interior
or engine compartment. It can then damage
the engine's or automatic transmission's
electronic components. It can also be sucked
in by the engine's air intake connection and
cause engine damage. Winter driving
G
WARNING
If you shift down on a slippery road surface in an attempt to increase the engine's braking
effect, the drive wheels could lose their grip.
There is an increased danger of skidding and
accidents.
Do not shift down for additional engine brak-
ing on a slippery road surface. G
DANGER
If the exhaust pipe is blocked or adequate
ventilation is not possible, poisonous gases
such as carbon monoxide (CO) may enter the vehicle. This is the case, e.g. if the vehicle
becomes trapped in snow. There is a risk of
fatal injury. If you leave the engine or the auxiliary heating
running, make sure the exhaust pipe and area
around the vehicle are clear of snow. To
ensure an adequate supply of fresh air, open a window on the side of the vehicle that is not
facing into the wind.
Have your vehicle winter-proofed at a qualified
specialist workshop at the onset of winter.
Drive particularly carefully on slippery road sur- faces. Avoid sudden acceleration, steering and
braking maneuvers. Do not use cruise control.
If the vehicle threatens to skid or cannot be
stopped when moving at low speed:
X Shift the transmission to position 005C.
The outside temperature indicator is not
designed to serve as an ice-warning device and
is therefore unsuitable for that purpose.
Changes in the outside temperature are dis-
played after a short delay.
Indicated temperatures just above the freezing
point do not guarantee that the road surface is
free of ice. The road may still be icy, especially in wooded areas or on bridges. The vehicle could
skid if you fail to adapt your driving style. Always
adapt your driving style and drive at a speed to
suit the prevailing weather conditions.
You should pay special attention to road condi-
tions when temperatures are around freezing
point.
Further information on driving with snow chains (Y page 265).
Further information on driving with summer
tires (Y page 265).
Observe the notes in the "Winter operation" sec-
tion (Y page 265). Driving systems
Cruise control
General notes Cruise control maintains a constant road speed
for you. It brakes automatically in order to avoid
exceeding the set speed. Change into a lower
gear in good time on long and steep downhill
gradients. This is especially important if the
vehicle is laden. By doing so, you will make use of the braking effect of the engine. This relieves
the load on the brake system and prevents the 134
Driving syste
msDriving and parking