2019 MASERATI QUATTROPORTE dashboard
[x] Cancel search: dashboardPage 87 of 396

Enabling and Disabling Park
Assist By accessing the submenu “Safety &
Driving Assistant” from MTC+ System,
the “Park Assist” can be disabled
(option “Off”). The available options
regarding the warning alerts are:
“Sound” or “Sound + Display”. Refer
to “MTC+ Settings” in section
“Dashboard Instruments and
Controls” for further information.
The front sensors can be enabled or
disabled at any time by pressing the
button on the front dome console.
After pressing the button the
instrument cluster will display the
state of front parking sensors for
approximately five seconds. The
button LED will be on when the front
sensors are disabled. The button LED
will be off when the front sensors are
enabled. If the button is pressed and the system requires service, the LED
will blink momentarily, and then the
LED will be on.
When the shift lever is moved to R
(Reverse) or to D (Drive) at a speed of
7 mph (11 km/h) or below and the
system is disabled, the instrument
cluster will display the “PARK ASSIST
Off” message for 5 seconds until the
shift lever remains in R (Reverse) or
when the shift lever is moved in D
(Drive).
Service the Park Assist System In case of malfunction of the Park
Assist system, the instrument cluster
will actuate a single sound, once per
ignition cycle. The instrument cluster
will display a message when any of
the rear or front sensor(s) are blocked
by snow, mud, or ice and the vehicle is
shifted into R (Reverse) or D (Drive).
The instrument cluster will display a
message when any of the rear or front
sensors are damaged and require
service.
When the shift lever is moved to R
(Reverse) or D (Drive) and the system
has detected a faulted condition, the
instrument cluster will display the
corresponding message for the time
lapse the vehicle is in R (Reverse) or D
(Drive) at speeds less than 7 mph (11 km/h). Under this condition Park
Assist will not operate. See
“Instrument Cluster” in section
“Dashboard Instruments and
Controls” for further information.
If the instrument cluster displays a
message prompting you to clean the
sensors, make sure the outer surface
and the underside of the rear bumper
and/or front bumper is clean and clear
of snow, ice, mud, dirt or other
obstruction and then cycle the ignition
switch. If the message continues to
appear contact the Authorized
Maserati Dealer .
If a failure message is displayed on the
instrument cluster, contact the
Authorized Maserati Dealer .Before Starting
2
83
Page 89 of 396

or when the vehicle is overtaken by
motorcycles or other vehicles on one
or both sides in a queue of traffic.
When you set the volume, only the
parking sensor acoustic signal will be
affected. The radio or any other
devices connected to the vehicle
sound system will not be affected.
Refer to chapter “MTC+ Settings” in
section “Dashboard Instruments and
Controls” for further information.
Rear Parking Camera Your vehicle is equipped with a rear
parking camera that allows you to see
an image on the MTC+ screen of the
rear surroundings of your vehicle
whenever the shift lever is put into R
(Reverse).
When “Parkview Camera Off Delay”
mode is enabled, the rear view image
shall be displayed for up to 10 seconds
after shifting out of R (Reverse).
When “Rearwiew Camera Delay”
mode is enabled, the rear view image
shall be displayed for up to 10 seconds
after shifting out of R (Reverse).
To assist the driver during maneuvers
on dead-ends/roads and on
intersections, the vehicle may be
equipped with an optional surround
view camera system. In this case, the
rear parking camera is integrated into
the surround view camera system. In
both configurations (rear parking
camera only or surround view camera
system), you can always monitor the
rear view. For more details on this
option, see chapter "Surround View
Camera System (optional)" in this
section.
The image will be displayed along
with a caution note to “Check Entire
Surroundings” across the top of the screen. After five seconds this note
will disappear.
The rear parking camera is located on
the rear of the vehicle above the rear
license plate.
When the shift lever is shifted out of R
(Reverse), the rear camera mode is
exited and the navigation or audio
screen appears again.
When displayed, dynamic grid lines (if
the function is set to “MTC+ Settings”)
will illustrate the width of the vehicle
to assist with parking or aligning to a
hitch/receiver. The dynamic grid lines
will show separate zones in different
color that will help indicate the
distance to the rear of the vehicle.Before Starting
2
85
Page 92 of 396
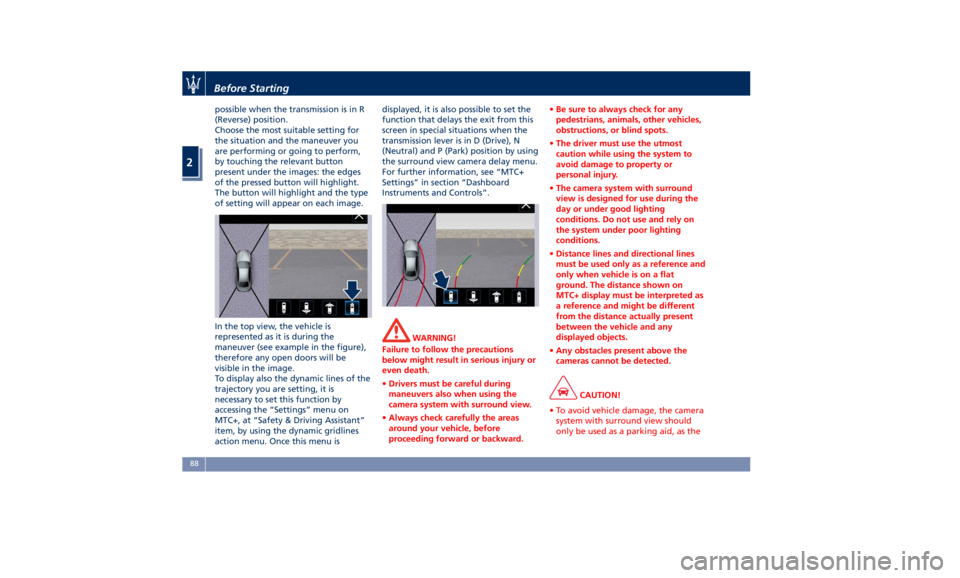
possible when the transmission is in R
(Reverse) position.
Choose the most suitable setting for
the situation and the maneuver you
are performing or going to perform,
by touching the relevant button
present under the images: the edges
of the pressed button will highlight.
The button will highlight and the type
of setting will appear on each image.
In the top view, the vehicle is
represented as it is during the
maneuver (see example in the figure),
therefore any open doors will be
visible in the image.
To display also the dynamic lines of the
trajectory you are setting, it is
necessary to set this function by
accessing the “Settings” menu on
MTC+, at “Safety & Driving Assistant”
item, by using the dynamic gridlines
action menu. Once this menu is displayed, it is also possible to set the
function that delays the exit from this
screen in special situations when the
transmission lever is in D (Drive), N
(Neutral) and P (Park) position by using
the surround view camera delay menu.
For further information, see “MTC+
Settings” in section “Dashboard
Instruments and Controls”.
WARNING!
Failure to follow the precautions
below might result in serious injury or
even death.
• Drivers must be careful during
maneuvers also when using the
camera system with surround view.
• Always check carefully the areas
around your vehicle, before
proceeding forward or backward. • Be sure to always check for any
pedestrians, animals, other vehicles,
obstructions, or blind spots.
• The driver must use the utmost
caution while using the system to
avoid damage to property or
personal injury.
• The camera system with surround
view is designed for use during the
day or under good lighting
conditions. Do not use and rely on
the system under poor lighting
conditions.
• Distance lines and directional lines
must be used only as a reference and
only when vehicle is on a flat
ground. The distance shown on
MTC+ display must be interpreted as
a reference and might be different
from the distance actually present
between the vehicle and any
displayed objects.
• Any obstacles present above the
cameras cannot be detected.
CAUTION!
• To avoid vehicle damage, the camera
system with surround view should
only be used as a parking aid, as theBefore Starting
2
88
Page 95 of 396
checked by the Authorized Maserati
Dealer .
WARNING!
Certain components of this vehicle
such as air bag modules, seat belt
pretensioners, adaptive steering
columns, and button cell batteries
may contain Perchlorate material.
Special handling may apply for service
or vehicle end of life disposal. See
www.dtsc.ca.gov/hazardouswaste/
perchlorate.
Defroster
Check
operation by
selecting the
defrost mode and place the fan system
on high speed (see “Air Conditioning
Controls” chapter in section
“Dashboard Instruments and
Controls”).
You should be able to feel the air
directed against the windshield and
front side windows. Contact
Authorized Maserati Dealer for service
if your defroster is inoperable.
Floor Mat
Always use floor mats designed to fit
the footwell of your vehicle. Use only
floor mats that leave the pedal area
unobstructed and that are firmly secured so that they cannot slip out of
position and interfere with the pedals
or impair safe operation of your
vehicle.
NOTE:
The Authorized Maserati Dealer can
provide you with any information
about the available Maserati floor
mats included in the “Genuine
Accessories” range.
WARNING!
Pedals that cannot move freely can
cause loss of vehicle control and
increase the risk of serious personal
injury.
• Always make sure that floor mats
are properly attached to the proper
fasteners.
• Never place or install floor mats or
other floor coverings in the vehicle
that cannot be properly secured to
prevent them from moving and
interfering with the pedals.
• Never put floor mats or other floor
coverings on top of already installed
floor mats. Additional floor mats
and other coverings will reduce the
size of the pedal area and interfere with the pedals.
• Check mounting of mats on a
regular basis. Always properly
reinstall and secure floor mats that
have been removed for cleaning.
• Always make sure that objects
cannot fall into the driver footwell
while the vehicle is moving. Objects
can become trapped under the
brake pedal and accelerator pedal
causing a loss of vehicle control.
• Mounting posts must be properly
installed, if not equipped from the
factory. Failure to properly follow
floor mat installation or mounting
can cause interference with the
brake pedal and accelerator pedal
operation causing loss of control of
the vehicle.
Tires
•
Examine tires for excessive tread
wear and uneven wear patterns.
• Check for stones, nails, glass, or
other objects lodged in the tread or
sidewall.
• Inspect the tread for cuts and cracks.
• Inspect sidewalls for cuts, cracks and
bulges.
• Check the wheel nuts for tightness.Before Starting
2
91
Page 96 of 396
• Check the tires (see “Tire Inflation
Pressure” chapter in section
“Features and Specifications”) for
proper cold inflation pressure.
Lights and Indicator Lights
• Have someone observe the operation
of exterior lights while you operate
the controls (see “Lights” chapter in
section “Understanding the
Vehicle”).
• Check turn signal and high beam
indicator lights on the instrument
cluster (see “Instrument Cluster”
chapter in section “Dashboard
Instruments and Controls”).
Door Latches
• Check for positive closing, latching,
and locking of doors and trunk lid
(see “Unlock the Vehicle with Key
fob” chapter in this section).
Fluid Leaks
• Check area under vehicle after
overnight parking for recent fluid
leaks (oil, fuel, etc.).
• If gasoline fumes are detected or
fluid leaks are suspected, contact the
Authorized Maserati Dealer . WARNING!
California Proposition 65
Operating, servicing and maintaining
a passenger vehicle or off-road vehicle
can expose you to chemicals including
such as, engine exhaust, carbon
monoxide, phthalates and lead, that
which are known to the State of
California to cause cancer and birth
defects or other reproductive harm. To
minimize exposure, avoid breathing
exhaust, do not idle the engine except
as necessary, service your vehicle in a
well-ventilated area and wear gloves
or wash your hands frequently when
servicing your vehicle. For more
information go to:
www.P65Warnings.ca.gov/passenger-
vehicleBefore Starting
2
92
Page 98 of 396
Interior Components Dashboard ComponentsUnderstanding the Vehicle
3
94
Page 99 of 396

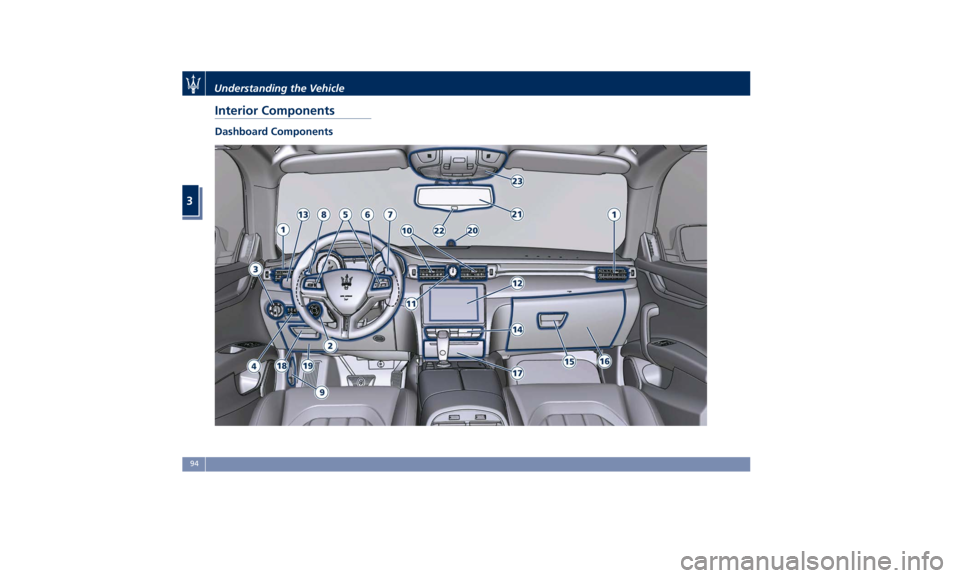
1 Adjustable side air outlets.
2 Engine START/STOP button.
3 Light switch.
4 Light dimmer controls.
5 Steering wheel controls.
6 Instrument cluster.
7* Right shift paddle +.
8* Left shift paddle –.
9 Hood release.
10 Adjustable central air outlets.
11 Analog clock.
12 MTC+ display.
13 Multifuction lever (windshield
wipers, headlight selection and
turn signals).
14 Climate controls.
15 Dashboard glove box handle.
16 Dashboard glove box.
17 Cover for compartment with
AUX, USB, SD memory card
port and slide phone drawer.
18 Storage compartment handle.
19 Storage compartment.
20 Vehicle security light and solar
sensor.
21 Internal rear view mirror. 22 Auto-dimming on/off button.
23 Front dome console.
(*) If equipped.
Central Console Components 1 Automatic transmission shift
lever.
2 Hazard lights switch.
3 Drive mode switches.
4 Electric Parking Brake lever.
5 Glove compartment.
6 Unlock button for central
console with cupholder and
power outlet.
7 Rotary selectors and buttons
foe the multimedia navigation.
8 Cover for cupholder and power
socket compartment.
9 Central console covers with
armrest function.
10 Air outlets (adjustable).
11 Rear power sunshade and rear
seats comfort controls panel.
12 Storage compartment.
13 Rear climate controls panel for
four-zone air conditioner
(optional).A/C Dual – zone
A/C Four – zone Understanding the Vehicle
3
95
Page 103 of 396
Grip switch 1 from the back side and
push it down or up.
Release the switch 1 when the desired
position is reached.
CAUTION!
If the seat's movement does not work,
make sure that the corresponding fuse
is not tripped (see chapter “Fuse
Replacement” in section
“Maintenance and Care”).
Seat Tilt Control (Up/Down)
The
angle of the seat cushion can be
adjusted in four directions.
Pull upward or push the front of the
switch 1 , to move the front cushion
seat in the direction of the switch.
Release the switch 1 when the desired
position is reached.
Seat Back Tilt Control
The angle of the seatback can be
adjusted forward or rearward.
Push the seatback switch 2 forward or
rearward, the upper seatback will
move in the direction of the switch.
Release the switch 2 when the desired
position is reached. Power Lumbar
Push the switch 3 forward or rearward
to increase or decrease the lumbar
support.
Push the switch 3 upward or
downward to raise or lower the
lumbar support.
WARNING!
• Never adjust the seat while driving.
You could lose control of the vehicle.
Moving the seat could distract you
or make you press a pedal
unintentionally.
• Seats should be adjusted before
fastening the seat belts and while
the vehicle is parked.
• Do not ride with the seatback
reclined so that the shoulder belt is
no longer resting against your chest.
In a collision you could slide under
the seat belt, which could result in
serious injury or death.
CAUTION!
Do not place any object under a
power seat or obstruct its movement
as it may cause damage to the seat
controls. Seat movement may become limited if there is an obstruction in the
way.
Front Heated Seats The front seats are equipped with
heaters in both seat cushions and
seatbacks.
The seats comfort commands are in
the “Climate” screen of the MTC+.
They are present in the "Climate"
screen even when the A/C is off. See
“Air Conditioning Controls” in section
“Dashboard Instruments and
Controls” for further details.
WARNING!
• Persons with low skin sensitivity
because of advanced age, chronic
illness, diabetes, spinal cord injury,
medication, alcohol use, exhaustion
or other physical conditions must be
careful when using the seat heater.
It may cause irritation even at low
temperatures, especially if used for
long periods of time.
• Do not place anything on the seat
that insulates against heat, such as a
blanket or cushion. This may cause
the seat heater to overheat.Understanding the Vehicle
3
99