2019 MASERATI QUATTROPORTE dashboard
[x] Cancel search: dashboardPage 120 of 396

Lights Light Switch The light switch located on the left
side of the dashboard is used for the
position/DRL lights, headlights, side
marker, license plate lights and rear
fog lights operation. The regulation
devices beside the switch (see “Interior
Lights” in this chapter) can adjust the
brightness of the instrument cluster
lights, the doors controls rear lighting
and the interior lighting.
Rotate the light switch to the
or
to the
position: the instrument
cluster will display the related telltale. NOTE:
If the headlights or position/DRL lights
are on after the ignition switch is
placed in OFF position, a buzzer will
alert the driver while opening the
driver's door.Understanding the Vehicle
3
116
Page 122 of 396

Automatic Headlights This system automatically turns the
headlights on or off according to
ambient light intensity detected by the
twilight sensor positioned on the inner
surface of the windshield, over the
rear view mirror. To turn the system
on, rotate the lights switch clockwise
to “AUTO” position.
When the automatic system is
activated, the headlight time delay
feature is activated as well. This means
the headlights will stay on for up to 90
seconds after you place the ignition
device into OFF position.
To turn the automatic system off,
move the lights switch out of “AUTO”
position.
NOTE:
The engine must be running before
the headlights turn on in automatic
mode.
WARNING!
The responsibility for turning on the
lights, depending on the daylight and
regulations in force in the country of
use, always lies with the driver. The
automatic system for switching on
and off the external lights is to be considered as an aid for the driver. If
necessary, switch the lights including
the rear fog lights on and off
manually.
Headlights On with Wipers
When
this feature
is active, the
headlights will turn on approximately
10 seconds after activation of the
wipers, if the lights switch is placed in
the “AUTO” position. The headlights
will additionally turn off by
deactivation of the wipers if previously
activated with this function.
NOTE:
The Headlights with wipers feature
may be turned on and off using the
MTC+ System, refer to “MTC+
Settings” in section “Dashboard
Instruments and Controls”.
Headlights Time Delay This safety feature provides headlight
illumination for up to 90 seconds
(programmable) when leaving your
vehicle in an unlit area. To activate the
delay feature, place the ignition switch
in the OFF or ACC position while the
headlights are still on. Then turn off
the headlights within 45 seconds. The delay interval begins when the
lights switch is turned off (position
“0”). If you turn the headlights or
position lights on, or place the ignition
switch in RUN , the system will cancel
the delay.
If you turn the headlights off (“0”
position) before the ignition, they will
turn off in the normal mode.
NOTE:
• To activate this feature the lights
must be turned off (“0” position)
within 45 seconds of placing the
ignition switch in the OFF or ACC
position.
• Once the delay feature is active, any
additional shifting of the light switch
will cancel the feature.
• The headlight delay time is
programmable using the MTC+
System, see “MTC+ Settings” in
section “Dashboard Instruments and
Controls”.
• If the low beam LEDs are active due
to “Headlights with Wipers”, then
the headlamps delay feature will not
be activated when the ignition
switch is set in OFF position.Understanding the Vehicle
3
118
Page 123 of 396

Daytime Running Lights (DRL) The lighting system uses the same
high or low intensity headlamps LED,
respectively, for the DRL lights and
front position lights.
DRL lights will turn on when the
twilight sensor is in “DAY” mode, the
engine is running and the light switch
is in
or “AUTO” position.
If a turn signal is activated, the DRL
LED on the same side of the vehicle
switches in position light function for
the duration of the turn signal
activation. Once the turn signal is
deactivated, the DRL LED will light up
again.
NOTE:
On Canadian vehicles DRL are always
on. On USA vehicles, the DRL lights
can be turned on and off using the
MTC+ System, see “MTC+ Settings” in
section “Dashboard Instruments and
Controls” for further information.
“Full-LED” Headlight with
Cornering Function These headlamps combine the
cornering function to the “Full-LED”
technology consisting of an additional
LED module which turns on when two
conditions occurs: the driver turns the steering wheel or the driver activates
the turn indicator. The cornering
function will illuminate the corner to
enhance the visibility to the driver as
long as speed will be lower than 25
mph (40 km/h).
“Full-LED” Technology
This technology creates headlights
with a simpler construction and a
more compact size compared to those
equipped with traditional or Xenon
light bulbs.
Other advantages are:
• a clearer light beam, with a cool
white tone that allows a better
perception of the contrasts thus
making the night vision more
efficient and less tiring;
• a longer duration equivalent at least
to that of the vehicle;
• a reduced current consumption. These features positively affect some
vehicle management economy aspects
by eliminating/reducing the light bulb
replacements and help limit fuel
consumption.
Automatic High Beam (for
versions/markets, where
provided) The Automatic High Beam headlight
control system provides increased
forward lighting at night by
automating high beam control
through the use of the forward-facing
digital camera located behind the
rear-view mirror, which is the same
one used for example by the Lane
Keeping Assist - LKA system on
vehicles with ADAS systems.
This camera detects the environmental
luminosity, the headlamps of
oncoming vehicles and the tail lamps
of proceding vehicles in the front
area. In these cases, the system
automatically switches from high
beams to low beams until the
approaching vehicle is out of view.
Furthermore, the digital camera is
able to detect the urban areas and the
inhabited centers and to turn off the
high beams when driving near of one
of them.Understanding the Vehicle
3
119
Page 127 of 396

recommend therefore that you switch
them off when they are no longer
necessary and every time the twilight
sensor deactivates the external lights.
Automatic High Beams
The
Automatic High Beam headlight
control system provides increased
forward lighting at night by
automating high beam control
through the use of the forward digital
camera mounted behind the rearview
mirror, which is the same one used
also by the Lane Departure Warning
(LDW) system. This camera detects
vehicle specific light and automatically
switches from high beams to low
beams until the approaching vehicle is
out of view. Furthermore, the digital
camera is able to detect the urban
areas and the inhabited centers and to
turn off the high beams when driving
near of one of them.
The high beam can be turned back on
if there are all the necessary
conditions and if the vehicle speed
exceed 21.7 mph (35 km/h).
The “Auto High Beam Assist” feature
can be turned on or off using the
MTC+ System. Refer to “MTC+
Settings” in section "Dashboard
Instruments and Controls" for further
information. The function is enabled only if the
brightness sensor detects the right
lighting conditions.
To activate this function:
• Shift the multifunction lever onward
.
• Put the headlight switch in “AUTO”
position.
• Enable the “Auto High Beam Assist”
function on MTC+.
After these steps, the green indicator
on the upper right side of the TFT
display comes on. NOTE:
Broken, muddy, or obstructed
headlights and taillights of vehicles in
the field of view will cause headlights
to remain on longer (closer to the
vehicle). Also, dirt, film, and other
obstructions on the windshield or
camera lens will cause the system to
function improperly.
If the windshield or Automatic High
Beam headlight control mirror is
replaced, the mirror must be re-aimed
to ensure proper performance. See
your local Authorized Maserati Dealer .
Interior Lights The interior and exterior approach
lights turn on and off when
entering/exiting the vehicle (see
“Illuminated Entry/Exit” in section
"Before Starting" for further
information).
The brightness of the lights can be
manually adjusted with the regulator
positioned beside the light switch.
To protect the battery, the interior
lights will turn off automatically 10
minutes after the ignition switch has
been shifted to OFF . This occurs if the
interior lights were turned on
manually or by opening of a door. The
glove box light, share the sameUnderstanding the Vehicle
3
123
Page 132 of 396

settings to adjust the detection system.
First wiper delay position is the least
sensitive, and fourth wiper delay
position is the most sensitive. Third
position should be used for normal
rain conditions.
The rain sense wipers will
automatically change between an
intermittent wipe, slow wipe and a
fast wipe depending on the amount of
detected moisture sensed by a
particular area of the windshield.
Place the wiper switch in the “OFF”
position when you do not want to use
the automatic intermittent system.
The rain sensing feature can be turned
on and off using the MTC+ System, see
“MTC+ Settings” in section
“Dashboard Instruments and Controls”
for further information.
CAUTION!
• The rain sensing feature may not
function properly by ice or dried salt
water on the windshield.
• Use on the windshield of RainX ®
or
products containing wax or silicone
may reduce rain sensor performance.
The rain sensing system has protective
features for the
wiper blades and arms. It will not operate under the
following conditions:
• Low Temperature Wipe Inhibit : the
rain sensing feature will not operate
when the ignition is in RUN position,
the vehicle is stationary and the
outside temperature is below 32°F
(0°C). To resume, set the automatic
feature on the multifunction lever,
start the engine and drive or wait
until the outside temperature rises
above freezing.
• Wipe Inhibit with Transmission in
Neutral Position : the rain sensing
feature will not operate when the
ignition is placed in the RUN
position, the transmission shift lever
is in the N (Neutral) position and the
vehicle speed is less than 5 mph
(8 km/h). To resume, set the
multifunction lever to the automatic
function or move the shift lever out
of N (Neutral).
Headlights On with Windshield
Wipers When activating this function, the
headlights will light up approximately
10 seconds after the wipers acting on
the windshield are turned on if the
light switch is placed in “AUTO”
position. In addition, the headlights switch off when the wipers are turned
off (position “OFF”) if they were
previously turned by using this
function. Powering on Headlights with
wipers can be activated and
deactivated with the MTC+ System, see
“MTC+ Settings” in section
“Dashboard Instruments and Controls”
for further information.
Wiper Blade Maintenance When the wiper arms acting on the
windshield are in the rest position it is
not possible to check or replace the
blades (Service position) as they are
folded under the hood. To service the
blades (see paragraph “Wiper
Maintenance and Blades
Replacement” in chapter
“Maintenance Procedures” of section
“Maintenance and Care”) it is
necessary to shift the multifunction
lever to “OFF” and the ignition switch
to OFF position.
Shift the control lever within 15
seconds to the “MIST” position
(forward rotation of the end of the
multifunction control lever) and
release. The blades are brought in a
position enabling to open the wiper
arms and change the blades.Understanding the Vehicle
3
128
Page 136 of 396

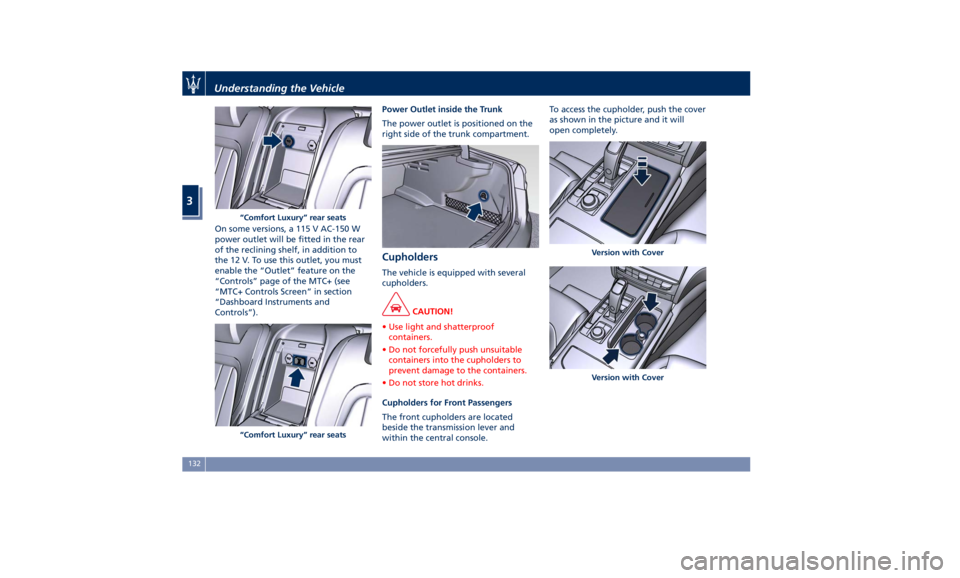
On some versions, a 115 V AC-150 W
power outlet will be fitted in the rear
of the reclining shelf, in addition to
the 12 V. To use this outlet, you must
enable the “Outlet” feature on the
“Controls” page of the MTC+ (see
“MTC+ Controls Screen” in section
“Dashboard Instruments and
Controls”). Power Outlet inside the Trunk
The power outlet is positioned on the
right side of the trunk compartment.
Cupholders The vehicle is equipped with several
cupholders.
CAUTION!
• Use light and shatterproof
containers.
• Do not forcefully push unsuitable
containers into the cupholders to
prevent damage to the containers.
• Do not store hot drinks.
Cupholders for Front Passengers
The
front cupholders are located
beside the transmission lever and
within the central console. To access the cupholder, push the cover
as shown in the picture and it will
open completely.
“Comfort Luxury” rear seats
“Comfort Luxury” rear seats Version with Cover
Version with CoverUnderstanding the Vehicle
3
132
Page 138 of 396

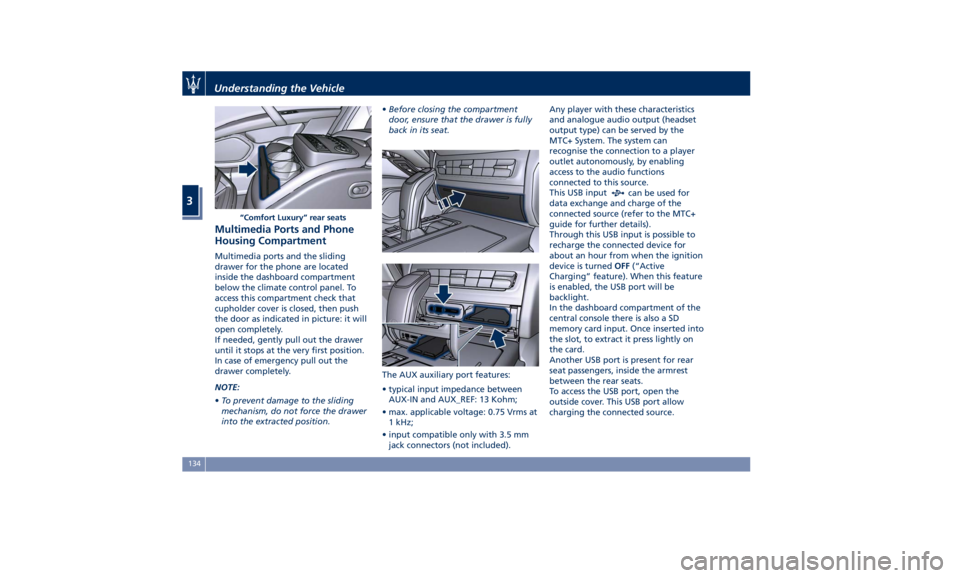
Multimedia Ports and Phone
Housing Compartment Multimedia ports and the sliding
drawer for the phone are located
inside the dashboard compartment
below the climate control panel. To
access this compartment check that
cupholder cover is closed, then push
the door as indicated in picture: it will
open completely.
If needed, gently pull out the drawer
until it stops at the very first position.
In case of emergency pull out the
drawer completely.
NOTE:
• To prevent damage to the sliding
mechanism, do not force the drawer
into the extracted position. • Before closing the compartment
door, ensure that the drawer is fully
back in its seat.
The AUX auxiliary port features:
• typical input impedance between
AUX-IN and AUX_REF: 13 Kohm;
• max. applicable voltage: 0.75 Vrms at
1 kHz;
• input compatible only with 3.5 mm
jack connectors (not included). Any player with these characteristics
and analogue audio output (headset
output type) can be served by the
MTC+ System. The system can
recognise the connection to a player
outlet autonomously, by enabling
access to the audio functions
connected to this source.
This USB input
can be used for
data exchange and charge of the
connected source (refer to the MTC+
guide for further details).
Through this USB input is possible to
recharge the connected device for
about an hour from when the ignition
device is turned OFF (“Active
Charging” feature). When this feature
is enabled, the USB port will be
backlight.
In the dashboard compartment of the
central console there is also a SD
memory card input. Once inserted into
the slot, to extract it press lightly on
the card.
Another USB port is present for rear
seat passengers, inside the armrest
between the rear seats.
To access the USB port, open the
outside cover. This USB port allow
charging the connected source.“Comfort Luxury” rear seatsUnderstanding the Vehicle
3
134
Page 147 of 396

open, then adjust the sunroof opening
to minimise the buffeting.
Ignition Off Operation The power sunroof controls will
remain active for up to approximately
ten minutes after the ignition switch is
in OFF position. Opening either front
door will cancel this feature. The
ignition system timing can be set using
the MTC+ System (see “MTC+
Settings” in section “Dashboard
Instruments and Controls”).
Sunroof Maintenance Use only a nonabrasive cleaner and a
soft cloth to clean the glass panel. HomeLink ®
(optional) HomeLink ®
replaces up to three
hand-held transmitters operating the
automatic devices that open garage
doors and gates, enable/disable the
lighting or security systems. The
HomeLink ®
unit is powered by your
vehicle's 12 Volt battery. The
HomeLink ®
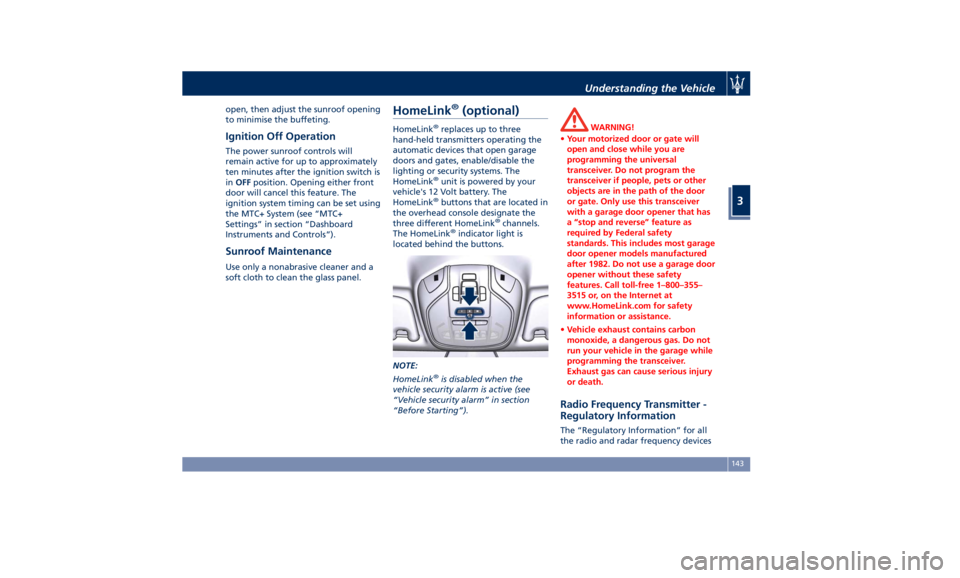
buttons that are located in
the overhead console designate the
three different HomeLink ®
channels.
The HomeLink ®
indicator light is
located behind the buttons.
NOTE:
HomeLink ®
is disabled when the
vehicle security alarm is active (see
“Vehicle security alarm” in section
“Before Starting”). WARNING!
• Your motorized door or gate will
open and close while you are
programming the universal
transceiver. Do not program the
transceiver if people, pets or other
objects are in the path of the door
or gate. Only use this transceiver
with a garage door opener that has
a “stop and reverse” feature as
required by Federal safety
standards. This includes most garage
door opener models manufactured
after 1982. Do not use a garage door
opener without these safety
features. Call toll-free 1–800–355–
3515 or, on the Internet at
www.HomeLink.com for safety
information or assistance.
• Vehicle exhaust contains carbon
monoxide, a dangerous gas. Do not
run your vehicle in the garage while
programming the transceiver.
Exhaust gas can cause serious injury
or death.
Radio Frequency Transmitter -
Regulatory Information The “Regulatory Information” for all
the radio and radar frequency devicesUnderstanding the Vehicle
3
143