2019 MASERATI QUATTROPORTE sport mode
[x] Cancel search: sport modePage 80 of 396
NOTE:
For additional information, refer to
"http://www.safercar.gov/parents/
index.htm"
www.safercar.gov/parents/index.htm
or call 1-888-327-4236.
Canadian residents should refer to
Transport Canada’s website for
additional information:
http://www.tc.gc.ca/eng/motorvehicle
safety/safedrivers-childsafety-index-
53.htm
WARNING!
• Improper installation can lead to
failure of an infant or child restraint.
It could come loose in a collision. The
child could be badly injured or killed.
Follow the restraint manufacturer’s
directions exactly when installing an
infant or child restraint.
• A rearward-facing child restraint
should only be used in a rear seat. A
rearward-facing child restraint in the
front seat may be struck by a
deploying passenger air bag, which
may cause severe or fatal injury to
the infant. Here are some tips on getting
the most out of your child
restraint • Before buying any restraint system,
make sure that it has a label
certifying that it meets all applicable
Safety Standards. Maserati also
recommends that you make sure that
you can install the child restraint in
the vehicle where you will use it
before you buy it.
• The restraint system must be
appropriate for your child’s weight
and height.
• Check the label on the restraint
system for weight and height limits.
• Carefully follow the instructions that
come with the restraint system.
• If installed improperly, it may not
work when needed.
• Fit the child into the seat according
to the child restraint manufacturer’s
directions.
WARNING!
When your child restraint system is
not in use, secure it in the vehicle with
the seat belt or remove it from the
vehicle. Do not leave it loose in the
vehicle. In a sudden stop or accident, it could strike the occupants or
seatbacks and cause serious personal
injury.
Installing Child Restraint
Systems using the Vehicle Seat
Belt equipped with ALR Child restraint systems are designed to
be secured in vehicle seats by lap belts
or the lap belt portion of a
lap/shoulder belt.
All the passenger seat belts are
equipped with an Automatic Locking
Retractor (ALR) to secure child
protection through a Child Restraint
System (CRS). These types of seat belts
are designed to keep the lap portion
of the seat belt tight around the child
restraint seat avoiding to use a locking
clip.
The ALR will make a ratcheting noise if
the entire belt is pulled out of the
retractor in order to enable the belt to
retract subsequently. For additional
information on ALR, see “Using Seat
Belt in Automatic Locking Retractor
(ALR) Mode” in “Occupants Restraint
Systems” in this section.
To install a Child Restraint System with
ALR, pull enough of the belt out of the
retractor leading it through the belt
path of the protection device. Slide theBefore Starting
2
76
Page 162 of 396
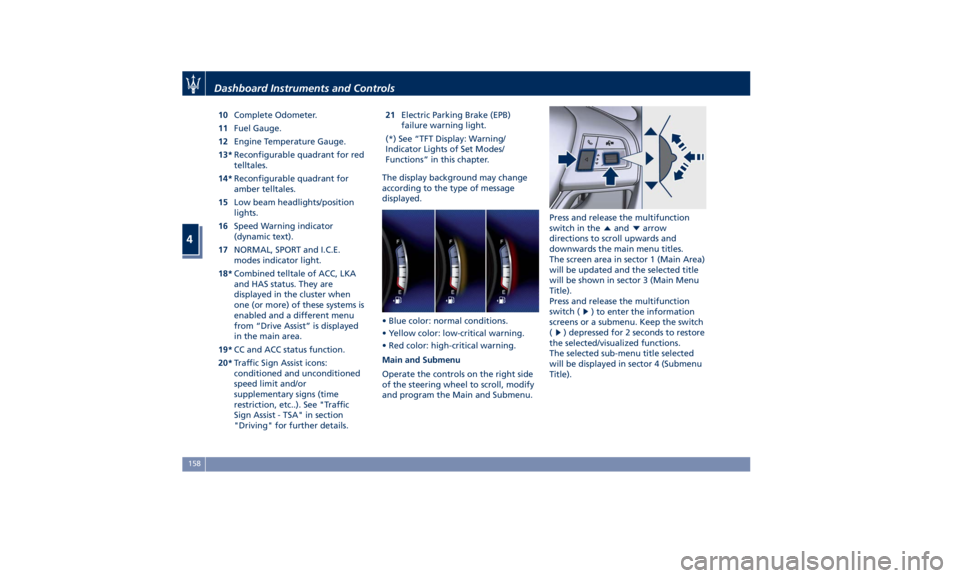
10 Complete Odometer.
11 Fuel Gauge.
12 Engine Temperature Gauge.
13* Reconfigurable quadrant for red
telltales.
14* Reconfigurable quadrant for
amber telltales.
15 Low beam headlights/position
lights.
16 Speed Warning indicator
(dynamic text).
17 NORMAL, SPORT and I.C.E.
modes indicator light.
18* Combined telltale of ACC, LKA
and HAS status. They are
displayed in the cluster when
one (or more) of these systems is
enabled and a different menu
from “Drive Assist” is displayed
in the main area.
19* CC and ACC status function.
20* Traffic Sign Assist icons:
conditioned and unconditioned
speed limit and/or
supplementary signs (time
restriction, etc..). See "Traffic
Sign Assist - TSA" in section
"Driving" for further details. 21 Electric Parking Brake (EPB)
failure warning light.
(*) See “TFT Display: Warning/
Indicator Lights of Set Modes/
Functions” in this chapter.
The display background may change
according to the type of message
displayed.
• Blue color: normal conditions.
• Yellow color: low-critical warning.
• Red color: high-critical warning.
Main and Submenu
Operate the controls on the right side
of the steering wheel to scroll, modify
and program the Main and Submenu. Press and release the multifunction
switch in the
and arrow
directions to scroll upwards and
downwards the main menu titles.
The screen area in sector 1 (Main Area)
will be updated and the selected title
will be shown in sector 3 (Main Menu
Title).
Press and release the multifunction
switch (
) to enter the information
screens or a submenu. Keep the switch
(
) depressed for 2 seconds to restore
the selected/visualized functions.
The selected sub-menu title selected
will be displayed in sector 4 (Submenu
Title).Dashboard Instruments and Controls
4
158
Page 166 of 396
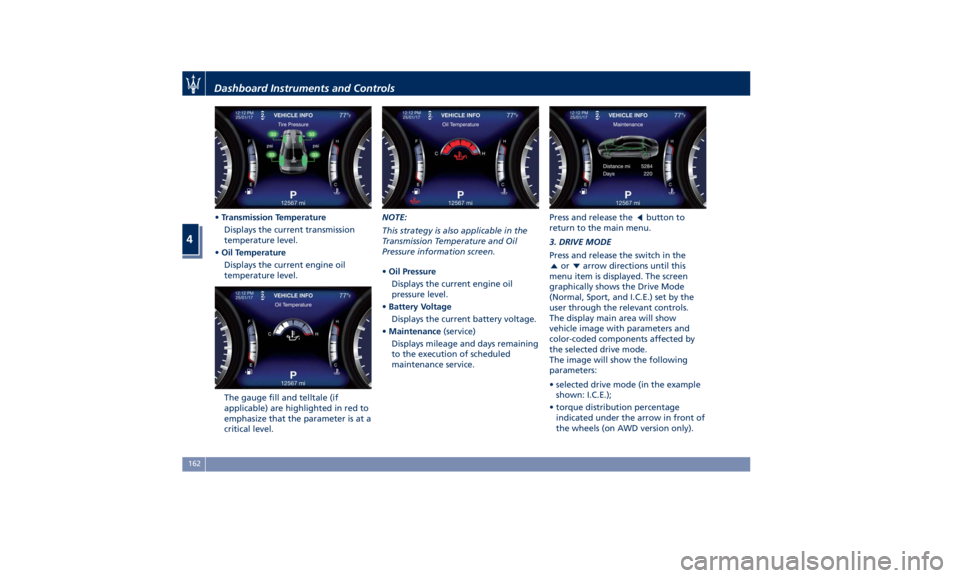
• Transmission Temperature
Displays the current transmission
temperature level.
• Oil Temperature
Displays the current engine oil
temperature level.
The gauge fill and telltale (if
applicable) are highlighted in red to
emphasize that the parameter is at a
critical level. NOTE:
This strategy is also applicable in the
Transmission Temperature and Oil
Pressure information screen.
• Oil Pressure
Displays the current engine oil
pressure level.
• Battery Voltage
Displays the current battery voltage.
• Maintenance (service)
Displays mileage and days remaining
to the execution of scheduled
maintenance service. Press and release the
button to
return to the main menu.
3. DRIVE MODE
Press and release the switch in the
or arrow directions until this
menu item is displayed. The screen
graphically shows the Drive Mode
(Normal, Sport, and I.C.E.) set by the
user through the relevant controls.
The display main area will show
vehicle image with parameters and
color-coded components affected by
the selected drive mode.
The image will show the following
parameters:
• selected drive mode (in the example
shown: I.C.E.);
• torque distribution percentage
indicated under the arrow in front of
the wheels (on AWD version only).Dashboard Instruments and Controls
4
162
Page 173 of 396
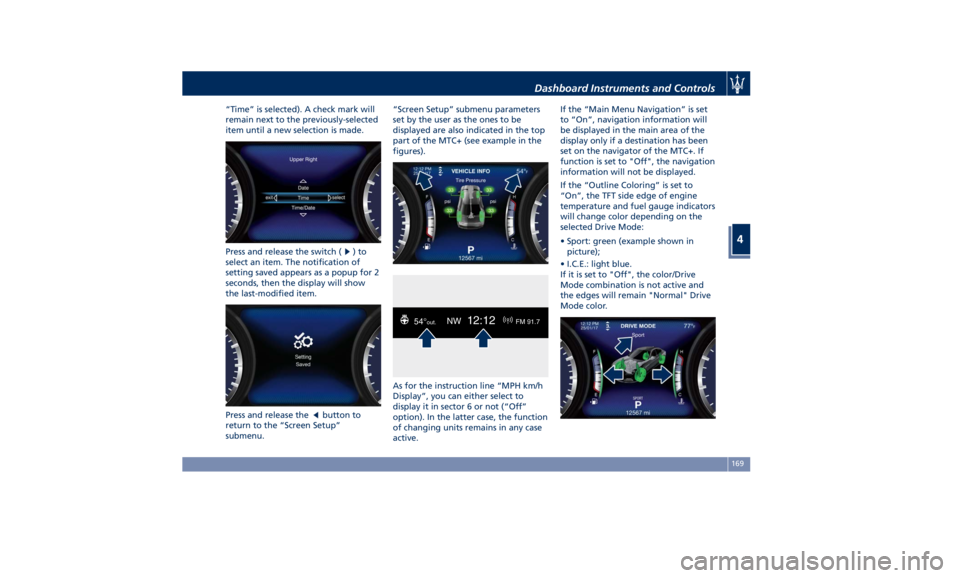
“Time” is selected). A check mark will
remain next to the previously-selected
item until a new selection is made.
Press and release the switch (
)to
select an item. The notification of
setting saved appears as a popup for 2
seconds, then the display will show
the last-modified item.
Press and release the
button to
return to the “Screen Setup”
submenu. “Screen Setup” submenu parameters
set by the user as the ones to be
displayed are also indicated in the top
part of the MTC+ (see example in the
figures).
As for the instruction line “MPH km/h
Display”, you can either select to
display it in sector 6 or not (“Off”
option). In the latter case, the function
of changing units remains in any case
active. If the “Main Menu Navigation” is set
to “On”, navigation information will
be displayed in the main area of the
display only if a destination has been
set on the navigator of the MTC+. If
function is set to "Off", the navigation
information will not be displayed.
If the “Outline Coloring” is set to
“On”, the TFT side edge of engine
temperature and fuel gauge indicators
will change color depending on the
selected Drive Mode:
• Sport: green (example shown in
picture);
• I.C.E.: light blue.
If it is set to "Off", the color/Drive
Mode combination is not active and
the edges will remain "Normal" Drive
Mode color.Dashboard Instruments and Controls
4
169
Page 225 of 396

In this case it is possible to release the
brake pedal and the vehicle will
remain in “AutoStop” with engine off.
Pressing the brake pedal and shifting
transmission into D (Drive) or R
(Reverse) will deactivate the
“AutoStop” condition and restart the
engine.
Start&Stop Deactivated Start&Stop function is deactivated
under the following conditions:
• When SPORT drive mode is activated.
• When
(ESC Off) drive mode is
activated.
• If it has been disabled through the
main menu item “Start&Stop”, via
the controls located on the right side
of the steering wheel, or through
the Start & Stop hard button on the
central console (see chapter “Drive
Mode” in this section) or via the MTC+ in the "Controls" page (see
“MTC+ “Controls” Screen” in section
"Dashboard Instruments and
Controls") .
Start&Stop Not Active For keeping driving safety, interior
comfort and a correct functioning of
engine and vehicle, the Start&Stop
function does not activate under the
following conditions:
• When the driver’s seat belt is
unbuckled (see example in picture).
• When the driver door is open.
• When the fuel level is too low.
• When the vehicle is stopped on a
very steep road.
• When the vehicle is stopped with
steered wheels (over 135° of steering
wheel angle for each part). • When the vehicle is maneuvering:
shift lever in R (Reverse).
• When the temperature conditions
inside the vehicle do not correspond
to the air conditioning setting.
• When the front and rear “defroster”
function is activated.
• When the engine coolant and the
engine oil temperature are not on
proper functioning level.
• When the external temperature is
too cold.
• When the battery charge is below
safety value.
• When the previous stop had just
happened (few seconds) and the
minimum speed has not yet been
achieved.
• Shortly after R (Reverse) has been set
or when driving under a certain
speed level.
• When the hood is open.
• The sensors managing the
Start&Stop have been damaged.
• Start&Stop system faults are present.
Automatic Restarting of the
Engine The engine may automatically restart,
before the brake pedal has beenDriving
5
221
Page 226 of 396
released, when one of the following
conditions occurs:
• The SPORT drive mode or (ESC Off)
drive mode is being activated.
• If the Start&Stop function has been
disabled through the main menu
voice “Start & Stop” (see chapter
“Instrument cluster” in section
“Dashboard Instruments and
Controls”) or through the Start&Stop
hard button on the central console
(see chapter “Drive Mode” in this
section) or via MTC+ in the “Control”
page (see “MTC+ ”Control” Screen”
in section “Dashboard Instruments
and Controls”).
• If shift lever is moved to R (Reverse).
• If the steering wheel is moved to
steer the wheels.
• When the temperature conditions
inside the vehicle do not correspond
to the air conditioning setting.
• When changing the temperature
setting on the air conditioning.
• When the defroster function is being
activated.
• When the battery charge is below
safety value.
• When the accelerator pedal is being
pressed (together with the brake
pedal). • If a long time has passed since the
last automatic stop of the engine.
Occupants Safety Function To enhance occupants safety, the
Start&Stop system monitors if the
driver is present and does not allow
automatic restarting of the engine if
one of the following manoeuvres is
being performed while in “AutoStop”
condition:
• The driver unbuckles his/her seat belt
and releases the brake pedal.
• The driver opens the door and
releases the brake pedal.
• The driver unbuckles the seat belt
and opens the door.
• The driver opens the hood.
All the above-mentioned conditions
deactive the Start&Stop function (the
“AutoStart” is deactivated and the
engine remains off) and the
transmission shifts automatically in P
(Park).
The
telltale will flash to indicate
the Start&Stop function disabling. To
restart the engine it is necessary to
press the brake pedal and push the
START/STOP button.
Move the shift lever to D (Drive) to
drive away. WARNING!
• Even when the vehicle is stopped in
the “Stop (AutoStop)” phase, the
driver is responsible for the vehicle
and the occupants and shall take
care of what happens inside and
outside the vehicle.
• Even when the vehicle is stopped
within the “Stop (AutoStop)” phase,
the vehicle driver is responsible for
the vehicle, the vehicle’s occupants
and the vehicle’s surrounding area.
Never leave the vehicle unattended
with the engine running; doing so
poses a risk of danger. It is a good
practice to always ensure to set the
parking brake and place the
transmission gear selector lever into
the P (Park) position, thereby
ensuring the vehicle will not move,
when performing any vehicle checks,
maintenance and/or service
procedures on the vehicle.
Start&Stop Function Disabling Start & Stop enabled is the default
status.
Under certain driving conditions, when
frequent stops and restarts of the
engine may become annoying, it isDriving
5
222
Page 234 of 396
paragraph); to return to “D”
position, move the shift lever to the
right. It is possible to shift from D
(Drive) mode to M +/- (Manual) mode
regardless of car speed.
• When in D (Drive) mode, using the
paddles behind the steering wheel (if
equipped), will cause the system to
enter a temporary function and
enable the manual shift mode. This
range is indicated with the symbols
“+/-” above and below “D” letter on
the gear range field of the display.
The system will then switch back to
automatic mode according to time
elapsed in “temporary” mode and
driving conditions.
At extremely cold temperatures (-23°F /
-30°C or below), transmission may be
affected by the low temperature of
the engine and transmission. Normal
operation will resume once the
transmission temperature has risen to
a normal level.
M +/- (Manual)
This mode is obtained by moving the
shift lever to the left in “M +/-“
position.
In this mode, the transmission interacts
with the driver in order to allow
manual shift and ensure increased
control of the vehicle. The current mode allows the transmission system
to optimise the engine brake action,
remove undesired shifting into higher
and lower gears and improve the
overall performance of the vehicle.
This mode allows you to move the shift
lever step by step forward “–“ or
backward “+” without pressing the
unlock button. The current
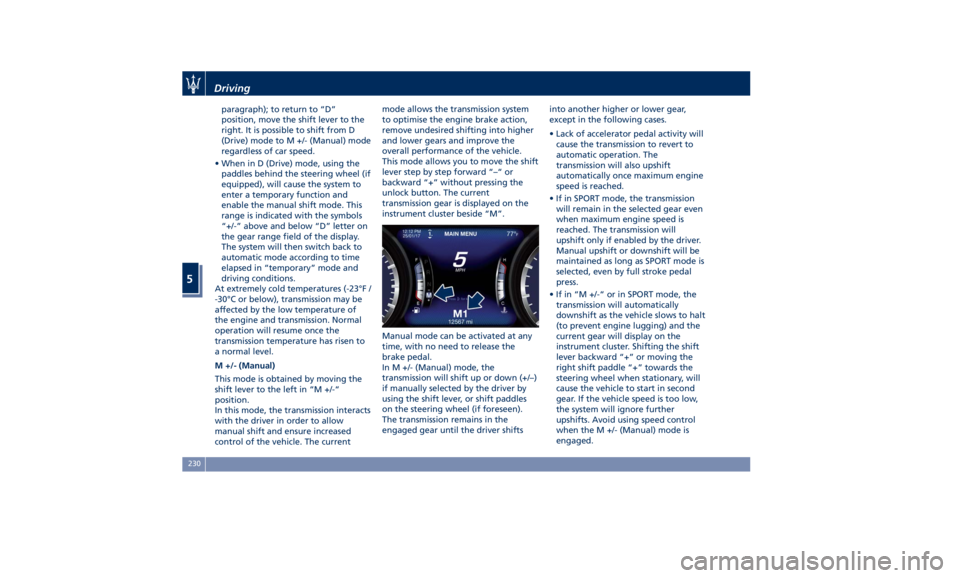
transmission gear is displayed on the
instrument cluster beside “M”.
Manual mode can be activated at any
time, with no need to release the
brake pedal.
In M +/- (Manual) mode, the
transmission will shift up or down (+/–)
if manually selected by the driver by
using the shift lever, or shift paddles
on the steering wheel (if foreseen).
The transmission remains in the
engaged gear until the driver shifts into another higher or lower gear,
except in the following cases.
• Lack of accelerator pedal activity will
cause the transmission to revert to
automatic operation. The
transmission will also upshift
automatically once maximum engine
speed is reached.
• If in SPORT mode, the transmission
will remain in the selected gear even
when maximum engine speed is
reached. The transmission will
upshift only if enabled by the driver.
Manual upshift or downshift will be
maintained as long as SPORT mode is
selected, even by full stroke pedal
press.
• If in “M +/-“ or in SPORT mode, the
transmission will automatically
downshift as the vehicle slows to halt
(to prevent engine lugging) and the
current gear will display on the
instrument cluster. Shifting the shift
lever backward “+” or moving the
right shift paddle “+” towards the
steering wheel when stationary, will
cause the vehicle to start in second
gear. If the vehicle speed is too low,
the system will ignore further
upshifts. Avoid using speed control
when the M +/- (Manual) mode is
engaged.Driving
5
230
Page 238 of 396
Drive Mode Controls Preview Drive modes can be set using the
buttons on central console.
CAUTION!
“NORMAL” is the default drive mode,
optimized for the best balance
between performance, fuel
consumption and emissions in the
standard conditions use of the car.
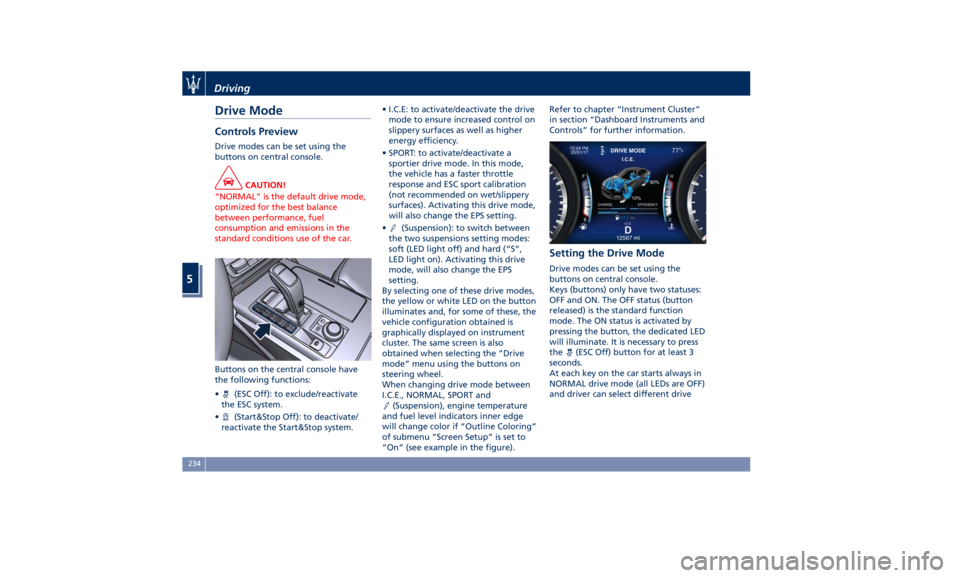
Buttons on the central console have
the
following functions:
•
(ESC Off): to exclude/reactivate
the ESC system.
•
(Start&Stop Off): to deactivate/
reactivate the Start&Stop system. • I.C.E: to activate/deactivate the drive
mode to ensure increased control on
slippery surfaces as well as higher
energy efficiency.
• SPORT: to activate/deactivate a
sportier drive mode. In this mode,
the vehicle has a faster throttle
response and ESC sport calibration
(not recommended on wet/slippery
surfaces). Activating this drive mode,
will also change the EPS setting.
•
(Suspension): to switch between
the two suspensions setting modes:
soft (LED light off) and hard (“S”,
LED light on). Activating this drive
mode, will also change the EPS
setting.
By selecting one of these drive modes,
the yellow or white LED on the button
illuminates and, for some of these, the
vehicle configuration obtained is
graphically displayed on instrument
cluster. The same screen is also
obtained when selecting the “Drive
mode” menu using the buttons on
steering wheel.
When changing drive mode between
I.C.E., NORMAL, SPORT and
(Suspension), engine temperature
and fuel level indicators inner edge
will change color if “Outline Coloring”
of submenu “Screen Setup” is set to
“On” (see example in the figure). Refer to chapter “Instrument Cluster”
in section “Dashboard Instruments and
Controls” for further information.
Setting the Drive Mode Drive modes can be set using the
buttons on central console.
Keys (buttons) only have two statuses:
OFF and ON. The OFF status (button
released) is the standard function
mode. The ON status is activated by
pressing the button, the dedicated LED
will illuminate. It is necessary to press
the
(ESC Off) button for at least 3
seconds.
At each key on the car starts always in
NORMAL drive mode (all LEDs are OFF)
and driver can select different driveDriving
5
234