2019 MASERATI QUATTROPORTE glove box
[x] Cancel search: glove boxPage 99 of 396

1 Adjustable side air outlets.
2 Engine START/STOP button.
3 Light switch.
4 Light dimmer controls.
5 Steering wheel controls.
6 Instrument cluster.
7* Right shift paddle +.
8* Left shift paddle –.
9 Hood release.
10 Adjustable central air outlets.
11 Analog clock.
12 MTC+ display.
13 Multifuction lever (windshield
wipers, headlight selection and
turn signals).
14 Climate controls.
15 Dashboard glove box handle.
16 Dashboard glove box.
17 Cover for compartment with
AUX, USB, SD memory card
port and slide phone drawer.
18 Storage compartment handle.
19 Storage compartment.
20 Vehicle security light and solar
sensor.
21 Internal rear view mirror. 22 Auto-dimming on/off button.
23 Front dome console.
(*) If equipped.
Central Console Components 1 Automatic transmission shift
lever.
2 Hazard lights switch.
3 Drive mode switches.
4 Electric Parking Brake lever.
5 Glove compartment.
6 Unlock button for central
console with cupholder and
power outlet.
7 Rotary selectors and buttons
foe the multimedia navigation.
8 Cover for cupholder and power
socket compartment.
9 Central console covers with
armrest function.
10 Air outlets (adjustable).
11 Rear power sunshade and rear
seats comfort controls panel.
12 Storage compartment.
13 Rear climate controls panel for
four-zone air conditioner
(optional).A/C Dual – zone
A/C Four – zone Understanding the Vehicle
3
95
Page 108 of 396
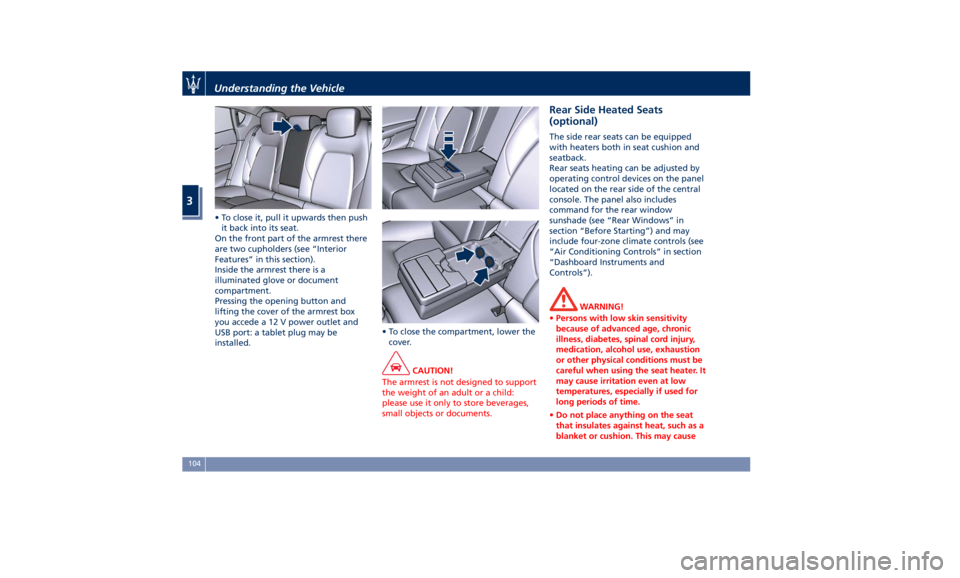
• To close it, pull it upwards then push
it back into its seat.
On the front part of the armrest there
are two cupholders (see “Interior
Features” in this section).
Inside the armrest there is a
illuminated glove or document
compartment.
Pressing the opening button and
lifting the cover of the armrest box
you accede a 12 V power outlet and
USB port: a tablet plug may be
installed. • To close the compartment, lower the
cover.
CAUTION!
The armrest is not designed to support
the weight of an adult or a child:
please use it only to store beverages,
small objects or documents. Rear Side Heated Seats
(optional) The side rear seats can be equipped
with heaters both in seat cushion and
seatback.
Rear seats heating can be adjusted by
operating control devices on the panel
located on the rear side of the central
console. The panel also includes
command for the rear window
sunshade (see “Rear Windows” in
section “Before Starting”) and may
include four-zone climate controls (see
“Air Conditioning Controls” in section
“Dashboard Instruments and
Controls”).
WARNING!
• Persons with low skin sensitivity
because of advanced age, chronic
illness, diabetes, spinal cord injury,
medication, alcohol use, exhaustion
or other physical conditions must be
careful when using the seat heater. It
may cause irritation even at low
temperatures, especially if used for
long periods of time.
• Do not place anything on the seat
that insulates against heat, such as a
blanket or cushion. This may causeUnderstanding the Vehicle
3
104
Page 127 of 396

recommend therefore that you switch
them off when they are no longer
necessary and every time the twilight
sensor deactivates the external lights.
Automatic High Beams
The
Automatic High Beam headlight
control system provides increased
forward lighting at night by
automating high beam control
through the use of the forward digital
camera mounted behind the rearview
mirror, which is the same one used
also by the Lane Departure Warning
(LDW) system. This camera detects
vehicle specific light and automatically
switches from high beams to low
beams until the approaching vehicle is
out of view. Furthermore, the digital
camera is able to detect the urban
areas and the inhabited centers and to
turn off the high beams when driving
near of one of them.
The high beam can be turned back on
if there are all the necessary
conditions and if the vehicle speed
exceed 21.7 mph (35 km/h).
The “Auto High Beam Assist” feature
can be turned on or off using the
MTC+ System. Refer to “MTC+
Settings” in section "Dashboard
Instruments and Controls" for further
information. The function is enabled only if the
brightness sensor detects the right
lighting conditions.
To activate this function:
• Shift the multifunction lever onward
.
• Put the headlight switch in “AUTO”
position.
• Enable the “Auto High Beam Assist”
function on MTC+.
After these steps, the green indicator
on the upper right side of the TFT
display comes on. NOTE:
Broken, muddy, or obstructed
headlights and taillights of vehicles in
the field of view will cause headlights
to remain on longer (closer to the
vehicle). Also, dirt, film, and other
obstructions on the windshield or
camera lens will cause the system to
function improperly.
If the windshield or Automatic High
Beam headlight control mirror is
replaced, the mirror must be re-aimed
to ensure proper performance. See
your local Authorized Maserati Dealer .
Interior Lights The interior and exterior approach
lights turn on and off when
entering/exiting the vehicle (see
“Illuminated Entry/Exit” in section
"Before Starting" for further
information).
The brightness of the lights can be
manually adjusted with the regulator
positioned beside the light switch.
To protect the battery, the interior
lights will turn off automatically 10
minutes after the ignition switch has
been shifted to OFF . This occurs if the
interior lights were turned on
manually or by opening of a door. The
glove box light, share the sameUnderstanding the Vehicle
3
123
Page 135 of 396
WARNING!
High power consumption items
plugged into this outlet for long
periods may discharge the battery
and/or prevent the engine from
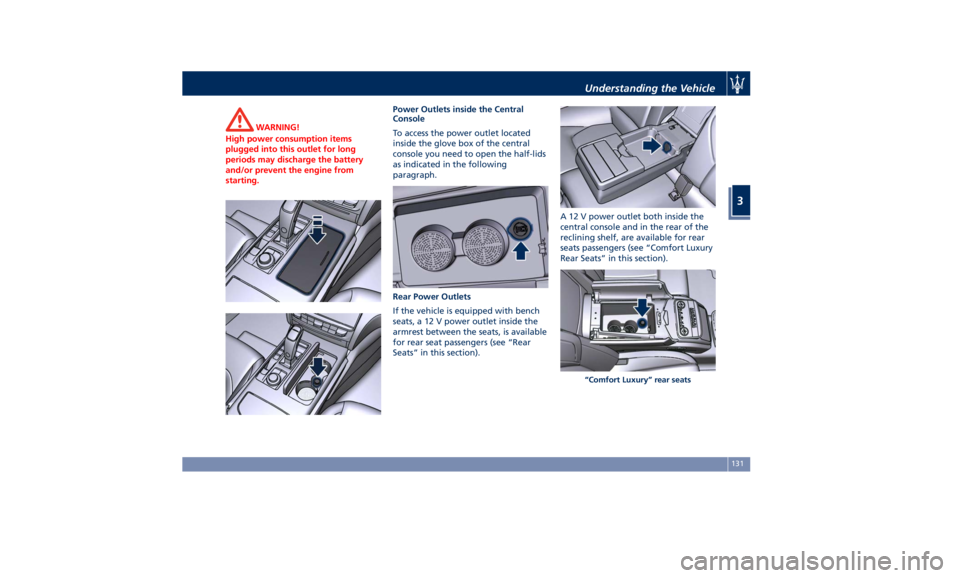
starting. Power Outlets inside the Central
Console
T
o access the power outlet located
inside the glove box of the central
console you need to open the half-lids
as indicated in the following
paragraph.
Rear Power Outlets
If the vehicle is equipped with bench
seats, a 12 V power outlet inside the
armrest between the seats, is available
for rear seat passengers (see “Rear
Seats” in this section). A 12 V power outlet both inside the
central console and in the rear of the
reclining shelf, are available for rear
seats passengers (see “Comfort Luxury
Rear Seats” in this section).
“Comfort Luxury” rear seatsUnderstanding the Vehicle
3
131
Page 189 of 396
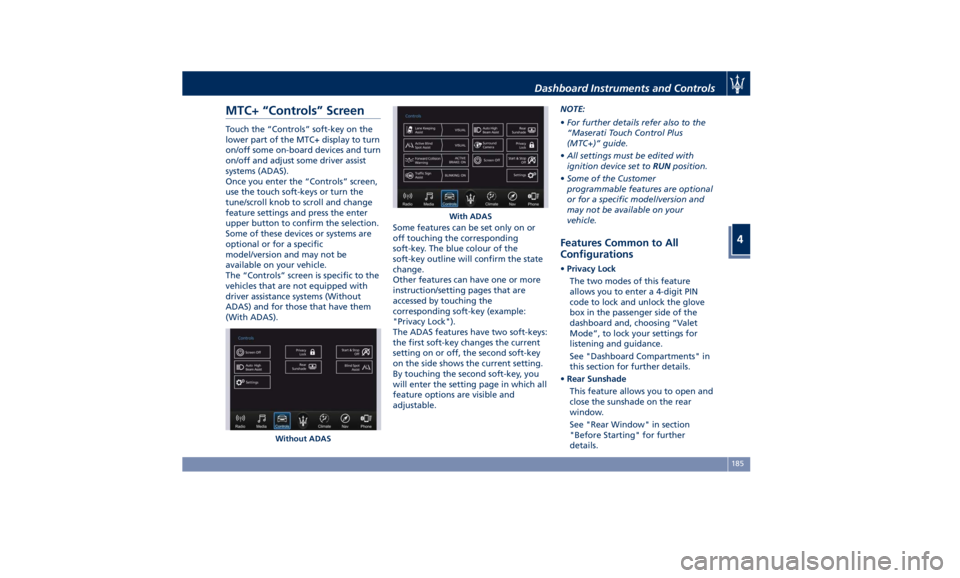
MTC+ “Controls” Screen Touch the “Controls” soft-key on the
lower part of the MTC+ display to turn
on/off some on-board devices and turn
on/off and adjust some driver assist
systems (ADAS).
Once you enter the “Controls” screen,
use the touch soft-keys or turn the
tune/scroll knob to scroll and change
feature settings and press the enter
upper button to confirm the selection.
Some of these devices or systems are
optional or for a specific
model/version and may not be
available on your vehicle.
The “Controls” screen is specific to the
vehicles that are not equipped with
driver assistance systems (Without
ADAS) and for those that have them
(With ADAS). Some features can be set only on or
off touching the corresponding
soft-key. The blue colour of the
soft-key outline will confirm the state
change.
Other features can have one or more
instruction/setting pages that are
accessed by touching the
corresponding soft-key (example:
"Privacy Lock").
The ADAS features have two soft-keys:
the first soft-key changes the current
setting on or off, the second soft-key
on the side shows the current setting.
By touching the second soft-key, you
will enter the setting page in which all
feature options are visible and
adjustable. NOTE:
• For further details refer also to the
“Maserati Touch Control Plus
(MTC+)” guide.
• All settings must be edited with
ignition device set to RUN position.
• Some of the Customer
programmable features are optional
or for a specific model/version and
may not be available on your
vehicle.
Features Common to All
Configurations • Privacy Lock
The two modes of this feature
allows you to enter a 4-digit PIN
code to lock and unlock the glove
box in the passenger side of the
dashboard and, choosing “Valet
Mode”, to lock your settings for
listening and guidance.
See "Dashboard Compartments" in
this section for further details.
• Rear Sunshade
This feature allows you to open and
close the sunshade on the rear
window.
See "Rear Window" in section
"Before Starting" for further
details.Without ADAS With ADASDashboard Instruments and Controls
4
185
Page 204 of 396
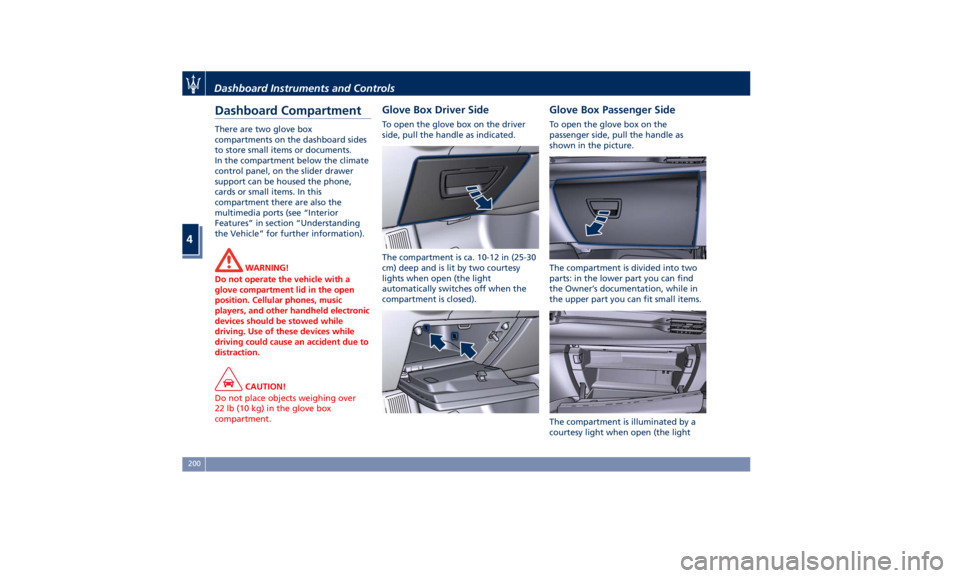
Dashboard Compartment There are two glove box
compartments on the dashboard sides
to store small items or documents.
In the compartment below the climate
control panel, on the slider drawer
support can be housed the phone,
cards or small items. In this
compartment there are also the
multimedia ports (see “Interior
Features” in section “Understanding
the Vehicle” for further information).
WARNING!
Do not operate the vehicle with a
glove compartment lid in the open
position. Cellular phones, music
players, and other handheld electronic
devices should be stowed while
driving. Use of these devices while
driving could cause an accident due to
distraction.
CAUTION!
Do not place objects weighing over
22 lb (10 kg) in the glove box
compartment. Glove Box Driver Side To open the glove box on the driver
side, pull the handle as indicated.
The compartment is ca. 10-12 in (25-30
cm) deep and is lit by two courtesy
lights when open (the light
automatically switches off when the
compartment is closed). Glove Box Passenger Side To open the glove box on the
passenger side, pull the handle as
shown in the picture.
The compartment is divided into two
parts: in the lower part you can find
the Owner’s documentation, while in
the upper part you can fit small items.
The compartment is illuminated by a
courtesy light when open (the lightDashboard Instruments and Controls
4
200
Page 205 of 396
will automatically switch off when the
compartment is closed).
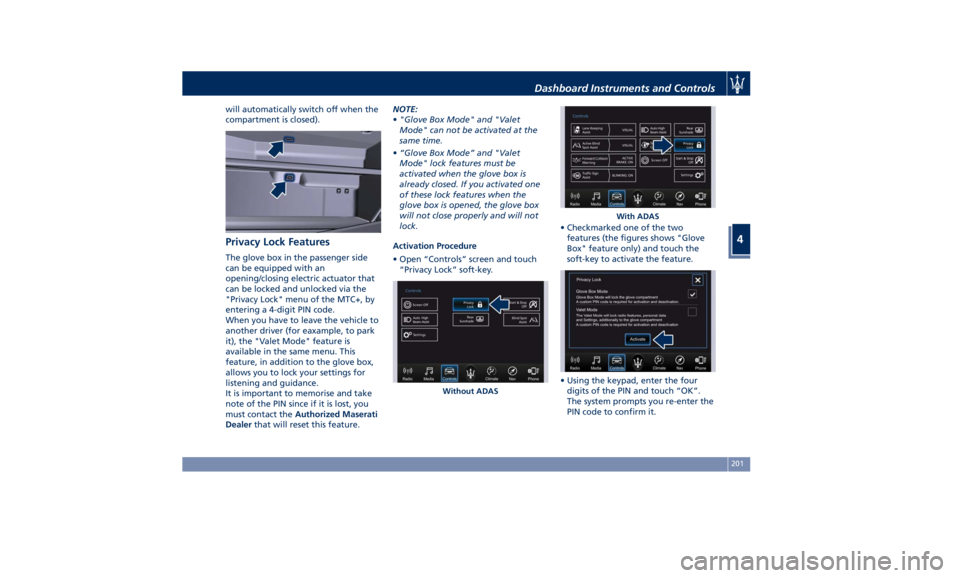
Privacy Lock Features The glove box in the passenger side
can be equipped with an
opening/closing electric actuator that
can be locked and unlocked via the
"Privacy Lock" menu of the MTC+, by
entering a 4-digit PIN code.
When you have to leave the vehicle to
another driver (for eaxample, to park
it), the "Valet Mode" feature is
available in the same menu. This
feature, in addition to the glove box,
allows you to lock your settings for
listening and guidance.
It is important to memorise and take
note of the PIN since if it is lost, you
must contact the Authorized Maserati
Dealer that will reset this feature. NOTE:
• "Glove Box Mode" and "Valet
Mode" can not be activated at the
same time.
• “Glove Box Mode” and "Valet
Mode" lock features must be
activated when the glove box is
already closed. If you activated one
of these lock features when the
glove box is opened, the glove box
will not close properly and will not
lock.
Activation Procedure
• Open “Controls” screen and touch
“Privacy Lock” soft-key. • Checkmarked one of the two
features (the figures shows "Glove
Box" feature only) and touch the
soft-key to activate the feature.
• Using the keypad, enter the four
digits of the PIN and touch “OK”.
The system prompts you re-enter the
PIN code to confirm it.Without ADAS With ADASDashboard Instruments and Controls
4
201
Page 206 of 396
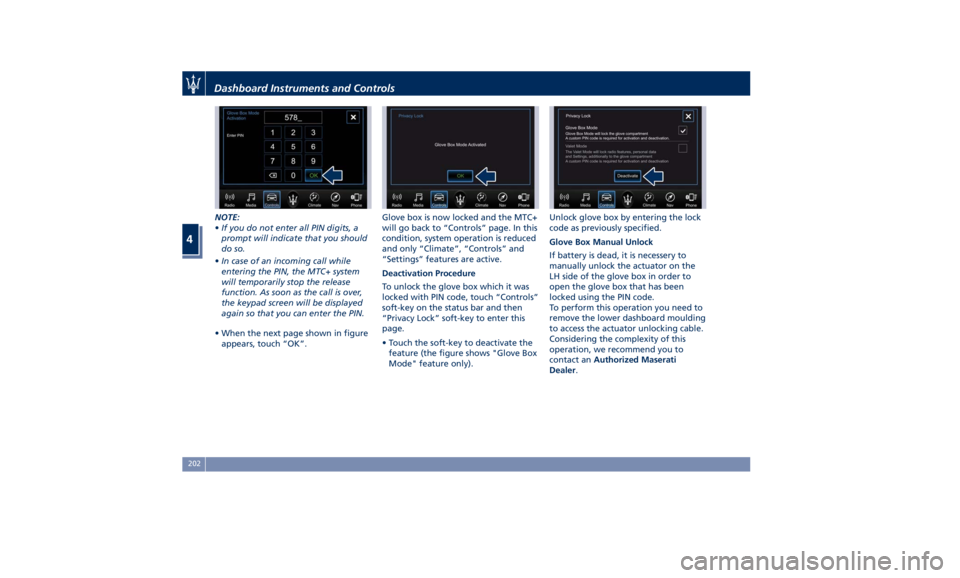
NOTE:
• If you do not enter all PIN digits, a
prompt will indicate that you should
do so.
• In case of an incoming call while
entering the PIN, the MTC+ system
will temporarily stop the release
function. As soon as the call is over,
the keypad screen will be displayed
again so that you can enter the PIN.
• When the next page shown in figure
appears, touch “OK”. Glove box is now locked and the MTC+
will go back to “Controls” page. In this
condition, system operation is reduced
and only “Climate”, “Controls” and
“Settings” features are active.
Deactivation Procedure
To unlock the glove box which it was
locked with PIN code, touch “Controls”
soft-key on the status bar and then
“Privacy Lock” soft-key to enter this
page.
• Touch the soft-key to deactivate the
feature (the figure shows "Glove Box
Mode" feature only). Unlock glove box by entering the lock
code as previously specified.
Glove Box Manual Unlock
If battery is dead, it is necessery to
manually unlock the actuator on the
LH side of the glove box in order to
open the glove box that has been
locked using the PIN code.
To perform this operation you need to
remove the lower dashboard moulding
to access the actuator unlocking cable.
Considering the complexity of this
operation, we recommend you to
contact an Authorized Maserati
Dealer .Dashboard Instruments and Controls
4
202