Page 219 of 626
Supplemental Driver Knee Air Bag
This vehicle is equipped with a Supplemental Driver Knee
Air Bag mounted in the instrument panel below the
steering column. The Supplemental Driver Knee Air Bag
provides enhanced protection during a frontal impact by
working together with the seat belts, pretensioners, and
front air bags.
Supplemental Side Air Bags
Supplemental Seat-Mounted Side Air Bags (SABs)
This vehicle is equipped with Supplemental Seat-Mounted
Side Air Bags (SABs).
Supplemental Seat-Mounted Side Air Bags (SABs) are
located in the outboard side of the front seats. The SABs are
marked with “SRS AIRBAG” or “AIRBAG” on a label or on
the seat trim on the outboard side of the seats.The SABs may help to reduce the risk of occupant injury
during certain side impacts, in addition to the injury
reduction potential provided by the seat belts and body
structure.
Page 226 of 626
Maintaining Your Air Bag System
WARNING!
•Modifications to any part of the air bag system could
cause it to fail when you need it. You could be
injured if the air bag system is not there to protect
you. Do not modify the components or wiring, in-
cluding adding any kind of badges or stickers to the
steering wheel hub trim cover or the upper passenger
side of the instrument panel. Do not modify the front
bumper, vehicle body structure, or add aftermarket
side steps or running boards.
• It is dangerous to try to repair any part of the air bag
system yourself. Be sure to tell anyone who works on
your vehicle that it has an air bag system.
• Do not attempt to modify any part of your air bag
system. The air bag may inflate accidentally or may
not function properly if modifications are made.
Take your vehicle to an authorized dealer for any air
bag system service. If your seat, including your trim
cover and cushion, needs to be serviced in any way
(including removal or loosening/tightening of seat
attachment bolts), take the vehicle to an authorized
(Continued)
Page 250 of 626
WARNING!(Continued)
•If the vehicle carpet has been removed and re-
installed, always properly attach carpet to the floor
and check the floor mat fasteners are secure to the
vehicle carpet. Fully depress each pedal to check for
interference with the accelerator, brake, or clutch
pedals then re-install the floor mats.
• It is recommended to only use mild soap and water
to clean your floor mats. After cleaning, always check
your floor mat has been properly installed and is
secured to your vehicle using the floor mat fasteners
by lightly pulling mat.
Periodic Safety Checks You Should Make Outside
The Vehicle
Tires
Examine tires for excessive tread wear and uneven wear
patterns. Check for stones, nails, glass, or other objects
lodged in the tread or sidewall. Inspect the tread for cuts
and cracks. Inspect sidewalls for cuts, cracks, and bulges.
Check the wheel nuts for tightness. Check the tires (includ-
ing spare) for proper cold inflation pressure.
Lights
Have someone observe the operation of brake lights and
exterior lights while you work the controls. Check turn
signal and high beam indicator lights on the instrument
panel.
Door Latches
Check for proper closing, latching, and locking.
Fluid Leaks
Check area under the vehicle after overnight parking for
fuel, coolant, oil, or other fluid leaks. Also, if gasoline
fumes are detected or if fuel, or brake fluid leaks are
suspected. The cause should be located and corrected
immediately.
248 SAFETY
Page 257 of 626
5. If the vehicle speed is above 5 mph (8 km/h), theENGINE START/STOP button must be held for two
seconds (or three short pushes in a row) to turn the
engine off. The ignition will remain in the ACC mode
(NOT the OFF mode) if the engine is turned off when
the transmission is not in PARK.
NOTE: The system will automatically time out and the
ignition will cycle to the OFF mode after 30 minutes of
inactivity if the ignition is left in the ACC or RUN (engine
not running) mode and the transmission is in PARK.
ENGINE START/STOP Button Functions — With Driv-
er ’s Foot OFF The Brake Pedal (In PARK Or NEUTRAL
Position)
The ENGINE START/STOP button operates similar to an
ignition switch. It has three modes: OFF, ACC, and RUN.
To change the ignition modes without starting the vehicle
and use the accessories, follow these steps:
1. Starting with the ignition in the OFF mode,
2. Push the ENGINE START/STOP button once to place the ignition to the ACC mode (instrument cluster will
display “ACC”), 3. Push the ENGINE START/STOP button a second time
to place the ignition to the RUN mode (instrument
cluster will display “ON/RUN”),
4. Push the ENGINE START/STOP button a third time to return the ignition to the OFF mode (instrument cluster
will display “OFF”).
NOTE: Only press one pedal at a time while driving the
vehicle. Torque performance of the vehicle could be re-
duced if both pedals are pressed at the same time. If
pressure is detected on both pedals simultaneously, a
warning message will display in the instrument cluster. For
further information, refer to “Instrument Cluster Display”
in “Getting To Know Your Instrument Panel”.
AutoPark
AutoPark is a supplemental feature to assist in placing the
vehicle in PARK should the situations on the following
pages occur. It is a back up system and should not be relied
upon as the primary method by which the driver shifts the
vehicle into PARK.
The conditions under which AutoPark will engage are
outlined on the following pages.
6
STARTING AND OPERATING 255
Page 262 of 626
PARKING BRAKE
Before leaving the vehicle, make sure that the parking
brake is fully applied and place the gear selector in the
PARK position.
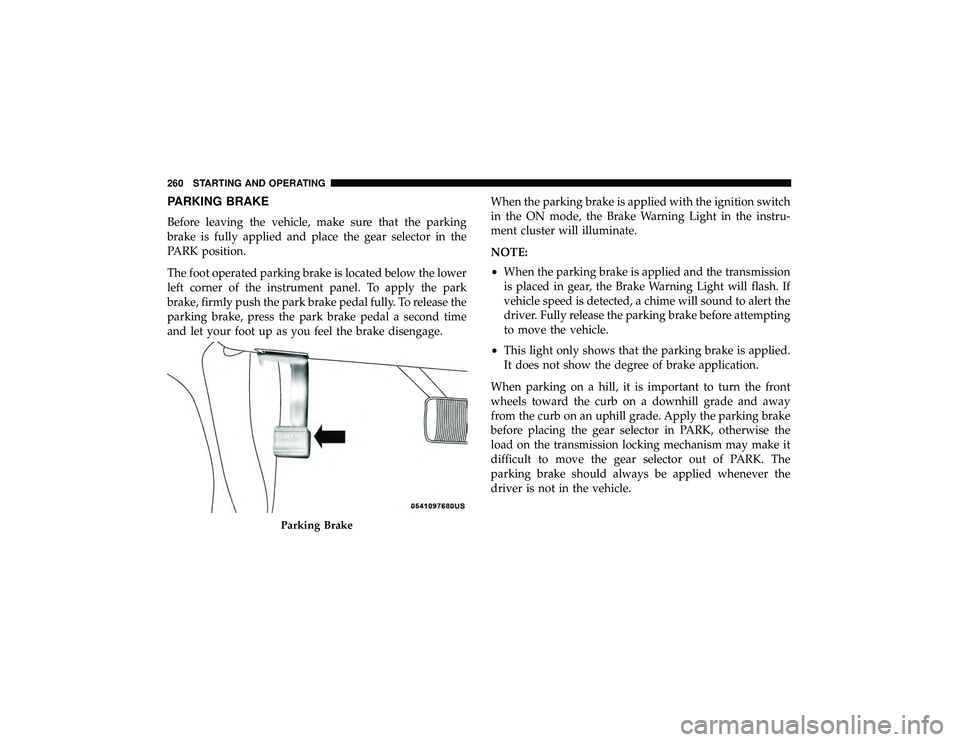
The foot operated parking brake is located below the lower
left corner of the instrument panel. To apply the park
brake, firmly push the park brake pedal fully. To release the
parking brake, press the park brake pedal a second time
and let your foot up as you feel the brake disengage.When the parking brake is applied with the ignition switch
in the ON mode, the Brake Warning Light in the instru-
ment cluster will illuminate.
NOTE:
•
When the parking brake is applied and the transmission
is placed in gear, the Brake Warning Light will flash. If
vehicle speed is detected, a chime will sound to alert the
driver. Fully release the parking brake before attempting
to move the vehicle.
• This light only shows that the parking brake is applied.
It does not show the degree of brake application.
When parking on a hill, it is important to turn the front
wheels toward the curb on a downhill grade and away
from the curb on an uphill grade. Apply the parking brake
before placing the gear selector in PARK, otherwise the
load on the transmission locking mechanism may make it
difficult to move the gear selector out of PARK. The
parking brake should always be applied whenever the
driver is not in the vehicle.
Page 266 of 626
Fuel Economy (ECO) Mode
The Fuel Economy (ECO) mode can improve the vehicle’s
overall fuel economy during normal driving conditions.
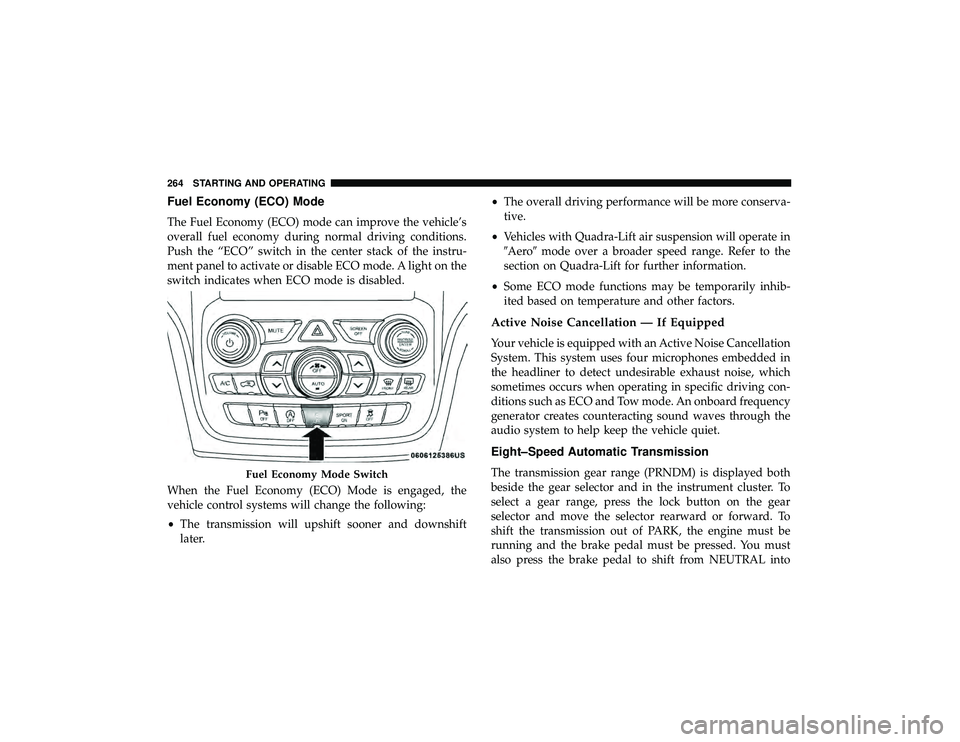
Push the “ECO” switch in the center stack of the instru-
ment panel to activate or disable ECO mode. A light on the
switch indicates when ECO mode is disabled.
When the Fuel Economy (ECO) Mode is engaged, the
vehicle control systems will change the following:
•The transmission will upshift sooner and downshift
later. •
The overall driving performance will be more conserva-
tive.
• Vehicles with Quadra-Lift air suspension will operate in
�Aero� mode over a broader speed range. Refer to the
section on Quadra-Lift for further information.
• Some ECO mode functions may be temporarily inhib-
ited based on temperature and other factors.
Active Noise Cancellation — If Equipped
Your vehicle is equipped with an Active Noise Cancellation
System. This system uses four microphones embedded in
the headliner to detect undesirable exhaust noise, which
sometimes occurs when operating in specific driving con-
ditions such as ECO and Tow mode. An onboard frequency
generator creates counteracting sound waves through the
audio system to help keep the vehicle quiet.
Eight–Speed Automatic Transmission
The transmission gear range (PRNDM) is displayed both
beside the gear selector and in the instrument cluster. To
select a gear range, press the lock button on the gear
selector and move the selector rearward or forward. To
shift the transmission out of PARK, the engine must be
running and the brake pedal must be pressed. You must
also press the brake pedal to shift from NEUTRAL into
Page 277 of 626
NOTE:Refer to “Selec-Terrain — If Equipped” for further
information on the various positions and their intended
usages.
Shifting Procedures
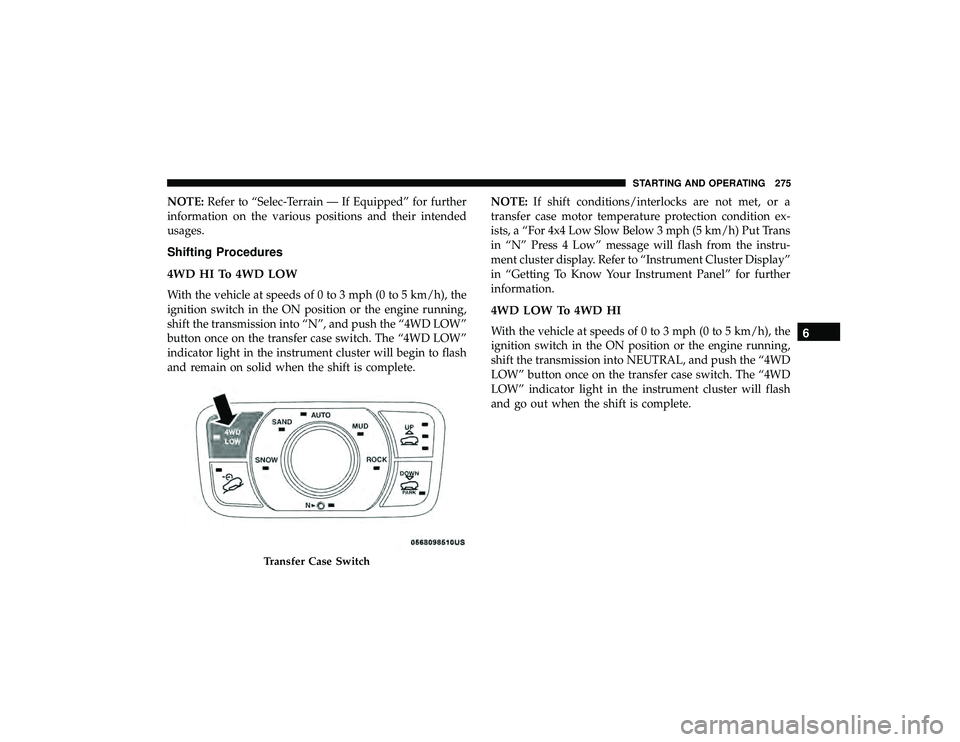
4WD HI To 4WD LOW
With the vehicle at speeds of 0 to 3 mph (0 to 5 km/h), the
ignition switch in the ON position or the engine running,
shift the transmission into “N”, and push the “4WD LOW”
button once on the transfer case switch. The “4WD LOW”
indicator light in the instrument cluster will begin to flash
and remain on solid when the shift is complete. NOTE:
If shift conditions/interlocks are not met, or a
transfer case motor temperature protection condition ex-
ists, a “For 4x4 Low Slow Below 3 mph (5 km/h) Put Trans
in “N” Press 4 Low” message will flash from the instru-
ment cluster display. Refer to “Instrument Cluster Display”
in “Getting To Know Your Instrument Panel” for further
information.
4WD LOW To 4WD HI
With the vehicle at speeds of 0 to 3 mph (0 to 5 km/h), the
ignition switch in the ON position or the engine running,
shift the transmission into NEUTRAL, and push the “4WD
LOW” button once on the transfer case switch. The “4WD
LOW” indicator light in the instrument cluster will flash
and go out when the shift is complete.
Page 278 of 626
NOTE:
•If shift conditions/interlocks are not met, or a transfer
case motor temperature protection condition exists, a
“For 4x4 High Slow Below 3 mph (5 km/h) Put Trans in
N push 4 Low” message will flash from the instrument
cluster display. Refer to “Instrument Cluster Display” in
“Getting To Know Your Instrument Panel” for further
information.
• Shifting into or out of 4WD LOW is possible with the
vehicle completely stopped; however, difficulty may
occur due to the mating clutch teeth not being properly
aligned. Several attempts may be required for clutch
teeth alignment and shift completion to occur. The
preferred method is with the vehicle rolling 0 to 3 mph
(0 to 5 km/h). If the vehicle is moving faster than 3 mph
(5 km/h), the transfer case will not allow the shift.Shifting Into NEUTRAL (N)
WARNING!
You or others could be injured or killed if you leave the
vehicle unattended with the transfer case in the NEU-
TRAL (N) position without first fully engaging the
parking brake. The NEUTRAL (N) position disengages
both the front and rear drive shafts from the pow-
ertrain and will allow the vehicle to roll, even if the
transmission is in PARK. The parking brake should
always be applied when the driver is not in the vehicle.
1. Bring the vehicle to a complete stop, with the engine running.
2. Press and hold the brake pedal.
3. Shift the transmission into NEUTRAL.
4. If vehicle is equipped with Quadra-Lift air suspension, ensure the vehicle is set to Normal Ride Height.
276 STARTING AND OPERATING